Before you go to the effort of compressing your PowerPoint presentation, ask yourself if you even need to bother?
If you are not having trouble sharing your presentation, or you don’t need to email it to anyone (maybe you can share it on a USB instead), don’t worry about how large your presentation is.
If you’ve added lots of images, videos, graphics, and 3D models, your PowerPoint presentation might be huge. But so what?
Only follow these steps if you find that your presentation is becoming unwieldy or too big to share. And then, only do the minimum required to get to a functional state.
6 Ways to Compress a PowerPoint Presentation
To get access to all our best PowerPoint speed training courses and resources for one affordable monthly price, check out our PowerPoint Pro Membership here.
1. Compress Images in PowerPoint
If you have lots of images in your presentation, you can save a lot of space by compressing them. This is a fast and uncomplicated way to reduce your PowerPoint file size.
You can also save a lot of file space in PowerPoint by converting your PNG images into JPEG images. To learn how to do that before you compress your images, read our guide here.
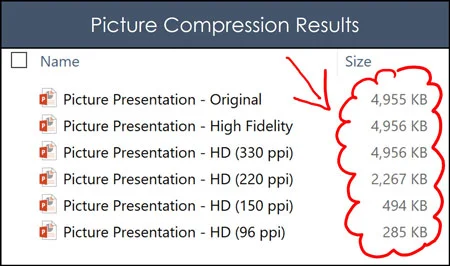
Notice in the picture above how much space was saved using the different compression options.
The HD (96 ppi) compressed file is 17x smaller than the original presentation. Just make sure when you compress your images that you pay attention to their quality. The more you compress an image in PowerPoint, the more quality you will lose.
Ideally you want to use the HIGHEST quality resolution as possible, especially if you are presenting on a large overhead projector.
To compress your images in PowerPoint, follow these steps.
1. Open the Picture Format tab

Select a picture in PowerPoint to open the Picture Format tab in your Ribbon and select it.
The Picture Format tab is where all the commands and features related to working with and editing images are located.
For example, to see how to turn an image into a black and white drawing using the Artistic Effect features in PowerPoint, read our guide here.
If you do not see the Picture Format tab in your PowerPoint Ribbon, it means you have not selected an image or photo to work with. The Picture Format tab is contextual and will open only once you have selected an image or picture to work with.
2. Select the Compress Pictures command

Inside the Picture Format tab, find and select the Compress Pictures command.
Depending on your screen resolution and the size of your computer monitor, this command might appear as just an icon.
Either way, the icon should be to the right of the Transparency command.
3. Choose your compression options
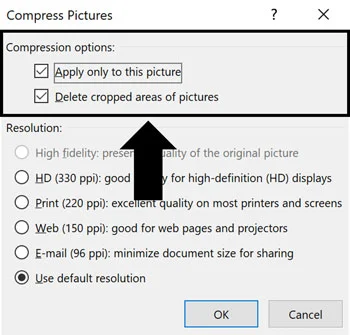
You have two main compression options to choose from:
Apply only to this picture: This determines if the resolution you pick is applied only to the picture you have selected or to all the pictures within your presentation.
Most often, your images will require different compression resolutions. That’s why I recommend keeping the Apply only to this picture option selected and working your way through the images in your presentation one by one.
If you know that you want all of the pictures in your presentation compressed to a specific resolution, you can choose to unselect this option.
Delete cropped areas of pictures: Selecting this option removes any cropped areas in your pictures as part of the compression process. This will dramatically decrease the size of any images you have cropped.
However, please note that once you do this, you lose all the parts of the images that you cropped out. This means that you won’t be able to return to the original image and adjust the cropping.
To expand your knowledge and learn how to crop your pictures in PowerPoint to save additional space before you compress them, read our guide here.
4. Choose your resolution
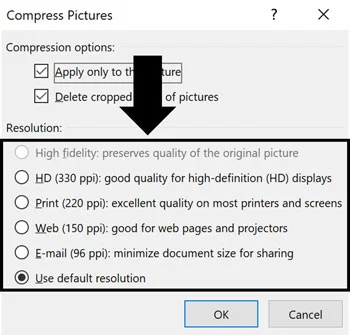
Next, choose the resolution you want your image(s) compressed to. The smaller the resolution, the smaller the size of the images and the smaller the size of your presentation.
The question is, what is the best resolution to pick? This depends on how you plan to give your presentation.
If you’re presenting on a large overhead projector, I recommend choosing a higher resolution like HD (330 ppi) so that all your images are sharp and clear. If you are printing or just showing someone your presentation on your laptop, then Print (220 ppi) is fine.
I don’t recommend going much smaller than these two resolutions as the overall quality of your images will decrease rapidly.
For more help choosing the right resolution when compressing images in PowerPoint, see our guide here.
5. Click OK
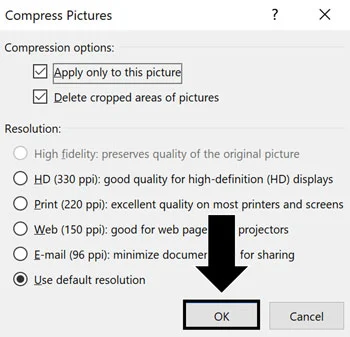
Once you have made your compression choices and picked a resolution, click OK and PowerPoint will compress your image(s) for you.
Once PowerPoint finishes compressing your images, I recommend reviewing the quality of the compression to make sure everything looks okay. If you find that your image looks grainy, hit Ctrl+Z to undo and choose a higher resolution.
2. Compress Videos in PowerPoint
Videos and media files (like audio files) can be huge!
So if you have a video or other media files in your presentation, compressing them is another fast way to reduce your PowerPoint file size. Or better yet, if you realize you are not using a specific video (or rarely use it), remove it.
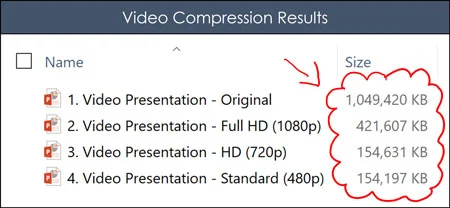
Using the default video compression options in PowerPoint, I saw the following results, reducing my file size by over 6x.
To compress your videos and other media in PowerPoint, simply follow the following steps.
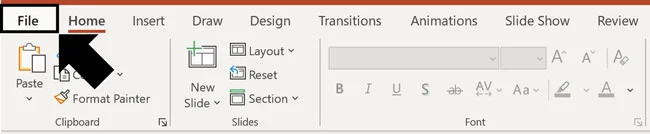
1. Select the File tab
Click the File tab to open the backstage view of PowerPoint.
Videos and other media are all compressed in the backstage view of PowerPoint, not in the Video Format tab like you might think.
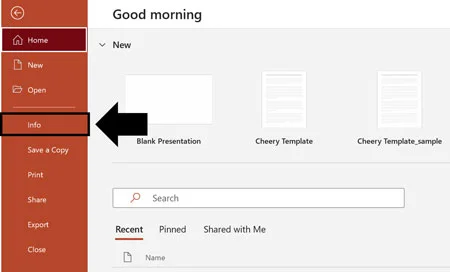
2. Select the Info tab
Find and click the Info tab to access the Compress Media tools.
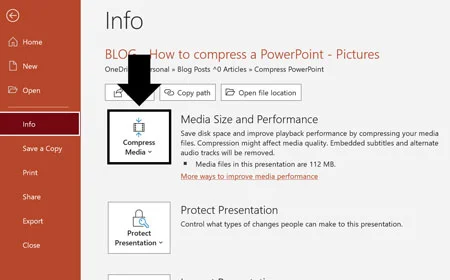
3. Open the Compress Media dropdown
Inside the Info tab and underneath Media Size and Performance, PowerPoint tells you the total size of the media files (video and audio) in your presentation.
Find and select the Compress Media command, which should be at the top of the Info tab.
If you do not see the Compress Media command, that means that you don’t have any media that PowerPoint can compress.
You can only compress videos and other media inside your current PowerPoint presentation.
If you have narrated your presentation using PowerPoint’s built-in Record Slide Show command, your narration videos and audio do not require compression. To learn how to narrate a PowerPoint using PowerPoint’s built-in Record Slide Show command, read our guide here.
4. Choose a compression file size
In the Compress Media dropdown, choose one of the three compression options for your videos and other media:
Full HD (1080p)
HD (720p)
Standard (480p)
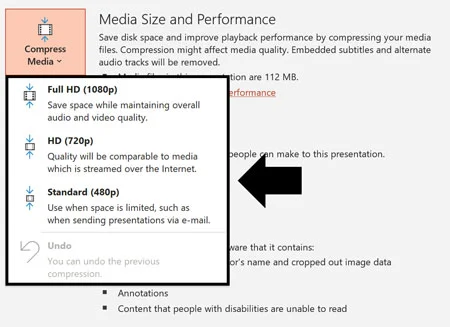
If you are not sure which compression option to choose, I recommend at least compressing using the Full HD (1080p) option. In my compression tests, the Full HD (1080p) reduced the size of my original video by half.
Full HD (1080p) works great for any overhead projector or monitor you will be presenting on. If you need to save more space, you can test out one of the smaller formats. But be careful. Just like when compressing images and photos, the more you compress your videos (or other media) the lower the quality of your video.
As a best practice when building presentations, use the highest compression rate you can without sacrificing the quality of the videos (or other media).
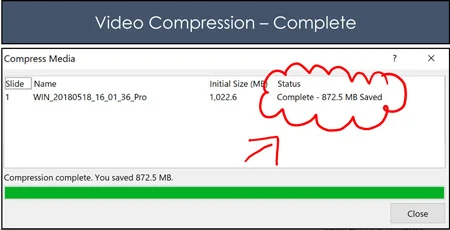
5. Wait as PowerPoint compresses your videos
After choosing a compression size, PowerPoint will begin compressing all the videos in your presentation. When it’s done, a dialog box will show you how much space you saved with each compressed video.
For example, for a raw video I inserted and compressed in PowerPoint, I saved 872.5 MB. That is A LOT and it allows me to share my presentation more easily.
To expand your knowledge and learn how to embed a video in PowerPoint (and learn how it is different than embedding a YouTube video), read our guide here.
3. Clean out the Master Views in PowerPoint
Before you worry about compressing any of your images or videos, see if you can reduce your file size by removing hidden and unused elements in your presentation.
One of the culprits of a large PowerPoint file size (especially if you don’t feel like you have that many slides in your presentation), is hidden graphics on one or more of the following masters in PowerPoint:
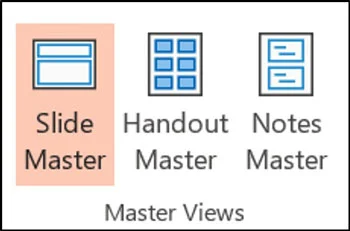
Slide Master (most common)
Handout Master
Notes Master
It’s common to find excessively large graphics or things you can eliminate to reduce file size in your different master views. That said, you do not want to just delete anything you find there. That is because someone might have set them up for a reason in the first place. Double-check before you start deleting things, but this is a common way to cut down the size of your deck
A. Slide Master - Hidden graphics
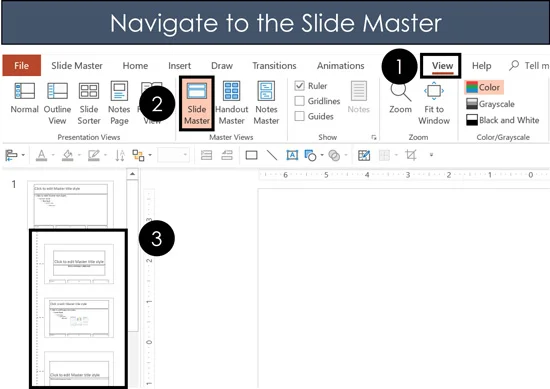
To navigate to the Slide Master view to spot check your child slide layouts, simply:
Navigate to the View tab
Select Slide Master
Spot check your Child Slide layouts
Here you want to look at your Child Slide layouts and see if there are any with extremely large pictures or media files that you are not using.
Then you can decide whether to compress them (as mentioned above) or delete them.
You might also find a lot of duplicate Child Slide layouts that you can simply remove. This happens when people copy and paste between presentations that don’t have a consistent or well-built PowerPoint template. To expand your knowledge and learn how to create your own custom PowerPoint template from scratch, read our guide here.
B. Handout Master - Hidden graphics
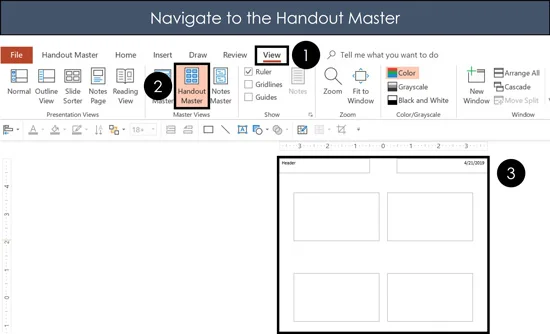
To navigate to the Handout Master view of your presentation, simply:
Navigate to the View tab
Select Handout Master in your Ribbon
Spot check your Handout Master
Here you are looking for excessively large company logos or graphics that you can compress or remove.
PowerPoint shapes such as rectangles, lines and text boxes are fine. Removing them will not impact the size of your presentation.
Formatting your Handout Master is a fantastic way to create customized slide handouts of your presentation, but if there are excessively large graphics here, compressing or removing them can help you decrease the size of your presentation.
C. Notes Master - Hidden graphics
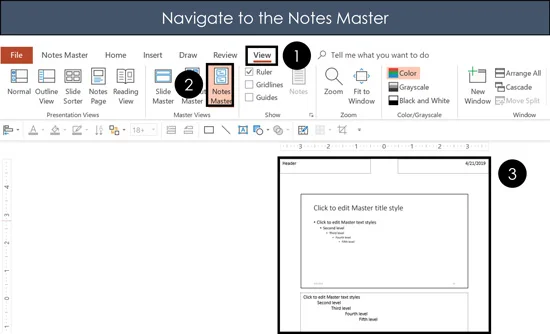
To navigate to the Notes Master view of your presentation, simply:
Navigate to the View Tab
Select Notes Master in your Ribbon
Spot check your Notes Master
If you find any excessively large images, or multi-media elements here, removing them will reduce your overall file size. You don’t have to worry about any shapes, lines, or text boxes (these will never increase the size of your presentation). You are looking for unnecessarily large graphics, or graphics that are placed outside of the Notes Master area (as those will never appear on your handouts anyway).
Formatting the Notes Master is a terrific way to create branded handouts for your speaker notes. However, if there are large graphics here that you are not using, compressing, or removing them can help reduce the size of your presentation.
To learn more about your Notes Master and how it affects the formatting and layout of your speaker notes in PowerPoint, read our guide here.
To expand your knowledge and learn how to professionally print your speaker notes in PowerPoint, read our guide here.
4. Swap out 3D Models and Other Media
If you have the Office 365 subscription (check it out here), you can now add 3D models and graphics into your presentations from the Insert Tab, 3D Models dropdown.
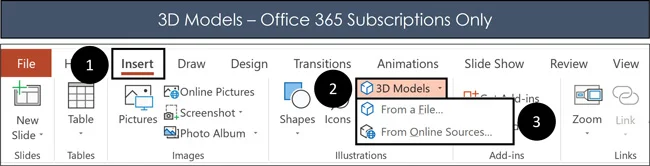
Click the Insert tab
Open the 3D Models dropdown
Select the location source for your 3D model
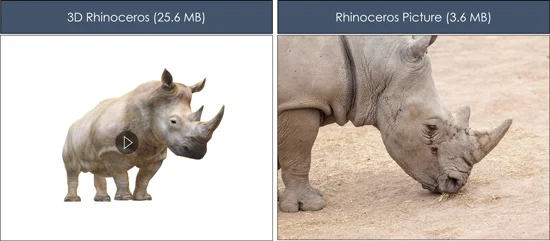
Below are examples of animated 3D models you can insert into PowerPoint. I’ve selected the rhinoceros.
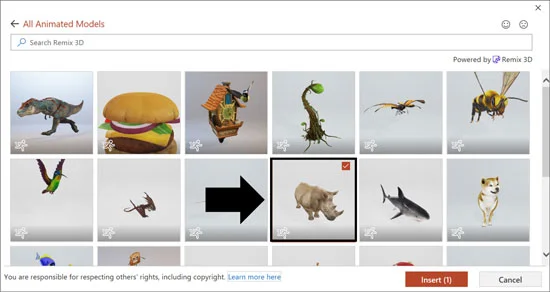
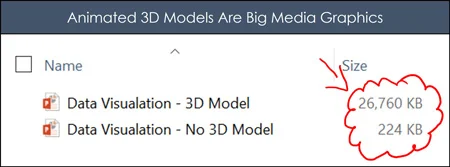
These 3D models can be quite large and there is currently no way to compress them. Notice in the picture below how adding just one animated 3D model adds over 26 MB to the PowerPoint file.
So if you need to reduce the size of your presentation, try to replace any 3D models with a static image. For example, instead of using the 3D rhinoceros, use a picture of a rhinoceros instead.
Notice that the picture of the rhinoceros is 7x smaller than the 3D model on the left.
If you want to keep the 3D look of your model, you can also Copy (Ctrl+C) and Paste Special (Ctrl+Alt+V) your 3D model as a PNG image. That will retain the 3D look of the model in your presentation without its size. To expand your knowledge and learn more about the Paste Special shortcut (which is also the trick to pasting formatting in Excel), read our guide here.
5. Convert PowerPoint to PDF
If you don’t need to present using PowerPoint, instead of trying to compress your presentation, you can simply convert it to the PDF file format.
That’s because the PDF conversion process automatically compresses images and removes any videos, 3D models, etc.
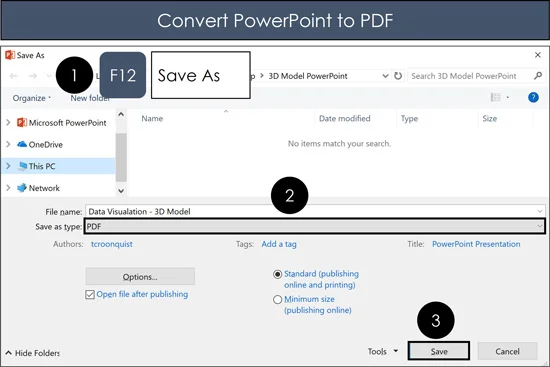
To convert your presentation to the PDF file format, simply:
Hit F12 to open the Save As dialog box
Change the File Type to PDF
Click Save
Just be aware that not everything in your presentation will properly convert to the PDF file format. You will lose quite a few things, such as animations and transitions. To learn all the ins and outs of converting a PowerPoint presentation into a PDF file format, read our guide here.
6. Compress PowerPoint as a ZIP File
As a last resort, you can also try to reduce the size of your presentation by compressing it into a ZIP file.
While this technique compresses everything in your presentation, it doesn’t always save you a ton of space.
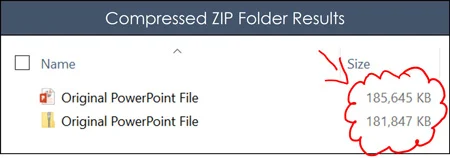
For example, notice in the picture below how my file size has only been reduced by 4MB using this ZIP folder technique.
If you need to keep all of your videos, graphics, and 3D models as they are, this might be your best bet Just keep in mind that it might not save you a ton of space and you may be better off using something like OneDrive, Google Drive or Dropbox.
How to create a compressed (zipped) folder
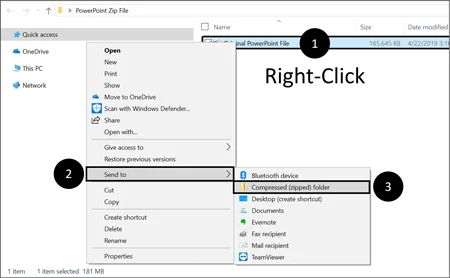
To compress your PowerPoint presentation into the ZIP file format, simply:
In File Explorer, Right-Click your file
Select Send to
Choose the Compressed (zipped) folder option
Selecting the Compressed (zipped) folder, PowerPoint compresses your presentation as much as possible. How much room it saves depends on what is in your presentation. If you have already compressed your images and other multi-media files, then you will not save much space.
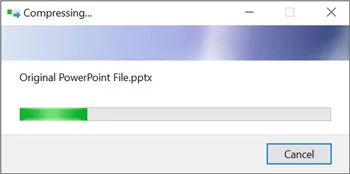
Below you can see the dialog box showing you that your presentation is being compressed.
How to extract a compressed (zipped) folder
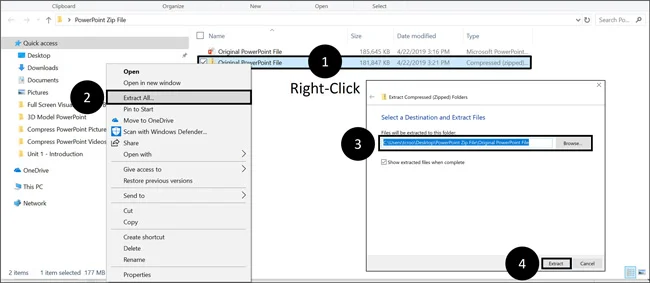
To decompress a zipped file, simply:
Right-Click the zipped folder
Select Extract All…
Choose a File Location to extract your folder to
Click Extract
Extracting your file turns your zip folder into a normal folder with your original PowerPoint file in it. Instead of just zipping your PowerPoint file, you can add additional files to a folder and ZIP the entire folder. In this way, you can reduce the overall file size of a number of files or documents you want to share with a client or colleague.
Conclusion
Compressing the different elements of your presentation is a great way to reduce your overall PowerPoint file size.
Just remember that compressing your PowerPoint presentations is an optional step. If you are not having any trouble sharing it with other people, don’t bother.
That’s because while reducing your file size can make it easier to share with others, it can also decrease the quality of the images and media.
If you enjoyed the depth of this tutorial, you can learn more about our PowerPoint training courses and resources here.
About the Author

Taylor Croonquist
Co-Founder, Nuts & Bolts Speed Training
Taylor Croonquist is a PowerPoint expert and trainer. Over a career spanning the globe, from consulting in New York and investment banking in China, Taylor has truly seen it all in PowerPoint. Through necessity and a natural tech savvy, Taylor honed his PowerPoint skills to the point of even blowing the minds of the Microsoft PowerPoint programming team. When he's not busy crafting PowerPoint training, you can find him reading a sci-fi series or scuba diving.