If you are using lots of images in your PowerPoint presentations, compressing your images can make disturbing your presentation significantly easier. That’s because most of the images you find online are WAY bigger than they need to be for your PowerPoint presentation.
In short, having large images you don’t need inside your presentation can make distributing your presentation harder than it needs to be, and make your machine run slower during your presentation. That said, compressing images in PowerPoint is NOT always necessary.
If you are having ZERO trouble sharing your presentation with other people or are presenting from your own computer, there is no need to go through all these picture compression steps.
That said, if you are the go-to person in your company for all things PowerPoint related, this is a valuable skill you will want on your belt.
Table of Contents
[Watch] Compressing Images in PowerPoint
You are currently viewing a placeholder content from Youtube. To access the actual content, click the button below. Please note that doing so will share data with third-party providers.
More InformationHow to compress images in PowerPoint
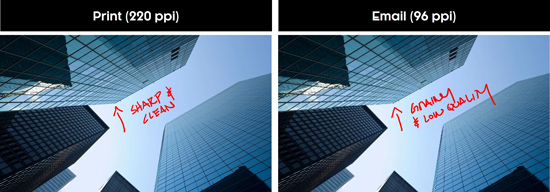
Compressing images in PowerPoint is not hard, but there are a few different options you need to be aware of. As a rule of thumb, the more you compress your images (to reduce the file size of your presentation), the grainier (or lower quality) your images will appear in your presentation.
In other words, don’t over compress your images, as they will look bad.
1. Open the Compress Pictures dialog box

Select your image in PowerPoint to open the Picture Format tab, then click the Compress Pictures command.
Keep in mind that the PowerPoint ribbon is contextual. That means you first need to select an image before the Format Picture tab appears.
Also note that for the Compress Pictures command, depending on your screen resolution and the size of your screen, the command might just appear as an icon, without the Compress Pictures label, as pictured above.
2. Choose your the Compress Options
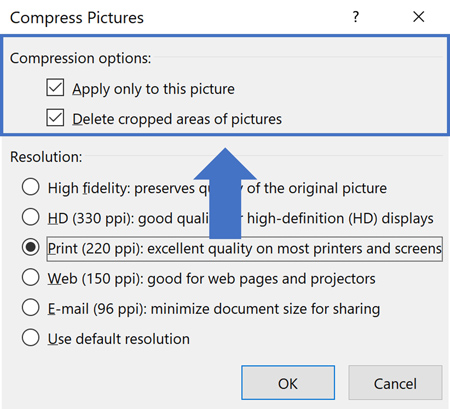
When compressing images in PowerPoint, you have two main options to choose from: choose wisely.
See descriptions of each of these options below for details.

Apply only to this picture:
This is an important option to understand before you accidentally mess up all of the photos in your presentation.
Apply only to this photo (the default setting) ensures that only the picture you currently have selected is compressed.
No other images in your presentation are affected (hence why this is the default option). By unselecting this option, you are telling PowerPoint to compress all the photos within your presentation based on your selections.
This can save you a bunch of time if you know what you are doing, and you know that you want all the photos in your slides compressed in this way. But this can waste a bunch of time if you don’t know what you are doing.

Delete cropped areas of pictures:
This option affects whether PowerPoint keeps the cropped areas of your photos or not.
When you first crop an image in PowerPoint, PowerPoint keeps whatever you crop out of your image. In short, PowerPoint hides the part of the image you crop away from you, allowing you to bring it back at any time. That’s why cropping an image doesn’t make your PowerPoint presentation any smaller.
If you know that you do not want to keep the cropped areas of your photos, you can decrease the overall size of your image by selecting the Delete cropped areas of pictures compression option.
Just be warned that once you select this option and delete the cropped areas from your images, it is permanent. There is no way back without first finding the original photo and starting over again.
Picture Cropping Help: If you want to expand your knowledge and learn how to crop images in PowerPoint (and better understand the options that are available to you), read our guide here.
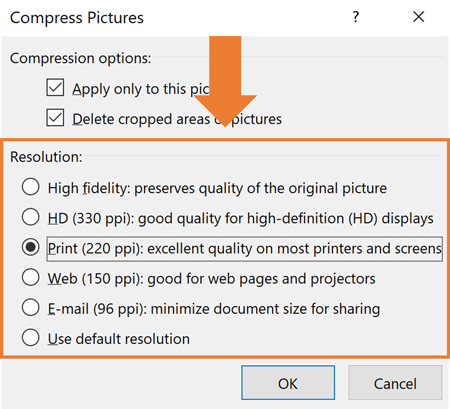
3. Choose your image Resolution

Higher resolutions like HD 330 ppi (pixels per inch) equate to the highest quality photo with larger file sizes.
Lower resolutions like email 96 ppi (pixels per inch) equate to lower quality photos that can appear grainy on large overhead projectors, and thus smaller files sizes.

If you are presenting on a large screen, I recommend using the largest PNG images you can find, as they will look better on the overhead projector.
If you are simply emailing a presentation to a colleague to view ONLY on their laptop (it will never be presented on a large overhead screen) then you can get away with a much lower resolution.
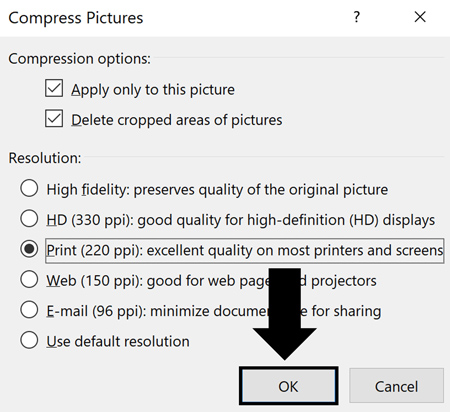
4. Double-check your selections and click ok

Before you click okay, this is your chance to double-check your selections to make sure you get the compression results you want.
I again recommend working through your images one-by-one and compressing them, rather than applying the changes to all of the images within your presentation.
Compress Images as a PDF
Another option for compressing your images is to simply convert PowerPoint to a PDF.
- Hit F12 for the Save As dialog box
- Change your Save as type to the PDF format
- Click Save
The reason why this works so well is the PDF file format automatically compresses images for you (and removes other media that could be influencing your file size).
That said, you do lose a lot of native PowerPoint functionality in the PDF format, so I would only recommend doing this if you are distributing your slide as PDF handouts.
To learn how to compress your images using the PDF file format, see our guide converting PowerPoint to PDF.
Conclusion
Compressing images in PowerPoint is one to dramatically reduce your overall file size so that you can more easily share your presentation with other people.
That said, I only recommend compressing your images if you really need to. If you are using a USB drive to share your presentation or you are just running your presentation from your own computer, there is no need to go through the hassle of compressing everything.
If you enjoyed this tutorial and want to learn more about our online training courses and other PowerPoint tutorials, visit us here.
🔒 Unlock the PowerPoint Shortcuts Trusted by Industry Leaders KKR, American Express, HSBC, and More!
Join over 114,880 professionals from diverse fields including consulting, investment banking, advertising, marketing, sales, and business development who have supercharged their PowerPoint game with our proven methods.
✅ Customize compelling presentations effortlessly.
✅ Master time-saving techniques for faster deck creation.
✅ Boost your career prospects with top-notch PowerPoint skills.
Get FREE access to the Critical PowerPoint Shortcuts module of our premium training course by entering your name and email below.
DISCLAIMER: PC Users Only!
We respect your privacy and will keep your info safe and confidential.
