In this article, you will learn how to turn a photo into a sketch inside Microsoft PowerPoint. You can do this with any photo you insert into PowerPoint using the Artistic Effects options.
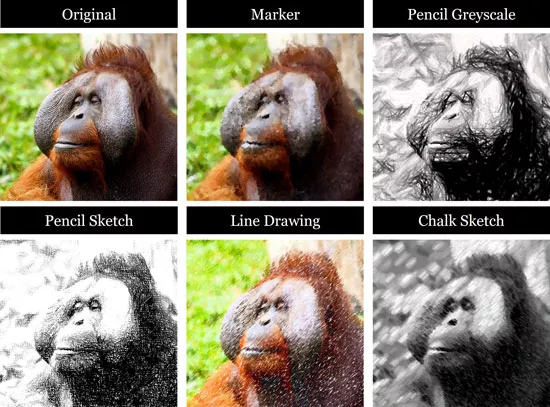
Below is a cross section of the different five different sketch affects you can turn your photo into. On top of that, you can increase or decrease the sketch or drawing effect using the different PowerPoint options discussed below.
The fact that you can convert your photos into sketches and line drawings directly in PowerPoint, instead of having to use a program like Photoshop, means that you can quickly crank out interesting slide backgrounds and picture effects on the fly for your presentations.
To learn how to turn a photo into a painting (instead of a sketch), see our guide here.
Table of Contents
[Watch] Turning a photo into a sketch in PowerPoint
You are currently viewing a placeholder content from Youtube. To access the actual content, click the button below. Please note that doing so will share data with third-party providers.
More InformationTurning a photo into a sketch in PowerPoint
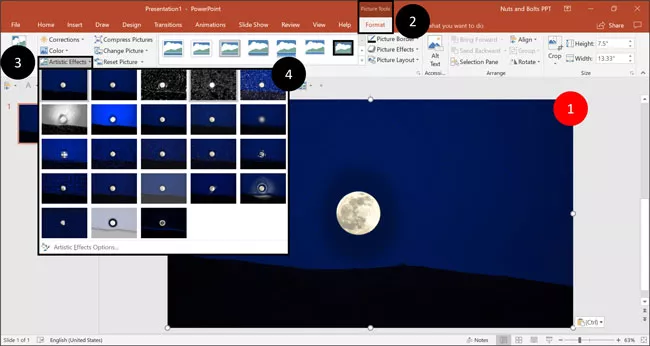
To turn a photo into a sketch in PowerPoint, simply:
- Select your Photo
- Navigate to the Picture Format tab
- Open the Artistic Effects Drop down
- Choose one of the sketching artistic effects
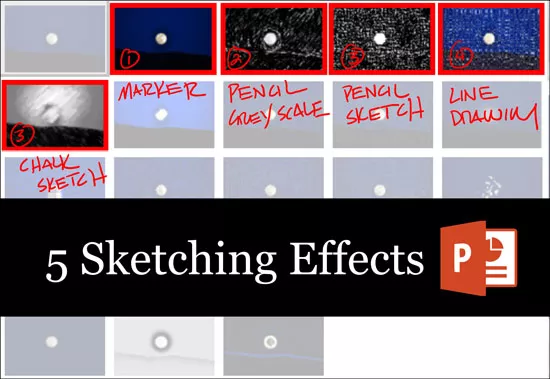
The 5 sketch effects available to you in PowerPoint (all highlighted below) are the:
- Marker effect
- Pencil Greyscale effect
- Pencil Sketch effect
- Line Drawing effect
- Chalk Sketch effect
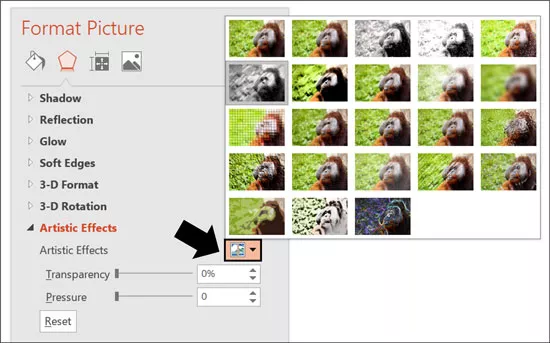
You can alternatively use the Artistic Effects dropdown in the Format Picture dialog box to not only turn your photo into a sketch or line drawing, but also to adjust the intensity of the sketching effect.
In addition, if you don’t want a black and white sketch of your photo, you can use the transparency options (described below) to bleed the underlying color from your photo into your drawing to give it some color.
Note: Turning your photo into a sketch can dramatically increase the size of your photo or image. To learn how to reduce your image file size by compressing your photo, see our guide here.
Adjusting the ‘photo to sketch’ artistic effect
When you convert a photo to a sketch or line drawing in PowerPoint, you can control two different styling options to adjust the intensity of the drawing effect in your photo.
To see these different options, simply open the Artistic Effects Options at the bottom of the Artistic Effects drop down.
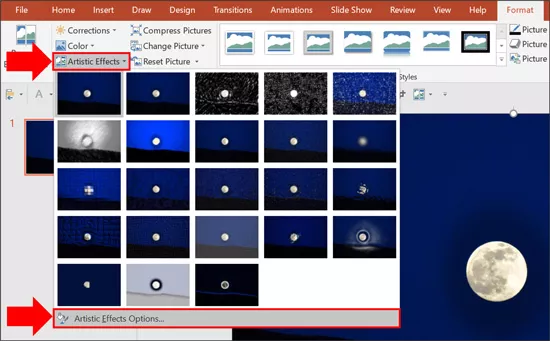
I recommend exploring the different options available here. That’s because they make a HUGE difference on the final effect when you turn a photo into a sketch like this.
Transparency and brush size are the two effect options that have the most effect on your photos
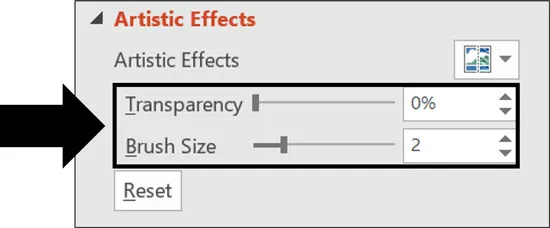
Adjusting the ‘photo to sketch’ artistic effect
After converting your image into a sketch in PowerPoint, there are a variety of different adjusting their intensity (or brush size) changes the effect.
1. Transparency options
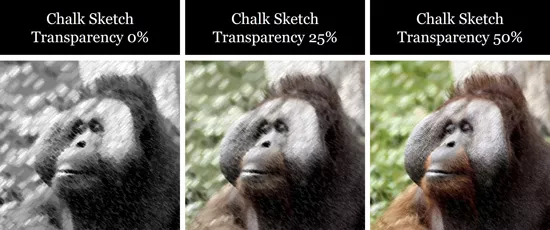
How much of your original photo bleeds through your sketch or line drawing, depends on the transparency.
A transparency of 0 means that none of the original picture bleeds through the sketch effect. This creates the most drawing-like effect for your photo.
A transparency of 100 means that the entire photo bleeds through the effect, essentially killing the artistic effect altogether.
When I want to turn a picture into a drawing (or chalk sketch, for example), I always use a transparency of 0 to get the maximize sketch effect.
That said, if you want to add color to one of the black and white sketch effects, you can test out a transparency of 25% to 50%. This bleeds the underlying color of your photo through your image.
2. Intensity or Brush Size:
This affects how neat and tidy the sketching effect is in your image or photo. The higher the Brush Size (or ‘intensity’), the more artistic and blurred the details in your photo become.
Below I’ve created some snapshots of the different sketching effects with various intensity levels to help you decide what works best for you.
3. Marker sketch effect
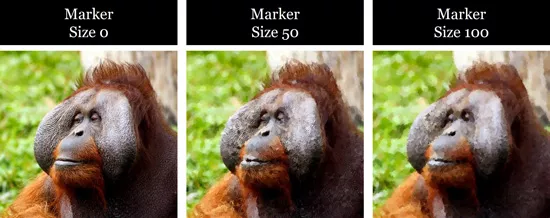
The Market Sketch effect uses a marker effect to sketch your image in PowerPoint. This sketch effect is not as noticeable as some of the other options. If you want to use this effect, I recommend using a marker size of 50 or greater.
Notice that as the size of the marker increases, the blurriness of the details within the photo increases.
4. Pencil Greyscale sketch effect
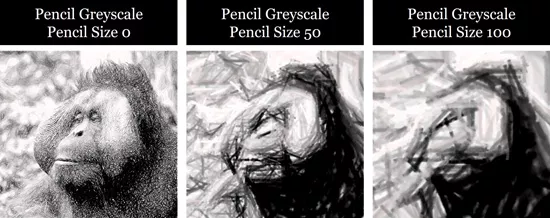
Notice that when converting a photo to a greyscale sketch, the size of the pencil dramatically changes the effect. This is one of the two effects that automatically turns your pictures into a black and white drawing in PowerPoint.
That said, you can add back color to black and white sketch by adjusting the transparency level. As discussed above, this will bleed color in from your original photo.
5. Pencil sketch effect
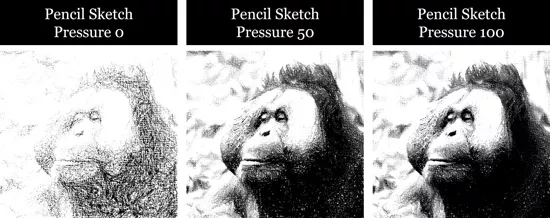
Notice that when converting your image into the pencil sketch effect, the pressure is what dictates how much of the details are etched out.
This is one of the two different black and white drawing effects you can apply to your photos in PowerPoint like this.
If you again don’t want a black and sketch drawing of your image, you can either choose the Line Drawing effect or use the transparency slider to bleed a bit of the color from your original photo back into your sketch.
6. Line Drawing effect
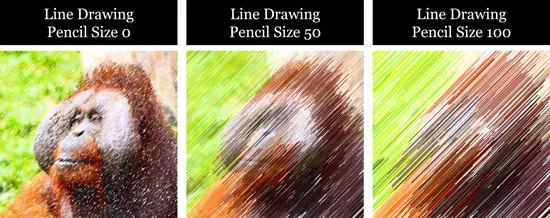
The line drawing effect (in my humble opinion) is kind of weird.
If you want a colored line drawing of your photo, I recommend using either the Pencil Sketch effect or the Pencil Greyscale effect and using the transparency slider to bleed through the underlying colors from your photo.
7. Chalk sketch effect
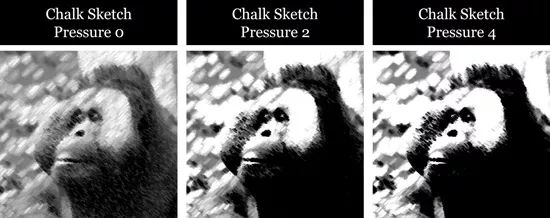
You don’t have quite as many variations available to you with the Chalk Sketch effect, but you can see that as you increase the pressure from 0 to 4, the photo and underlying details get darker.
And those are the basics for turning a photo into a sketch or line drawing 100% in PowerPoint, and the different options you have available to you.
Resetting an image in PowerPoint
If at any point you want to turn your sketch back into the original photo (removing whatever sketch effects or edits you’ve applied to the photo), you can simply use the Reset Picture command.

To reset a photo back to its original (non-artistic effect) state, simply:
- Select the Photo you want to reset
- Navigate to the Picture Tools Format tab
- Select the Reset Picture command
Assuming you haven’t cropped AND compressed your photo, selecting the Reset Picture command reverts your photo back to its original version.
To learn everything you need to know about cropping images in PowerPoint, see our guide here.
Conclusion
These artistic effects show you the formatting power available to you in PowerPoint, allowing you to take ordinary color photos and turn them into a variety of different sketch.
You can use these effects to create interesting visuals and slide backgrounds for your presentations to help set you apart from your peers.
If you enjoyed this tutorial and want to learn more about our PowerPoint training courses and free tutorials, visit us here.
🔒 Unlock the PowerPoint Shortcuts Trusted by Industry Leaders KKR, American Express, HSBC, and More!
Join over 114,880 professionals from diverse fields including consulting, investment banking, advertising, marketing, sales, and business development who have supercharged their PowerPoint game with our proven methods.
✅ Customize compelling presentations effortlessly.
✅ Master time-saving techniques for faster deck creation.
✅ Boost your career prospects with top-notch PowerPoint skills.
Get FREE access to the Critical PowerPoint Shortcuts module of our premium training course by entering your name and email below.
DISCLAIMER: PC Users Only!
We respect your privacy and will keep your info safe and confidential.
