Did you know that you can use PowerPoint to turn a photo into a painting, without ever having to leave PowerPoint?
Below are the three different options you can use to make a photo look like a painting in PowerPoint (and you can customize these options as discussed below).
The fact that you can do this directly in PowerPoint instead of having to flip to another software program like Photoshop is AMAZING!
This makes creating interesting painting effects out of your photos extremely easy in PowerPoint.
Photo to Sketch tutorial: To learn how to turn images in PowerPoint into a sketch instead of a painting, read our guide here.
How to turn a photo into a painting
Photo to Painting in PowerPoint (Step-by-Step)
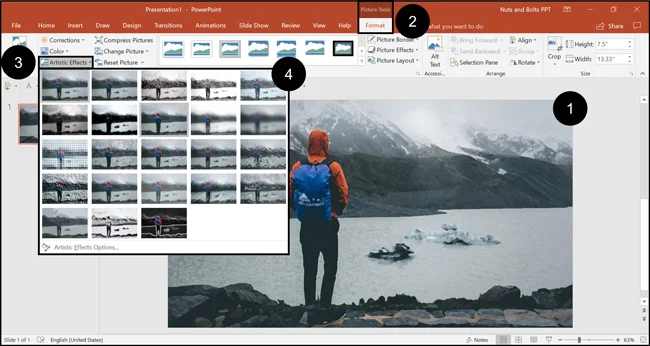
To turn a photo into a painting like effect in PowerPoint, simply:
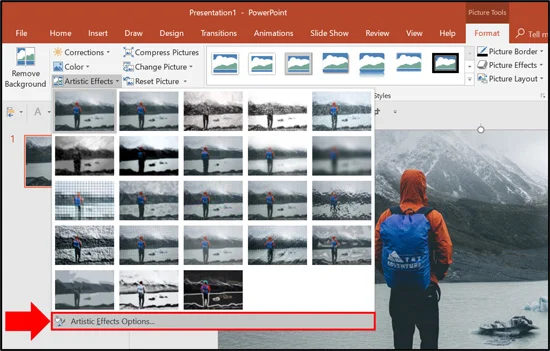
- Select your Photo
- Navigate to the Picture Tools Format tab
- Open the Artistic Effects drop down menu
- Choose a painting Artistic Effect
You can alternatively use the Painting Styles drop down in the Format Picture dialog box to not only turn your photo into a painting, but also adjust the painting effect options, as described below.
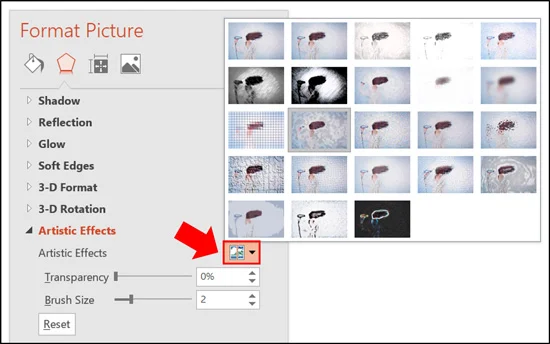
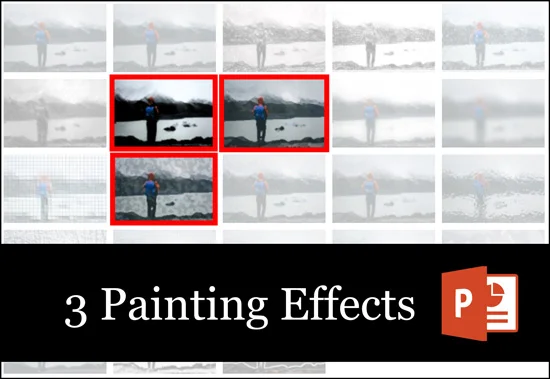
Photo to painting effect adjustments
There are two different styling effect options you can use to increase or decrease the intensity of the photo to paining effect.
To find these styling options, simply open the Artistic Effects Options at the bottom of the Artistic Effects drop down.
And if you don’t fully explore these painting effect options, you might give up on turning your photo into a painting, simply because it doesn’t look realistic enough.
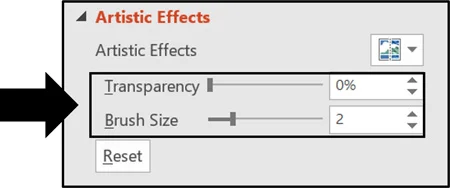
1. Transparency effect options
Transparency affects how much of your original image bleeds through the painting effect you apply to your photo in PowerPoint.
A transparency of zero (0) means that none of your original picture bleeds through (creating the starkest painting effect), while a transparency of one hundred (100) means that the entire photo bleeds through (killing the painting effect all together).
When converting a photo into a painting there is no right or wrong transparency level. It is just a set of options you can play around with to find the painting effect you like best.
When I want to make a photo look like a painting (or a watercolor), I always use a transparency level of zero (0) so that I get the maximum painting style effect.
To learn everything there is to know about making an image transparent in PowerPoint, read our guide here.
2. Intensity or brush size
How neat and tidy the painting effect is in your image. The higher the Brush Size is, the more artistic and blurred the edits will be in your painting.
See side-by-side examples of the different painting effects applied to the same images using the different brush sizes or intensity levels.
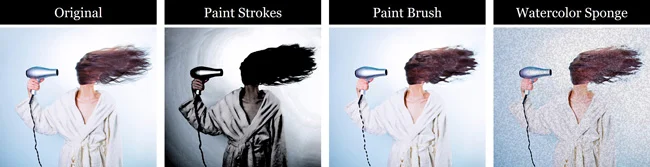
3. Paint strokes photo effect
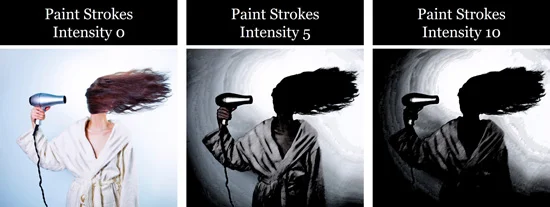
Notice that as the intensity increases, the darkness of the photo increases as well. When turning a photo into a painting using this Paint Strokes effect, I typically use an intensity level of 0, 1 or 2.
4. Paint brush photo effect
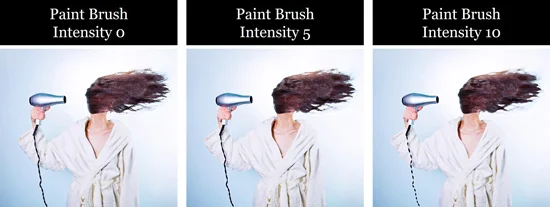
Look closely at the details within the photo (like the woman’s hair) to see the thickening intensity of the paint brush painting effect below. The effect is more pronounced when viewed in full screen. The higher the intensity, the more of the effect is applied to the photo you are turning into a painting.
5. Watercolor sponge photo effect
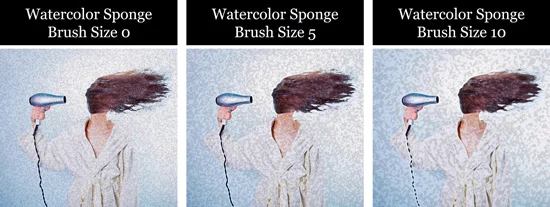
When turning a photo into a watercolor painting, the larger the brush size you use increases the watercolor splotches within the photo.
Those are your basics for how to make a photo look like a painting in PowerPoint, and some of the picture editing options you have available to you. Again, the more of an effect you apply to your image, the more of the painting effect that you will see.
Resetting your painting back to a photo

To rest your picture back to its original state (removing your photo to painting effect), simply:
- Select the Photo you want to reset
- Navigate to the Picture Tools Format tab
- Select the Reset Picture command
Selecting Reset Picture reverts your edited photo back to the original image you started with, assuming you haven’t cropped or compressed the picture.
The reason the Reset Picture command works is because PowerPoint always keeps two different copies of your photos or images when you add them to your slides.
Photocopy #1: The photo that you crop, resize, edit, and add your photo filters and special effects to.
Photocopy #2: The original photo itself.
That’s why you can always go back to your original photo or image, regardless of what you’ve done to in PowerPoint (or reset a stretched picture that someone has left in their slides).
The only exception is if you have cropped and or compressed your photo. Once you’ve cropped and compressed your photo, you can no longer get back to the original image by resetting it.
Conclusion
So those are the artistic affects you can use to make a photo look like a painting in PowerPoint.
This is a fantastic way to create new and interesting photo effects for your presentations. Just remember to play around with the intensity options for your chosen photo to painting effect to find the one you like best.
If you enjoyed this tutorial and want to learn more about our training course and PowerPoint resources, visit us here.
About the Author

Taylor Croonquist
Co-Founder, Nuts & Bolts Speed Training
Taylor Croonquist is a PowerPoint expert and trainer. Over a career spanning the globe, from consulting in New York and investment banking in China, Taylor has truly seen it all in PowerPoint. Through necessity and a natural tech savvy, Taylor honed his PowerPoint skills to the point of even blowing the minds of the Microsoft PowerPoint programming team. When he's not busy crafting PowerPoint training, you can find him reading a sci-fi series or scuba diving.