In this tutorial, you’ll learn how to crop pictures in PowerPoint using the different tools and features that PowerPoint provides. This gives you more control over the images you use in your presentations and does not require Photoshop. The same steps apply whether you’re cropping an image you found online or a photo straight off your phone.
And there is more to cropping images than just resizing them for your slides. For example, you can:
Crop images into circles (or other shapes)
Crop images into specific aspect ratios to fit your slides better
Reduce your image file size by cropping out the parts you don’t want
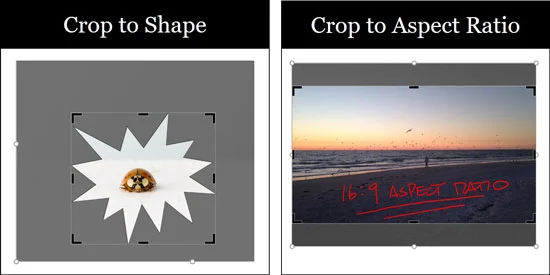
How to crop an image in PowerPoint
Below you'll learn every way that I know of to crop an image in PowerPoint, from the basic rectangular crop, to cropping a photo into a circle, to power cropping a whole batch of pictures at once. And if you use the Crop to Aspect Ratio feature, you can quickly and easily make great slide backgrounds for your presentations.
Cropping pictures in PowerPoint (basics)
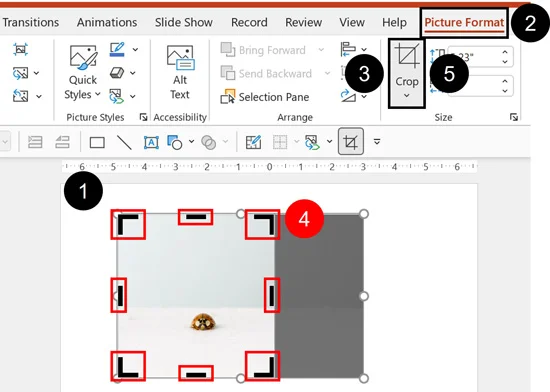
To crop a picture in PowerPoint, follow these steps:
Select the picture you want to crop.
Select the Picture Format tab
Click the Crop command to enter cropping mode.
Resize the Cropping Handles (they are black) on your photo.
Select Crop again (or hit the Esc key) to exit cropping mode.
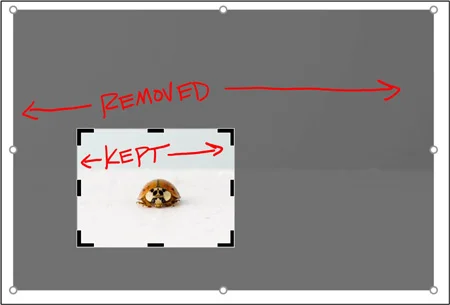
After you adjust the black handlebars on your picture, the grey or faded parts are what is removed from your image. Only the colorful parts of your picture remain after you close the Crop command as you can see in the picture below.
If you have a lot of pictures in your presentation, you can reduce your file size by compressing your images after you crop them. See my post on how to compress your images to learn more.
How to crop a picture into a circle (make any picture round)
Instead of just cropping an image down to a normal square or rectangle, you can also use PowerPoint’s cropping tool to immediately crop your image into a circle, triangle, or other shape. It’s the PowerPoint move behind all those team bio slides with matching round headshots. One photo, one shape, done.
There are two different ways to do this. I personally prefer the second method – Intersect to Shape – but that feature is not available in all versions of PowerPoint. So, let’s first look at the most basic way to crop a picture into a shape.
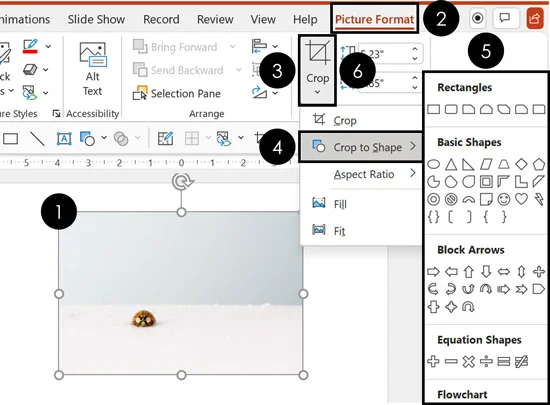
To crop a picture into a circle in PowerPoint:
Select the picture you want to crop.
Navigate to the Picture Format tab.
Open the Crop dropdown.
Select Crop to Shape.
Choose the Circle shape (or other shape)
Click the Crop tool again or hit Esc on your keyboard.
When you crop a rectangular image into a circle, it looks like the oval below.

Notice how the ladybug is not centered perfectly inside of the oval? If this happens to you, you will want to adjust the image. You can do that manually or use the Offset X and Offset Y commands in the Format Picture dialog box as discussed below.
If you’d rather have your image be a circle instead of an oval, you need to start with a square picture (rather than a rectangle) — squares and circles have the same height and width.
So crop your picture to a square first (Picture Format > Crop > Aspect Ratio > 1:1), then run the Crop to Shape steps above. Squaring the picture first is what makes it come out round instead of oval. That’s the order we teach for team bio slides: square your pictures before you convert them, or you’ll end up with stretched ovals.
How to crop multiple pictures at once (‘Power Cropping’)
Instead of cropping your images one by one, you can also save yourself a lot of time by using SmartArt. This method allows you to quickly crop and resize all your pictures at once (detailed below).
Warning: This Power Cropping trick only works on PC versions of PowerPoint 2013 and later. If you have an earlier version of PowerPoint, this is one of many good reasons to consider upgrading soon.
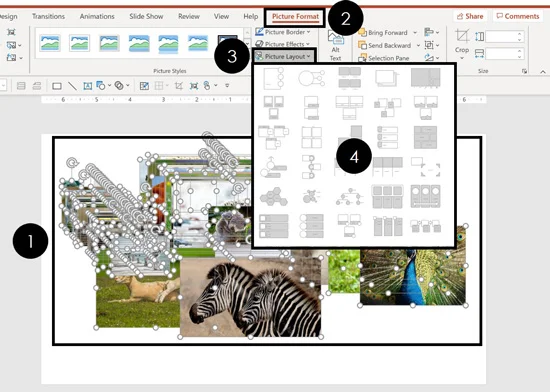
To crop and resize multiple pictures at the same time using SmartArt, simply:
Select your images
Navigate to the Picture Format tab
Open the Picture Layout dropdown
Select a SmartArt layout to crop your images
As you hover over the different SmartArt layouts, you get a live preview of how your pictures will be cropped and resized. Your goal at this stage is to find the shape that gets you closest to the shape you are looking for. You can adjust the shape later.
Below is an example of cropping pictures using the Bending Picture Semi-Transparent Text layout.
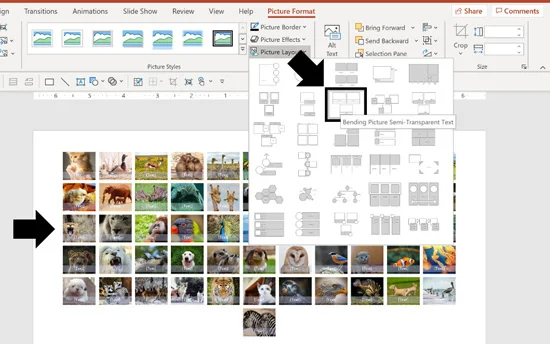
After you choose a layout, you can then break the SmartArt graphic apart so that you can freely work with the cropped pictures.
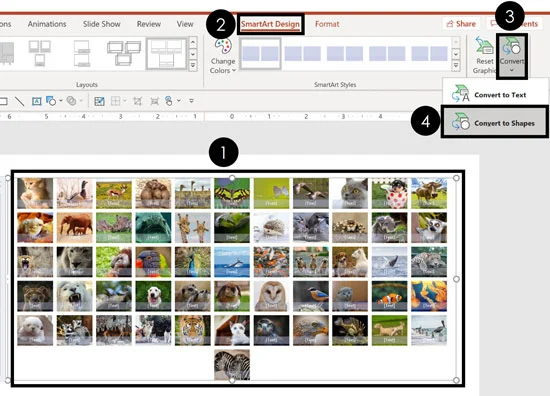
To break your SmartArt graphic apart, simply hit Ctrl + Shift + G twice on your keyboard to Ungroup the object.
Alternatively, you can use the Convert to Shapes command:
Select your SmartArt graphic
Navigate to the SmartArt Design tab
Open the Convert dropdown
Select Convert to Shapes
That turns your SmartArt graphic into a group of cropped pictures that you can then ungroup and use any way you like within your presentation. If any of the pictures aren’t cropped the way you like them, you can adjust the cropping as discussed below.
How to adjust a cropped image in PowerPoint
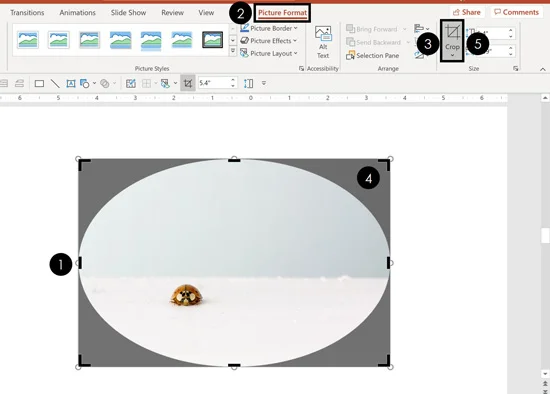
You can adjust what parts of your cropped image show within the cropped area in PowerPoint. To do that, simply:
Select the cropped picture
Navigate to the Picture Format tab
Select the Crop tool
Move the picture around within the frame (you can just click and drag, or readjust the black handlebars on the photo)
Select the Crop command again (or hit Esc) to exit cropping mode
You can also adjust your photo within the cropped area using the Offset X and Offset Y values in the Format Picture dialog box. This is what I would recommend if you are stuck with an off-centered picture inside your circle crop.
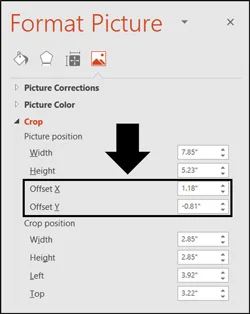
To adjust a cropped picture using the Offset X and Offset Y values, simply:
Right-click your picture
Select Format Picture
Click on the Picture icon
Under the Crop area, adjust the Offset X and Offset Y fields
Adjusting the Offset X value moves your picture horizontally within your cropped area. Adjusting the Offset Y value moves your picture vertically within your cropped picture area.
How to intersect a picture to a shape
The fastest and easiest way to crop to shape is to use the Intersect command in PowerPoint 2013 and later.
The reason it’s faster and easier is that you can draw the shape directly over the part of the photo that you want. This saves you from having to do all the manual adjusting.
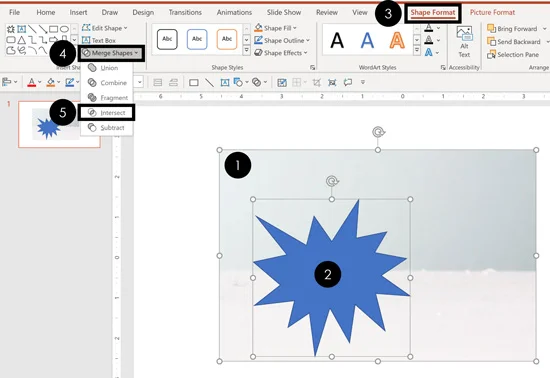
To crop a picture to a shape using the Intersect command in PowerPoint simply:
Insert the PowerPoint shape that you want and place it on top of your photo (in the picture above I’ve inserted an Explosion: 8 Points shape).
Select the picture.
While holding the Shift key, now select the shape (if you do it in the reverse order it won’t work).
With the picture and shape selected, navigate to the Shape Format tab.
Open the Merge Shapes tool.
Select the Intersect command.
Selecting Intersect, the intersection points between the shape and picture are combined, as pictured below.

How to crop a picture to an aspect ratio
The fastest way to turn a photo into a full-screen visual image for your slide background is to use the Aspect Ratio crop tool.
This allows you to crop a photo down to either the 16:9 aspect ratio for widescreen monitors or the 4:3 aspect ratio for printed slides.
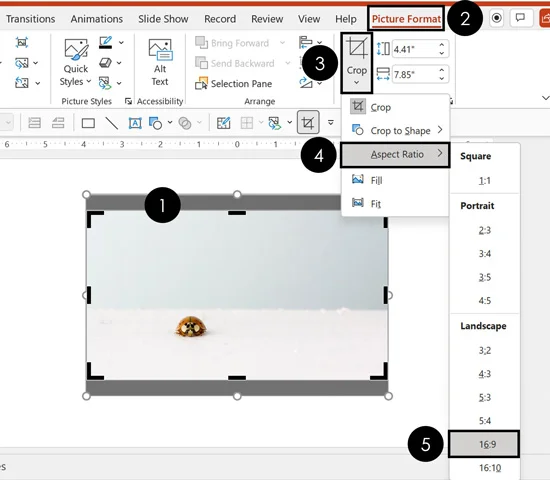
To crop a picture to the 16:9 aspect ratio, simply:
Select the picture you want to crop.
Navigate to the Picture Format tab.
Open the Crop dropdown.
Open the Aspect Ratio options.
Choose your aspect ratio. In the picture above I chose 16:9 for widescreen photos (another common aspect ratio is 4:3 for printed slides).
Adjust your photo within the frame.
Hit the Crop command again or hit Esc on your keyboard.
Once you have cropped it to the 16:9 aspect ratio, your photo should fit perfectly on your 16:9 slide. Just make sure you hold the Shift key while you enlarge your image, so you don’t accidentally warp it.
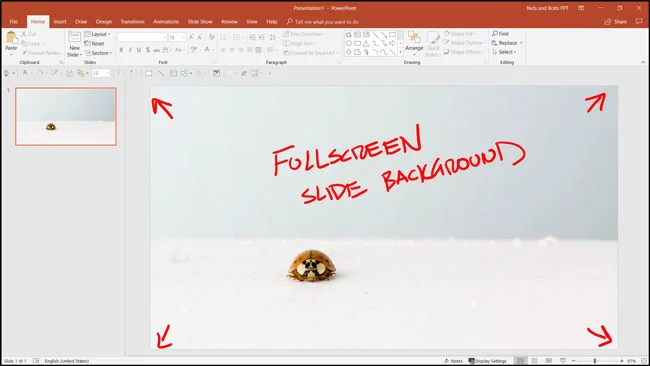
The Crop to Aspect Ratio command works best on photos that have a lot of negative space (like sky and sand, as pictured below). That’s because there is enough room in your photo to be cropped out and still look like a complete picture.
The negative space also works well for placing your content.
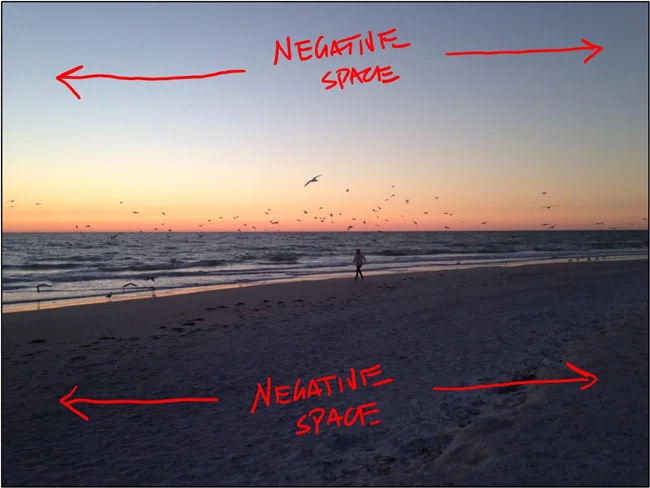
When you don’t have a lot of negative space in your photo, cropping to aspect ratio increases the size of the main people or objects in your photo.
3D picture cropping trick
Another clever cropping trick in PowerPoint allows you to create 3D pictures in PowerPoint, as you can see with the apple below (what is known as an ‘out of bounds’ effect).
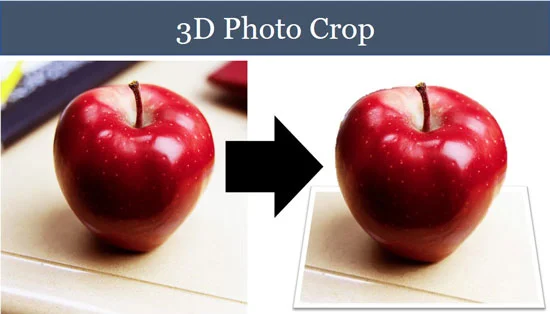
The trick is to overlay two photos and then use the cropping tools to create the 3D effect.
The 3-part process for creating a 3D image in PowerPoint is as follows:
Find a high-quality image (see the blog post linked below for image requirements).
Properly frame your picture in PowerPoint.
Overlay and crop your images down to create the 3D picture effect.
Crop FAQs
Q: How do I make a picture into a circle in PowerPoint (not an oval)?
A: If your picture keeps coming out as an oval, that’s Crop to Shape working as designed — the shape conforms to your picture’s proportions, so a rectangular photo becomes an oval. You have two ways to get a true circle:
Square it first (the Crop to Shape route): crop the picture to a square (Picture Format > Crop > Aspect Ratio > 1:1), then apply Crop to Shape > Oval as shown above. A square picture cropped to an oval is a perfect circle.
Draw the circle first (the Intersect route — the one I prefer): insert an Oval and hold Shift while you drag so it stays a perfect circle, position it over exactly the part of the photo you want to keep, select the picture, Shift-click the circle, then choose Shape Format > Merge Shapes > Intersect (full steps in the intersect section above). No squaring, no offset adjustments — the circle lands exactly where you drew it.
And one headshot rule worth knowing: don’t let the edge of the circle cut anyone off at the neck — crop tighter on the face, or wide enough to reach mid-chest. It looks off otherwise. It’s the “never decapitate people” rule Camille picked up from Nolan Haims at the Presentation Summit.
Q: What's the difference between Crop to Fill and Crop to Fit?
A: When you drop a picture into a shape or placeholder, PowerPoint gives you two ways to make it sit inside the frame — and they behave very differently.
Crop to Fill expands the picture until it covers the entire frame, so it fills every edge but PowerPoint trims off whatever hangs outside (you lose the overflow).
Crop to Fit shrinks the whole picture until it sits inside the frame, so you keep the entire image but you may be left with empty white space around it. Rule of thumb: use Fill when the frame's proportions matter more than seeing 100% of the photo (a full-bleed background, a headshot in a circle), and use Fit when you can't afford to lose any part of the image (a chart, a logo, a screenshot).
Both live under Picture Format > Crop (click the arrow under the Crop button).
Q: How do I keep a picture's crop when I copy it into a picture placeholder?
A: Short answer: there's no direct way to carry a crop into a picture placeholder — if you copy a cropped image and paste it into a placeholder, PowerPoint re-expands it to the full original picture and your crop is gone.
The workaround: flatten the crop into the image first, then drop that flattened version into the placeholder. To flatten it, copy the cropped image (Ctrl + C ), paste it back as a picture (via Paste Special) so the crop becomes part of the image itself — now it holds when you paste it into the placeholder.
Heads-up: once you flatten, the crop is permanent — so if you might want the original edges back later, keep an uncropped copy off to the side before you flatten.
Q: How do I extend a photo's background to fill the whole slide without warping the subject?
A: This is the classic “my photo won't fill a 16:9 slide and I can't stretch the subject without distorting it” problem. You've got two moves that extend the background while leaving the subject untouched.
Stretch: duplicate the photo, crop the duplicate down to the largest clean chunk of background, then stretch just that chunk outward to cover the gap — but keep it to about 20–25% max, past that the texture smears and it reads as fake.
Stamp: duplicate the photo, crop to a background chunk, then Flip Horizontal (Arrange > Rotate > Flip Horizontal) and butt it up back-to-back against the original edge so the texture mirrors cleanly — best for textured or patterned backgrounds. One catch with stamping: crop out any diagonal lines first, or the mirror seam will be obvious. (If it's fine to resize the subject too, the simplest route is cropping the whole photo to a 16:9 aspect ratio — see the aspect-ratio section above.)
I cover all of these techniques and more in my Full Screen Visuals course inside our PowerPoint Pro Membership.
Conclusion
So that’s how to crop a picture in PowerPoint, and a variety of the formatting options you have available to you.
Like many things in PowerPoint, there are many ways to do the same thing. Which one you use depends on your desired outcome.
Because adding visual elements like photos is critical to your success in designing your slides, I consider cropping photos a must-know in PowerPoint.
If you enjoyed the depth of this tutorial and want to learn more about our online training courses and other free resources, visit us here.
About the Author

Taylor Croonquist
Co-Founder, Nuts & Bolts Speed Training
Taylor Croonquist is a PowerPoint expert and trainer. Over a career spanning the globe, from consulting in New York and investment banking in China, Taylor has truly seen it all in PowerPoint. Through necessity and a natural tech savvy, Taylor honed his PowerPoint skills to the point of even blowing the minds of the Microsoft PowerPoint programming team. When he's not busy crafting PowerPoint training, you can find him reading a sci-fi series or scuba diving.
Take your PowerPoint skills to the next level
Get access to our complete training library, new tutorials every month, and the same techniques we teach in our corporate workshops. Join the 260,000+ professionals who have trained with us.
See Membership Options