In this article you’ll learn how to narrate a PowerPoint, with either just your voice or using the new video narration feature.
Firstly, there are two different tools you can use to narrate your PowerPoint slides.
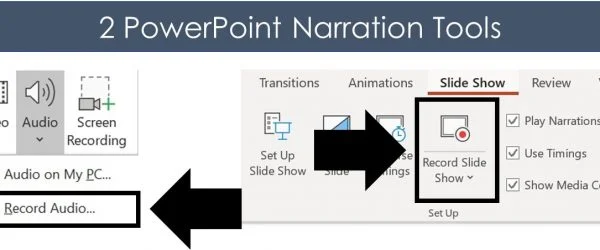
#1: Record Audio is the legacy PowerPoint narration tool. Although this tool doesn’t have as many features, it is faster to open and use, and is handy if you want to drop a voice note on a slide.
Features of this tool include:
- Voice narration only
- Adds narration to one slide at a time only
#2: Record Slide Show is the NEWEST (and best) narration tool in PowerPoint, giving you two different types of narration options plus a variety of other options.
The features here are:
- Voice narration
- Video narration (so your audience can also see your face)
- Allows you to narrate an entire presentation in one sitting
- Automatically sets slide timings for you if you later want to convert PowerPoint into a video
And before you get lost in either tool, let’s cover a few things which will help you out (trust me).
Narration definition in PowerPoint
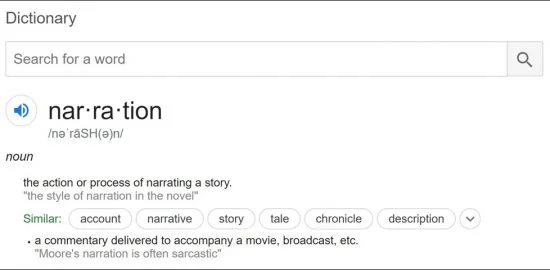
In PowerPoint, narration simply means recording your presentation as you walk someone through it, so that you can easily share the whole thing with someone else.
On top of that, if you get creative, you can use your narrated PowerPoint files to:
- Share your presentation with team members around the world
- Create a library of best practices for your company
- Build training materials for new hires
1. You don’t need fancy recording equipment
Don’t let fancy equipment or a professional recording studio hold you back from narrating your presentation. For most situations, using the built-in microphone on your personal computer is enough.
For example, if you are doing something relatively informal, such as walking a colleague through something in PowerPoint, the quality of your audio doesn’t need to be extremely high.
If you are creating training materials or giving an important presentation, I recommend getting a decent USB microphone (you can see a list of top rated microphones here).
That’s because they will help remove any background noise.
2. Find a quiet space and tell people you are recording
Regardless of the quality of your microphone, I recommend finding the quietest place possible to record your narration and let everyone know not to bother you.
When evaluating a quiet place, here are some things to be careful of and to spot check:
- Noisy air conditioners or refrigerators
- Street noise (cars, planes or pedestrians)
- Loud background office or cafe noise
- Cell phones, doorbells or other pinging noises
- Your kids playing in the background
For instance – imagine you are in the middle of narrating your presentation. All of a sudden a colleague knocks on your door or the doorbell rings, and you’re interrupted. It’s not the end of the world, but it will throw you off and likely annoy you.
In addition, if there is too much background noise (like a running air conditioner), the noise can be very distracting to whoever is watching the recording.
3. Check your microphone
The last thing you want to do is walk through your entire presentation, and then discover that your microphone wasn’t working.
Therefore, before narrating your PowerPoint, I recommend double-checking your recording equipment every time before you hit record. This includes ensuring that your equipment is properly plugged in (it happens).
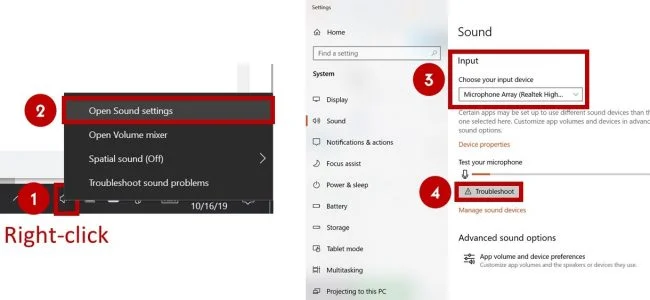 To test and troubleshoot the audio quality of your microphone, simply:
- Right-click the speaker icon in the task bar (lower right-hand corner of your desktop)
- Select Open Sound settings
- Choose your Input device
- Click on Troubleshoot under Test and troubleshoot
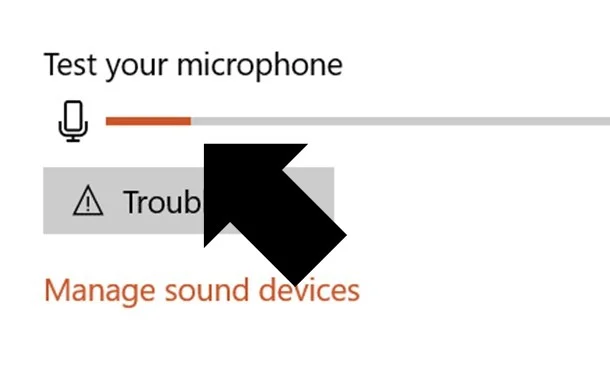
Note: If you don’t see the audio bar filling up with color as you talk, that means that your input device is either not selected or not properly connected.
- Connect all your audio and video equipment to your computer
- Restart your computer: Start, Power, Restart
#1. Record audio (audio narration only)
While this is the legacy narration tool in PowerPoint, I want to cover it first.
That’s because even if you decide not to use it to narrate your PowerPoint presentation, it is extremely useful for dropping voice notes on your slides.
When used this way, you can quickly capture your thoughts and ideas about a slide without having to get bogged down editing or building it out on the spot.
Below I’ve detailed how to use this tool to narrate PowerPoint slides.
1. Open the Record Sound dialog box

To open the Record Sound dialog box, simply:
- Navigate to the Insert tab
- Open the Audio drop down
- Select Record Audio
Keep in mind that you can only narrate one slide at a time using this tool. Hence why it’s great for dropping voice notes on a slide, one by one.
2. Record your audio narration
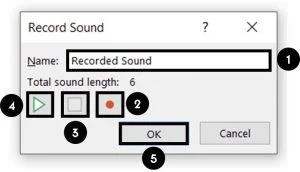
Inside the Record Sound dialog box you can narrate your PowerPoint slide. Simply:
- Type in a Name for your Audio Clip
- Select the Record button (the red dot) to begin narrating
- Click Stop (the square) to stop your narration
- Hit Play (the triangle) to listen to your narration
- Click OK to save the narration to your slide
As a result, you will see a little audio object added to your slide that you can move around and resize if you like.
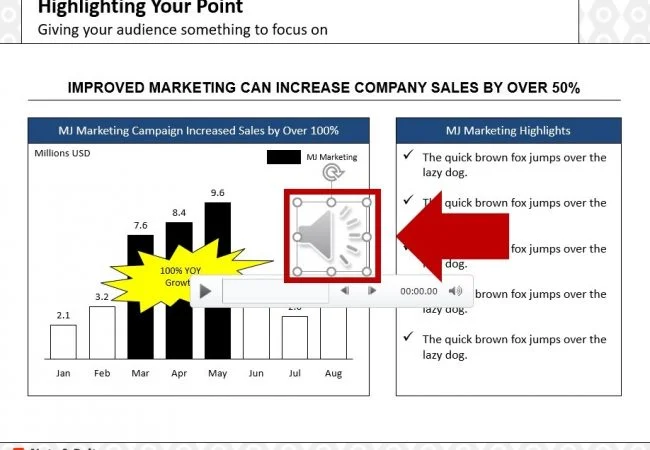
The audio file can also be played (simply click on the play icon) in both the Normal View and Slide Show View of your presentation.
In this way, you can work your way through your presentation, adding voice notes to your PowerPoint slides that you or your colleagues can play back from within your presentation.
To learn all about adding music to PowerPoint and how to loop your audio files, read our article here.
3. Playing your PowerPoint narration
By default, your audio file will be set to play In Click Sequence (explained below).
That means it will be added at the end of any animation sequences, trigger actions, etc.. If you don’t have any of these on your slide, it will automatically play when you to to advance to the next slide.
All you need to do is advance your slide (click, hit the space bar or arrow keys, etc.) and it will play.
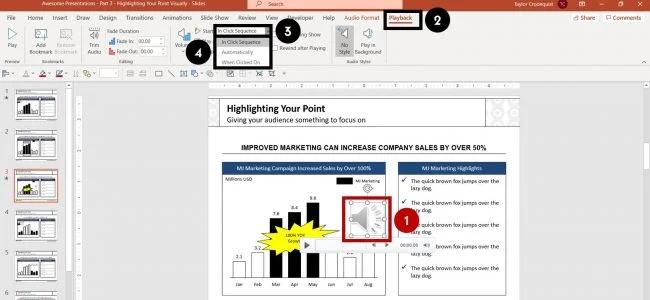
To change when your audio file plays, simply:
- Select your Audio file
- Navigate to the Playback tab
- Open the Start drop down
- Choose either In Click Sequence, Automatically or When Click On
In Click Sequence means that your audio file plays as part of the click sequence of actions that happen on your slide. This includes animated sequences, trigger actions, and videos, all of which you can set in the Animations Pane.
If you do not have any sequences set up on your slide, your audio file will play right before you advance to the next slide in your presentation.
Automatically means your audio file plays as soon as you get to that slide in your presentation, instead of playing right before you advance to the next slide.
When Clicked On means your audio file will only play if someone clicks on it during the presentation in Slide Show mode. For example, you can use this option for a piece of audio that you may not have the time to play, allowing you to choose in the moment whether to play it or not.
4. Delete or overwrite a previous narration file
To delete an audio file narration, simply select the object on your slide and hit Delete on your keyboard.
If you want to overwrite or change an existing narration, simply use the Record Audio dialog box again (as described above). Doing so will overwrite the existing audio file on your slide.
Warning: Two narration audio files cannot exist on a slide at the same time. That means that if you narrate a PowerPoint slide a second time, the first recorded file will be overwritten.
To be clear, that means you will need to start over – from scratch – for the individual slide where you want to change the narration.
While you can trim an audio file in PowerPoint, you cannot split apart or merge different audio files like you could if you used dedicated audio editing software.
#2. Record Slide Show (audio + video narration)
The Record Slide Show command is the NEWEST and BEST way to narrate a PowerPoint presentation for a few reasons, including:
- Record both audio and/or video narrations
- Narrate your entire presentation in one sitting (you are not limited to creating slide-by-slide narrations)
- You can use the pen, highlighter and laser pointer commands and have them captured in your narration too
- The tool allows you to pause and restart your recording
- All your slide timings are automatically recorded, allowing you to use them to turn your PowerPoint presentation into a video (see how to do that here)
In short, unless you have a really good reason not to use the Record Slide Show command to narrate your presentation, this is what you should be using.
As you will see below, there are a lot more settings you can toggle on and off, but don’t let this stop your from recording your presentation.
1. Open the Record Slide Show dialog box
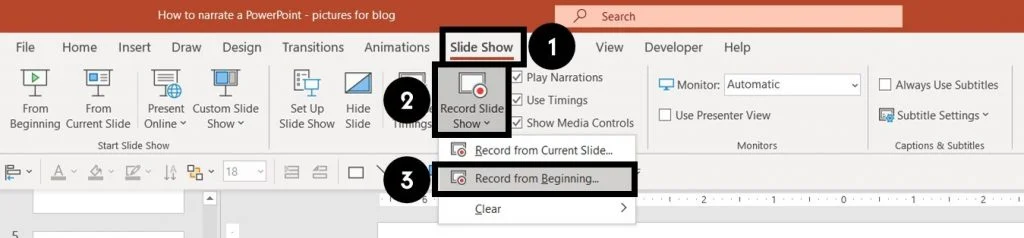
To open the Record Slide Show dialog box, simply:
- Navigate to the Slide Show tab
- Open the Record Slide Show command
- Choose Record from Beginning
If you simply click the Record Slide Show command in the Ribbon (instead of opening up the drop down) it will begin recording from the current slide.
Wait a couple of seconds, and the Record Slide Show commands will load, and you can start narrating your presentation.
Note: If you are converting your PowerPoint presentation to a video and have not set your slide timings, the Create a Video option will also open this Record Slide Show dialog box.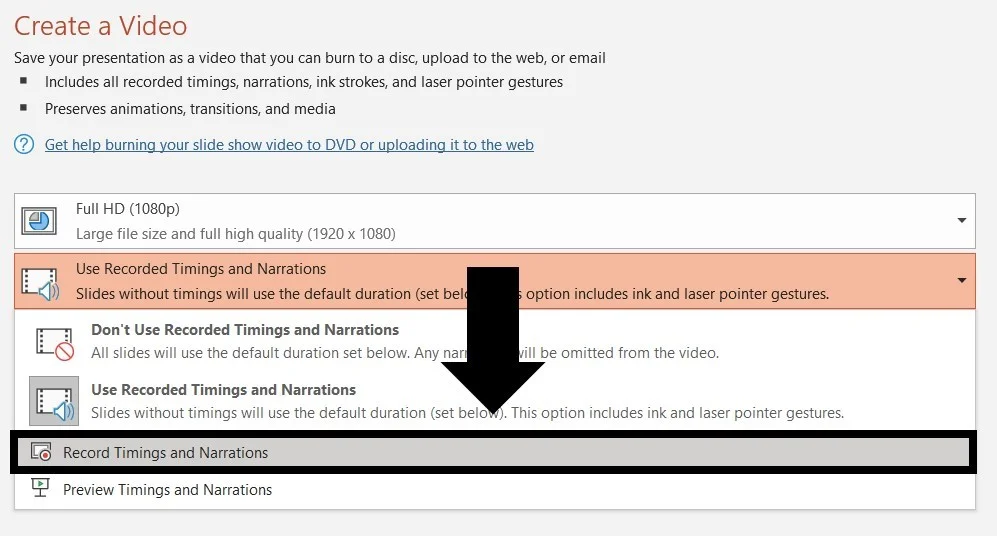 To learn how to convert PowerPoint to video,
read our guide here
.
To learn how to convert PowerPoint to video,
read our guide here
.
2. Record your slide show narration
There are a lot more options you can choose from in the Slide Show dialog box that that I will explain below, but recording your narration is still pretty easy and straight forward
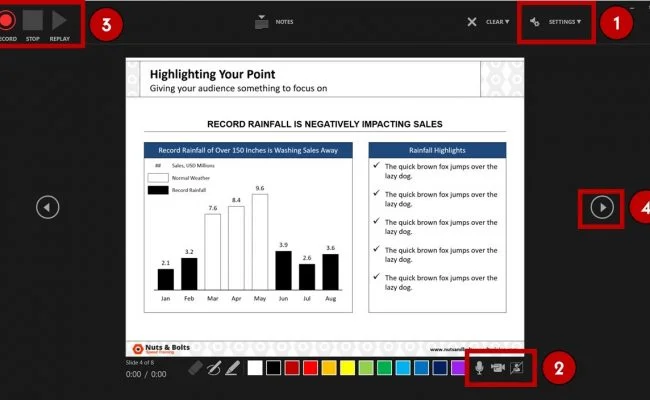
To start recording your slide show narration, simply:
- Choose your Camera and/or Microphone
- Make sure your Camera and/or Microphone is turned on
- Use the Record, Stop and Replay commands to start and stop your narrations
- Use the Arrow (or use your arrow keys) to advance to the next slide
Once you start recording, you get the option to pause the recording. This allows you to pause and collect your thoughts whenever you need to, and continue narrating your presentation when you are ready.

When you are finished, the individual video and/or audio file narrations are added to the lower right-hand corners of each individual slide, as you can see below.
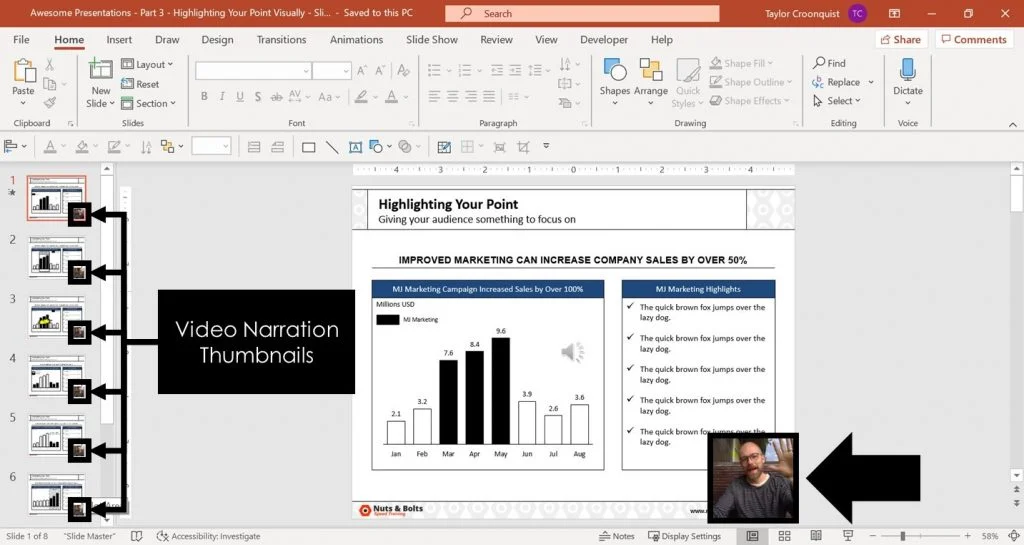
As you can see in the picture above, your audio and video narrations are recorded and saved on a slide-by-slide basis. That means you can review and record narrations on any slide within your presentation.
Warning: You can only have one narration file per slide.
If you re-record an audio or video narration, it automatically overwrites any previous narrations you had on that slide.
The only way to have two different narration files on the same slide, is to record one with the Record Slide Show dialog box, and record the second with the Record Audio command.
3. Set your narration to Play
Your Record Slide Show narrations are set to play Automatically.
That means that whenever you run your presentation (from beginning or from current), your audio and/or video narration will automatically play.
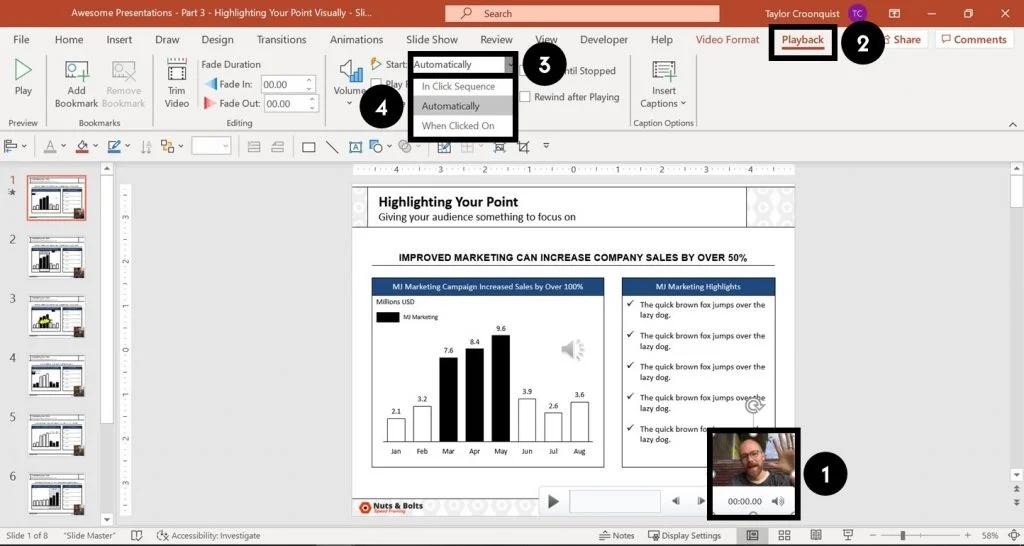
To change when your audio or video narration plays, simply:
- Select the Narration file on your slide
- Navigate to the Playback tab
- Open the Start drop down
- Choose either In Click Sequence, Automatically or When Clicked On
If you do not have any sequences set up on your slide, your audio file will play right before you advance to the next slide in your presentation.
Automatically means your audio file plays as soon as you get to that slide in your presentation, instead of playing right before you advance to the next slide.
When Clicked On means your audio file will only play if someone clicks on it during the presentation in Slide Show mode. For example, you can use this option for a piece of audio that you may not have the time to play, allowing you to choose in the moment whether to play it or not.
4. Record Slide Show options
Here is a quick run down of all the different tools and options you have in the Record Slide Show dialog box.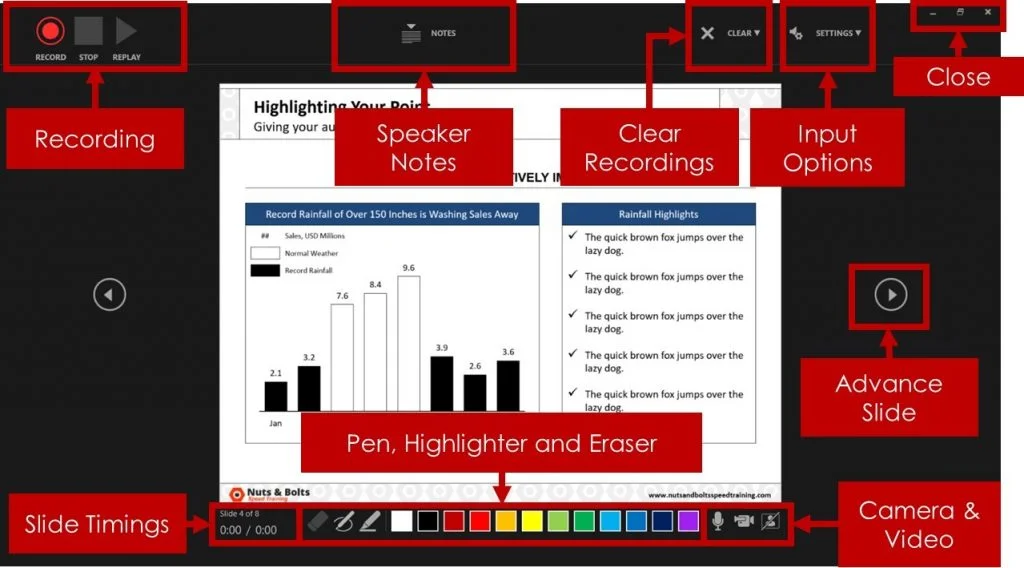 A. Recording options

Record (or hit R) to start recording your narration.
Pause (or hit I) to pause your narration and collect your thoughts. This button only displays once you’ve started recording.
Stop (or hit S) to end your narration. If you hit Record again, your new narration will overwrite the existing one.
If you want to stop narrating your current slide before starting on the next one, don’t use the Stop button. Instead, simply navigate to your next slide using your arrow keys or the forward arrow on screen.
Replay to replay your narration for the current slide. This button only becomes active after you have recorded a narration for that slide.
B. Speaker Notes options

Notes (or hit N) to open or close your speaker notes for that slide. The Notes window is fairly small and you cannot resize it very well.
Your action of opening and closing the speaker notes pane will not show up in your recorded narration.
Font Size commands increase and decrease the font size of your speaker notes so that you can see them better.
In my opinion the speaker notes pane is too small and not flexible enough for reviewing lots of speaker notes.
To learn how to print your speaker notes in PowerPoint, read our guide here.
C. Clear Recordings options
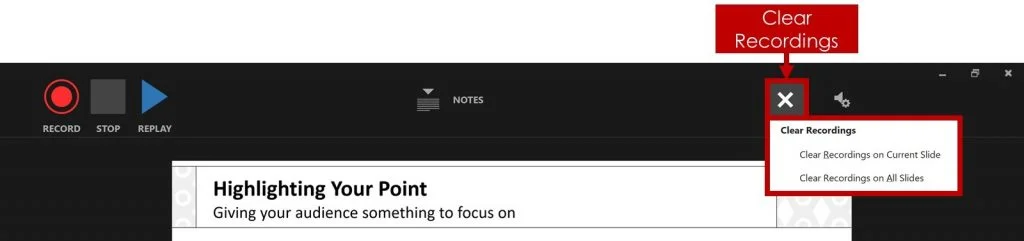
Clear Recordings allows you to clear your previous recording on either the current slide or on all the slides in your presentation.
You can also overwrite your recording and slide timings by simply recording over the top of your narrations.
Note: Using Clear Recordings removes both your slide timings and narrations.
That means that if you want to remove your narrations but keep your slide timings, you will want to clear recordings outside of the Record Slide Show dialog box. See how to clear timings and narrations below.
D. Input options: Camera and Microphone
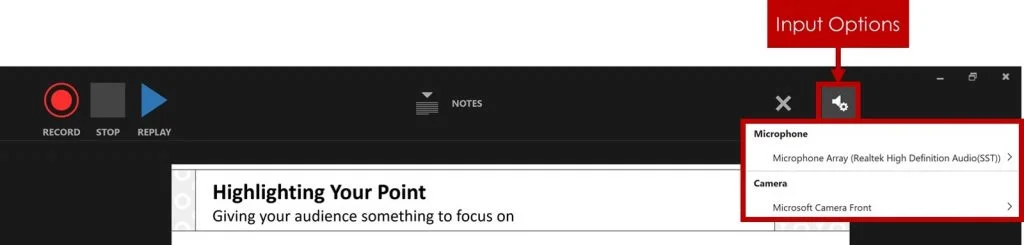
Microphone allows you to choose which microphone you want to record with. So if you are using a microphone other than your computer’s built-in one, this is where you want to select your microphone before you begin recording your narration.
Camera allows you to choose which camera or webcam you want to use if you are recording video narrations. If you are using a camera other than your computer’s built-in one, this is where you want to select it before you begin your narration.
E. Advance Slide options
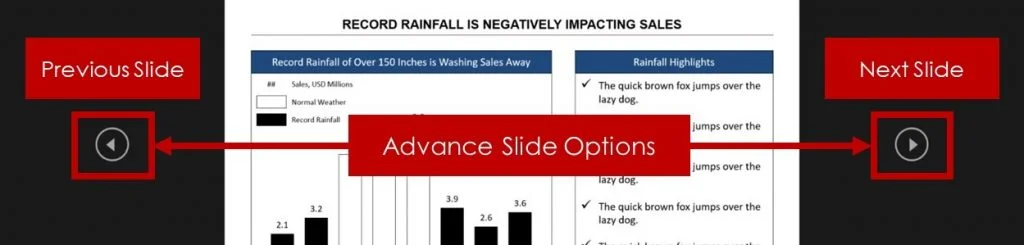
Next Slide advances the click sequence of your presentation, the same way hitting the right arrow key or clicking your slide with your mouse does.
If you have animated sequences or music that is supposed to play, clicking forwards will trigger those sequences, and eventually advance you to the next slide.
Previous Slide moves you back one slide in your presentation, but it is only available to you when you are not recording.
That’s because re-recording a narration automatically overwrites the previous narration. So once you start your recording, you can only move forward in your presentation.
F. On / Off: Camera and microphone

Microphone (on/off) turns your selected microphone on or off. You can turn your microphone off and still click through your presentation if you want to mute your sound in the recording.
Camera (on/off) turns your selected camera on or off. This allows you to add or remove video recording in your narration.
Camera Preview displays what your camera is recording during your narration. If seeing yourself onscreen while you narrate your presentation bothers you, simply turn camera preview off.
Note: If you are recording a video narration of your presentation, turning camera preview off will not remove the thumbnail icon of you in the lower right-hand corner of your slide. Camera Preview
only turns the preview of what you are recording on of off while you are filming your presentation. It won’t turn on or off the actual video recording itself.
Camera Preview
only turns the preview of what you are recording on of off while you are filming your presentation. It won’t turn on or off the actual video recording itself.
G. Ink options: Eraser, Pen and Highlighter

The Pen (Ctrl + P), Highlighter (Ctrl + I),and Eraser (Ctrl + E)allow you to draw and highlight things on your slides during your presentation.
To change the color of your ink, simply click on one of the colors at the bottom of your screen.
Anything that you draw on your slides during your narration will be recorded as you draw them. That means that someone watching the recording will see you draw on the slide, as you narrate your presentation.
H. Slide Timings options

Slide Timings show you how long you have spent on each slide, and which slide you are on within your presentation.
Therefore, if you are converting your PowerPoint presentation into a video, these slide timings determine how long you spend on each slide.
To learn all about how to convert PowerPoint to video, read our guide here.
I. Close / Minimize options
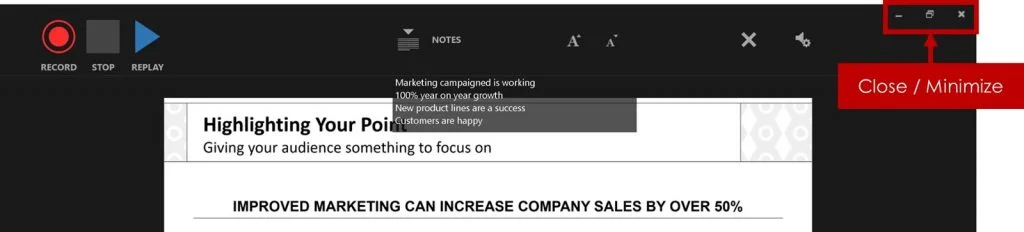
Close / Minimize allows you to close out of (or minimize) the Record Slide Show app.
Use the Close icon (the x) to exit out of the Record Slide Show dialog box and return to the Normal View of your presentation. You can also hit the Esc key on your keyboard to close out of the dialog box.
#3. How to clear your Timings and Narrations
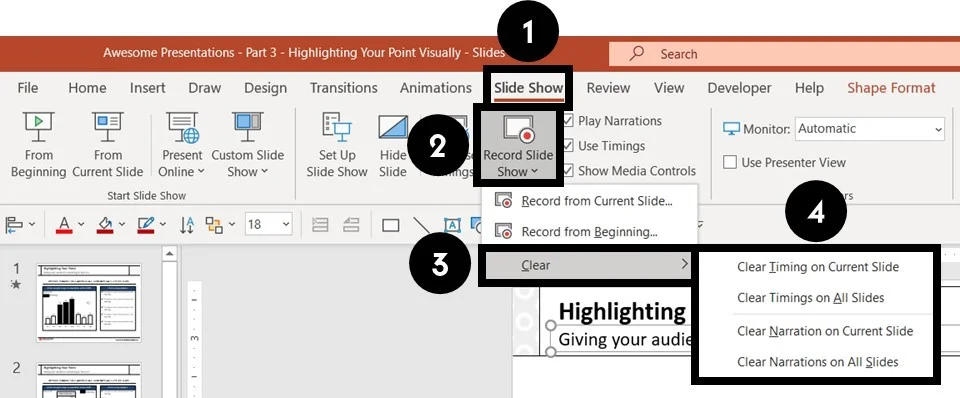
To clear your Timings and Narrations from the Normal View of PowerPoint, simply:
- Open the Slide Show tab
- Open the Record Slide Show drop down
- Select Clear
- Choose the Timings or Narrations you want to clear
If the Clear command is grayed out when you open the Record Slide Show drop down, that means that you do not have any Narrations or Timings (same as for transitions) set for your presentation.
Clear Timing on Current Slide removes the set transition timing for the current slide.
Clear Timings on All Slides removes the set transition timings on all the slides within your presentation.
Clear Narration on Current Slides removes any voice or video narration you’ve recorded on the current slide.
Clear Narration on All Slides removes any voice or video narrations from your entire presentation.
Note: You can also clear the Timings and Narrations for your slides at the same time from inside the Record Slide Show dialog box.

Inside the dialog box, simply click the X and choose to Clear Recordings on Current or Clear Recordings on All.
Doing so removes both the Timings and Narrations for your slides.#4. How to compress your PowerPoint narrations
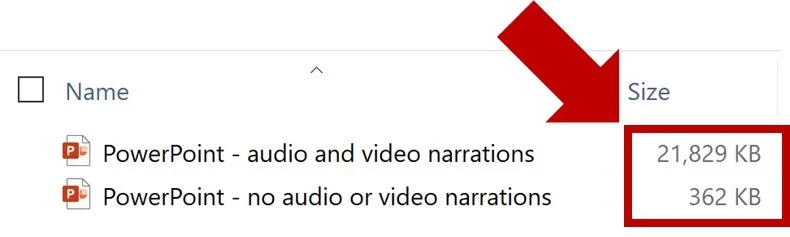
Adding audio and video narrations to PowerPoint significantly increases the size of your presentation as you can see in the picture above.
Therefore, I recommend compressing your file after you’re done recording narrations.
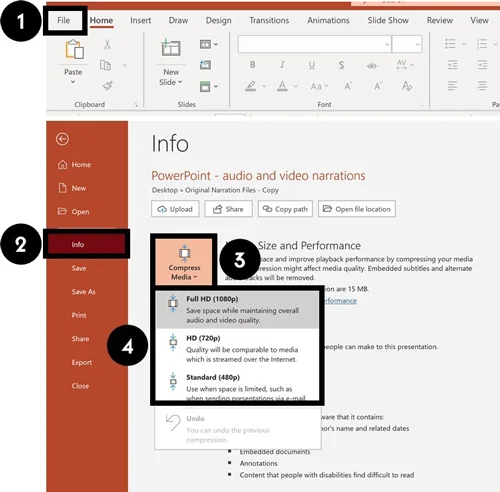
After narrating your PowerPoint, you can compress youraudio and video narrations. To do that, simply:
- Navigate to the File tab
- Select the Info group
- Open the Compress Media drop-down
- Choose a compression quality
PowerPoint automatically uses the Full HD (1080p) when recording your voice and video. So if you are tight for space, you will need to choose either the HD (720p) or Standard (480p) options.
To learn a variety of other ways you can reduce your PowerPoint file size, read our compression guide here.
Conclusion
That’s how to narrate a PowerPoint, and the different options you have using the Record Audio and Record Slide Show options.
If you have the latest version of PowerPoint, I highly recommend using the Record Slide Show option as it gives you the most options to work with.
Just keep in mind that narrating your PowerPoint with audio and video can greatly increase the size of your presentation. Therefore, you may end up needing to consider compress it.
If you enjoyed this article, you can learn more about how to improve your PowerPoint skills by visiting us here
What’s Next?
About the Author

Taylor Croonquist
Co-Founder, Nuts & Bolts Speed Training
Taylor Croonquist is a PowerPoint expert and trainer. Over a career spanning the globe, from consulting in New York and investment banking in China, Taylor has truly seen it all in PowerPoint. Through necessity and a natural tech savvy, Taylor honed his PowerPoint skills to the point of even blowing the minds of the Microsoft PowerPoint programming team. When he's not busy crafting PowerPoint training, you can find him reading a sci-fi series or scuba diving.