In PowerPoint, the Notes Page is a specific print layout that displays a slide thumbnail on the same page as its accompanying speaker notes. Printing PowerPoint slides with notes allows presenters to easily reference their talking points or distribute detailed, annotated handouts to their audience.
In this article, you’ll learn how to print your PowerPoint slides with speaker notes as handouts the way you want them.
Just keep in mind that, like many things in PowerPoint, there is a variety of ways to print your notes, each producing its own result. I cover each method below.
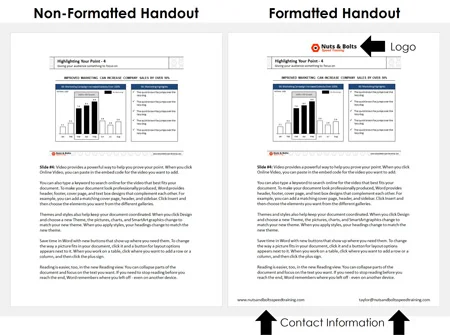
If you are distributing your slides to other people, I highly recommend customizing your handouts with your company information before you print them. This not only makes your handouts look more professional, but it also makes it easier for people to get in touch with you.
See our guide for help turning your PowerPoint notes into PDF handouts.
How to print PowerPoint with notes (basics)
As a presentation design specialist who has trained professionals in advanced PowerPoint techniques, I have tested every native printing layout. Based on my experience, my primary recommendation is to always format your Notes Master with your company contact information before distributing any physical handouts.
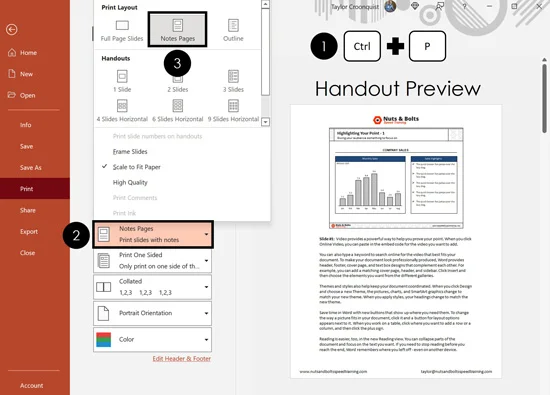
The most common way to print PowerPoint notes is with the thumbnail image of the slide at the top of the page, and the notes directly beneath (as pictured above). To print your notes like this, simply:
Hit Ctrl + P for Print (or click File then Print)
Open the Print Layout options
Select the Notes Page layout
Click Print
If you want to print your notes only (without the thumbnail image), see further below.
As you can see in the live preview on the right in the picture above, I have already formatted the Notes Master to include my company’s logo, and my contact information.
If you have lots of speaker notes for a particular slide, the text may run off onto a second or third page. If this happens, keep in mind that your slide thumbnail only appears on the first page of notes.
Also keep in mind that the page number at the bottom of your handouts represents the slide number in your presentation, not the number of pages you are printing.
That means that if you have ten (10) pages of speaker notes for slide number 2 in your deck, each of those ten pages of speaker’s notes will have a number 2 on them.
So where do you add a header, a date or a footer to your notes pages, or switch that number off? Not on your slides. It is in the Header & Footer dialog box, on a tab that is very easy to forget.
Click the Insert tab and select Header & Footer (or hit Alt + Shift + D)
At the top of the dialog box, click the Notes and Handouts tab
Tick or untick Date and time, Page number, Header and Footer
Click Apply to All
The Slide tab and the Notes and Handouts tab look exactly the same. They just have a different name at the top. Whatever you set on the Notes and Handouts tab shows up when you print your notes or handouts. It does not show up on your slides.
If you typed a header and it goes missing from your print preview, come back to this tab, retype it and click Apply to All.
See our guide for help on how to print multiple slides on one page in PowerPoint.
If you are distributing your notes as handouts before or after your presentation, I recommend customizing your Notes Master.
Formatting the Notes Master for professional handouts
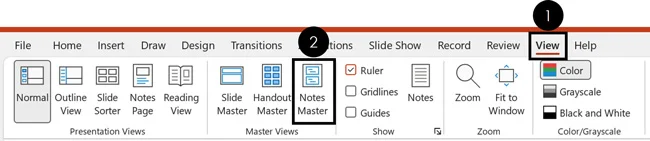
To customize your notes page before you print it in PowerPoint first navigate to the Notes Master view.
Click the View tab
Select the Notes Master
The View tab in PowerPoint is also where you can find the Handout Master view (discussed further below), and the Slide Master view. These master views control the default formatting of your slides, handouts, and notes.
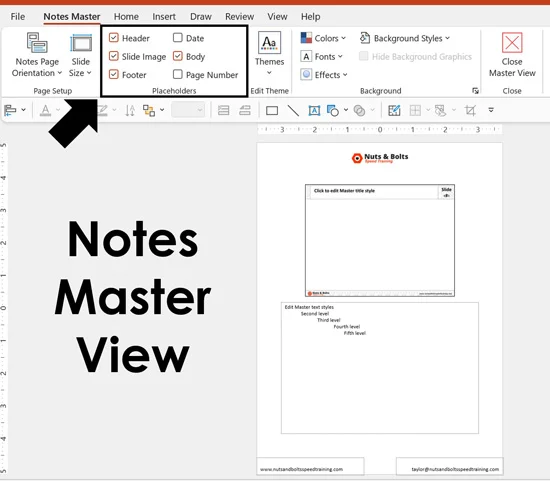
Once you are in the Notes Master view, you can select which placeholders you want to include in your handouts. In this view, you can also add any images, shapes, or other design elements to jazz up your handouts. I recommend adding things like:
Your company logo
Your email address (or contact information)
Your company website
When it comes to formatting your handouts, more is not better. I recommend adding enough to make your handouts look professional and make it easy for people to contact you.
One catch trips people up here. The Notes Master does not pick up your template’s theme colors. Open Shape Fill while you are in the Notes Master and you get the default Microsoft Office colors, not your company’s. The Notes and Handout Masters are a little archaic like that.
The fix is to save your theme colors first, then select them on the master:
Close the Master view, click the Design tab and open the Variants dropdown
Select Colors, then Customize Colors at the bottom
Your current theme colors are already filled in, so just name them and click Save
Click the View tab and go back to the Notes Master
On the Notes Master tab, open the Colors dropdown and select the theme you just saved
Your theme fonts work the same way, and so does the Handout Master. If you format both masters, select your colors on both.
The Notes Master sets the default for every page. When one slide needs something different, use the Notes Page view: click the View tab and select Notes Page (Alt, W, T).
Every slide gets its own Notes Page, and what you change there only affects that one slide. So you can:
Resize or move the slide thumbnail on a single page
Change the font size and color of your notes and see them the way they will print
Add extra text boxes, shapes or charts that print on that page only
This is how Camille builds leave-behind handouts. Her warning: if you do not want your speaker notes on the printed page, do not delete them on the Notes Page. That deletes them from your slide too. Drag the notes box off the edge of the page instead. Your notes stay with the slide and stay off the printout.
Finish your Notes Master first, though. As Camille puts it, the master does 80 percent of the formatting. Then go slide by slide for the exceptions.
The Notes Master is the only place where you can globally change all of the font sizes for your notes in PowerPoint. If you change them slide by slide on the Notes Page, you are working against the Notes Master. To revert those manually changed font sizes, select your notes and hit Ctrl + Spacebar. That resets them back to the global settings on your Notes Master.
Printing PowerPoint Notes with multiple slides per page
To print your PowerPoint notes as handouts with multiple slides per page, you need to first export your PowerPoint slides to Microsoft Word using the Create Handouts command.
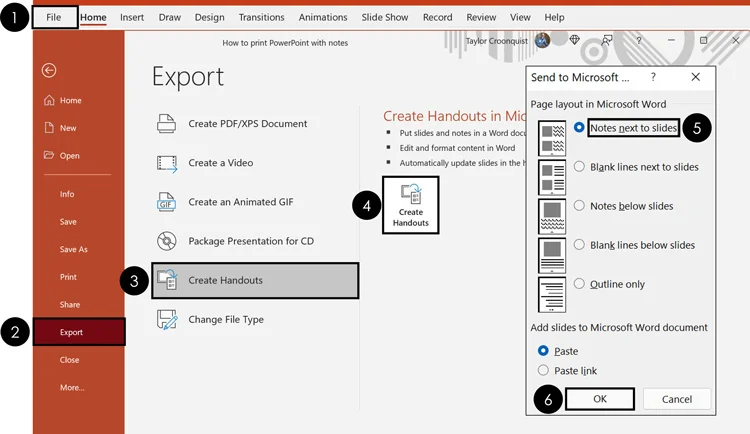
To convert PowerPoint to Word using the Create Handouts command, simply:
Click the File tab
Select Export
Select Create Handouts
Click the Create Handouts command
Select Notes next to slides
Click OK
Doing so turns your PowerPoint presentation into a Word document, with all your slides and speaker notes in a table format that you can then update and edit in Microsoft Word. The length of your notes affects how many slides you can have on a single page in Word.
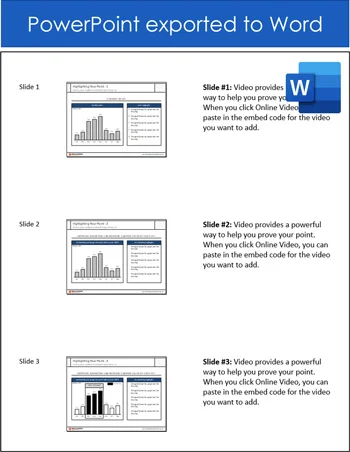
Table of Contents: If you have a lot of slides you are converting into a Word document, you can make your Word document easier to read and navigate by inserting a table of contents. See out guide for help on making a table of contents in Word.
How to print PowerPoint notes only
Yes, you can print just your PowerPoint notes (no slide thumbnail images) without messing up your presentation. I don’t recommend deleting things on your Notes Master, simply follow the steps listed below.
To see how to pull this off using a combination of the Create Handouts command and the Outline View in PowerPoint, see the short PowerPoint video tutorial below (it will make the most sense that way).
To print only your PowerPoint speaker notes without the slide thumbnail images, you must first export your presentation to Microsoft Word. You can do this by going to File, selecting Export, clicking Create Handouts, and choosing Notes next to slides. Once the document opens in Word, simply delete the column containing the slide thumbnails and print the remaining text.
1. Push your PowerPoint slides to Microsoft Word
The first step is to push your slides and speaker notes into Microsoft Word. To do that, follow these steps:
From within PowerPoint open the File menu
Click Export on the left
Select Create Handouts in the middle
Click Create Handouts on the right
Select Notes next to slides
Click OK
PowerPoint then exports all your slides and speaker notes to Word in a table format. To make it easier to edit our table, let’s add borders to it.
2. Add table borders to your table to see what you are working with
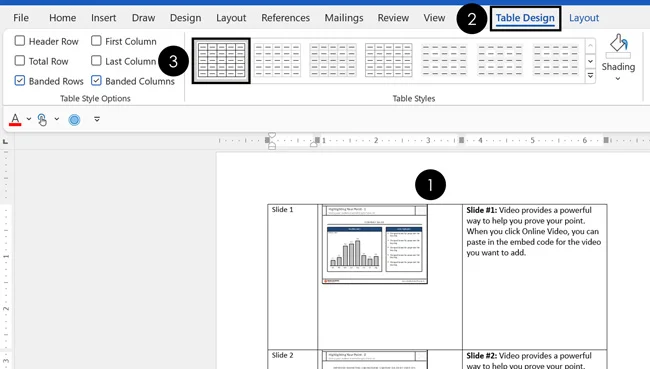
Once PowerPoint finishes exporting your slides to Microsoft Word, I recommend adding table borders to see what you are working with. To do that, simply:
Select the table in Word
Click the Table Design tab
Choose a table border style
While this is an optional step, it makes formatting your notes in Word a lot easier.
3. Format your PowerPoint notes in Word
As a last step, you simply need to make the formatting adjustments you want to your notes. These can include:
Delete the thumbnail image column
Resize the column widths
Paste your slide title names in from the Outline View in PowerPoint
Customize your handouts with your contact information
Continue formatting in order to get your desired result
One Word tip that saves some head scratching: to remove the thumbnail column, select the whole column (click the small down arrow that appears at the top of it) and hit Backspace. The Delete key only wipes out what is inside the cells and leaves the empty column behind.
How to print PowerPoint with comments
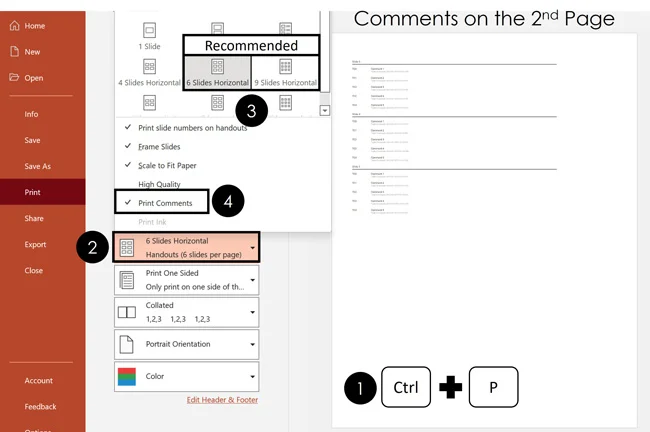
Assuming you have comments in your presentation, you can print those in either the Handout view or the Outline view.
To print your PowerPoint slides with comments:
Hit Ctrl + P for print
Open the Slide Layout options
Choose how many slides you want per page (I recommend 6 or 9 so you don’t waste paper)
Select Print Comments
Click Print
It’s important to note that PowerPoint comments always print on the second page. Your first page will be the handouts themselves (with the comments marked on the slide). The second will be the actual comments.
As this tends to waste a lot of printer paper and ink, I recommend using the 9-slide layout unless you have a specific reason to do otherwise.
How to print PowerPoint with lines for notes
To quickly print PowerPoint slides with blank lines for audience note-taking, press Ctrl + P to open the Print menu, click the Print Layout dropdown menu, and select the 3 Slides layout option.
This specific Handout layout is the only native PowerPoint setting that automatically generates slides with lined space next to each thumbnail.
1. The easy way
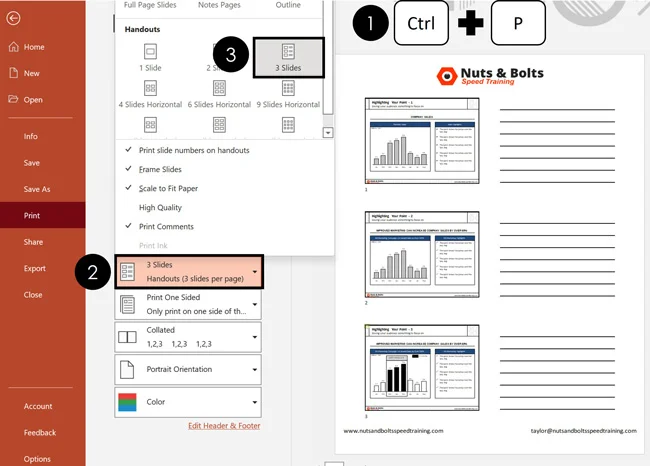
To print your slides with non-customizable lines for notes (in PowerPoint):
From within PowerPoint, hit Ctrl + P for print
Open the Slide Layout options
Choose the 3-slide layout with lines (you’ll see a live preview on the right)
Click Print
You can customize your layout using the Handout Master as described above.
2. The customizable way
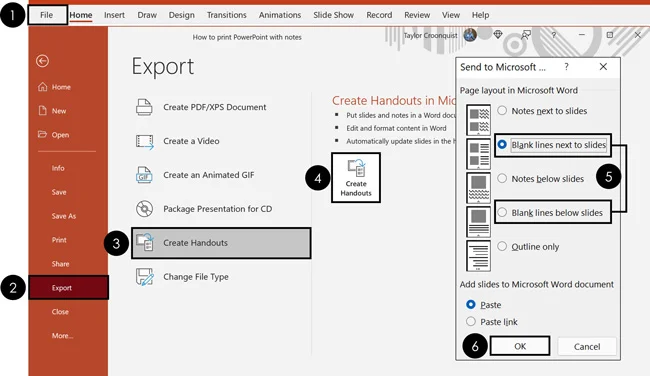
To print your slides with customizable blank lines for notes (Converting PowerPoint to Word):
Navigate to the File tab
Click Export
Select Create Handouts
Click on the Create Handouts button
Select either Blank lines next to slides or Blank lines below slides (depending on what you want)
Click OK
Once your slides export to Microsoft Word, you can do whatever you want with the lines. For example, you can decrease the paragraph spacing to add more lines if you like. You can also format them and make them bold.
See our guide on how to export your PowerPoint slides to Microsoft Word (and the different options you have).
Printing an outline of PowerPoint
Before you get too excited about printing your PowerPoint outline, it’s important to note that only information that is within your content placeholders prints. That means that text inside regular shapes and text boxes doesn’t appear.
On top of that, an outline can only print text. That means that none of your graphics, charts or pictures show up in your printed document.
There are two different ways to print your outline: You can directly print your outline out of PowerPoint, or you can export your outline to Microsoft Word so that you can edit it before you print it. Choose the option below that works best for you.
1. Directly printing your outline from PowerPoint
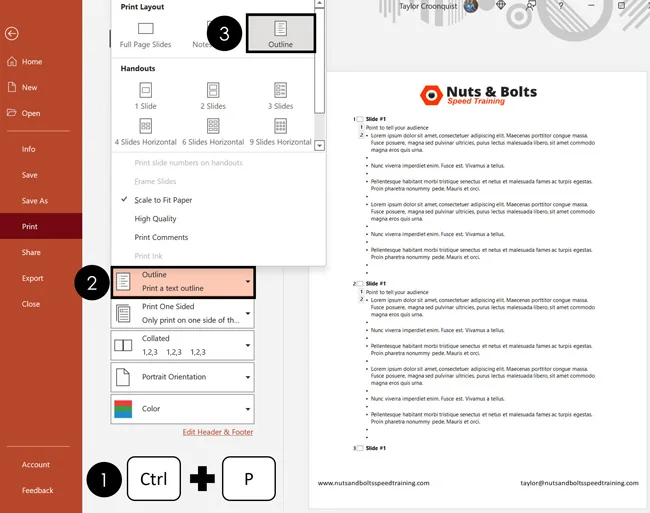
To print your PowerPoint slides as an outline only, simply:
Hit Ctrl + P to open your print options
Open the Slide Layout options
Select Outline
Click Print
Note: If you don’t see all the content in your outline (you only see the slide titles, for example) that means that your Outline View is collapsed.
To expand your Outline View, simply:
Navigate to the View tab
Click on the Outline View
Within the Outline View (click into that actual Outline View on the left), hit the expand keyboard shortcut: Alt+ Shift + 9. See our guide for more help working in the Outline view in PowerPoint.
2. Exporting an editable version of your Outline to Microsoft Word
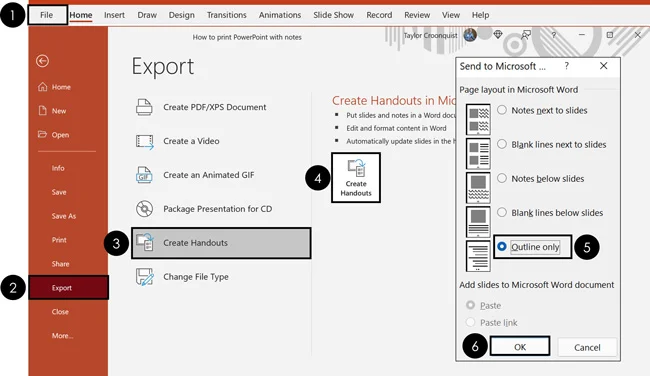
If you want to customize your PowerPoint outline in Microsoft Word before you print it, simply:
Click the File tab
Click Export
Select Create Handouts
Click on the Create Handouts button
Select Outline only
Click OK
Pushing your outline into Microsoft Word like this allows you to customize and edit the outline before you print it.
Common questions about printing PowerPoint with notes
Q: How do I print PowerPoint slides with speaker notes?
Go to File > Print, open the Full Page Slides menu, and choose Notes Pages.
Q: Can I print multiple slides with speaker notes on one page?
Not directly with Notes Pages. Export the slides and notes to Word using File > Export > Create Handouts, then adjust the layout in Word.
Q: Can I print only my PowerPoint speaker notes?
PowerPoint does not have a simple notes-only print layout. Export the presentation to Word, remove the slide thumbnails, and format the notes there.
Q: How do I print three slides with lines for notes?
Choose 3 Slides under Handouts in the Print menu. The lines are blank spaces for handwritten notes, not your speaker notes.
Q: Can I save PowerPoint slides with notes as a PDF?
Yes. Select Notes Pages in the Print menu, then choose your computer’s PDF printer or Save as PDF option.
Q: Why aren’t my PowerPoint notes printing?
Check that the Print Layout is set to Notes Pages, not Full Page Slides or one of the Handouts layouts.
Q: Why do my notes print in a different font size than I see on screen?
Because the Notes Pane does not show font size. Change the size there and nothing seems to happen, but your notes print at whatever size you set. What you see on screen is a zoom level (hold Ctrl and roll your mouse wheel to change it). To see the real size before you print, click the View tab and select Notes Page.
Q: Can I print only some of my slides?
Yes. In the Print menu, open the Print All Slides dropdown, just above the layout options. You can print the current slide, a custom range, or a Custom Show. Custom Shows only appear in that list once you have created one. At the bottom of the same dropdown is Print Hidden Slides. Untick it and your hidden slides stay out of the printout.
Takeaways for printing multiple slides per page
Printing PowerPoint with notes gives you several ways to turn your presentation into a useful handout.
Choose Notes Pages to print each slide with its speaker notes underneath.
Choose 3 Slides under Handouts when you want blank lines for handwritten notes.
Export your presentation to Word when you need more control over the layout or want to print only the notes.
Select a PDF printer or Save as PDF to create a digital copy with your notes included.
Always check the print preview before printing to make sure your notes are complete and easy to read.
Once you understand the difference between speaker notes, Notes Pages, and handouts, PowerPoint’s printing options become much easier to manage. You can choose the format that fits your audience, save paper, and avoid handing out the wrong version of your presentation.
Next, read: if you export your notes to Word, add page numbers in Word before you print, so a dropped handout goes back together in order.
About the Author

Taylor Croonquist
Co-Founder, Nuts & Bolts Speed Training
Taylor Croonquist is a PowerPoint expert and trainer. Over a career spanning the globe, from consulting in New York and investment banking in China, Taylor has truly seen it all in PowerPoint. Through necessity and a natural tech savvy, Taylor honed his PowerPoint skills to the point of even blowing the minds of the Microsoft PowerPoint programming team. When he's not busy crafting PowerPoint training, you can find him reading a sci-fi series or scuba diving.
Take your PowerPoint skills to the next level
Get access to our complete training library, new tutorials every month, and the same techniques we teach in our corporate workshops. Join the 260,000+ professionals who have trained with us.
See Membership Options