To print multiple PowerPoint slides on one page, go to File > Print, open the Full Page Slides menu, and choose one of the layouts under Handouts.
This tutorial uses PowerPoint for Windows. PowerPoint for Mac has a different Print dialog, while PowerPoint for the web offers fewer advanced handout options.
But before you print your presentation, an important question to answer first is:
Are you printing multiple slides because you want to distribute them out as handouts?
If so, I recommend formatting your Handout Master (as discussed below) with your company logo, contact information, etc., before you print your slides. Adding just a few simple things will vastly improve the professional quality of your handouts.
Printing multiple slides on one page
To print multiple slides on one page in PowerPoint, click the File tab and select Print. Click the Layout Options dropdown, navigate to the Handouts section, choose your desired layout such as 4, 6, or 9 slides per page, and click Print.
Follow these steps to print 4 slides per page in PowerPoint as handouts.
Take your PPT skills to the next level
Break free from PowerPoint struggle and reclaim your time. Amplify your PowerPoint knowledge with proven advanced methods taught in the PowerPoint Pro Membership.
1. Click the File tab
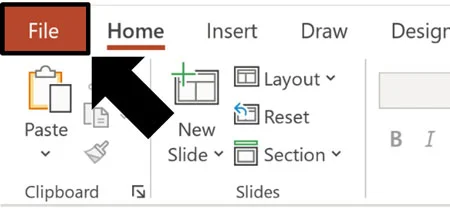
Within your PowerPoint presentation, click the File tab to open the backstage view.
2. Select Print
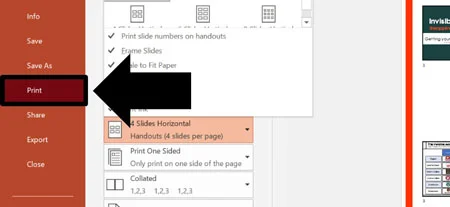
In the backstage view, click the Print group to get at all of the printing options.
3. Open the Layout Options
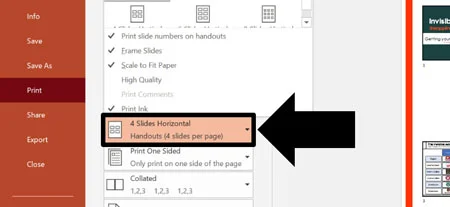
Open the Layout Options dropdown menu to see all of your different handout options.
4. Choose a Handouts layout
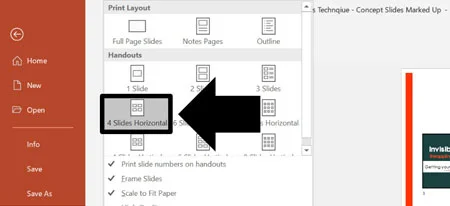
Under Handouts, choose how many slides you want to print on each page.
As you select the different handout options, you get a live preview of what your handouts will look like on the right. This is a good time to double-check that everything looks right.
5. Click on Print
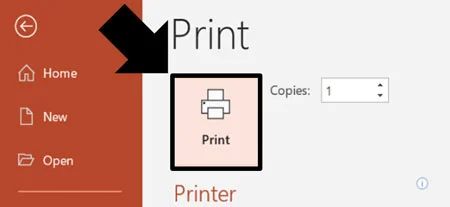
After you’ve made all your printing option selections, including how many copies you want to print, click on Print.
If you print lots of files and documents like this, I recommend learning the Print shortcut:
Ctrl + P to print on a PC
Cmd + P to print on a Mac
This universal keyboard shortcut works in Microsoft Word, Excel, and PowerPoint (and almost any other software program you will ever use).
It saves you from having to use your mouse to navigate to the printing options every time you want to print a document. See our guide on other time-saving PowerPoint shortcuts to learn more.
In the same way, you can choose to print 6 slides per page (horizontal or vertical) or 9 slides per page (horizontal or vertical) as pictured below.
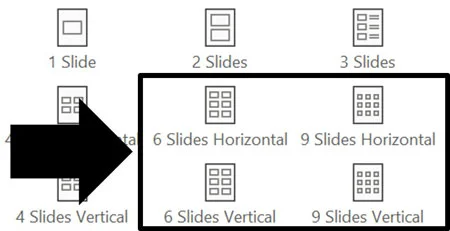
As you make your printing option selections (see the next section below), you will see a live preview of your handouts on the right of the dialog box. This live preview includes any formatting you add on the Handout Master as discussed above.
If you don’t like the look of your handouts in the live preview, either select a different handout layout, adjust your print settings, or reformat your Handout Master.
Pro-Tip: Make sure your handouts are legible.
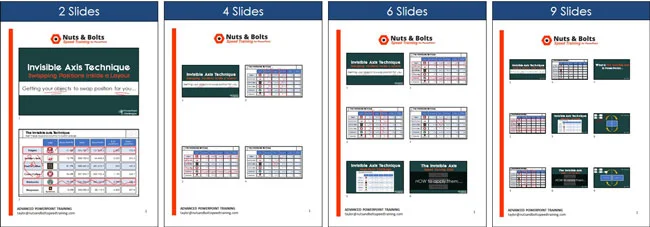
Although you can save trees by increasing the number of slides you print per page, keep in mind that it also decreases the size of your slide thumbnails.
The smaller your thumbnails, the harder your content is to read, as you can see in the picture below. For examples of how legible your handouts will be using the different handout layouts, see the next section.
Handout Printing Options
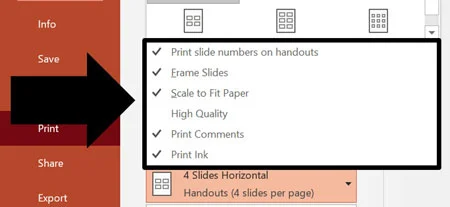
There are six printing options to be aware of.
That’s because these printing options influence the look and feel of your PowerPoint handouts. Below I’ve detailed each option and included recommended printing options for each.
To change any of the following options in the Print dialog box, simply open the Layout Options and check or uncheck the selections.
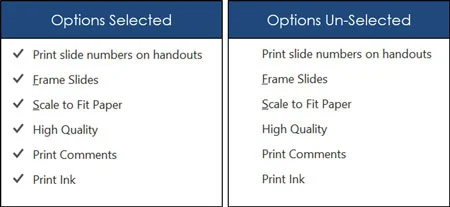
A check mark means the option is selected, and you will see the result (although sometimes subtle) in the live preview on the right.
1. Print slide numbers on handouts
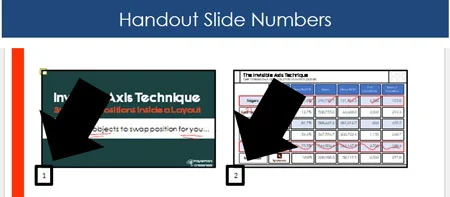
This option determines whether PowerPoint includes the slide numbers beneath the thumbnails of your slides.
If you are walking people through your handouts in a small meeting or conference call, I recommend including the slide numbers. That way when you reference slide number 3, everyone will know which one you are talking about.
2. Frame Slides
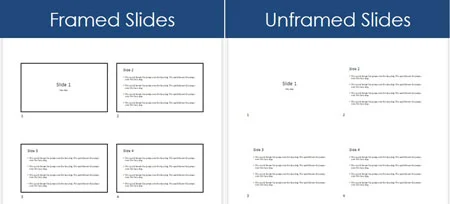
This determines whether or not PowerPoint includes a black outline around each slide thumbnail.
If your slides are mostly black and white (as pictured above), I recommend including the outline around your slide thumbnails. That will make the thumbnails stand out better on the page, making them easier to read.
3. Scale to Fit Paper
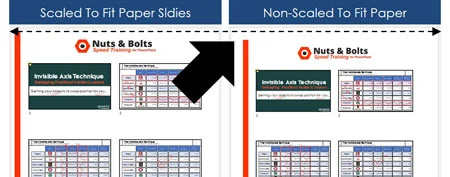
This determines whether PowerPoint maximizes your handout space by increasing the size of your thumbnails.
In other words, if you choose Scale to Fit Paper, PowerPoint will scale your slide thumbnails to fit your paper size. If you choose not to do so, it simply prints the thumbnails (regardless of size) on your selected paper size.
As shown in the picture above, although the difference is slight, you can see that:
The orange border on the left is narrower
The slide thumbnails are slightly smaller
The company logo is slightly smaller
My recommendation is to always use the Scale to Fit Paper option. That way you don’t have to become an expert in all the different paper sizes to make your handouts look legible and nice.
4. High Quality
The High Quality option improves printed output by increasing the resolution and more accurately rendering elements such as transparent graphics and soft shadows.
Turn it on when print quality matters, especially for polished or image-heavy handouts. For quick internal drafts, you can leave it off if faster printing matters more than maximum fidelity.
5. Print Comments
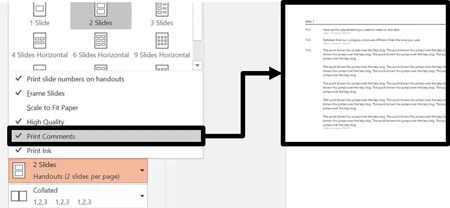
This determines whether PowerPoint marks your slides with comments and prints them individually on a backup page.
Comments are easiest to review and fix in PowerPoint. Trying to review comments in small thumbnail images is not only difficult, but on top of that you still need to go back into PowerPoint to fix them.
When you print comments, the thumbnails will always be marked with a number and the comments for each slide will be printed as a backup page (even if you only have a comment that says “good job”).
I generally avoid printing comments unless I know that I need them. Why? Simply because the comments are SO SMALL on your printed handouts, it’s hard to review them.
On top of that, since you will need to update your slides based on those comments, I believe it’s better (and faster) to review the comments and update your deck at the same time on your computer (not on your handouts).
6. Print Ink
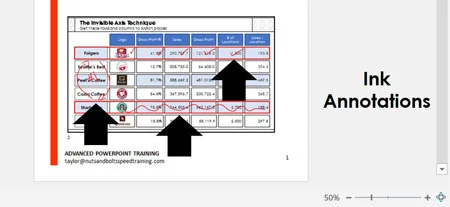
This determines if PowerPoint includes any ink annotations you’ve added to your presentation.
For example, during your presentation you might mark it up with ink as you explain things. You can choose whether or not you want those markings to display in print or not.
The fastest way to save multiple PowerPoint slides onto a single PDF page is to use the native Print menu, select Microsoft Print to PDF as your active printer, and choose a multiple-slide Handout layout before clicking Print.
Printing Multiple Slides on One PDF Page
Besides printing your slides on normal 8.5 x 11 pieces of paper, you can also use Microsoft Print to PDF to create PDF handouts. It’s the same steps as printing on paper, and you just need to change the printer.
To print multiple slides on one PDF page in PowerPoint, simply:
Navigate to the File menu
Select Print
Open the Handout options
Select how many slides you want to print per page
Open the Printer dropdown menu
Select the Microsoft Print to PDF printer
Click Print
Choose a location to save your PDF
Name your file
Click Save
Doing so turns your slides into PDF handouts that you can then distribute to your audience.
NOTE: This is slightly different than ‘converting’ your PowerPoint into the PDF file format. See our guide for help converting your slides into a PDF document (and objects that will not properly convert).
Printing Speaker Notes Next to Your Handouts
One last thing you might want to do is print your speaker notes next to multiple slides on a single page. You can do this by converting PowerPoint to Word.
To convert PowerPoint to Word as handouts, simply:
Navigate to the File tab
Select Export on the left
Choose Create Handouts
Click the Create Handouts command
Select Notes next to slides
Click OK
Your PowerPoint slides and speaker notes are then pushed into a table in Microsoft Word.
The length of your individual speaker notes is what determines how many slides you can have on a single page.
Once you are in Microsoft Word, you can select and format your speaker notes or resize the table in any way you like.
If you need additional help with Word, see our guide on converting PowerPoint to Word.
Formatting Your Handout Master
If you plan to print your slides as handouts for your event, I recommend formatting the Handout Master. This allows you to add your company logo, contact information, etc.
In short, this is your chance to make your handouts look professional. To do this, simply follow these steps.
1. Navigate to the View tab
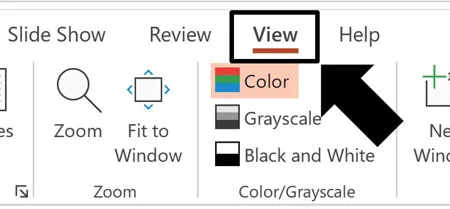
In the PowerPoint Ribbon, click the View tab.
2. Select the Handout Master command
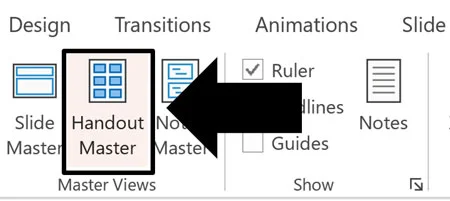
Inside the View tab, click the Handout Master command (in the Master Views group).
3. Format your Handout Master
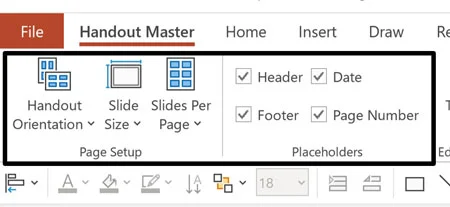
You can edit the Handout Master just like you would normally edit your PowerPoint slides.
You can add company logos, your contact details, design elements, etc. Just make sure that you pay attention to the Page Layout and Placeholders sections in regards to how many slides you want to print per page.
Also, if you want to save the changes you made to your Handout Master, you will have to save a local copy of your presentation to your computer. The online version of PowerPoint currently does not allow you to save changes to the Handout Master in PowerPoint.
Common Questions
Q: How many PowerPoint slides should I print on one page?
A: Four or six slides per page usually gives you the best balance between readability and saving paper.
Q: How do I print three slides with lines for notes?
A: Go to File > Print, open the Full Page Slides menu, and choose 3 Slides under Handouts.
Q: Do the lines include my speaker notes?
A: No. The lines are blank spaces for handwritten notes. To print speaker notes, choose Notes Pages instead.
Q: How do I save multiple slides on one PDF page?
A: Choose a Handouts layout in the Print menu, then select Save as PDF or your computer’s PDF printer.
Q: Can I add a logo or page numbers to my handouts?
A: Yes. Go to View > Handout Master to add logos, page numbers, headers, footers, and dates.
Q: Can I print multiple slides per page in PowerPoint for the web?
A: Options may be limited in the web version. For more control, open the presentation in the PowerPoint desktop app.
Key takeaways: Printing multiple slides per page
Printing multiple PowerPoint slides on one page is a simple way to create compact handouts, save paper, and give your audience something useful to follow during a presentation.
You now know how to:
Choose a Handouts layout with multiple slides per page
Use the 3 Slides option when you want space for handwritten notes
Switch between horizontal and vertical slide order
Add frames around each slide for clearer separation
Adjust color, grayscale, and print-quality settings
Preview your handout before printing
Save the finished handout as a PDF
Use the Handout Master to add page numbers, logos, or contact information
The best layout depends on how your handout will be used. Four or six slides per page can work well for reference materials, while three slides per page gives your audience room to take notes.
Check the print preview before you hit Print, and make sure the slide text is still large enough to read. A few quick adjustments can turn your presentation into a clean, practical handout people can actually use.
About the Author

Taylor Croonquist
Co-Founder, Nuts & Bolts Speed Training
Taylor Croonquist is a PowerPoint expert and trainer. Over a career spanning the globe, from consulting in New York and investment banking in China, Taylor has truly seen it all in PowerPoint. Through necessity and a natural tech savvy, Taylor honed his PowerPoint skills to the point of even blowing the minds of the Microsoft PowerPoint programming team. When he's not busy crafting PowerPoint training, you can find him reading a sci-fi series or scuba diving.
Take your PowerPoint skills to the next level
Get access to our complete training library, new tutorials every month, and the same techniques we teach in our corporate workshops. Join the 260,000+ professionals who have trained with us.
See Membership Options