One of the most annoying and tedious PowerPoint tasks is aligning objects BETWEEN your slides so that stuff isn’t just floating around in your presentation…yes, everyone notices!
So the question is, how can I simplify this common and time consuming task? Good question!
First off, you want to distinguish between two types of unaligned objects.
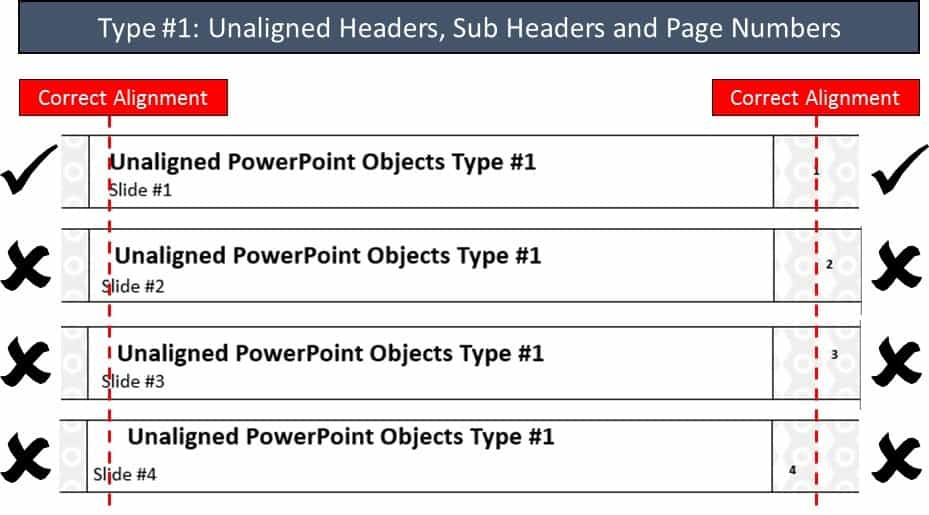
Type #1 Unaligned objects
These are defined as any PowerPoint object set on your Slide Master (titles, footers, page numbers, content holders, etc.).
Yes, in the diagram below I’ve exaggerated the unaligned objects so that they are glaringly apparent.
Type #2 Unaligned objects
These are basically everything that is not type #1…so just about everything else you build out on your slides in PowerPoint.
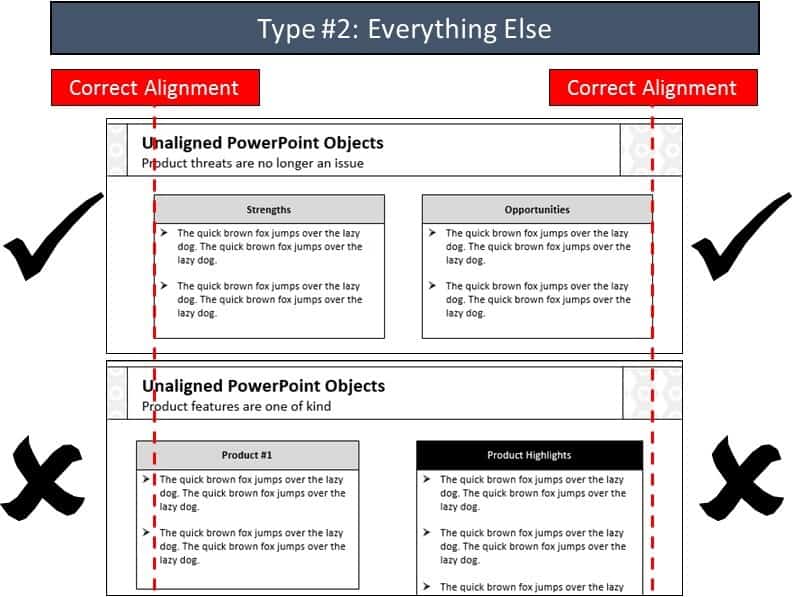
And whereas type #1 objects are easily fixed with a click of a button (see tutorial below), type #2 objects are the ones that can drive you crazy.
For example, in the picture above, how often have you wished there was a superfast way to get the boxes on the second slide in the EXACT same position as the boxes on the first slide, WITHOUT having to:
- Duplicate the slide and retype or copy / paste the text;
- Set up the guides within your presentation and manually snap the objects into position;
- Memorize the coordinates of your object and manually retype the coordinates;
- Or even copy and paste the correctly positioned object onto the offending slide, use the alignment tool to position everything, and then delete the object.ure:
And while all of these techniques work (and I’ve used them ALL), they all fall short of a newly discovered add-in (new for me at least) called the Thor Tool.
How cool is the Thor Tool? It can only be expressed with the following picture:

Well, it allows you to copy the position of an object, and then paste it onto another object…which makes type #2 object unalignments ridiculously easy to fix.
The tool was developed by PowerPoint MVP Steve Rindsberg of www.pptools.com, which you can learn how to download, install and trouble shoot in our Thor Tool post (here I’ll just show you how to use it).
Fixing type #1 Unaligned objects
Type #1 objects are defined as anything that is set on your Slide Master that can be edited in the Normal View of your presentation, including:
Titles, Sub-Titles, Footers, Headers, Page Numbers and Placeholders.
The clever trick here is that because these objects are all set on your Slide Master, you can “reset” the slide’s layout and automatically force ALL of those objects back into their correct position (regardless of how they accidentally became unaligned).
The one thing you need to be on the lookout for are the dreaded phantom content containers (see below).
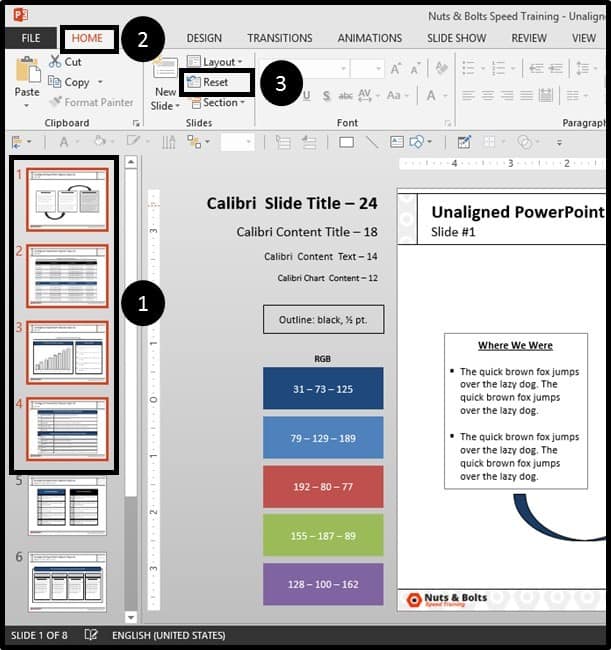
Select your slide(s) and reset the layout
Holding shift, select all of the slides that you wish to reset the layout for. With the slides selected, from the Home tab, select Reset, and voila…all of the placeholders will be moved back into their original positions…that’s it!
Why does this work?
The Reset Layout tool works because all of the unaligned objects have placeholders that are set on the slide master. The tool itself simply tells PowerPoint to reset the placeholders back into their original position, as dictated by the slide master.
Dealing with phantom content placeholders
Now sometimes when you reset a layout, you will end up with the dreaded phantom content placeholder, as pictured below on the right.
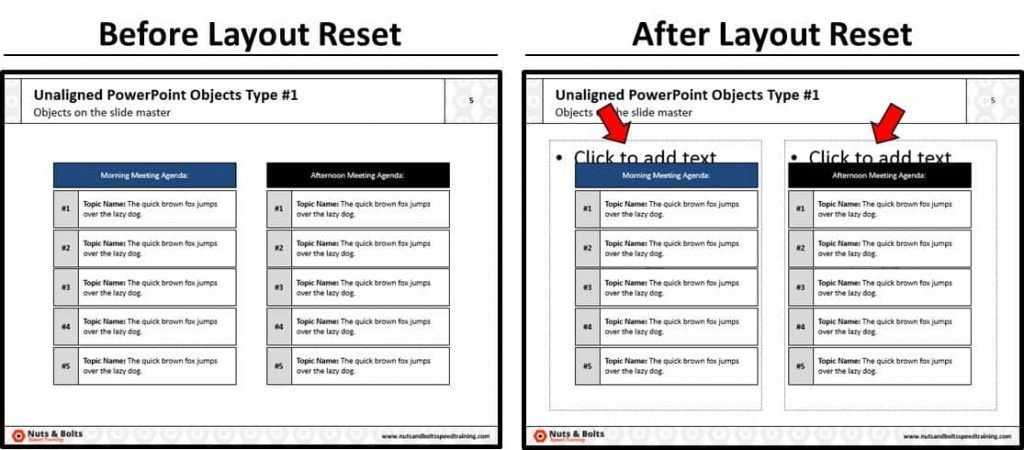
Having phantom containers appear simply means that those containers exist for that specific slide layout and that someone simply removed them when they were building the slide.
In other words, instead of building out the slide as dictated by the content containers, someone nuked the containers (something I would frequently do) and built the slide from scratch.
How do you fix them?
Ideally your slide master should include a blank layout, or a layout without any content containers, so that someone can build a slide from scratch if they want to.
That said, as empty containers never show up when printing or presenting (so it’s not the end of the world to have them there), most people just delete the ones they don’t want.
Fixing type #2 Unaligned objects
Type #2 objects are basically everything else in PowerPoint…all the stuff you add to your slides in the Normal View of your deck, including shapes, charts, tables, SmartArt, pictures, etc.
And although there are many clever ways to manage the inter-slide alignment of these objects, the Thor Tool from Steve Rindsberg at www.pptools.com hands down, beats them all.
And the way to use it is to first copy the position of what I will call your lead object, and then paste the object’s position onto a second object…which then snaps into position with the lead object.
First I’ll show you how to use the tool….then you can decide whether or not it’s worth downloading and installing (FYI: you’d be CRAZY not to).
Part 1: Set up the funky dialog box
Once you download and install the PPTools add-in (to see how to do that, check out our Thor Tool installation guide), click the ADD-INS tab in your Ribbon and select the blue circle with an ‘i’, to launch the dialog box.

Within the dialog box, pay special attention to the upper lefthand corner…this is where you want to set the part of the object you want to use as your anchor…i.e. how other objects will be placed, or aligned to your original object.
For example, if you pick the upper lefthand corner, all objects you then hammer will be forced into the same upper lefthand position as your lead object.
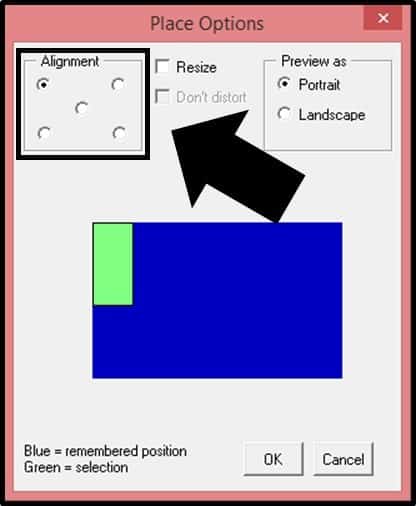
It’s fairly straightforward, the Green bit means which part of the selected object you want the tool to remember…and you have five options to pick from:

With this dialog box set you’re ready to begin aligning objects the SUPER-FAST and effective way! And don’t worry, you can re-adjust this dialog box whenever you want to match your situation.
For the example below, I’m going to start with the upper lefthand alignment.
Part 2: Align your objects
Step #1: Identify your un-aligned object(s)
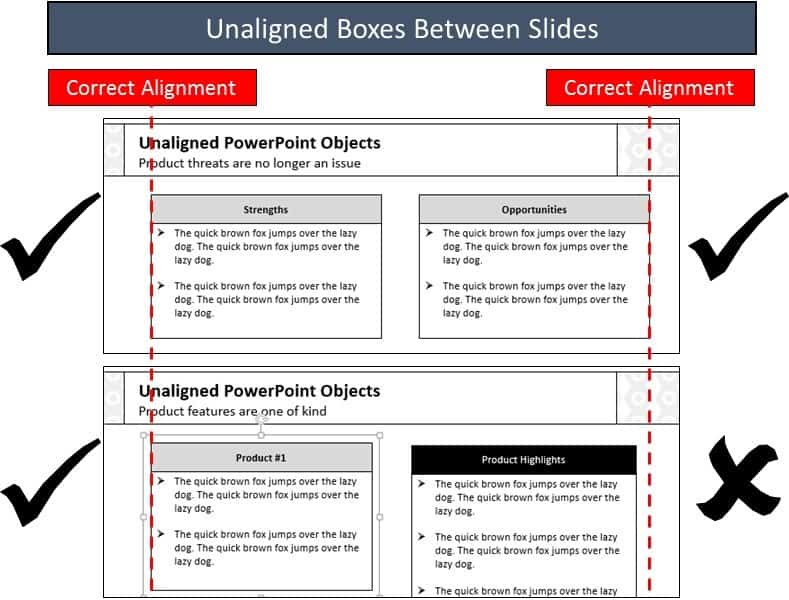
As I’ve tried to depict in the graphic below, the objects on the second (bottom) slide, ‘Product #1’ and ‘Product Highlights’ are my unaligned objects.
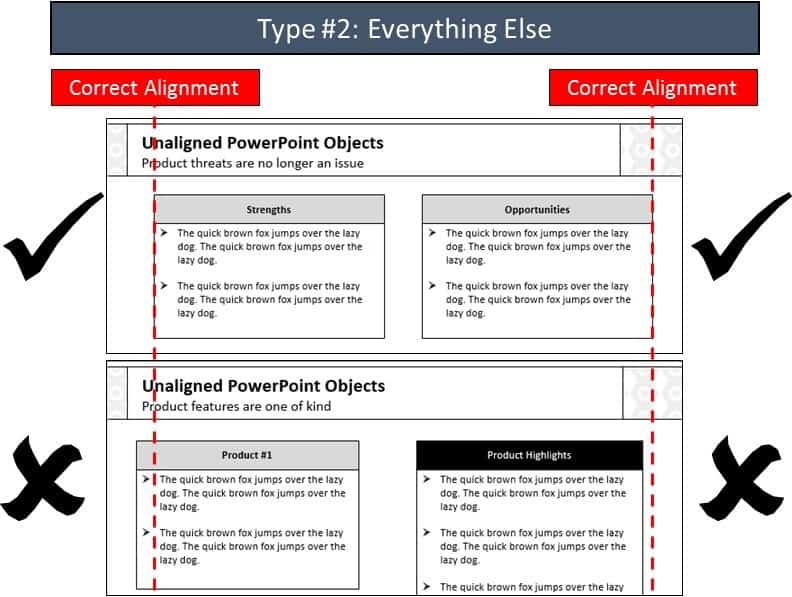
I’ve added the dotted red lines above to show what the correct alignment should be with the objects on the previous slide.
So I need to get the objects on the second slide in line with the objects on the first slide….CLASSIC PowerPoint problem.
Step #2: Copy the position of your lead object
On the first slide, I will select the ‘Strengths’ box, and then from the Add-Ins tab (this is added once you install the FREE add-in) select the ‘Memorize an Object’s Position’ command.
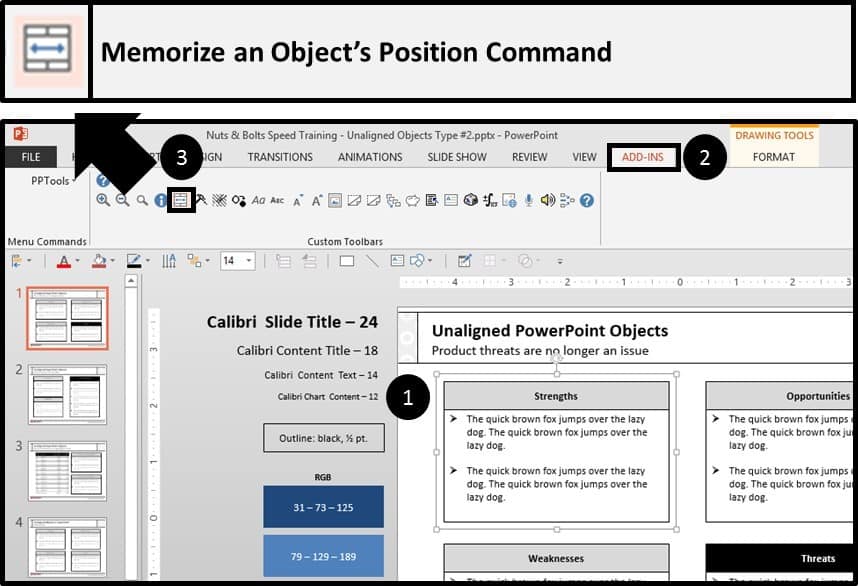
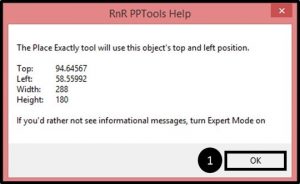
Selecting the command, a dialog box appears telling you the exact position of the object selected. Select okay to close the dialog box.
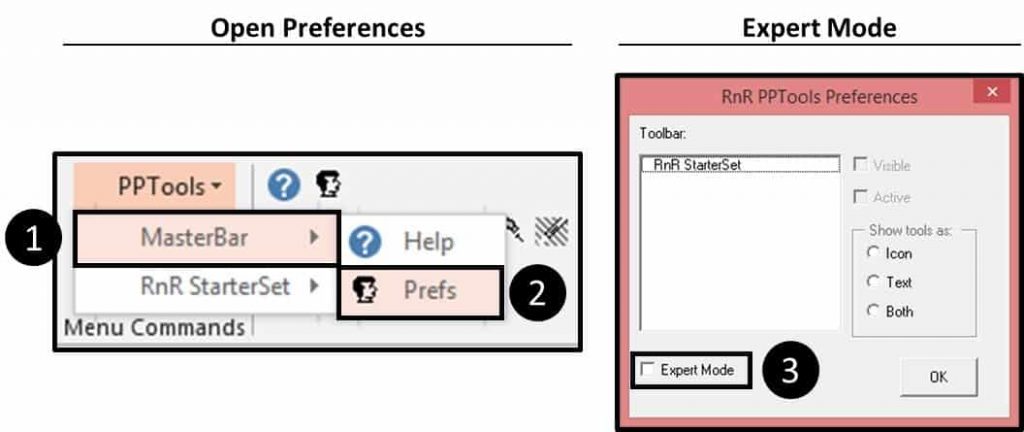
Note: If you don’t want to see this dialog box every time you use the command, you can turn on “Expert Mode”.
Turning on Expert Mode (0ptional):
To turn on expert mode, navigate to the PPTools dropdown, MasterBar and Preferences…and then in the dialog box, tick the ‘Expert Mode’ box.
Step #3: Paste the copied position onto your un-aligned object
With the position copied, navigate to the slide where you have the unaligned object. Select the object, and then from the Ribbon, select the Thor tool.
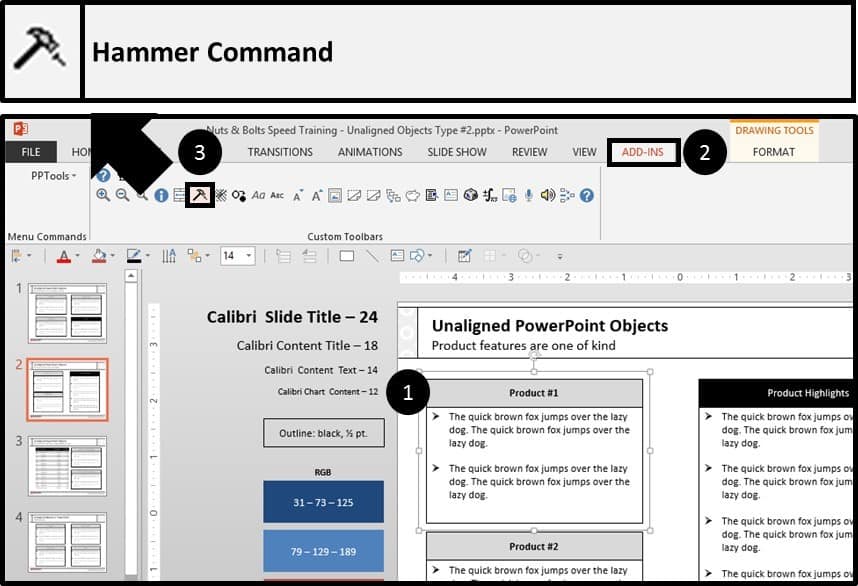
Selecting the Thor Tool, the ‘Product #1’ box jumps into perfect alignment with the ‘Strengths’ box on the previous slide.
Assuming you had MORE slides with objects that you wanted to align, you could continue to sweep through your deck and use the currently copied position…the Thor Tool remembers your last copied position.
Step #4: Align any other inter-slide Objects
With the first object aligned, next you need to repeat steps #2 and #3 for any other objects that you want to align between your slides.
In the case above, I need to copy the position of the ‘Opportunities’ box on slide #1, and paste its position onto the ‘Product Highlights’ box on slide #2.
Step #5: Align any same slide objects
With the objects between your slides set, you can then focus on any alignment cleanup work that you need to do on the slide itself.
In this example, I’ll right-align the Product #2 box to the Product #1 box.
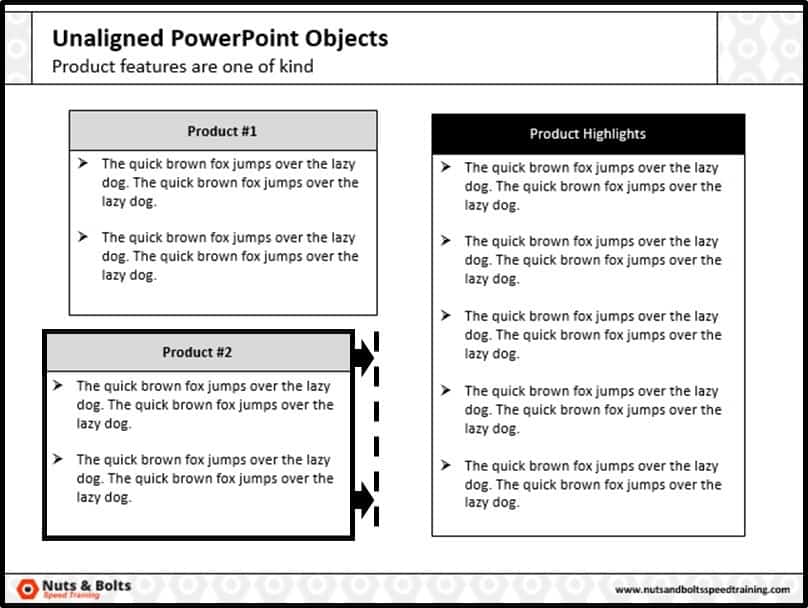
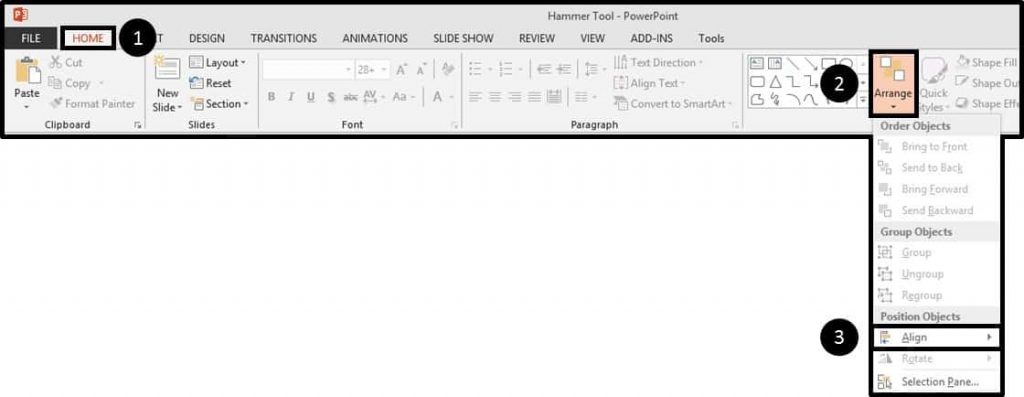
With both objects selected, navigate to the Alignment tool, which is a part of the Arrange Tool dropdown menu, and select Align Right.
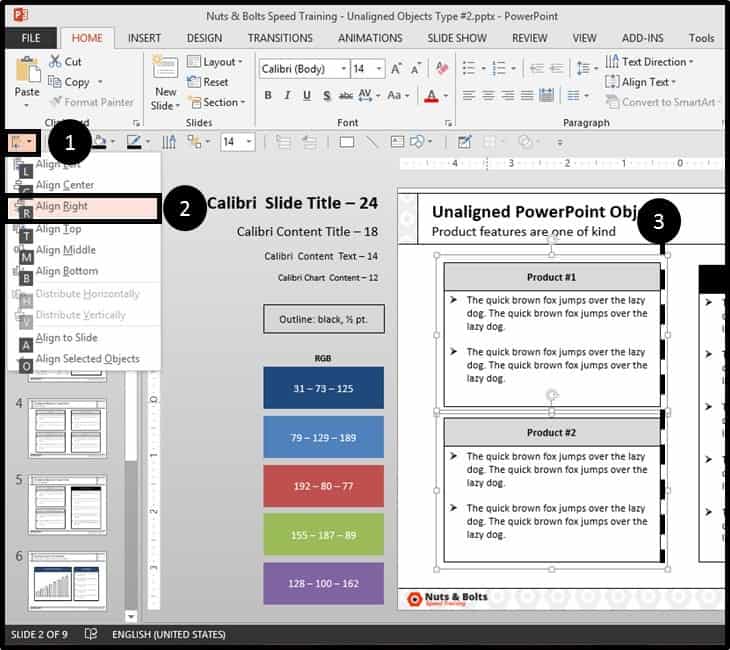
Alternatively, if you have the alignment tool on your QAT (which you can learn how to set up in our YouTube tutorial on rapid-fire alignments), as pictured below hit the Alt key, to bring up your guides, hit 1 to open the tool and then hit R for Right, and the objects snap into right alignment.
So that’s how to align type #2 objects between your slided using the Hammer Tool…I think it’s one of the most GENIUS add-ins for PowerPoint I’ve seen and highly recommend downloading and installing it.

This is the most specific and detailed help I have ever got on “objects alignment”. Hail for the help.
Thanks Stacey! We have tons more simple tips on “basic” things like this in PowerPoint, so keep your eyes peeled! 😉