1. Home
  2. PowerPoint Tutorials
  3. Pictures, Icons, Videos, Etc.
  4. How to Embed a YouTube Video in PowerPoint (Step-by-Step)

How to Embed a YouTube Video in PowerPoint (Step-by-Step)

This is your SUPER GUIDE for how to embed a YouTube video in PowerPoint, covering all versions of PowerPoint (find your version below).

Adding videos to your presentations is a great way to create more engaging content and backup your main points with PROOF.

Before you get started embedding your video though, there are 3 considerations to take into account

Note: You are limited to what you can do with online videos in PowerPoint, compared to videos you embed from your computer. To learn all about these differences, read our guide

YouTube Video Considerations

1. Which version of PowerPoint you are using?

There are various techniques for the different versions of PowerPoint and add-ins you can install to make this process (and your life) easier.

The guide below covers PowerPoint versions 2007, 2010, 2013 and the latest Office 365 version of PowerPoint.

2. Do you want the YouTube video’s entire playlist on your slide?

If so, you need to navigate to your video through the YouTube channel’s playlist, which drove me crazy when I was trying to figure this out.

Also, inserting a playlist isn’t available in PowerPoint 2007.

3. Do you need to trim your YouTube video?

If you want to take advantage of all the PowerPoint video editing features, you will need to find a way to download your YouTube video and embed it in PowerPoint.

That’s because the FULL range of PowerPoint video editing tools is only available for videos you directly embed into PowerPoint from your computer.

To see everything you can do with videos embedded directly from your computer (instead of from an online source like YouTube), read our guide here.

PowerPoint 2019 (Office 365) Embed a YouTube Video

Properly adding a YouTube video to PowerPoint is a two-step process. First (and most importantly), you need to find the proper URL of the video you want to embed. Then (and only then), are you ready to embed it. Follow these steps to nail it.

1. Find your YouTube video’s proper URL

This might sound obvious, but if you don’t find the proper URL for your YouTube video, it won’t work the way you expect it to.
Navigate to YouTube, find the video you want to embed in PowerPoint, open the video, and select share at the bottom of the YouTube video

To find the right URL for your YouTube video to embed into PowerPoint, follow these steps:

  1. Navigate to YouTube.com
  2. Use the Search Bar to find your video
  3. Select your video to open the YouTube Player
  4. Click Share at the bottom of the video player
  5. Click Copy

The same is true if you are using an online video from another source.

You want to make sure you use the Share button (or similar feature) to get the proper URL for your video before you embed it into PowerPoint.

Otherwise it might not play properly, as discussed below.

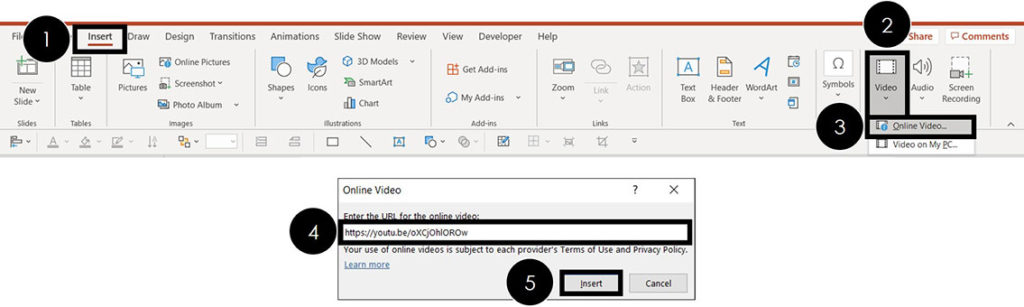
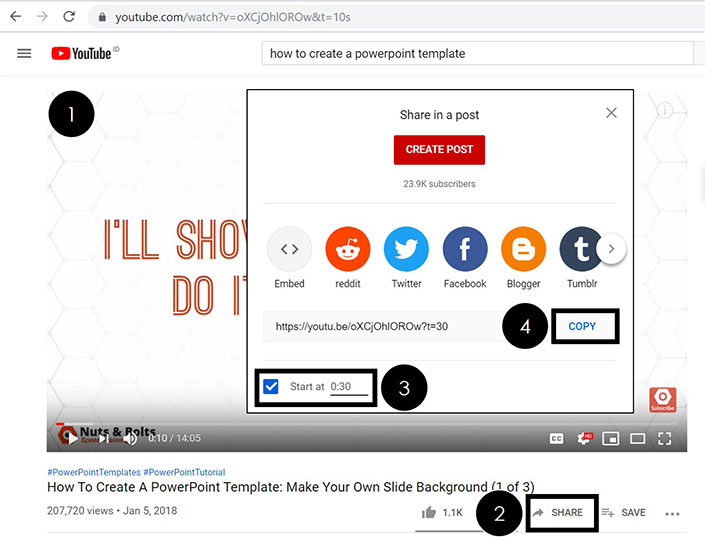
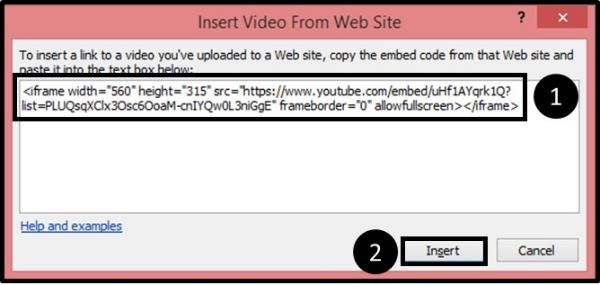
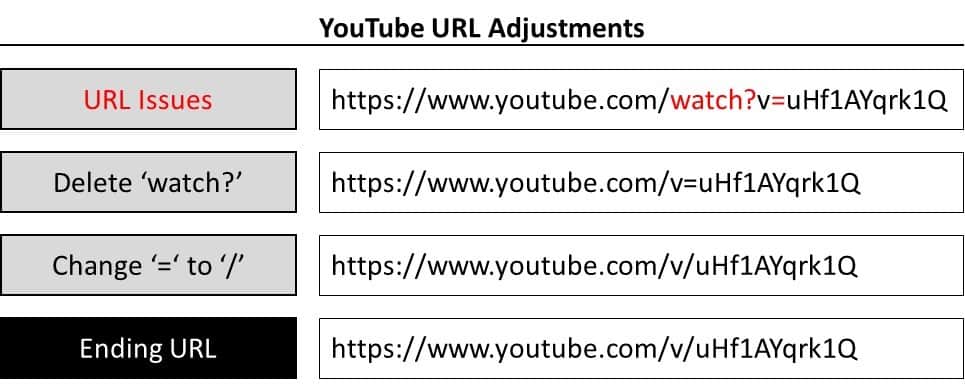
WARNING: Get the right YouTube URL

You want to make sure you copy your video’s URL using the share button. DO NOT use the URL from your web browser.

That’s because the URL in your web browser tends to start where you last left off in the video and not at the beginning of the video.

In the picture above this is reflected in the URL with T=60s. This means the video will start 60 seconds into the video, and not from the beginning.

This can lead to an embarrassing presentation, where you play the video at the punchline that you want to make instead of the full video that leads up to the punch line.

2. Embed your YouTube video into PowerPoint

Once you have the CORRECT URL for your video, then you can insert it into PowerPoint
Click the insert tab, open the video drop down, click online video, paste your video code into the dialog box and click insert

To embed a YouTube video in PowerPoint, simply:

  1. Navigate to the Insert tab
  2. Select the Video drop down (within the Media group)
  3. Choose Online Video
  4. Where it says Enter the URL for the Online VideoPaste in (Ctrl + V) your URL
  5. Click Insert

Clicking Insert, a message at the bottom of your screen will tell you the video is processing. Once it’s done, the video appears on your slide as you can see below

Example of a YouTube video embedded in PowerPoint
When using online videos like this, it’s important to properly cite your sources so you don’t get into legal trouble. To learn how to cite a YouTube video (and other online sources),read our citing guide here.
Note: When you open a presentation with a video embedded from an online source like YouTube, you will see the following security warning. how-to-embed-a-youtube-video-in-powerpoint-5 
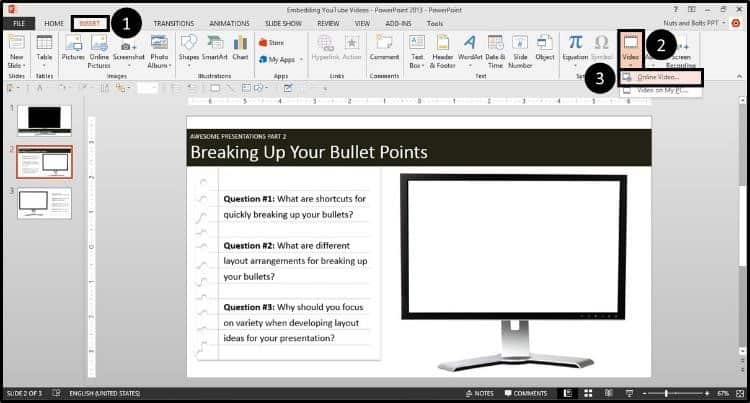
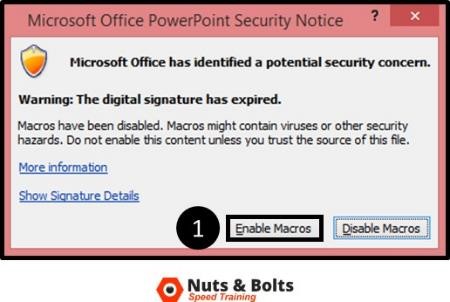
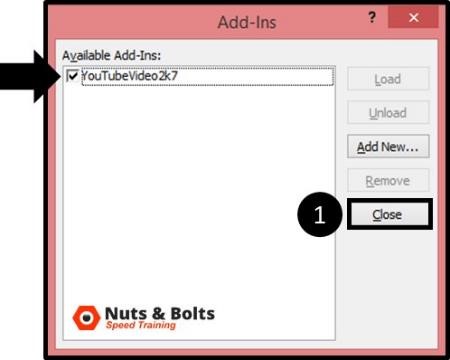
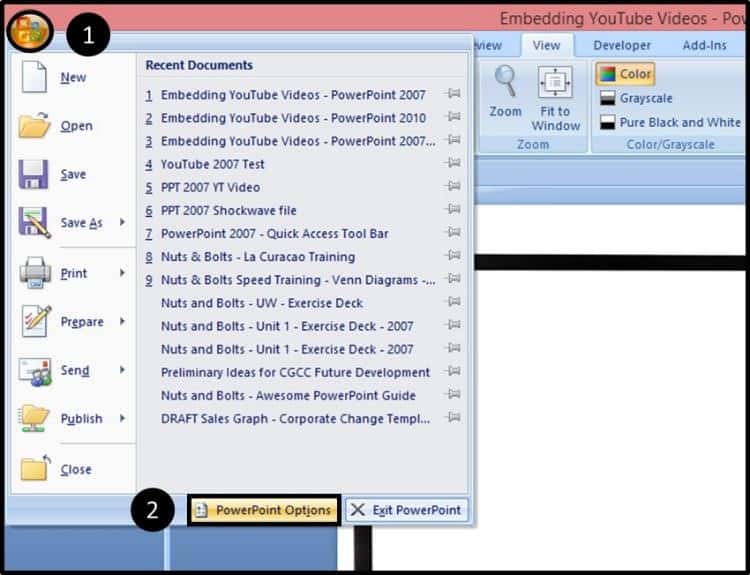
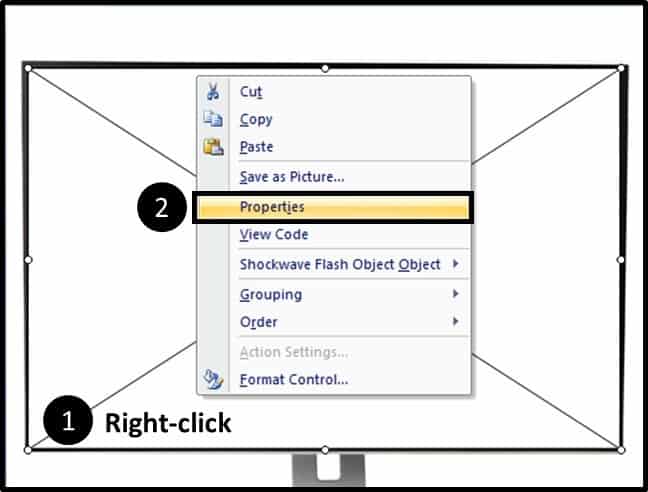
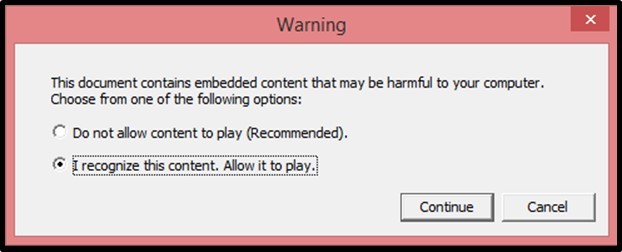
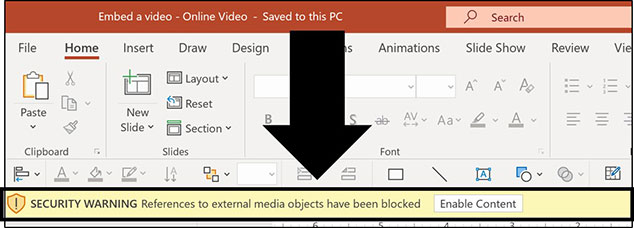
You need to select Enable Content before your video will play in PowerPoint

How to trim a YouTube video

Keeping in mind that you are limited in what you can do with online videos in PowerPoint (like YouTube videos), you can adjust the start time of your YouTube video.

This allows you to start your YouTube video at a certain time within the video, so you can just show the most relevant part of the video that backs up your presentation.

The trick to doing this is to adjust it BEFORE you copy the YouTube video’s URL.

If you want to trim both the start and end times of your video, you’ll need to download the YouTube video, embed the video from your PC and then use the Trim command.

To learn how to embed a video in PowerPoint (including trimming the video’s length), read our guide here.

To trim a YouTube video to a certain start time, simply:

  1. Open your YouTube video’s watch page
  2. Click the Share button
  3. Adjust the video’s Start at time
  4. Click Copy

Adjusting the YouTube video’s start time, you’ll see the new start time reflected in the URL, as pictured below.

PowerPoint 2013: Embed a YouTube video in PowerPoint

There are two ways to embed YouTube videos in PowerPoint 2013: the new dedicated YouTube option in PowerPoint, and the old embed code method.

Warning: New YouTube Option

Although the new YouTube option in PowerPoint simplifies the embedding process…you DO lose the capability to format your YouTube videos and/or embed an entire YouTube playlist.

To format the appearance of the YouTube video in PowerPoint 2013 or to grab a playlist, you still need to use the old embed code method (the second method).

I’ve covered both methods in the tutorials below. You’ll notice I used an image of a computer screen to frame the video and create a cool effect…just another tip for making your videos come to life!

There are two methods for adding YouTube videos in PowerPoint:

Method #1 – The dedicated YouTube option (simplest but least flexible)

Method #2 –  Using the embed code (most flexible)

Although the words ‘embed code’ wig most people out, rest assured that you don’t need to know ANYTHING about coding to pull the second method off…YouTube does all of the hard work for you

Method #1: Dedicated YouTube option

1. Search the YouTube dialog box

Within PowerPoint, navigate to the Insert tab in the Ribbon, open the Video dropdown and select Online Video.
Click the insert tab, open the videos dropdown and select Online Video

Within the online video dialog box, go to the YouTube search box and type the name of the video you are searching for (in this case I’ve typed ‘breaking up your bullet points’), and then hit Enter.

The dialog box searches YouTube and displays the video results. In this case the video we want is on the far left so I will select it and hit Insert.

In the YouTube dialog box select the video that you want to embed in PowerPoint and click insert

2. Resize the YouTube video to fit your screen

With the YouTube video inserted onto our slide (notice we never had to leave PowerPoint), you then want to resize and position the video. In this case I’m snapping it to the edges of the blank computer screen image.

Note: If you are using an image like I am, you want to extend the YouTube video until its controls cover up the bottom of the picture…which will make it look more realistic.

With the video setup, double-click the embedded YouTube video to load the video and see what it looks like.

Example of an embedded video in PowerPoint that has been resized to fit a picture of a computer monitor

What about the playlist and other formatting options?

Although this new YouTube embedding method is EXTREMELY fast and easy, notice that you are not given any options to remove the YouTube controls (on the bottom or the top of the video) and there was no option to include the entire YouTube playlist (assuming there is one associated with that video).

You can see the difference in this picture:

For more control over these additional features, you need to know how to embed a YouTube video using the embed code method, which is SUPER straightforward and easy…continue reading on to see how.

Method #2: Using the embed code

This technique not only works for embedding a YouTube playlist into your presentation, but will also work for embedding other online videos into your presentation.

1. Navigate to your YouTube video through the channel playlist

Assuming that you want a video’s entire playlist, you need to navigate to the channel where the playlist exists, and open the video through the playlist. If you don’t care about the playlist, simply search YouTube as you normally would.

This might seem SUPER weird, but as you will see in a minute, it works.

To get the playlist for this video, you can see that I’ve navigated to the Nuts & Bolts channel page (fancy that!), selected the playlists option, found my playlist and then found the video that I want within the playlist.

Select the video (through the playlist) to open the video in YouTube as you normally would. Notice in the picture below, to the right of the video, you can see the entire playlist.

To embed a YouTube playlist in PowerPoint need to open through the actual playlist first

2. Navigate to the embed code

Selecting the video, you want to navigate below the video and select Share, Embed and then open up “Show More Options”.

3. Choose how you want your video to play

When embedding a YouTube video in PowerPoint 2013, there are few options you want to pay attention to, primarily:

Below the YouTube video you can choose to show suggested videos, show player controls, and to show video title and player actions before you embed it in PowerPoint

Option #1: Show Player Controls – This includes the pause, play and other navigational features at the bottom of the YouTube video.

Option #2: Show Video Title and Player Actions – This includes the tile of the video, share buttons on the far right and a playlist dropdown…assuming the video is part of a playlist and you navigated to it through the playlist itself.

Leaving these selected, the YouTube video will play in PowerPoint as demonstrated below.

If you uncheck both of these options, your YouTube video will play in your PowerPoint presentation as pictured below (you can obviously do a hybrid of these controls as well).

Other video options include:

Video size – Not terribly important as you can manually resize your video within PowerPoint anyway.

Show suggested videos when the video finishes – This is optional and depends on whether you want people to continue watching other videos once the video finishes. This option is not available if you navigate to the video through the playlist as I described above.

Enable privacy – Enhanced mode – This last option is only relevant if you are embedding the YouTube video on a website…choosing this option will not work in PowerPoint.

4. Copy and Paste the Embed Code

Once you’ve made your formatting selections in YouTube, select the embed code above the preview window and hit CTRL + C to copy.
Copy the entire embed code of the YouTube video to embed a YouTube video in PowerPoint

Alternatively, you can simply right-click the video, select ‘Get embed code’ and then hit CTRL + C to copy.

With the embed code copied, back in PowerPoint 2013, navigate to the Insert tab, open the Insert Video dropdown and select Online Video.

To embed an online video PowerPoint click the insert tab, open the video drop down and select online video

In the dialog box that pops open, in the ‘From a Video Embed Code’ option, hit CTRL + V on your keyboard to paste the embed code into the dialog box and then hit Enter.

A black box is inserted into your layout that you now want to resize and position.

If you are using a blank TV or computer monitor image (as I am in this example) you want to stretch the video down to cover the bottom of the monitor so that the YouTube controls cover the controls on the static image…it will look more realistic this way.

Use of the white resizing handles on your video to resize the video to fit your PowerPoint layout
With the video stretched out, you can then double-click the video to see how it looks and make any other adjustments that you want.
Once you've embedded a YouTube video, you can double click the video to preview it to make sure you have the correct YouTube video

Note: Going this route has given us more control over the look and feel of our YouTube video and we were able to get the playlist feature in the upper left-hand corner.

PowerPoint 2010: Embed a YouTube video in PowerPoint

Believe it or not, there are three ways to embed YouTube videos in PowerPoint 2010:

  1. The free add-in (see Method #1 on the PowerPoint 2007 tab)
  2. Using the Shock Wave ActiveX Control (see Method #2 on the PowerPoint 2007 tab)
  3. Using the dedicated YouTube embed option

In this tutorial, I will focus on the third and newest method, which is a HUGE improvement over the previous methods: using the dedicated YouTube embed code option.

This method gives you the most flexibility in formatting your YouTube video in PowerPoint AND it allows you to embed an entire playlist…something that was not possible in PowerPoint 2007.

For the tutorial, I used an image of a computer screen to frame the video and create a cool effect…just another tip for making your videos come to life!

1. Find your YouTube video

Navigate to YouTube and find the video that you want to insert into your presentation. In this example, we’ll be adding the “Highlighting Your Point Visually” video.
Use the YouTube search bar to find the YouTube video you want to embed in PowerPoint

2. Navigate to the embed code

Selecting the video, you want to navigate below the video and select Share, Embed and then open up “Show More Options”.

3. Choose how you want your video to play

Below the YouTube video you can choose to show suggested videos, show player controls, and to show video title and player actions before you embed it in PowerPoint

When embedding a YouTube video in PowerPoint 2010, there are few options you want to pay attention to, primarily:

Option #1: Show Player Controls – This includes the pause, play and other navigational features at the bottom of the YouTube video.

Option #2: Show Video Title and Player Actions – This includes the tile of the video, share buttons on the far right and a playlist dropdown (see ‘getting the playlist’ below) on the left…assuming the video is part of a playlist.

Leaving these selected, your YouTube video will play in PowerPoint as demonstrated below.

If you uncheck both of these options, your YouTube video will play in your PowerPoint presentation as displayed here:

Other video options include:

Video size – This is not terribly important as you can manually resize your video within PowerPoint anyway.

Show suggested videos when the video finishes – This is optional and depends on if you want people to continue watching other videos once the video finishes.

Enable privacy – Enhanced Mode – This is only relevant if you are embedding the video on your website…choosing this option will not work in PowerPoint.

As YouTube states “Enabling this option means that YouTube won’t store information about visitors on your web page unless they play the video.”

4. Copy and paste the embed code

Copy the entire embed code of the YouTube video to embed a YouTube video in PowerPoint

Alternatively, you can simply right-click the video, select ‘Get embed code’ and then hit CTRL + C to copy.

With the YouTube embed code copied, back in PowerPoint, navigate to the Insert tab, select Video and then select the ‘Video from Web Site’ option.

In PowerPoint 2010, you want to select the insert tab, click the video drop down and select video from website

In the dialog box that pops open, hit CTRL + V on your keyboard to paste the YouTube embed code into the dialog box, and then click on Insert.

A black box is inserted onto your slide that you then want to resize and position.

Note: If you have the option to show the player controls at the bottom of your video, you will want to stretch the video out to cover the image you are using (in this case a blank computer screen) so that the YouTube video controls show on top of the controls on your image.

That way, when you play the video, it will look more realistic.

Use of the white resizing handles on your video to resize the video to fit your PowerPoint layout

To see how the video lines up within your frame (which can be tough when you have a black box on top of a black frame), simply double click the video in the Normal View, and the YouTube video will load.

Notice in the picture below how the YouTube controls replace the controls on the bottom of the static picture I’m using, creating a more realistic effect in PowerPoint.

Once you've embedded a YouTube video, you can double click the video to preview it to make sure you have the correct YouTube video

PowerPoint 2007: Embed a YouTube in PowerPoint

There are two methods for inserting YouTube videos in PowerPoint 2007, and a number of trouble shooting issues you need to be aware of.

Method #1: The Easy Way – Using add-ins like the free one built by Microsoft MVP Shyam, which does all of the hard work for you.

Method #2: The Harder Way  Adding the Developer tab to your Ribbon, adding a Shockwave ActiveX Object, and then manually manipulating the URL of your YouTube video.

Which one is best depends on how many YouTube videos you need to add to your PowerPoint presentations and how often you plan to do so.

If you frequently need to install YouTube videos in PowerPoint, you should definitely get the free add-in for PowerPoint 2007 and/or consider upgrading to a more recent version of PowerPoint which gives you additional YouTube options like adding playlists.

Warning: Compatibility Issues

If you are sharing your files with people using other versions of PowerPoint, you also need to be aware of the compatibility issues.

YouTube videos inserted in more recent versions of PowerPoint (2010 and 2013) will not necessarily play when opened in PowerPoint 2007…they might, it just depends on how they were added.

That said, any YouTube video successfully inserted in an earlier version of PowerPoint, will always play in a later version.

Method #1: The Easy Way

Embedding YouTube videos in PowerPoint 2007 normally requires getting and manipulating the video’s URL. This easy method of using an add-in is awesome because it does all of the hard work for you!

It takes a minute in the beginning to download and install the add-in, but once it’s all set up, with just a few clicks (as you’ll see below), you can quickly grab your YouTube videos and play them directly in PowerPoint.

A big thanks to Microsoft MVP Shyam Pillai for developing this great free add-in!

1. Download the free add-in

Navigate to Shyam’s website and download the free add-in, which will download a zip file to the Downloads folder on your computer.

2. Extract the zipped file

Navigate to the Downloads folder on your computer, find the zip file called ‘YouTubeVideo2K7’, right-click the folder and extract the contents of the folder.

3. Copy the PowerPoint add-in

Open the unzipped folder, select the YouTubeVideo2k7 file and hit CTRL + C to copy it.

4. Add the PowerPoint add-in

Back in PowerPoint 2007, open the Windows button in the upper left-hand corner and select PowerPoint Options.

Select Add-ins on the left, use the drop-down at the bottom of the screen to filter to PowerPoint Add-ins and the select Go.

In the Add-Ins dialog box that opens, select Add New.

In the Dialog box that opens, hit CTRL + V to paste the add-in file into the window. You can see I have a number of add-ins already. If this is your first add-in, you will only have the YouTubeVideo2K7 file in this window.

If nothing pastes into the window, make sure you go back and copy that add-in file from the extracted folder.

Clicking OK, a macro dialog box might open. If it does, select Enable Macros.

You should now see the YouTubeVideo2k7 add-in in the window with a check mark next to it. Click Close.

With the add-in installed, if you now open up the Insert tab in PowerPoint 2007 or 2010, you will have an added command at the end of the Insert Tab for quickly embedding YouTube videos.

Now that you have the PowerPoint 2007 Add-In installed, let’s take a look at how to use it.

5. Navigate to YouTube and copy your video’s URL

The first step is to find your video on YouTube.

Warning: Get the right URL

Be VERY careful here!

PowerPoint 2007 cannot play YouTube playlists, which you can tell by the length of the URL. Notice in the picture below the difference in length between the video and the video plus its playlist.

If you accidentally embed the longer URL into PowerPoint 2007, the YouTube video will not play, regardless of how you try to troubleshoot. If you want to embed a playlist in PowerPoint, you need to upgrade to PowerPoint 2010 or PowerPoint 2013.

You need to grab the shorter URL which is everything up until the ‘&list’ or ‘&index” separator. With the shorter URL selected, hit CTRL + C on your keyboard to copy it.

6. Insert the YouTube video using the add-in

With the URL copied, navigate back to PowerPoint and from the Insert tab select ‘YouTube Video’.
A dialog box opens. Simply hit Next.

Hit CTRL + V to paste in your YouTube URL, then hit Next.

You can select options for your video like Play and Loop. I will simply hit Next.

You can then choose to resize the video here if you like. But as we can do this on our own in a second, I will again simply hit Next.

On the last screen, hit Finish

The YouTube video is now inserted into your slide as a white box with an X through it.

7. Resize the YouTube video

Next simply resize and position the video on your slide. In this case I’m using the blank computer monitor to frame the YouTube video. Note that if you are using a blank screen or monitor like I am, you will want to stretch the video to the very bottom of the image so that it covers up the monitor controls.

As you resize the video, the entire box might turn white, but no worries, you are still fine.

8. Launch the YouTube video

With the video in place, hit SHIFT + F5 to launch full screen mode. You might receive a warning like the one below, simply click Continue.

Assuming you are connected to the internet, the video will load and you will be able to play the video directly from within your PowerPoint 2007 presentation.

The final example of a YouTube video embedded in PowerPoint 2007

Method #2: The Hard Way

If that sounds scary to you, I highly recommend the easier method described above, using the free add-in.

1. Add the Developer Tab to your ribbon

Navigate to the Windows button in the upper left-hand corner of your screen and from the dropdown select the PowerPoint Options. Navigate to the Windows button in the upper left-hand corner of your screen and from the dropdown select the PowerPoint Options.
Within the dialog box that opens, make sure you have the ‘Show Developer tab in the Ribbon’ option selected in the Popular tab.
Close the dialog box and you should see the Developer tab there in your Ribbon.

2. Insert a Shockwave file

From the Developer tab, launch the ‘More Controls’ dialog box. The icon is a crisscrossed wrench and hammer.

Within the dialog box, navigate down to Shockwave ActiveX Control, click OK.

And then draw a rectangle on your slide (where your YouTube video will go).

Note that you cannot draw the Shockwave ActiveX Control on top of another object, so you will have to draw it on a blank part of your slide (assuming you have something on your slide).

Example inserting a video within a picture of a computer monitor

The Shockwave ActiveX object will look like a white box with an X through it. Resize and position the object on your slide, in this case I’m stretching it out to fit on top of my blank computer screen image.

Now we are ready to get our YouTube video

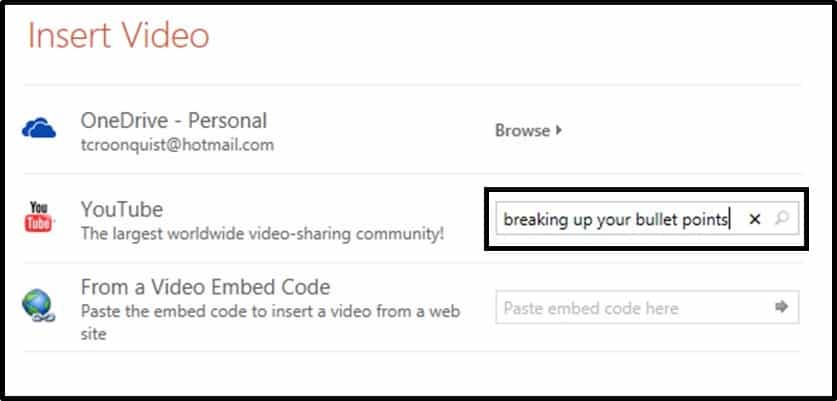
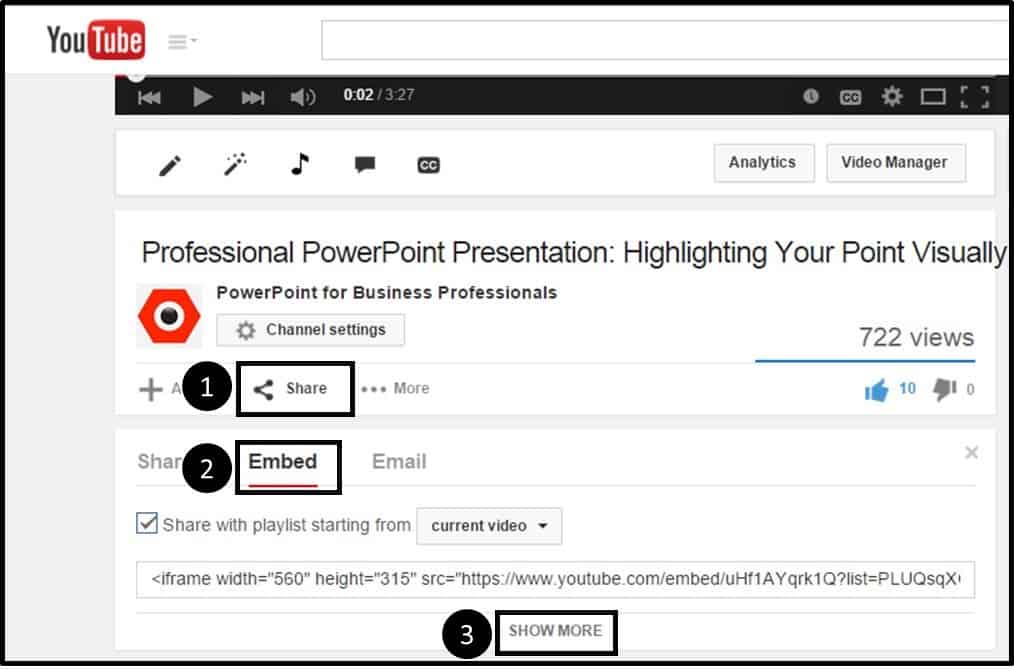
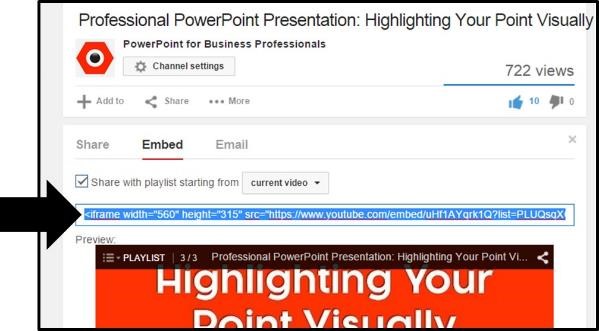
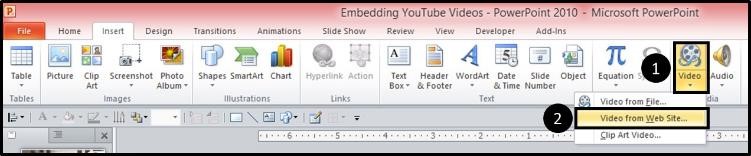
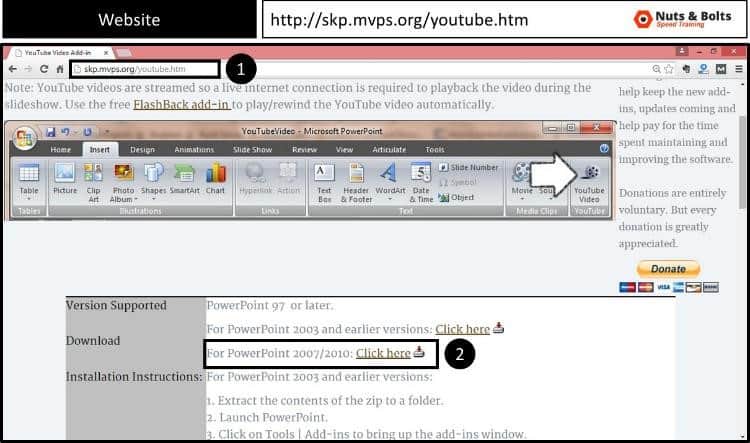
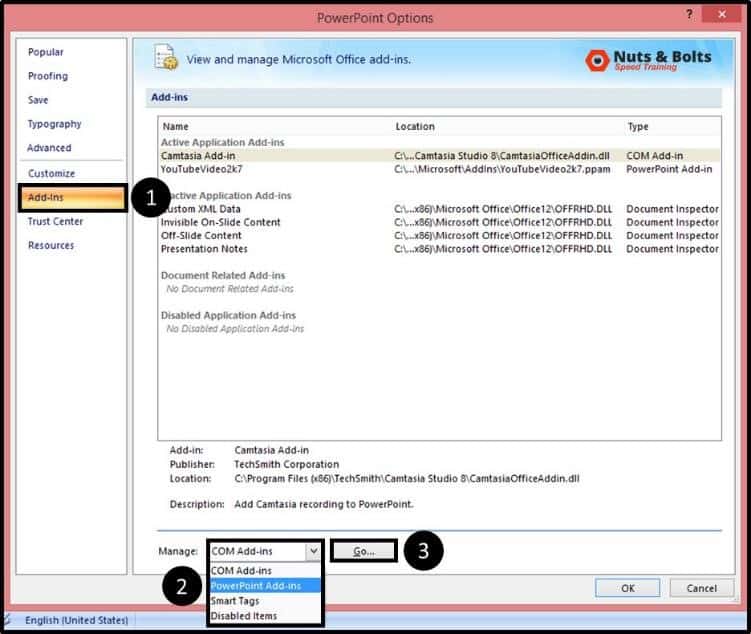
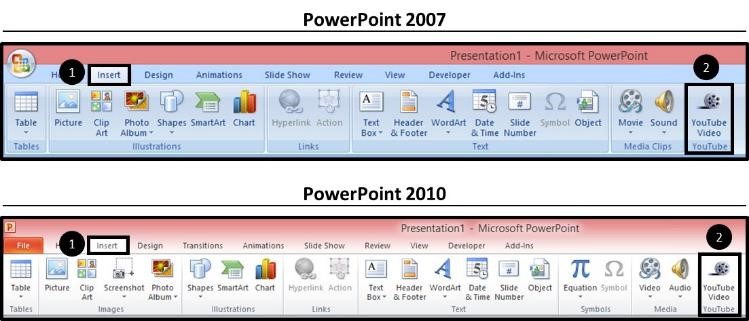
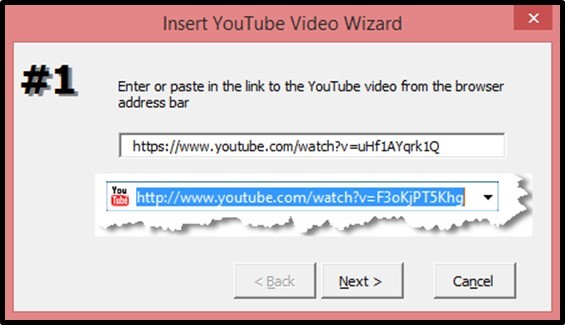
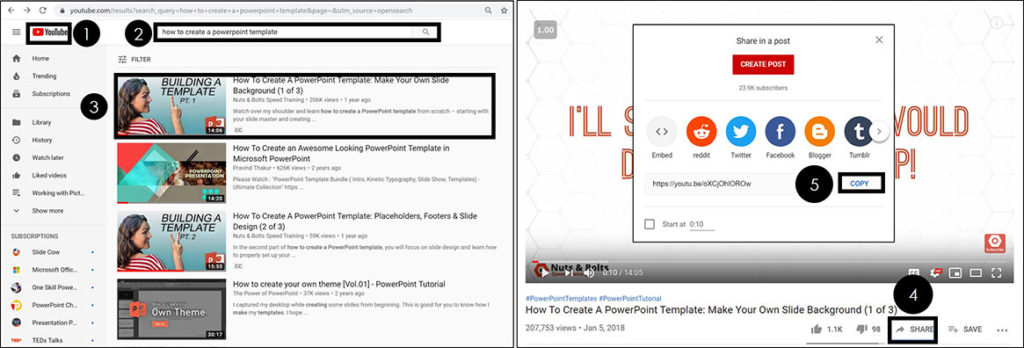
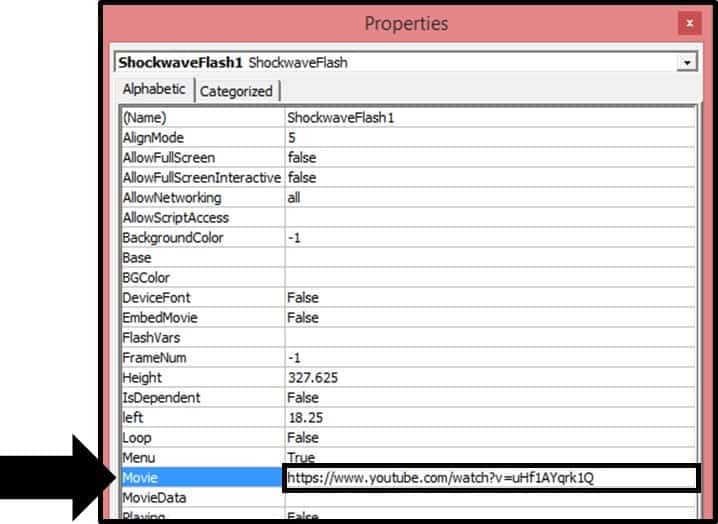
3. Find Your YouTube video’s URL

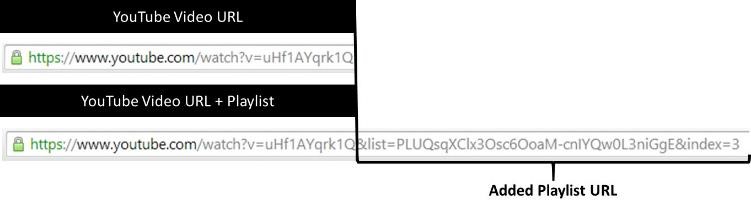
Navigate to YouTube and find your Video’s URL…but be VERY careful here! PowerPoint 2007 cannot play YouTube playlists, it can only play individual videos, so you need to be careful you don’t accidentally grab a video + its playlist.

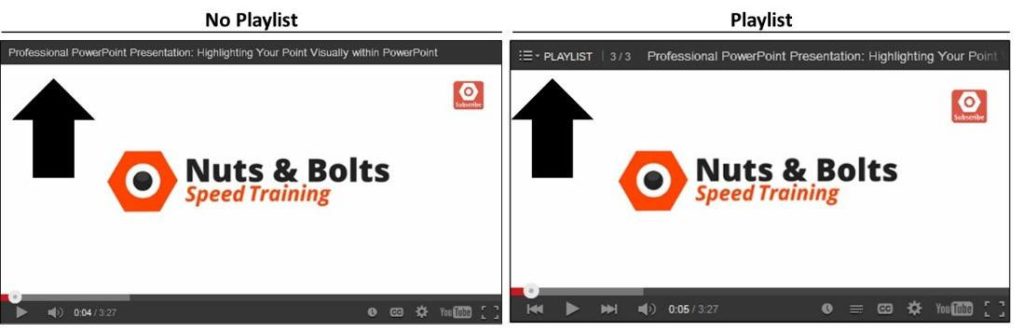
The way to tell the difference between a video URL and a playlist URL is by its length. Notice in the picture below how much longer the playlist URL is than the video URL.

You need to grab the shorter URL which is everything up until the ‘&list’ or ‘&index” separator. If you grab the longer URL, the video will not play in PowerPoint 2007, regardless of how you try to troubleshoot.

If you want to embed a playlist in PowerPoint, you need to upgrade to PowerPoint 2010 or PowerPoint 2013 and use the embed code method. See the PowerPoint 2013 tutorial below.

With the shorter URL selected, hit CTRL + C on your keyboard to copy.

4. Open up the properties of your Shockwave ActiveX object

With the shorter URL copied, navigate back to PowerPoint, right-click the ActiveX Object and select Properties.

In the Properties dialog box, scroll down to the Movie section and paste in your URL.

5. Adjust the YouTube URL within the dialog box

To get the YouTube video to play correctly in PowerPoint 2007, you need to make two adjustments:

#1: Delete the ‘watch?’ from the URL
#2: Replace the ‘=’ with ‘/’

With the URL adjusted, hit OK to close the dialog box.

6. Run your presentation

Back in your presentation, hit SHIFT + F5 for slideshow mode.

Depending on your macro settings, you might get a warning dialog like below. Select ‘I recognize this content…’ and Click continue.

Assuming you are connected to the internet, the video will load and you can play it.

Conclusion

So that’s how to embed a YouTube in PowerPoint, regardless of which version of PowerPoint you have.

This allows you to quickly and easily add interactive media features to your presentation.

The other advantage of embedding a YouTube video, is it does not increase the size of your presentation. That means that you don’t need to worry about compressing your presentation.

If you enjoyed the depth of this post and want to boost your PowerPoint skills for the professional world, visit us here.

What’s next?

This Post Has 5 Comments

  1. availablespace

    You may use Allavsoft to download YouTube video to AVI, WMV to put a youtube video in PowerPoint

  2. Jason Franklin

    This article certainly is thorough. Just an FYI, we’ve built a PowerPoint add-in at https://www.liveslides.com/websites/youtube/ that makes it significantly easier to embed and play YouTube videos (any web content really) directly in PowerPoint. Seriously, just a couple steps and you’re ready to roll.

    1. Camille Holden

      Thanks for sharing, Jason. I’ve never used your software but we usually like anything that helps us save time. Cheers

  3. Camille Holden

    Hey John, and thanks for sharing the software! Sounds like a handy program that can save you time – we like that! Just make sure you don’t abuse any copyright issues when downloading videos from the web 😉

Comments are closed.