Removing backgrounds from images in PowerPoint is one of those things that sounds simple — delete the background, keep the subject — but anyone who has actually tried it knows it can be tedious, imprecise, and frustrating. I’ve been teaching PowerPoint for years, and this question comes up constantly.
PowerPoint now gives you two approaches: the classic tools that have been around forever, and a brand-new AI-powered method inside the Copilot Designer Editor. This post covers both, because you need to understand when to reach for each one.
I’ll be honest — when I first used the AI background removal, it was probably my biggest ‘wow’ moment with Copilot so far. I really felt like AI actually did a good with a single button click.

After removing your image background, you can then compress your images in PowerPoint to reduce your file size.
Compressing your images is highly recommended, especially for AI-generated imagery as it is usually extremely large.
NOTE ON COPILOT LICENSING: The AI features require a Microsoft 365 Copilot license. If you don’t have one, the classic tools still work perfectly — they always will.
Copilot AI Picture Background Removal
Microsoft shipped a full AI image editor right inside PowerPoint — it’s called the Designer Editor, and most people still don’t know it exists. This is where the real innovation in PowerPoint image handling has landed.
One thing that’s driving people nuts: even users without a Copilot license are seeing the Edit Picture button in their ribbon, but they can’t click it. It’s grayed out. I don’t know why Microsoft does that — showing you a button you can’t use — but just know that’s a licensing issue, not a bug.
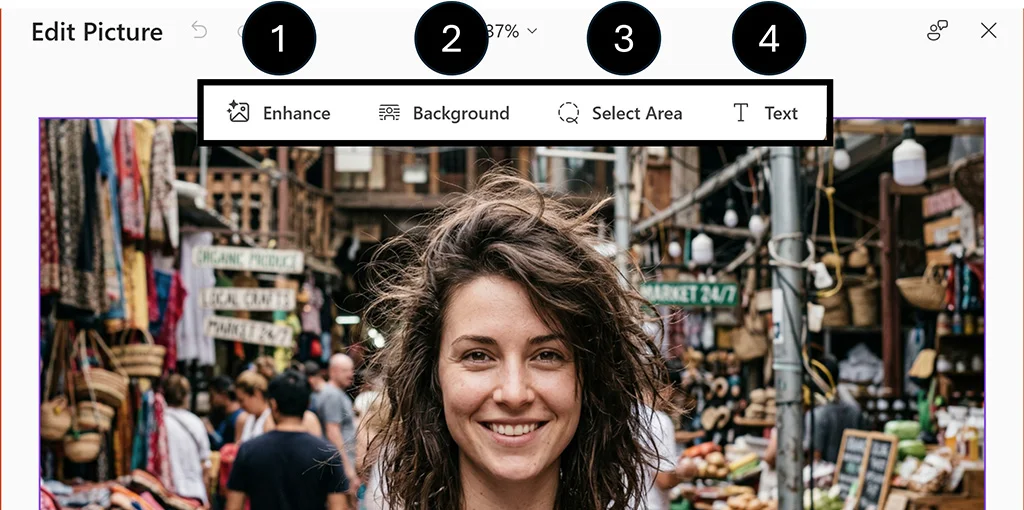
How to Access the Designer Editor
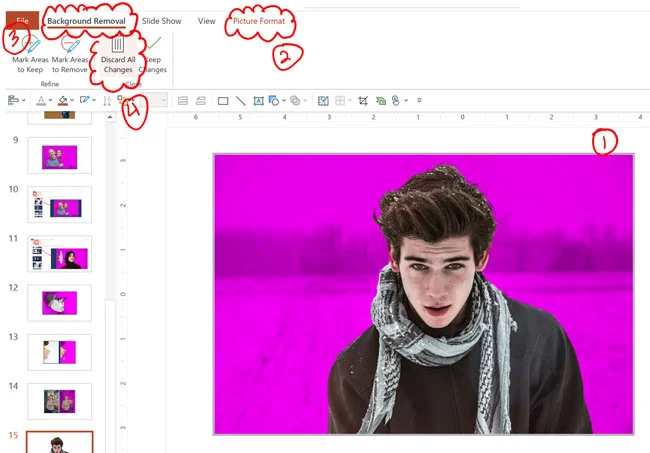
Select any image on your slide. Go to Picture Format in the ribbon and click Edit Picture on the left side. The Designer Editor panel opens on the right side of your screen.
The panel shows four tools (for background removal, you’re clicking Background):
- Enhance
- Background
- Select Area
- Text
And yes, I’m going to be referring to ‘Copilot’ and ‘Designer Editor’ and ‘Edit Picture’ somewhat interchangeably here, because there are way too many different Copilot names. Microsoft really needs to clean up their branding.
Copilot Background Removal Step-by-Step
To follow along with these steps, you do need to have a Microsoft Co-Pilot license.
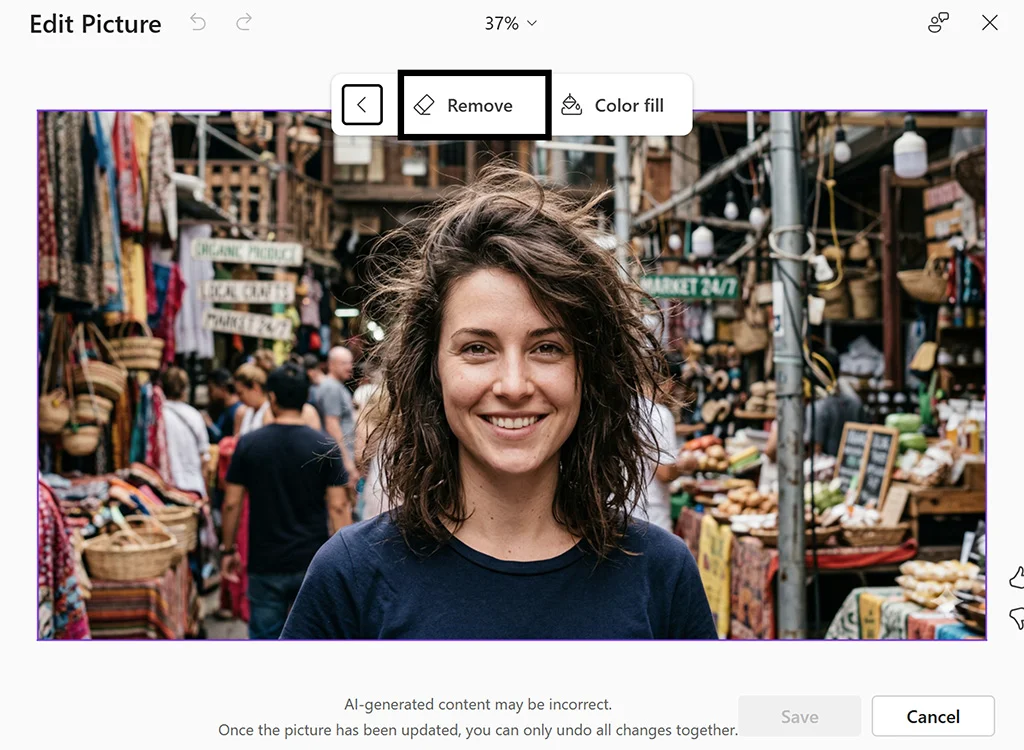
- Select an image on your slide.
- Go to Picture Format > Edit Picture (far left in the Ribbon)
- The Designer Editor panel opens . Click Background.
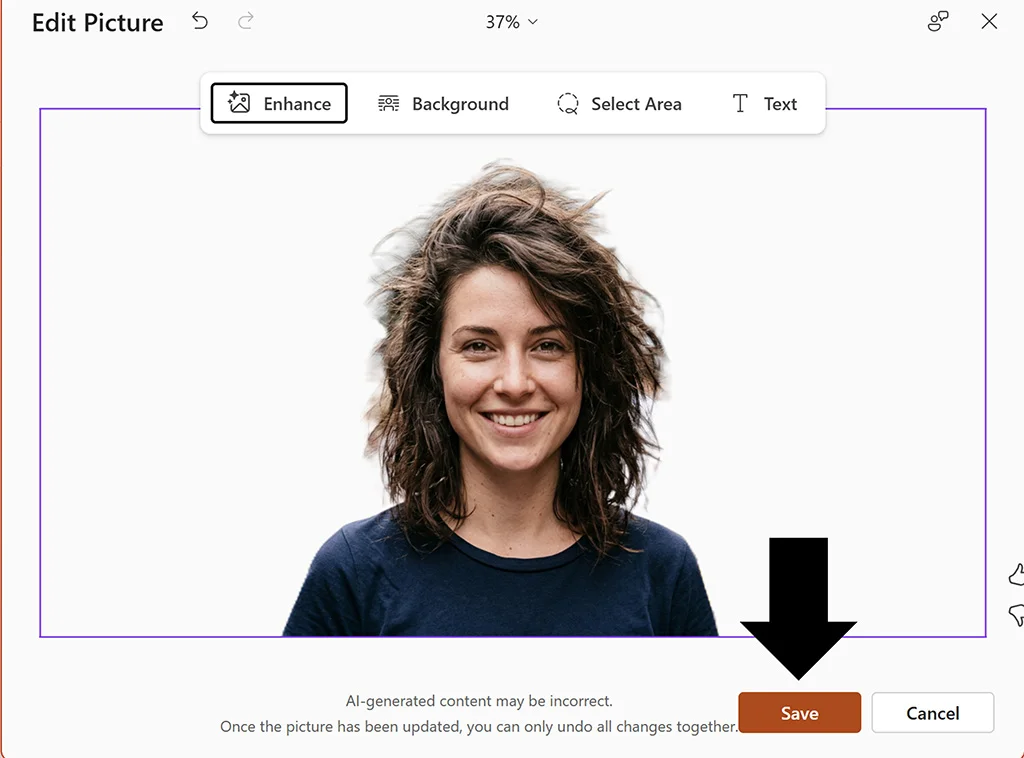
- Click Remove
- The AI analyzes the image and removes the background — usually in one click. No manual adjustment needed.
- Preview the result. If the AI over-removed or under-removed, you can use the Brush tool to refine.
- Click Save to apply the change.
That is so much easier than the techniques I list below using the Legacy tools. That said the Legacy tools don’t require tokens or credits for every picture adjustment.
Removing an image background in PowerPoint
NOTE: These background removal techniques DO NOT work with vector graphic files such as SVGs, WMs and DRWs. If you have one of these files, you’ll first need to convert it to the JPEG or PNG file format to follow along.
You can alternatively make your image background transparent (instead of removing it) using the Set Transparent Color tool. See below for more details.
Take your PPT skills to the next level
Break free from PowerPoint struggle and reclaim your time. Amplify your PowerPoint knowledge with proven advanced methods taught in the PowerPoint Pro Membership.Removing a white background from an image
The fastest way to remove an image background is to use the Set Transparent Color tool. The only catch is that it only works for removing solid colors, like white backgrounds.
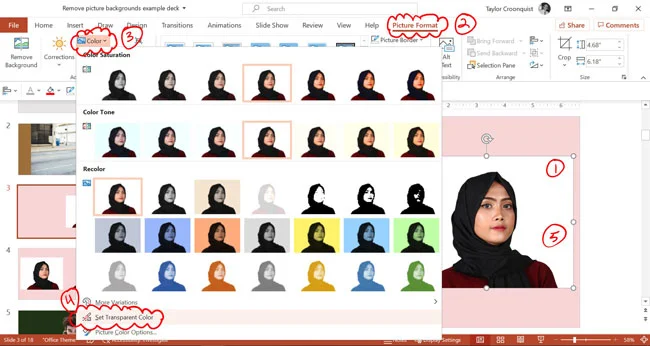
To remove a white background from an image in PowerPoint, simply:
- Insert and select a picture on your slide
- Navigate to the Picture Tools Format Tab
- Open the Color dropdown menu
- Select the Set Transparent Color tool (your cursor becomes a little pen with an arrow)
- Click on the color you want to remove from your background
PowerPoint turns that solid color transparent throughout your entire picture. In this case, the white background is removed.

This technique works best when you have a fairly simple background as pictured above. If your background is more complicated, you’ll need to use the Remove Background Tool instead. We cover this option further down in this article.
When Set Transparent Color doesn’t work
The Set Transparent Color tool works very well if you have photos with solid backgrounds. You will find these types of backgrounds on a lot of the stock photos you find online, such as on Pexels.
Just keep in mind that the Set Transparent Color tool does have limitations.
Example #1: This technique does not work well if the content of the image and its background are too similar in color. Because the entire image below is white, the woman’s face is removed with the background.

Example #2: This technique does not well with backgrounds that have shadows or gradients. Because the Set Transparent Color tool only removes a single color, gradients and shadows will be left in.

Example #3: This technique does not work well because of the detailing (like strands of hair, clothing, and skin).

For any of these types of scenarios, you’ll want to use the Remove Background tool instead.
Removing a complicated image background
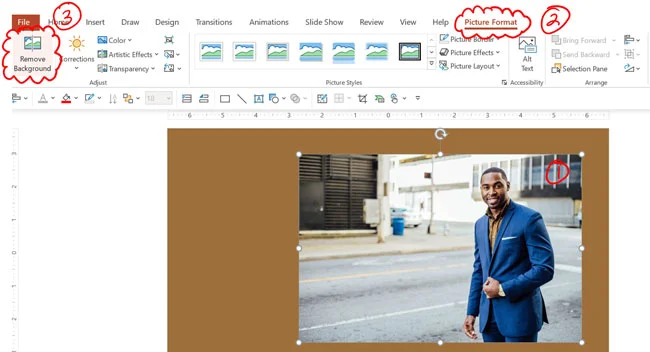
To remove a background from an image, simply:
- Select the image on your slide
- Navigate to the Picture Format tab
- Select the Remove Background command
- Adjust your removal settings (described below)
- Select Keep Changes
The magenta background portion of your image is then removed from your photo, as pictured below.

NOTE: Instead of removing the background from an image, you can instead add transparency to your picture. See how to do this, read our guide here.
Adjusting shat gets removed from your image
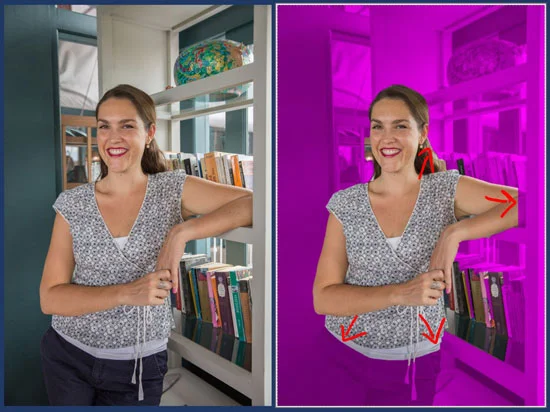
When you first select the Remove Background command, PowerPoint takes a guess at what you want to remove. In the picture below, that is shown in a pinkish (magenta) color.

While PowerPoint normally does a fairly decent job at guessing, it doesn’t always get it right.
Notice in the picture above that the woman’s arms are magenta, as is the bottom part of the man’s body. PowerPoint is guessing that those should be removed.
To fix it, all you need to do is specify what you want to keep and remove in your picture using the designated tools.
1. Mark areas to keep in your image
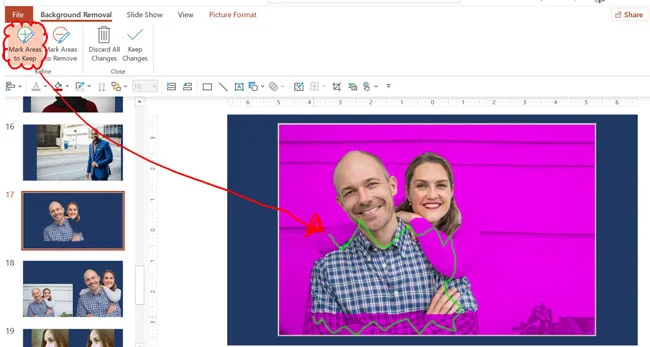
If PowerPoint doesn’t guess correctly and removes too many parts of your image, you can simply mark the areas you want to keep. To do that, simply:
- Select Mark Areas to Keep
- Click and draw over the parts of your photo you want to keep (creates green marks)
- Select Keep Changes
PowerPoint readjusts the parts of your image background that are removed. You might need to repeat this a few times to get it right.
2. Mark areas to remove in your image
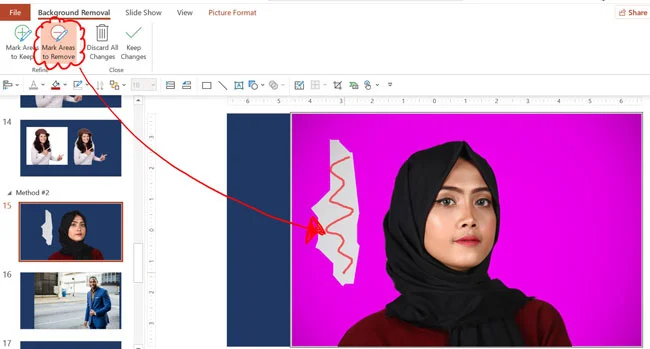
If PowerPoint guesses incorrectly and leaves too much background, you can mark areas to remove. To do that, simply:
- Select Mark Areas to Remove
- Click and draw over the parts of your photo you want to keep in Red
- Select Keep Changes
PowerPoint readjusts what parts of your background are removed. Keep in mind that depending on the complexity of your image, you might need to do this a few times to get it right.
3. When remove background doesn’t work
While the Remove Background tool will work for most backgrounds you want to remove, there are some limitations.
Limitation #1: If your picture is too homogenous, even the marking areas to keep and remove may not work. Sharp crisp photos work best.
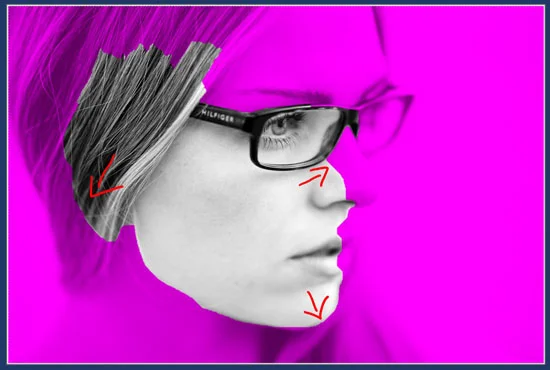
Limitation #2: It can be hard to remove the background around small details (like the background around strands of hair, binder rings, etc.).
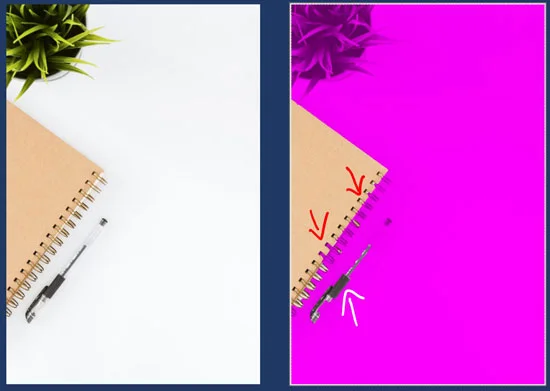
Limitation #3: If the background is a gradient, is too complex or has shadowing, removing the background can also be very challenging.
Undoing your background removal
By default, when PowerPoint removes the background from your image, it merely hides it from you.
That means that at anytime you can revert back to your original image or change your mind about what parts you want to remove.
To undo your background removal (or start over) simply:
- Select your photo with the removed background
- Navigate to the Picture Format tab
- Click Remove Background
Your image background reappears and you can make more edits (or select Discard All Changes to revert back fully).
The only time that you are not be able to revert to your original image is if you compress it. To learn more about your image compression options to save on file size, read our guide here.
Conclusion
In summary, while the Set Transparent Color tool is the fastest way to remove your image background, it only works some of the time.
That’s why I recommend that you familiarize yourself with the Remove Background tool. If you work with lots of images, this will become your go-to tool for removing backgrounds in PowerPoint.
If either of these methods doesn’t work, you can move over to Photoshop for more precision.
While PowerPoint’s picture editing features are GREAT… it’s hard to beat a dedicated picture editing program like Photoshop.
To learn more about our PowerPoint training courses and other presentation resources, visit us here.
About the Author

Nuts & Bolts
With our famous PowerPoint tips, training and self-paced courses, we help presenters save hours and gain peace of mind. Discover the career-changing wow moments that will transform not just the way you approach your presentations, but also how you tackle your work tasks in general.
Take your PowerPoint skills to the next level
Get access to our complete training library, new tutorials every month, and the same techniques we teach in our corporate workshops. Join the 260,000+ professionals who have trained with us.
See Membership Options