There are a variety of ways different ways to create Superscripts and Subscripts in Microsoft Word, Excel and PowerPoint.
- Ribbon guide commands (Microsoft Word only)
- Keyboard shortcuts
- The Font dialog box (w/ bonus shortcuts discussed below)
All of which are covered in detail for each program below, so you can choose which technique works best for you.
As you will see, the issues isn’t how to type a subscript or superscript. Instead, it’s how to turn the text you already have into the text effect format you want.
And just so that we are crystal clear on terminology, let’s look at the difference between the two.

What is a Superscript?
A superscript is text formatting set above the normal baseline (as pictured above on the left) and is most frequently used in mathematical equations and chemical formulas.
- A mathematical example is Einstein’s famous formula: E=mc2
- A chemical example is the metallic barium ion written: Ba2+
What is a Subscript?
A subscript is text formatting set below the normal text baseline (as pictured above on the right) and is also often used in mathematical equations and chemical formulas.- A mathematical example is the variable: an
- A chemical example is the chemical formula for water: H2O
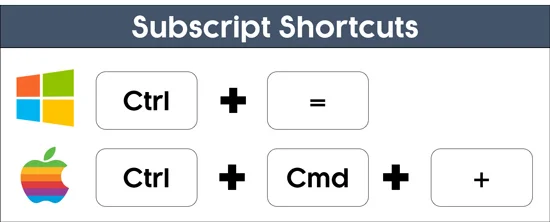
Subscript Shortcut
The Subscript shortcut is Ctrl + = on a PC and Ctrl + Cmd + + on a Mac.
This shortcut works in Microsoft Word and PowerPoint to quickly create (or remove) subscripts. That means that you don’t have to use the insert equation feature.
For example, to subscript 2 in a mathematical equation like this (X2), you’ll need to:
- Select the 2
- Hit Ctrl + = on your keyboard
To remove a subscript, simply select the subscript (2 in this case) and hit the Ctrl + = shortcut again to remove it. This shortcut does not work in Excel, see the section on Excel below for an alternative.
To expand your knowledge and learn more shortcuts that save you time in PowerPoint, read our guide here.
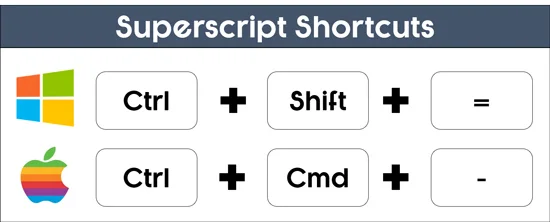
Superscript Shortcut
The superscript shortcut is Ctrl + Shift + = on a PC and Ctrl + Cmd + – on a Mac.
This shortcut works in Word and PowerPoint to quickly create (or remove) superscripts on the fly. That means you don’t have to use the insert equation commands.
For example, to superscript 2 in a mathematical equation like this (X2), you’ll need to:
- Select the 2
- Hit Ctrl + Shift + = on your keyboard
To remove the superscript after you have applied it, simply select it (in this case the 2) and hit the Ctrl + Shift + = shortcut a second time to remove it.
Word: How to Superscript and Subscript
Besides the two keyboard shortcuts mentioned above, there are two additional ways to create a Superscript and Subscript in Microsoft Word.
The superscript command is also the secret to type exponents in Word, as you will see below.
1. Use the Ribbon commands in Word
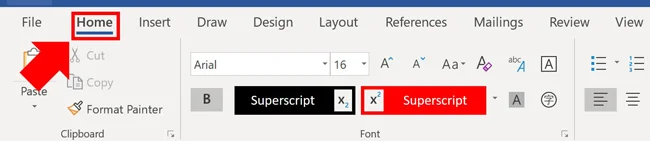
- Select the text in your Word document
- Navigate to the Home tab
- Click the Superscript or the Subscript command
While this is a super fast way to create these text effects, the Font dialog box gives you additional formatting options for making exponents and mathematical equations in Word, out side the Mathematical Equations tab.
Note: If you need help organizing your Word document so you can easily create a table of contents or convert your Word documents into PowerPoint slides, read our guide here.
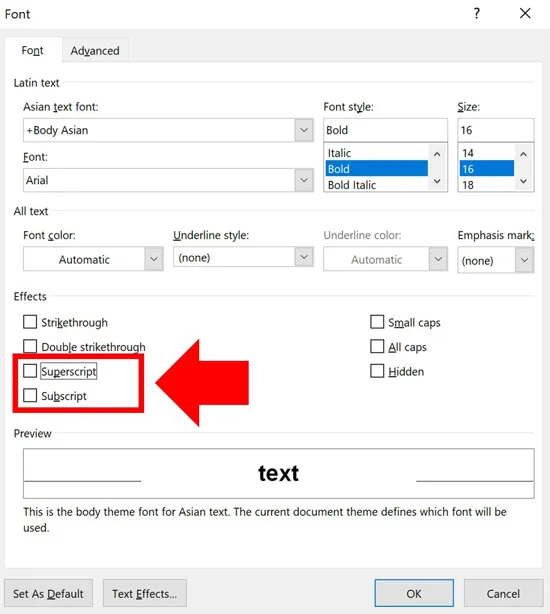
2. Use the Font dialog box in Word
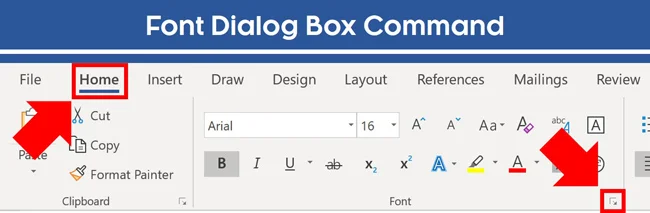
Instead of using the keyboard shortcut to open the Font dialog box (Ctrl+D), you can also open it by clicking the diagonal facing arrow in the Font group on the Home tab in your Ribbon (picture above).
- Select the text you want to superscript or subscript
- Hit Ctrl+D to open the Font dialog box in Word
- Select Superscript or Subscript
- Click OK
To remove a superscript or subscript, simply select the text and re-apply the effect a second time.
Note: Ctrl+D is one of the best PowerPoint shortcuts, but it does something completely different than in Word. To expand your knowledge and learn how to use Ctrl+D to speed up your slide work, read our guide here.
One reason the Font dialog box can be better than using your keyboard shortcuts is the dialog box gives you additional formatting options for your text.
Note: If you want to learn how to cross out text in Microsoft Word using keyboard shortcuts, read our article here.
Excel: Superscript and Subscript
There are two different ways to get at the Format Cells dialog box in Excel to apply the superscript and subscript formatting.
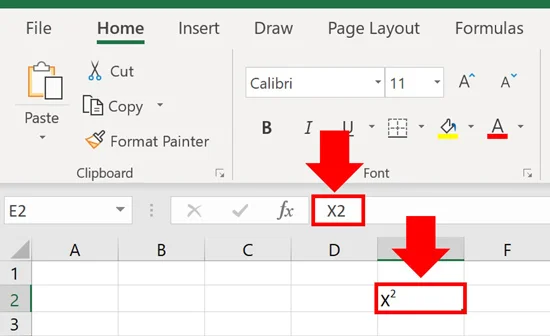
But first, it is important to note that your superscript and subscript formatting in Excel only displays within the cells of your Excel spreadsheet. The formatting does not display in the formula tab as pictured below.
So when you do not see the formatting applied in your formula bar, you have done nothing wrong. The text formatting has still been properly applied if you follow the steps below.
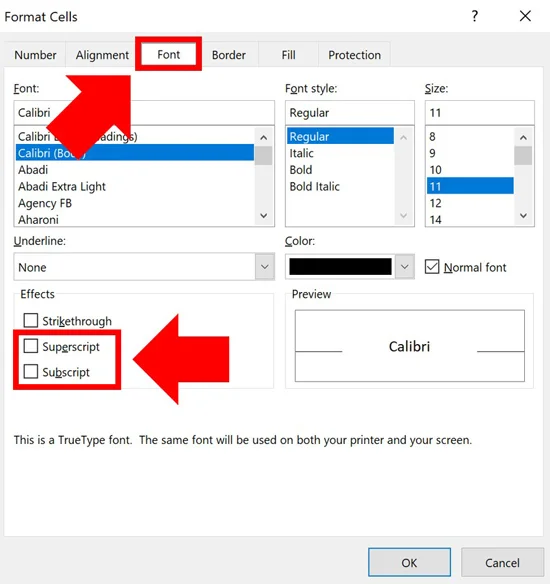
1. Using the Format Cells dialog box shortcut

- Select the text you want to superscript or subscript
- Hit Ctrl + 1 to open the Format Cells dialog box
- Select the Superscript or Subscript command
- Click OK
Another use of the Ctrl+1 keyboard shortcut is when formatting your charts in Excel. Simply select a chart element that you want to format and hit Ctrl+1 to open all the relevant formatting options for your selection.
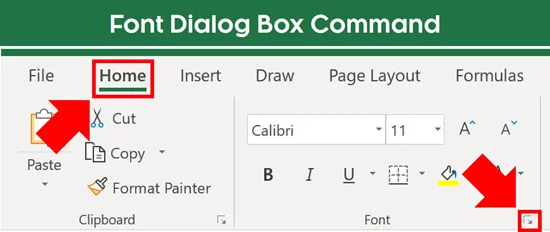
2. Font dialog box Ribbon command
If you don’t want to remember the Ctrl+1 keyboard shortcut in Excel, you can alternatively access the Font or Format Cells dialog box by clicking the downward-facing arrow on the Home tab.
Simply open the dialog box, select either the Superscript or Subscript formatting and click OK.
PowerPoint: Superscript and Subscript
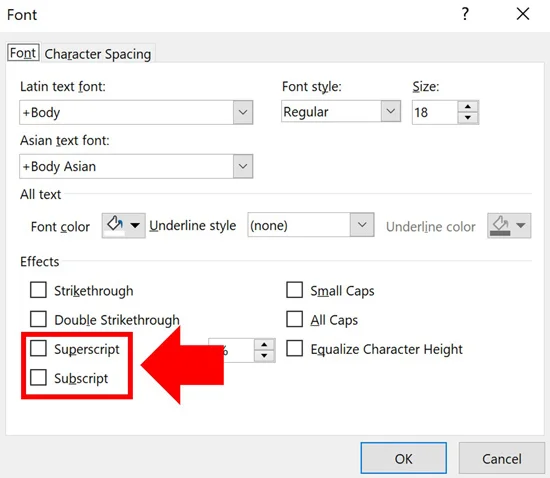
Besides using the two keyboard shortcuts discussed at the top of this page, you can alternatively apply the Superscript and Subscript formatting using the Font dialog box in PowerPoint.

- Select the text you want to superscript or subscript
- Hit Ctrl + T to open the Font dialog box in PowerPoint
- Select either the Superscript or Subscript commands
- Click OK
Instead of using the Ctrl + T shortcut to open the Font dialog box, you can click the diagonal facing arrow in the Font group on the Home tab.

Regardless of how you navigate to the Font dialog box, once it is open, simply select either the Superscript or Subscript formatting and click OK.
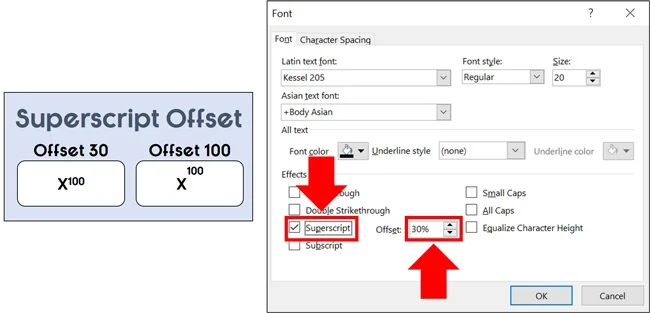
In the Font dialog box, you can also adjust the Offset of your Superscript. The higher the value of your Offset, the higher your Superscript will sit in relation to your text.
Simply select how much you want for your Offset and then click OK.
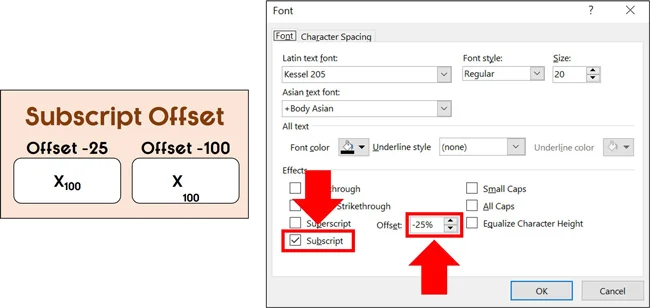
In the Font dialog box, you can also adjust the Offset of your Subscript. The lower the negative value, the lower your Subscript will sit below your text.
Simply select or input the Offset you want and then click OK.
Also note, inside the Font dialog box you can use your keyboard shortcuts to select or unselect the Superscript and Subscript commands (which you can see by the underlined letter in each).
Note: To learn how to use your keyboard shortcuts to create the strikethrough and other text effects in PowerPoint, see our guide here.
Conclusion
So those are all the different ways to create subscripts and superscripts in Word, Excel, and PowerPoint.
If you need to add this type of formatting a lot, I recommend learning the relevant keyboard shortcuts to speed up your workflow. If not, you can always use the Font dialog box (or Format Cells dialog box in Excel) to quickly get at the superscript and subscript formatting.
Currently, you can only add an Offset to your superscripts and subscripts in PowerPoint.
If you enjoyed this tutorial and want to learn more about our online training courses and other free PowerPoint training resources, check us out here.
About the Author

Taylor Croonquist
Co-Founder, Nuts & Bolts Speed Training
Taylor Croonquist is a PowerPoint expert and trainer. Over a career spanning the globe, from consulting in New York and investment banking in China, Taylor has truly seen it all in PowerPoint. Through necessity and a natural tech savvy, Taylor honed his PowerPoint skills to the point of even blowing the minds of the Microsoft PowerPoint programming team. When he's not busy crafting PowerPoint training, you can find him reading a sci-fi series or scuba diving.