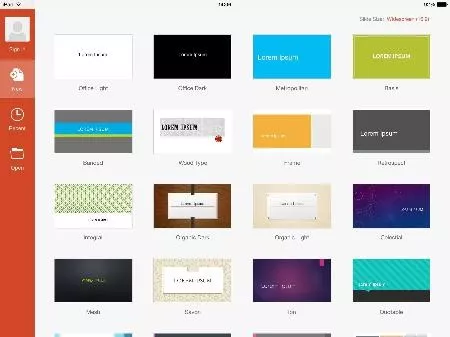
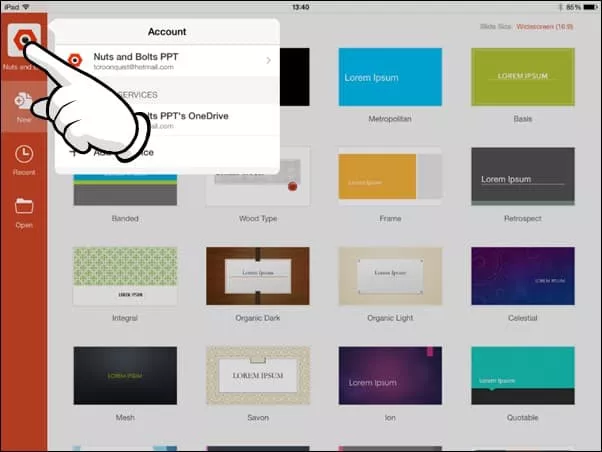
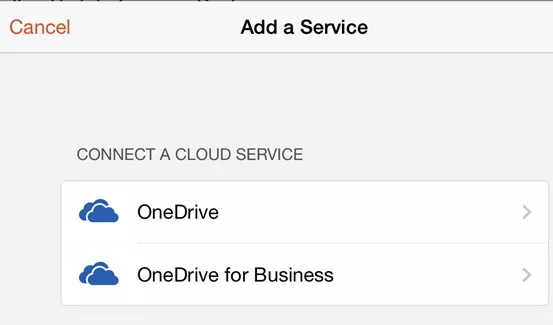
1. Home
  2. PowerPoint Tutorials
  3. Miscellaneous
  4. PowerPoint for iPad: A Visual Guide

PowerPoint for iPad: A Visual Guide

In this first ever visual guide for the iPad version of Microsoft PowerPoint (iPad PPT), we show you step-by-step how to use the app, as well as all of the nitty gritty details behind it that you likely don’t know.

We highlight those “little hiccups” that will drive you up the wall (it’s still not the same experience as your desktop version), and we’ve done our best to show you the workarounds, if and when they exist.

Make sure to note the orange boxes we’ve sprinkled through the guide with pro tips and tricks based on years of experience building PowerPoint presentations…ignore them at your own peril

We will do our best to keep this guide up to date with each new Microsoft update. If you see something that we’ve missed, PLEASE let us know and we’ll do our best to update this guide ASAP.

Don’t have the PowerPoint app on your iPad yet? Download it by clicking here.

Things that go well with your iPad

Here are some useful resources for working with PowerPoint for the iPad:

Microsoft apps for the iPad

If you want to edit or display your Microsoft documents in their native environments on your iPad or iPhone, you’ll need to download the Microsoft PowerPoint, Word, Excel, OneNote, and OneDrive apps on your iPad and iPhone through the iTunes store. Find them here.

Microsoft Office 365

Get automatic upgrades and unlimited storage by signing up for the Microsoft 365 subscription model. Check out the latest of version of Microsoft Office here.

Lightning to VGA adapter

If you’re giving presentations with your iPad, don’t assume the meeting room will have the right adapters for you. So make sure you always bring one with you. I like apple’s adapters as they’re sleek and are 100% compatible with your device.

Bluetooth speaker

Again, if you’re giving a presentation in a meeting room and need to play music/video, be aware that your ipad’s speakers will probably not be strong enough to fill the whole room. This super compact wireless speaker hooks up incredibly easily to your ipad or iphone with no software or app necessary, and provides really high quality sound for the price.

iPhone/iPad stand

Although the iphone and ipad are designed to be light and portable, carrying them around throughout a presentation, especially if you’re moving around a room, can be a bit cumbersome. Keep your device upright and in front of you with this no-frills stand. It will fit just about any device.

Disclosure:  please note that some of the links below are affiliate links, and at no additional cost to you, we will earn a commission if you decide to make a purchase.  Please understand that we have experience with all of these companies, and we recommend them because they are helpful and useful, not because of the small commissions we make if you decide to buy something.  Please do not spend any money on these products unless you feel you need them or that they will help you achieve your goals.

Ready to switch to mobile?

FINALLY…PowerPoint on our tablet! Down with the laptop and the desktop! Not so fast…

Although it is EXCITING to finally have PowerPoint on the iPad….there are MANY more versions to come before it can replace the desktop PowerPoint environment.

Until then, PowerPoint on your iPad is best thought of as an “extension” of the desktop experience, not as a replacement.

Yes, with each new PowerPoint for iPad update, you do get some new features, but the vast majority of REAL work that you do in PowerPoint (in our humble opinion) should still be done on your desktop.

Why? Because it’s just plain faster!

Yes, we are biased…we live, die and breath shortcuts on our keyboard AND we use LOTS of tips and tricks that haven’t come onto the iPad (yet)….so it’s okay to disagree with us.

With all that said, this is a GREAT step forward and we are PSYCHED for all the future updates and the new Office 2015.

We hope this guides helps make PowerPoint on your iPad a little bit, if not A LOT, easier for you to figure out.

How to use this guide

This guide is organized according to the different Views in the app, and then according to each element within those Views. You can access all of these pieces using the tables of contents bar on the left.

If you want a fast way to find a command, simply hit Ctrl + F on your keyboard to search this page.

File View

Account Settings

In this section, we look at the different things you can do in the Account Settings, such as signing out, signing in, and how to add multiple OneDrive accounts. To do any of these, you’ll have to go into the File View. In the top left hand corner, you have your Account Settings icon (with or without your account picture).

File View - Startup Screen Signed In 2
File View when signed in.
File View - Startup Signed Out 2
File View when signed out.

Signing out

If you need to log in as a different user, you’ll first have to sign out. To sign out of your account, follow these 3 steps (click to open gallery & instructions):

Pro Tip: Instead of signing out of your account, you can add multiple OneDrive services to the same account so that you can access your business and personal files.

Signing in

If you accidentally get signed out, here’s a step-by-step guide for how to sign back into your account. To sign into your account, follow these 4 steps (click to open gallery & instructions):

Note

Microsoft Account: Sign in with the account you use for OneDrive, Xbox, LIVE, Outlook.com or other Microsoft services.

Organizational Account: Sign in with the account provided by your work, school or university.

Adding a service

To add a cloud service to your account, follow these 4 steps (click to open gallery & instructions):

Pro Tip: Your Office 365 account starts with a OneDrive service attached to it (whether or not you have anything in it). If you have multiple OneDrive accounts, you can add them to your account (home or office accounts), allowing you to access those files directly on your iPad.

Note: Only Microsoft OneDrive, SharePoint, and Dropbox are currently supported on Office for iPad.

New file

In this section, you will learn how to create a new file/presentation, from scratch, as well as some key tips to keep in mind. To create a new presentation, follow these 2 steps (click to open gallery & instructions):

Pro Tip 1: All of the pre-set templates follow the “click to add text” approach. If you have your own company template you want to use, see our section on opening a file. Pro Tip 2: These templates are slightly different from those in the desktop version of PowerPoint. Pro Tip 3: All new presentations will by default, be saved locally on your iPad. To save your new file onto your OneDrive, you will either need to duplicate the file (the ‘Save As’ equivalent) or push the file to your OneDrive.

Recent files

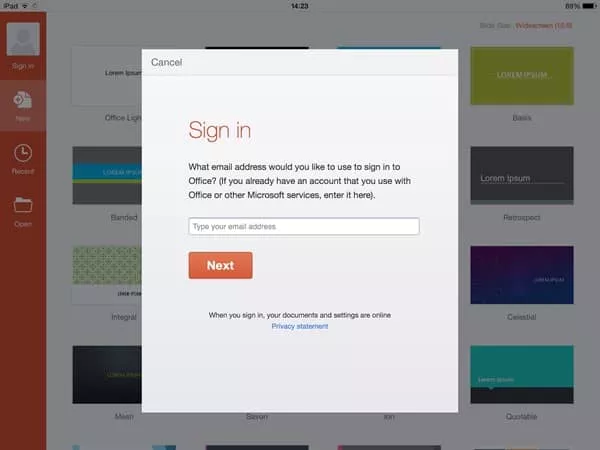
In this section, you will learn about the “Recent” area in the File View, as well as the different tools and functions available here, such as pinning and unpinning documents, sharing your files, and some EXTREMELY handy Pro Tips about version control. 1. Opening a recent file Step #1: Select the ‘Recent’ icon on the left side to view your recent presentations filtered by date. Note: Recent files accessed through your OneDrive are synced between your desktop and iPad versions of PowerPoint.
  1. If you have an internet connection, the most recent version of the file will be downloaded from your OneDrive and will open on your iPad.
  2. If you do not have an internet connection BUT have previously opened the document on your iPad before, the document will open, but it will not reflect any recent changes made to the version on your OneDrive (if you’ve made any changes from your desktop).
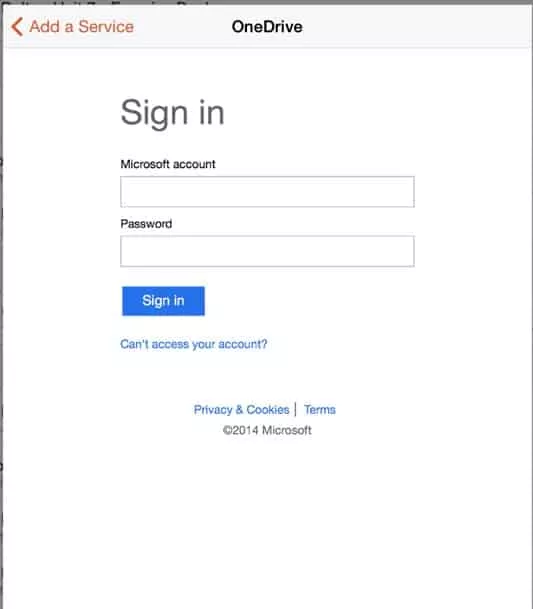
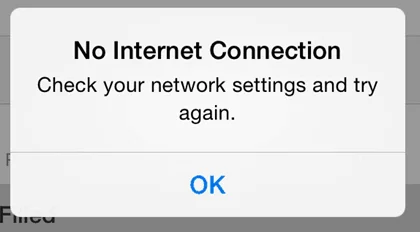
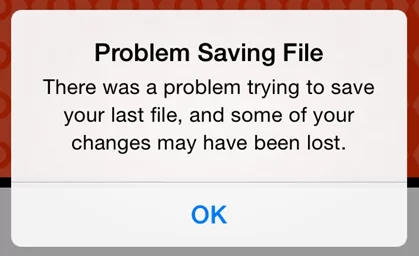
  3. If you do not have an internet connection and have never opened the document before on your iPad. You will receive a ‘No Internet Connection’ dialog box (below).
Pro Tip: Make sure you have the most recent versions of the documents you need downloaded on your iPad before you leave an internet connection. 2. More options 
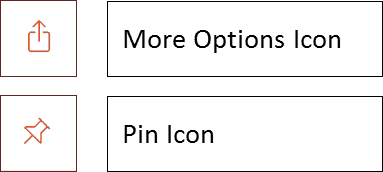
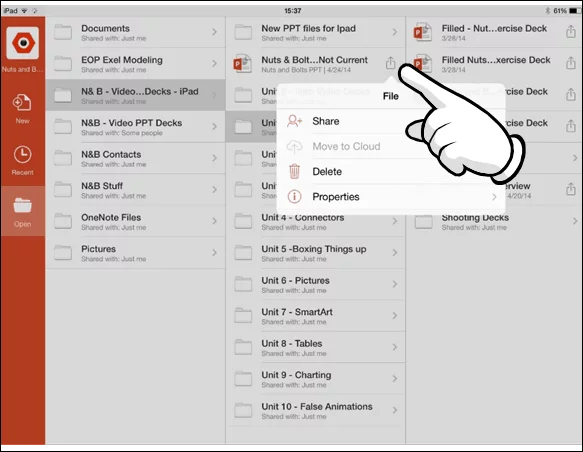
In the Recent area, you have two additional icons on the right-hand side of the screen: the ‘More Options’ icon and the ‘Pin’ icon. First, let’s look at ‘More Options’.
Selecting the ‘More Options’ icon opens a dialog box with additional options for managing your files:
Share: Options for sharing your documents:
  • Email as Link: Creates a “View Only” link or a “View and Edit” link of your file and launches the Mail App.
  • Email as Attachment: Attaches the presentation to an email, the recipient can open and edit the document natively.
  • Copy Link: Creates a “View Only” link or a “View and Edit” link of your file that you can paste into other documents or emails.

Move to Cloud: Allows you to move a presentation stored locally on your iPad onto your OneDrive. This option is only available when working with a file that is stored locally on your iPad.

Remove from Recent: Removes a file from this Recent menu here on your iPad AND on your desktop. This is not the same as deleting a file, it merely removes it from the Recent files list. To delete a file, you’ll have to go into Properties in the Open menu.

Discard Changes: Still not really clear what this does. If you figure it out, let us know.

Properties: Shows you additional properties about your file including filename, location, type, size, author, created, last modified, modified by and company.

Note: You can only create links for files stored on your OneDrive. If you have a locally stored file that you want to share a link to, you first need to move it to your OneDrive before you can create and share a link.

Note: You cannot edit any of these properties from your iPad, you must do so from your desktop version of PowerPoint. However, there are work arounds that will allow you to change the file name from your iPad. To see how that works, check out the section on renaming and duplicating your files.

Sharing: Below the file name, you can see if the document is being shared with anyone else.

Reloading Your Files: If you don’t see a file that you have recently saved to the OneDrive, push and drag down with your finger to reload the file menu. Sometimes there is some lag time depending on the speed of your internet connection.

  • To Pin a file: Simply select a non-colored pin
  • To Unpin a file: Simply reselect the colored pin

Pro Tip: Keep in mind that pinned documents’ names do not update in this recent list if you change their file name. If you try and open a pinned file that has been renamed, you will receive an error message. So if you pin files and rename them, you will need to do some pin-maintenance either on your iPad or desktop version of PowerPoint.


Open

The ‘Open’ area of the File View is where you will find all of the documents on your OneDrive services, as well as those saved on your iPad. So in this section, we’ll cover how to go about opening your files, as well as some EXTREMELY handy Pro Tips about sharing your documents and editing their properties.

Note: If you don’t see your iPad storage device or multiple OneDrive account folders in this view, it is likely because you have nested folders. Simply swipe to the right to navigate towards the left. From here you can open any of the storage devices.
More options Select the Share icon to the right of a file to get more file options:
Share: Options for sharing your documents
  • Email as Link: Creates a “View Only” link or a “View and Edit” link of your file and launches the Mail App.
  • Email as Attachment: Attaches the presentation to an email, the recipient can open and edit the document natively.
  • Copy Link: Creates a “View Only” link or a “View and Edit” link of your file that you can paste into other documents or emails.
Move to Cloud: Allows you to move a presentation stored locally on your iPad onto your OneDrive. This option is only available when working with a file that is stored locally on your iPad.

Delete: This is the only place where you can delete files from your different OneDrive accounts or from your iPad.

Properties: Shows you additional properties about your file, including: filename, location, type, size, author, created, last modified, modified by and company.

Note: You can only create links for files stored on your OneDrive. If you have a locally stored file that you want to share a link to, you first need to move it to your OneDrive before you can create and share a link. Pro Tip 1: Just below your folder names, you can see if the folder is shared with just you, or with any other people. 
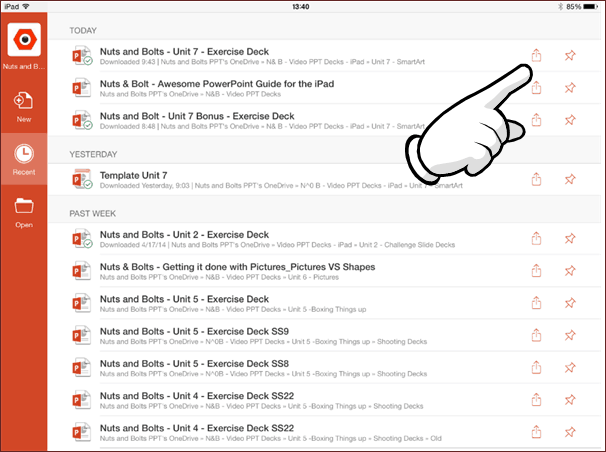
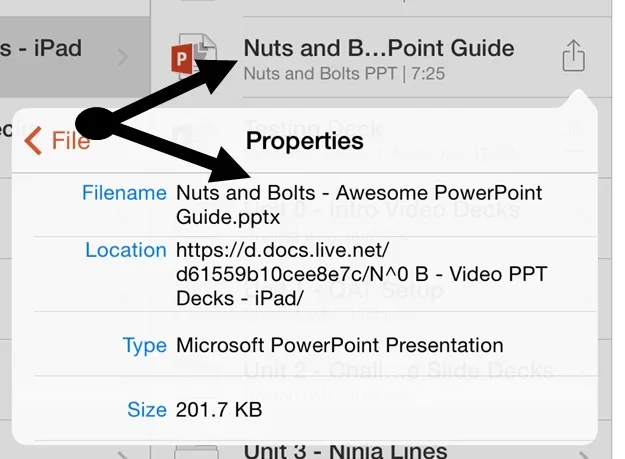
Pro Tip 2: Use the Properties Button to See Long File Names 
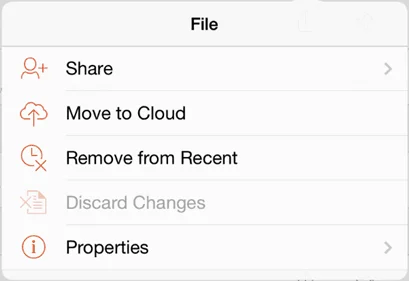
Notice in the picture above that long file names are often shortened, making it difficult to identify similarly named files. Because files download from your OneDrive whenever you open them, if your files are large, opening and closing files to find the right one can be a very slow and grueling process. Instead, simply tap on ‘Properties’ to view the full file name and identify the one you are looking for. This is SIGNIFICANTLY faster, you’re welcome! 
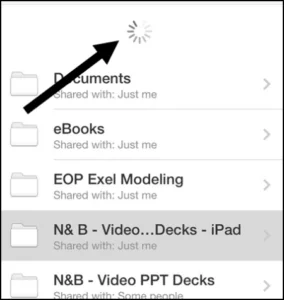
Pro Tip 3:Drag the column of folders or files downwards to refresh the files and folders. The spinning icon at the top indicates that your iPad is searching for new updates here. If a newly uploaded file doesn’t appear, wait a few minutes and then try again. There may be some lag time if you have a slow internet connection.

The Normal View


PowerPoint for iPad Navigation Buttons Overview

PowerPoint for iPad Navigation Buttons Drill Down


1. Back Button

PowerPoint for iPad Navigation File Menu Options

The undo and redo commands are the iPad keyboard of the CTRL + Z and CTRL + Y keyboard shortcuts on the desktop version of PowerPoint. Similar to the desktop version, you are given 15 commands in both directions, you can undo undo up to 15 actions, or redo 15 actions.

Note:The Navigation Bar is fixed as is. You currently cannot add other commands to it like you can on a Windows based version of PowerPoint with the Quick Access Toolbar. We hope to see this updated in a later version!

4. Autosave

The AutoSave command controls whether or not changes to your presentation are automatically saved and synced with OneDrive. By default, PowerPoint for your iPad is set to AutoSave, which occurs:

  • Periodically as you are working within your presentation
  • Immediately when you hit the back button to return to the file menu view

Don’t make the same mistake I made – save your presentation!

PowerPoint for iPad Navigation File Menu Problem Saving

This might sound obvious, but before closing PowerPoint on your iPad, hit the Back Button to return to the file menu view to ensure that the latest edits to your presentation are saved.

If you close the PowerPoint app by double-clicking the Apple button and swiping up (thus closing the app), you can lose the latest changes to your presentation…not fun!

So to ensure you save your latest changes, hit the button BEFORE closing the PowerPoint app.

AutoSave Off: if you choose to turn AutoSave off (you have to manually make this selection), a green Save button appears below the AutoSave icon
PowerPoint for iPad Navigation File Menu Save Changes

If you choose this mode, to save your presentation, you need to either:

  • Open the file menu and hit the green save button
  • Hit the back button to return to file menu view to launch the Save dialog box

5. Name

The Name command allows you to edit the name of a newly created AND unsaved PowerPoint presentation. As 90% of the presentations you work on your iPad will not be newly created or unsaved, this option will likely always be greyed out.

For example, if you create a new presentation on your iPad and have not saved it, the name command option is available. That said, as soon as you save the file with a name, this option becomes greyed out (forever).

How do you rename a file on your iPad?

To rename a presentation (or other office file) on your iPad, you either have to:

#1: Duplicate the presentation and save it with a new name. This will create a brand new document, so if you don’t want the older document, you will need to navigate to where it is saved on your iPad, or on your OneDrive and delete it. Painful, I know!

#2: Use the OneDrive app to rename your document (see our blog post on how to rename files in your OneDrive app).

6. Duplicate

The duplicate command creates a new copy of your current presentation and takes you to the File Menu View to rename your presentation (the same is true for the other Microsoft Office apps on your iPad). This is the Save As equivalent, or F12 keyboard shortcut on your desktop version of PowerPoint.

Note: Duplicating a presentation will not overwrite the original presentation, it will only create a new presentation with the new name you give it.

How to move my Presentation from OneDrive to my iPad:

To move a file from OneDrive to your iPad, you need to open the file, duplicate it and then select your iPad as the storage device. There is currently not a “move to iPad” command like there is a “move to cloud” command.

Note: Files stored on your iPad open faster than their OneDrive equivalents as they do not need to download the latest version.

7. Print PowerPoint for iPad Navigation File Menu Print Options This option is available as of version 1.01 (update your device if you don’t see this option), and it allows you to print your presentation to an AirPrint compatible device.
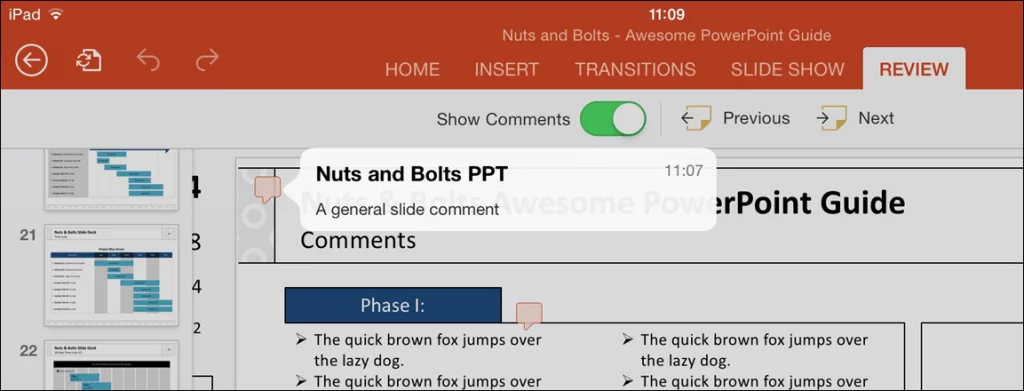
8. Restore

The restore command gives you a options for reverting back to an earlier version of your PowerPoint presentation.

You can either:

  • Back to the original you started with: Revert back to when it was last opened (PowerPoint will give you the specific time that it was opened). Doing so you get a warning indicating at what time the file was opened, so you get a sense of how far back you are going. Note: If this option is greyed out, it means there is currently nothing to revert back to.
  • Back to an online saved version of your presentation: Can revert back to an online saved version of your presentation. This option assumes that the file is saved on OneDrive and that you have an internet connection. Selecting this option launches safari and takes you to OneDrive. Log in with your Microsoft account and you will see all of the previous versions of your file by date on the left (assuming you have some) and allows you to revert back to that specific date.

9. Properties

Shows you the properties of your PowerPoint presentation including:

  • File name
  • Location
  • Type
  • Size
  • Author
  • Created
  • Last modified
  • Modified by
  • Company

Note: File Properties (other than Name) are only editable on the desktop version of PowerPoint. To modify a presentation’s name, you can duplicate the presentation and save it as a new name, or use the OneDrive app for PowerPoint to edit the presentation’s name on your OneDrive. To learn more about this, check out our article on using the OneDrive App.

The Help and Support button launches basic help, support and tutorials for PowerPoint on your iPad. This menu is not extensive, but does offer solutions to simple questions you might have.

Note: You do need an internet connection to launch this dialog box.

The Home tab

1. New slide

PowerPoint-for-iPad-Insert-Tab-1-New-Slide

This opens the PowerPoint slide gallery and allows you to pick from the available layouts within your presentation.

The five slide layouts shown in the picture are the standard layouts we use at Nuts & Bolts Speed Training for 99% of all of our PowerPoint presentations, you might have more or less slides layouts depending on your setup.

The Price of iPad Portability

Limited to Inserting Slides Only: You are limited to inserting slides layouts on your iPad. The Slide Master View is currently unavailable for PowerPoint on your iPad.

Changing a Slide’s Layout: You are limited to inserting new slides on your iPad, you cannot push a layout onto an existing slide.

To move an existing slide onto an new layout, you either need to wait until you are on your desktop version of PowerPoint, or insert a new slide layout, and copy and paste the different objects onto the new slide layout….kind of sucks, but that’s the price of portability.

2. Font styles

Copying and Pasting Style: If you are simply trying to match the font style of an object, it is often faster to copy and paste the font style you are trying to match, rather than identifying the font style, and then changing the font elsewhere

Note: Copying and pasting formatting in PowerPoint includes shape fills, shape outlines, font size, etc. So if you are trying to copy just the font style of an object without all the other formatting options applied to the object, identifying the font style and manually applying it yourself is faster.


Microsoft Account: Sign in with the account you use for OneDrive, Xbox, LIVE, Outlook.com or other Microsoft services.

Organizational Account: Sign in with the account provided by your work, school or university.

3. Font size

PowerPoint for iPad #3 Font Size Options

The font size dropdown in PowerPoint for iPad gives you three different ways to change the font size of your text:

#1 Pre-set Sizes: Select a preset size in the dropdown menu

#2 Clicker: You can use the plus and minus signs to select a font size

#3 Manually: You can double-tab the number between the plus sign and minus sign, and manually type in your desired font size

4. Bold / italics / underline

  • Bold: Creates bold text for highlighting information, often used in titles.
  • Italics: Creates italicized text for highlighting information, often used in subtitles and quotes.
  • Underline: Creates an underline text for highlight information, often used in titles and subtitles.

Note: There is no way to make a double underline in PowerPoint for your iPad.

Pro Tip: Don’t overdo it

If everything is important, nothing is important. Use text highlighting sparingly to better emphasize your points.

5. Formatting

PowerPoint for iPad #5 Formatting Options
Includes additional formatting for highlight your text within your presentation:
  • Strikethrough: Creates a strikethrough effect to emphasize that something should be removed
  • Subscript & Superscript: Creates the -25% offset subscript and +30% offset superscript formatting. These are typically used in formulas, mathematical expressions and specifications for chemicals and isotopes
Note: You are not allowed to adjust the offset percentage of the scripts on your iPad. Clear formatting reverts your text formatting back to the presentation’s default settings. It only works for text.
6a. Font color
PowerPoint for iPad #6A Font Color Optioins

Includes the basic theme colors for your PowerPoint presentation, and their resulting gradients (which you cannot manually set).

Automatic: The automatic color is determined by the “Windows Text” color set in Control Panel Display Appearance. Changing this color will affect text color in all Windows applications.

Editing Your Presentation’s Theme: Currently you are not allowed to change or edit your PowerPoint presentation’s theme on your iPad. All theme editing or updating must be done on your desktop version of PowerPoint.

Setting Your Presentation’s Defaults on Your Desktop: You can set the default formatting for your objects on your desktop version of PowerPoint and those defaults will carry over into PowerPoint for your iPad.

6b. More colors

PowerPoint-for-iPad-6B-More-Color-Options

#1 More Colors: Selecting more colors gives you a dialog box with standard colors to choose from.

#2 Recent Colors: If you use the Custom Color option to create your own colors within your presentation, this second row of recent colors populates.

#3 Custom Color: Allows you to select your own color from a color grid (which is not very useful as you cannot get a precise color).

Advanced Color Formatting: Currently there are no options to input RGB or HSL codes to create specific custom colors or apply transparencies in PowerPoint for your iPad. The eyedropper tool is also not available.

To copy a custom color style (font color, shape fill or shape outline) into your recent colors to reuse somewhere else, see our blog post on using custom colors in PowerPoint on your iPad.

7. Text styles

PowerPoint for iPad #7 Text Style Options

Includes standard WordArt styles you can apply to highlight your message.

Style Note: WordArt is often distracting and hard to read and should be used sparingly if at all. See the example of Aqua, Accent 1, Reflection below the font styles gallery I created.

Note: You do not have the Text Fill, Text Outline and Text Effect options that you have on your desktop version of PowerPoint. You are currently limited to these 20 styles.

Left / Center / Right / Justify: Dictates the horizontal text alignment for text within a given PowerPoint object.

Top / Middle / Bottom: Dictates vertical text alignment for text within a given PowerPoint object.

Horizontal / Rotate Clockwise / Rotate Counterclockwise / Stacked: Dictates the rotation of your text within a given PowerPoint object. See next page for examples of each.

Columns: Controls how many columns of text are within an object. This is often used for objects with lots of text to visually break up the text.

Note: Notice that the alignment drop down stays open so that you can make multiple selections at the same time while working in your presentation…very handy!

9. Bullet points and numbers
PowerPoint for iPad #9 Bullet and Numbering Options

Allows you to select bullet and numbers options for your lists in PowerPoint, but there are number of limitations that you should be aware of:

Limitation #1: The Ruler – As you cannot access the ruler in PowerPoint for your iPad, you are stuck with the default bullet and numbering tab spacing

Limitation #2: Custom Bullets – You cannot create custom bullets like you can on your desktop version. That said, custom bullets and numbering created on the desktop version of PowerPoint does carry over into PowerPoint for your iPad, but you are not allowed to use it outside of the shape that it is currently set in.

Limitation #3: Numbers Start at 1 – All numbers on the iPad start at 1. You cannot adjust the starting number.

10. List level increase / list level decrease

PowerPoint for iPad #10 Decrease List
PowerPoint for iPad #10 Increase List

Decrease List Level: SHIFT + TAB equivalent on the desktop version of PowerPoint. Moves a bullet or numbering backwards one indent level

Increase List Level: TAB equivalent on the desktop version of PowerPoint. Moves a bullet or numbering forward one indent level.

11. Text box

PowerPoint-for-iPad-11-Text-Box-Icon

Inserts a text box into the middle of your PowerPoint slide.

Note: All inserted objects always start in the middle of your slide. There is currently no setting to manually place/draw your objects in after you have selected them.

12. Shapes gallery

PowerPoint for iPad #12 Shapes Gallery

Opens the shapes gallery and allows you to pick a shape to insert into the middle of your PowerPoint slide.

Shapes Always Default to the Center of Your Slide: Whenever you insert an object, it always defaults to the center of your slide.

You will need to manually drag it around and position it. To make sure your shapes are the same size, either copy and paste an existing shape on your slide, or line it up next to your shape, and resize it using your SmartGuides.

The Insert tab

PowerPoint-for-iPad-Insert-Tab-Icons

1. New slide

PowerPoint-for-iPad-Insert-Tab-1-New-Slide

This opens the PowerPoint slide gallery and allows you to pick from the available layouts within your presentation.

The five slide layouts shown in the picture are the standard layouts we use at Nuts & Bolts Speed Training for 99% of all of our PowerPoint presentations, you might have more or less slides layouts depending on your setup.

The Price of iPad Portability

Limited to Inserting Slides Only: You are limited to inserting slides layouts on your iPad. The Slide Master View is currently unavailable for PowerPoint on your iPad.

Changing a Slide’s Layout: You are limited to inserting new slides on your iPad, you cannot push a layout onto an existing slide.

To move an existing slide onto an new layout, you either need to wait until you are on your desktop version of PowerPoint, or insert a new slide layout, and copy and paste the different objects onto the new slide layout….kind of sucks, but that’s the price of portability.

2. Table

PowerPoint-for-iPad-Insert-Tab-2-Tables

Inserting a table immediately gives you a default 3 by 3 table in the center of your PowerPoint slide and opens the Table Tab on the Ribbon. See Table Tab for Table Options.

Microsoft Account: Sign in with the account you use for OneDrive, Xbox, LIVE, Outlook.com or other Microsoft services.

Organizational Account: Sign in with the account provided by your work, school or university.

3. Pictures

PowerPoint-for-iPad-Insert-Tab-3-Pictures

Selecting pictures opens the Photo Gallery. Currently, you are only allowed to insert pictures that are stored locally on your iPad (in your Camera Roll, Photo Streams, etc.).

If you have company pictures on your computer that you want to access on your iPad, you can share those pictures wireless through the iCloud service so that you can access them in PowerPoint on your iPad.

Check out Apple’s step-by-step walk-through of the iCloud service.

4. Shapes

PowerPoint-for-iPad-Insert-Tab-4-Shapes-Gallery

Opens the shapes gallery and adds the Shape Tab on the Ribbon.

Default Your Shapes on Your Desktop: To avoid clumsy formatting in PowerPoint for your iPad, I highly recommend setting default formatting on the desktop version of PowerPoint for your specific decks as it carries over onto your iPad.

To set the default formatting on your desktop version of PowerPoint, simply right-click the shape you want to default the formatting for, and in the right-click menu, select set as default shape (line or text box, depending on what you are defaulting).

5. Text boxes

PowerPoint for iPad Insert Tab #5 Text Boxes

Inserts a text box into the middle of your PowerPoint slide and opens the Shapes tab on the Ribbon.

Pro Tip: Insert rectangles instead of text boxes to avoid the default “resize shape to fit text” setting. All text boxes start with this default setting and there is no way to un-select or change this formatting option in PowerPoint for your iPad.

The Transitions tab

1. Transition effect

Represents the 39 different types of transitions you can apply to your PowerPoint slides on your iPad.

PowerPoint-for-iPad-Transitions-Tab-1-Transition-Effects

32 of the 39 transition effects have effect options associated with them which changes the direction of the transition. These variations are often from left to right, or from top to bottom. For the style effects to be active, a transition with effects has to first be applied to a slide.

To change the effect options, simply select the alternative transition effect you would like for your slide.

Style Note: As transitions are often distracting when giving a presentation, I highly recommend using them sparingly (if at all) within your presentations.

PowerPoint for iPad Transitions Tab #2 Effect Options 2

Previewing a Transition: To preview your transition, hit the “from current” icon in the upper right hand corner of your screen to start the presentation form the current slide. Once in presentation mode, swipe right once to move to the previous slide, and then swipe left to preview the transition you just set for your slide.

Transitions without effects:

  • The Flash, Curtains
  • Prestige
  • Fracture
  • Crush
  • Dissolve
  • Honeycomb
PowerPoint for iPad Transitions Tab #2 Effect Options 3

3. Apply to all styles

PowerPoint-for-iPad-Transitions-Tab-3-Apply-To-All-Slides
Applies the transition associated with your current PowerPoint slide, to all of the slides within your presentation. When you apply to all slides, a black notification bar opens at the top of the slide.
Pro PowerPoint Tip: Removing All Transitions To remove all transitions from your presentation, apply the “none” transition to your current slide, and then press Apply To All slides. Applying the None transition effectively removes all transitions within your PowerPoint presentation.

The Review tab

PowerPoint-for-iPad-Review-Tab-Icons

1. Show comments

PowerPoint for iPad Review Tab #1 Comments On Off

Allows you to turn comments on or off in your PowerPoint presentation. Comments appear either in the upper left hand corner of the slide, or on the specific objects they have been added to.

Note: Comments can be only be viewed on the iPad, there is currently no support for editing, adding or removing comments from a presentation.

PowerPoint for iPad Review Tab #1 General Comment

2. Previous

PowerPoint for iPad Review Tab #2 Prevoius Comment


Cycles backwards to the previous comment within your presentation, starting from your current slide

3. Next

PowerPoint for iPad Review Tab #2 Next Comment
 
Cycles forwards to the next comment within your presentation, starting from your current slide

The Picture tab

PowerPoint for iPad Pictures Tab Icons

1. Picture styles

Represents the 28 different preset picture styles you can apply to your pictures in PowerPoint.

PowerPoint for iPad Pictures Tab #1 Picture Styles

2. Picture shadows

Represents the 23 different preset picture shadows you can apply to your pictures in PowerPoint.

PowerPoint for iPad Pictures Tab #2 Picture Shadows
3. Picture reflection Represents the 9 preset picture reflections you can add to your pictures in PowerPoint.
PowerPoint for iPad Pictures Tab #3 Picture Reflections

4. Re-order

All objects on a PowerPoint slide exist in a stacking or layering order based on when they were inserted onto the slide.

PowerPoint for iPad Pictures Tab #4 Reorder command
  • Bring Forward: Brings an object forward, one layer.
  • Bring to Front: Brings an object to the front layer of all the other objects on the slide
  • Send Backward: Sends an object backwards one layer.
  • Send to Back: Sends an object all the way to the back layer behind all the other objects on the slide.

Pro Tip 2: The Bring to Front and Send to Back commands are the fastest and easiest commands to use, as you know exactly where your objects will go. Best practice is to use these first, and then readjust any other objects that you want behind or in front of your other objects.

Note: More than one object has to be present on the slide for this command to be active.

The Shapes tab

PowerPoint for iPad Shapes Tab incons

1. Text Styles

PowerPoint for iPad Shapes Tab #1 Text Styles

The Text Styles gallery includes the 20 standard WordArt text styles that you can use to bring emphasis to or highlight the text within your presentation.

Are text styles worth using? Typically not, but it really depends on what you are trying to accomplish.

For example, for corporate presentations, WordArt is distracting and hard to read and should be used sparingly, if at all. That said, if you are using PowerPoint as a medium for creating a poster or a graphic for a website, the WordArt text styles could be useful.

Missing Text Styles Options: In PowerPoint for your iPad, the Text Fill, Text Outline and Text Effect formatting options are not available, you can currently only play with these options on your desktop version of PowerPoint.

2. Shape Styles

PowerPoint for iPad Shapes Tab #2 Shape Styles

The Shapes Styles represent the 42 different default shape formatting styles you can apply to your shapes in PowerPoint. Now although these are tempting to use, keep in mind that anyone who has PowerPoint has access to these shape styles, so simply using these default formatting styles will result in a very default looking PowerPoint presentation.

Can I change the default shapes styles in the gallery? Yes, the shape styles are dictated by your PowerPoint theme settings, so manipulating or building a corporate theme will change these default formatting styles.

3. Shape fill

Allows you to change the shape outline color in PowerPoint.

PowerPoint for iPad Shapes Tab #4 Shape Line
Although you can change the shape outline color, you currently cannot change the shape outline weight. You are restricted to the outline weights of: Outline weights of the quick styles Outline weights of other objects already existing in your presentation. For example, you can copy the formatting of a shape with a custom outline weight that you set on your desktop, and paste that formatting onto another shape, and it will inherit the shape outline. Default formatting carries over onto the iPad: If you set the default shape formatting with a custom shape outline on the desktop version of PowerPoint, that shape outline weight will carry over onto your iPad. So although you cannot manually adjust the outline weight on the iPad, all shapes will start with your default formatting.
5. Reorder All objects on a slide exist in a stacking or layering order based on when they were inserted on the slide.
  • Bring Forward: Brings an object forward, one layer
  • Bring to Front: Brings an object to the front layer of all the other objects on the slide
  • Send Backward: Sends an object backwards one layer
  • Send to Back: Sends an object all the way to the back layer behind all the other objects on the slide
PowerPoint for iPad Shapes Tab #5 Reorder

The Table tab

Table edit commands
  • Single tap a table: Get the standard object edit menu.
  • Double tap a cell within a table: Get the table specific edit menu.
Table Command Options:
  • Cut: Cuts the text out of the selected cell.
  • Copy: Copies the text in the selected cell.
  • Paste: Pastes in your last copied text or object. Note that you cannot copy and paste formatting between tables.
  • Clear: Clears the contents of the cell.
  • Delete: Opens an additional menu allowing you to either delete the column or row you are currently in.
  • Insert: Allows you to insert a column to the left of the current cell, or a row above your current cell.
  • AutoFit: Collapses the column width to fit the text within it.
PowerPoint for iPad Table Edit Commands Options
PowerPoint for iPad Table Edit Commands Insert Row Column
PowerPoint for iPad Table Edit Commands Delete Row Column
Note: When inserting tables rows or columns, the width and/or height of your table will not change. The new row or column will simply be squeezed within your current table. Note: AutoFit only works for column widths. There is currently no way to automatically collapse row heights. You instead need to adjust row heights manually.
PowerPoint for iPad Table Tab Icons
PowerPoint for iPad Table Tab #1 Table Styles Options
The table styles option represents pre-formatted table styles you can apply to the different Table Styles discussed below. Before manually making any of these formatting adjustments to your tables, I highly recommend checking if one of these options fulfills your requirements as they are much faster to apply and remove using the Table Styles Option drop-down.
  • Header Row: Formats the first row in your table as a header row
  • Total Row: Formats the last row in your table as a total
  • Banded Row: Adds a rotating fill color to the horizontal rows of your table
  • First Column: Highlights the first column in a table
  • Last Column: Highlights the last column in a table
  • Banded Columns: Adds a rotating fill color to the vertical columns of your table
PowerPoint for iPad Table Tab #1 Table Styles Options Selected
PowerPoint for iPad Table Tab #1 Tables Styles Options All Applied 2

​​​​Note: As you make table selections, the style gallery will populate with a live preview of those options for the different table styles.

2. Table styles

PowerPoint for iPad Table Tab #2 Table Styles
The Table Styles drop down represent different pre-formatted table styles you can automatically apply to your table. Note that applying a table style will remove or override any manual formatting adjustments you have made to your table.

From a formatting perspective, I highly recommend starting with a pre-formatted table style that gets you closest to your end result, and then manually tweaking the table from there.

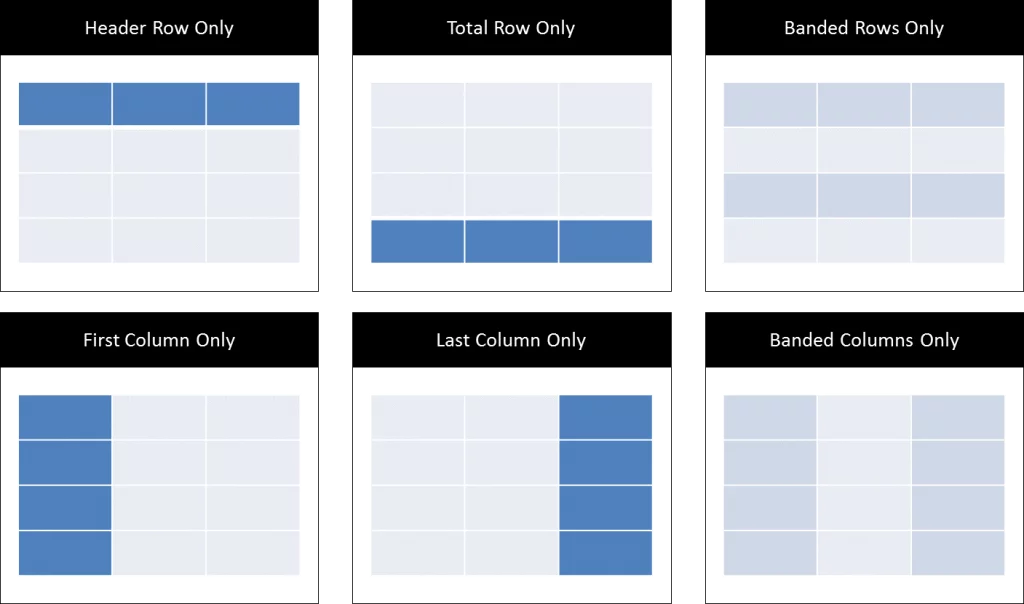
Lists the different default table styles you can apply to your tables in PowerPoint.

Note: The Styles Options (discussed above) that you have selected, will be shown within the Table Styles Gallery making it easier to pick the default style that get you closest to your end goal.

Style Note: Use the formatting / highlighting sparing to increase the effectiveness of your table.
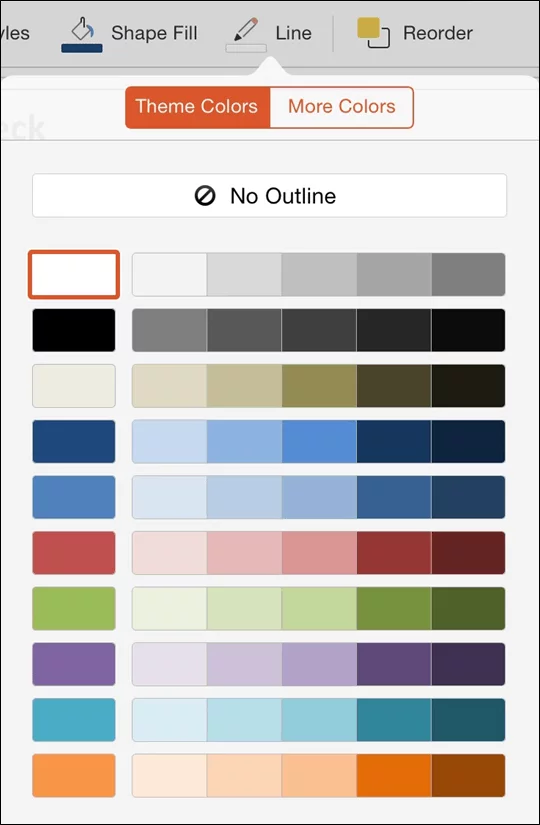
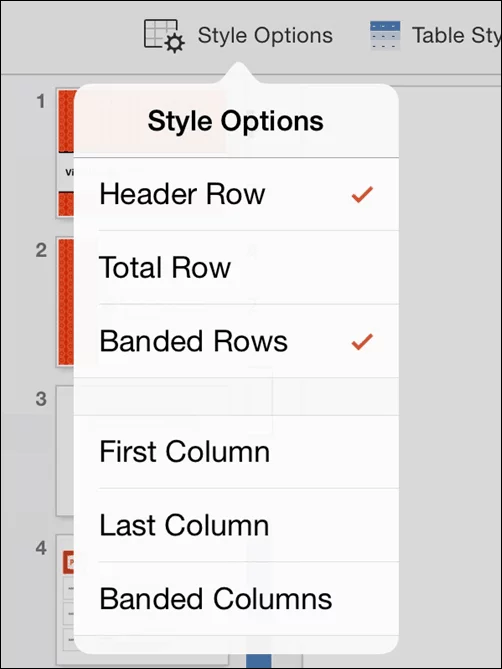

3. Shading

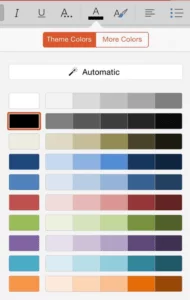
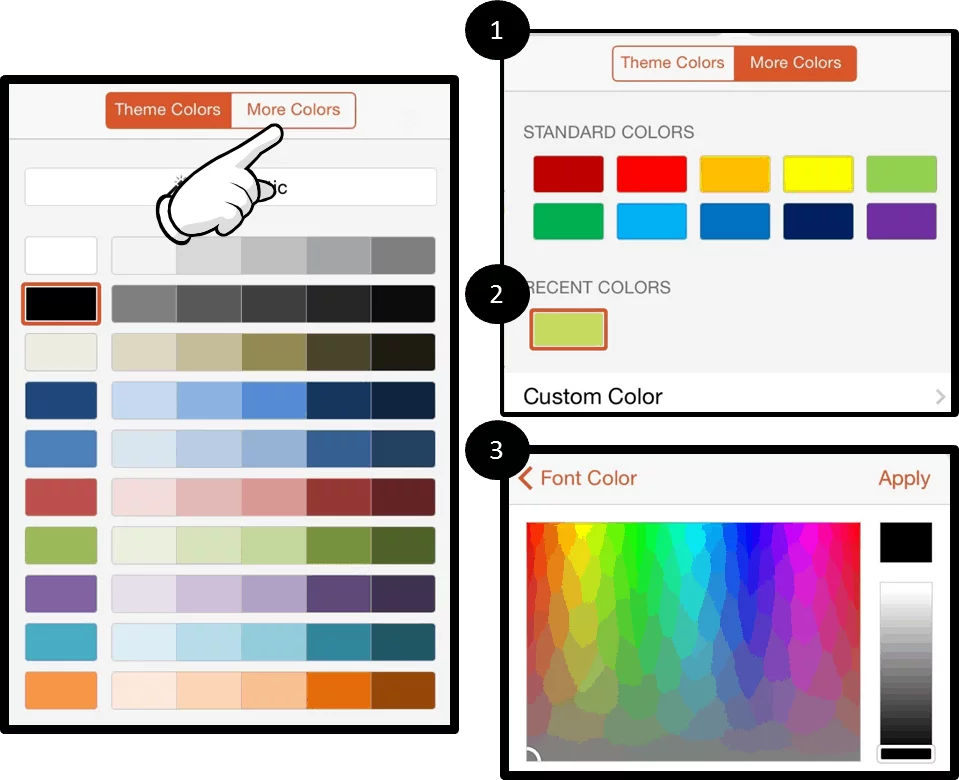
Tapping the fill colors opens the theme colors drop down, which you can use to manually override any of the Table Styles you have already applied to your table.

PowerPoint for iPad Table Tab #3 Table Shading

Pro Tip: To reverse the banding of your rows or columns, first, manually format the first row or column with a fill color, and then toggle on or off the header row option or the first column option.

Note: You are not able to change the outline weights or colors of a table or cells within a table in PowerPoint on your iPad. All table border formatting will have to wait until you are on your desktop of PowerPoint.
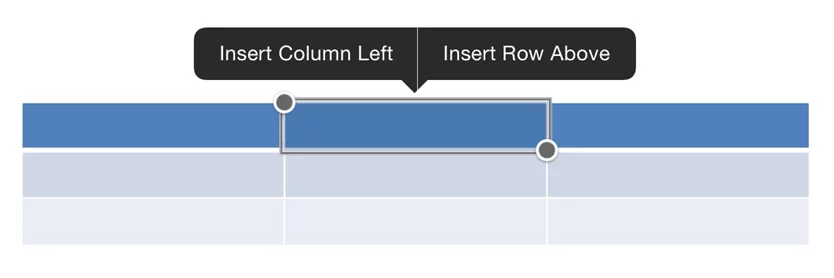
4. Insert

Gives you options to insert rows above or below the current cell you have selected within your table, or columns to the left or right of the current cell you have selected.

PowerPoint for iPad Table Tab #4 Table Insert


How can I insert multiple rows or columns at the same time?
 To insert multiple rows or columns within your table, first select multiple rows or columns within your table. With multiple rows or columns selected, when you click insert, the same number of rows or columns will be added to your table.
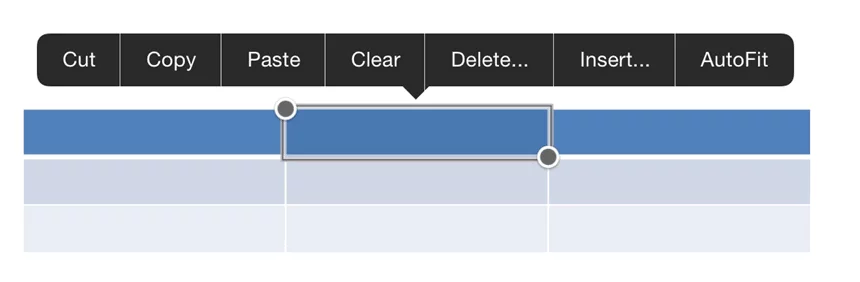
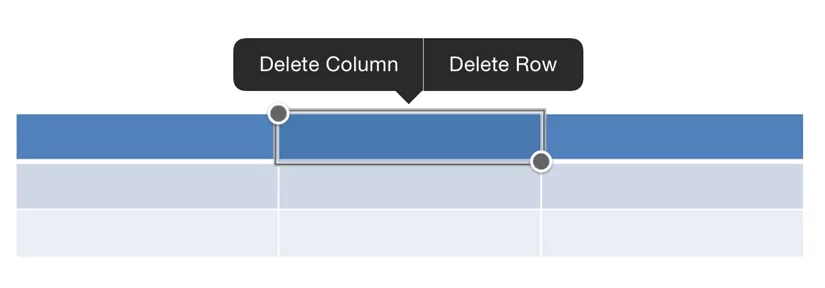
5. Delete

Deletes the row, column or table that you currently have selected.

PowerPoint for iPad Table Tab #5 Table Delete

6. Autofit

AutoFit collapses the column width to match the text currently within the column. This option currently only works for columns widths, and not for row heights.
PowerPoint for iPad Table Tab #6 Autfit


How do I AutoFit multiple columns at the same time?
 First select the individual columns (or the entire table) before selecting AutoFit.

7. Alignment

PowerPoint for iPad Table Tab #7 Alignment

The Text Alignment command changes the horizontal text alignment (Left, Center, Right) or the vertical text alignment (Top, Middle, Bottom) of a cell within the selected cell in your table (similar to using the Text Alignment tool on your shapes or other PowerPoint objects).
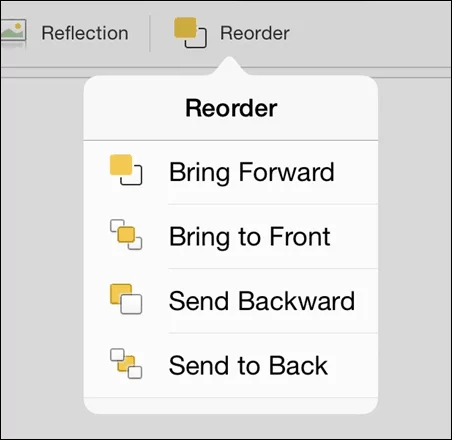
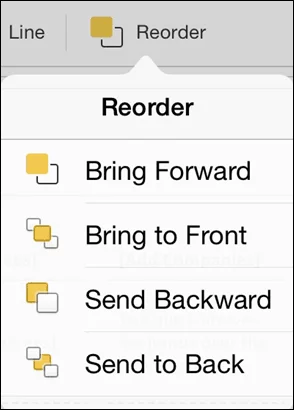
8. Reorder

The Reorder command allows you to change the layering of the objects on your PowerPoint Slide. All objects on your slide exist in a stacking or layering order (one on top of the other) based on when they were inserted on to the slide.

  • Bring Forward: Brings an object forward, one layer
  • Bring to Front: Brings an object to the front layer of all the other objects on the slide
  • Send Backward: Sends an object backward one layer
  • Send to Back: Sends an object all the way to the back layer behind all the other objects on the slide

PowerPoint for iPad Table Tab #8 Reorder

Pro Tip: When using the reorder command on a busy PowerPoint slide with lots of objects, the Bring to Front and Send to Back commands are the fastest and easiest to use, as you know exactly where your objects will end up.


Why is the reorder command grayed out?
 More than one PowerPoint object has to be present on your slide for the Reorder command to be active.

The Notes pane

1. Opening the Notes paneTo open the Notes Pane, tap in the lower right-hand corner of your screen where it says ‘Notes’.

PowerPoint for iPad Notes Pane #1 Opening


How can I tell if a PowerPoint slide on my iPad has notes associated with it?
 You can tell whether or not a particular slide has notes associated with by the little icon next to the word Notes, see notes icon below.


How do I best use the Notes pane on your iPad?
 I find the notes pane useful for quickly reviewing notes prior to your presentation, as the automatic full screen mode makes it easy to both review the notes for a particulate slide, and see the thumbnail of that particular slide, outlined in orange on the left side of the screen. The notes pane will also conveniently stay open on your iPad until you manually close it.

2. Closing the Notes pane

To close the Notes Pane in PowerPoint on your iPad, simply click the notes icon in in the upper right-hand corner of the slide, and you will return to the Normal View of your presentation.

PowerPoint for iPad Notes Pane #2 Closing

Share & Slide Show View

PowerPoint for iPad Share Icons 1PowerPoint for iPad Share Icons 2

Share

These are the options for sharing your documents:

  • Email as Link: Creates a “View Only” link or a “View and Edit” link of your file and launches the Mail App.
  • Email as Attachment: Attaches the presentation to an email, the recipient can open and edit the document natively.
  • Copy Link: Creates a “View Only” link or a “View and Edit” link of your file that you can paste into other documents or emails.

Slide Show

The Slide Show icon starts your presentation in slide show mode starting form the current slide. Besides running your presentation, this is great for spot checking your content and for reviewing any transitions you have applied as there is no “live preview” for them on your iPad.

The Slide Show icon is the equivalent of hitting the F5 keyboard shortcut on your desktop version of PowerPoint.

Help us keep this article updated

We hope you’ve found this PowerPoint for iPad guide helpful.

If you’ve see something that we’ve missed, PLEASE let us know and we’ll do our best to update this guide ASAP.

Oh, and we hope you’ve paid special attention to the pro tips and tricks we’ve sprinkled through the guide to help you avoid major errors, or to help you troubleshoot issues.

Cheers!

What’s next?

[thrive_leads id='35812']