The Quick Access Toolbar or QAT for short, is the best productivity feature ever added to the Microsoft Office Suite as it puts your hardest to reach, most frequently used commands in an easy-to-use place. You can now even add the Microsoft Copilot group to your QAT so you can easily access the newest AI tools and features inside the Microsoft Office suite whenever you need them.
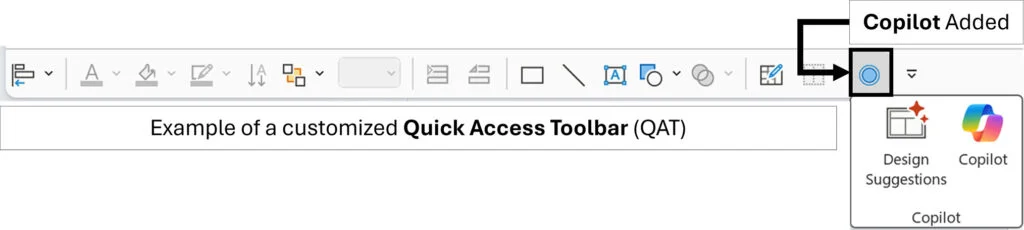
If you are not sure what the Quick Access Toolbar is, or how to use it, I highly recommend reviewing the guide below as it will improve your productivity as soon as you put it to use.
This is one of the focal points during our live training sessions, and is usually one of the biggest "speed" takeaways for consultants and bankers. Setting up their hardest to reach, most frequently used commands, and QAT shortcuts.
How to add Copilot to your Quick Access Toolbar
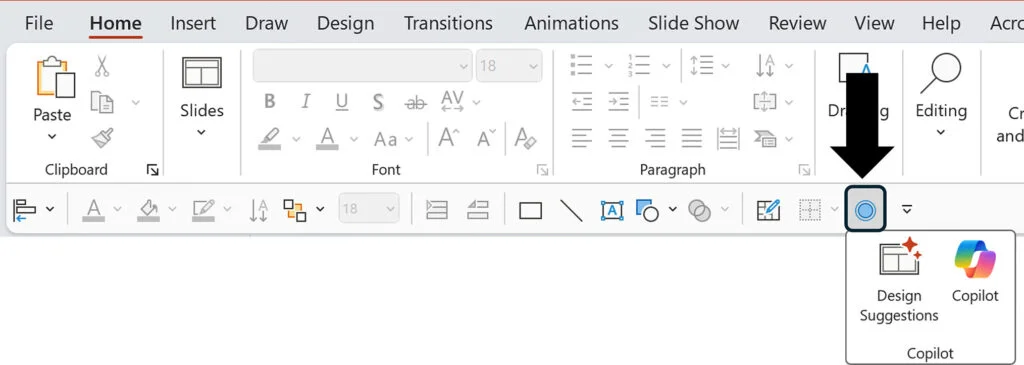
Microsoft Copilot can be added to your Quick Access Toolbar, just like any other command or feature in PowerPoint as I describe below. That said, only the Copilot group can currently be added, which includes both the Design Suggestions command (AKA Designer) and the Copilot command.
You can now find Copilot under File → Options → Quick Access Toolbar → All Commands, but there is an important catch.
Despite the name, PowerPoint still does not add the standalone Copilot button to your Quick Access Toolbar. It adds the Copilot group, which includes both Design Suggestions and Copilot.
So if your goal is to put only the Copilot button on your QAT, I still have not found a way to do that.

To add the Copilot group to your Quick Access Toolbar:
Navigate to the Home tab
Right-click Copilot (on the far right)
Select Add Group to Quick Access Toolbar
Note that because the Copilot group is added to your Quick Access Toolbar, it appears as a blue circle. Clicking the blue circle with your mouse (or using your QAT shortcuts described below) gives you immediate access to the Microsoft Copilot commands, regardless of where you are in the PowerPoint ribbon.
If your PowerPoint Copilot button is docked or floating, you can use the shortcut Alt + C to activate Copilot, then Enter to select it.
Are you using Copilot in Excel or Word? The QAT command there is labeled Assistance (which is bizarre), and it behaves differently. See the Copilot button in Excel and the Copilot button in Word.
What is the Quick Access Toolbar?
The Quick Access Toolbar (or QAT for short) is the customizable toolbar of commands and features inside each of the Microsoft Office Suite programs (Word, Excel, PowerPoint, etc.). The purpose of this toolbar is to help you quickly access your most frequently used commands and features to speed up your workflow.
The toolbar was introduced in Microsoft Office 2007, and it is arguably the best productivity feature that Microsoft has ever added to its Office Suite. The two main reasons it is the best are:
The QAT is 100% customizable, allowing you to add the commands and features you use most during your workday
On Windows based versions of Microsoft Office, the QAT creates easy to use Alt driven shortcuts of the commands and features you add to it (even if those commands and features don’t have shortcuts associated with them)
Customizations you make to the Quick Access Toolbar only display on your computer, which makes the QAT a program-level setting. The QAT does not travel with your Microsoft Office documents. To share your QAT with your colleagues or clients, you will need to export it from your computer and import it on their computer. See how to export your QAT below.
Where is the Quick Access Toolbar?
The Quick Access toolbar is either above or below the ribbon in Microsoft Word, Excel, and PowerPoint.
And in the latest version of Microsoft Office (Microsoft 365) you have the option to hide your Quick Access Toolbar too (see next section).
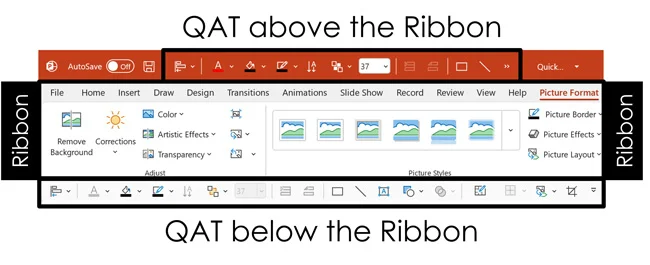
Notice in the picture above how many more commands you can put on your QAT when you place it below the Ribbon. This is one reason I recommend always putting your Quick Access Toolbar below the Ribbon.
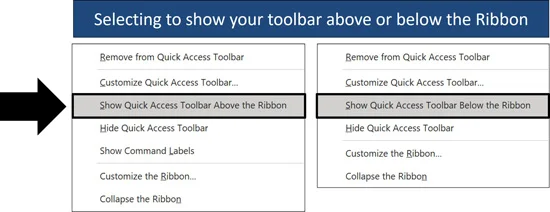
To change the location of your Quick Access Toolbar, simply:
Right-click anywhere within the Quick Access Toolbar
Select Show Quick Access Toolbar Above the Ribbon or Show Quick Access Toolbar Below the Ribbon
If you do not see the option to show the toolbar above or below your Ribbon, it means that either:
You have not right-clicked the actual Quick Access Toolbar (you might have accidentally right-clicked the Ribbon instead, so try again);
Or your QAT is hidden (see the next section).
How to Show or Hide the Quick Access Toolbar
In the latest version of Microsoft Office (the Microsoft 365 subscription), you can now hide and unhide the Quick Access Toolbar. If you have an earlier version of Office, there is no way to hide your Quick Access Toolbar like this.
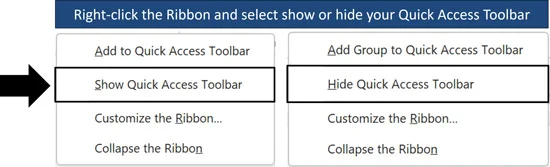
To show or hide the Quick Access Toolbar:
Right-click anywhere in the Ribbon
Select Hide Quick Access Toolbar or Show Quick Access Toolbar
Because the Quick Access Toolbar is such a good productivity feature, I never recommend hiding it. However, if you know for a fact that you’ll never use and customize it with your most frequently used commands and features, then you can choose to hide it to save some space on your screen.
Turn off the command labels
If every icon on your toolbar has its name printed next to it, a recent Office update turned on command labels. They take up about a third of the space a power user's toolbar needs, and once you know your Alt shortcuts you will never read them.
To turn them off, click the small dropdown arrow at the end of your Quick Access Toolbar and select Hide Command Labels. The toolbar collapses back to icons only. The same menu turns them back on if you ever want them.
Quick Access Toolbar missing? Four places it hides
If your Quick Access Toolbar has vanished, it is almost always one of these four things.
It is hidden. Right-click anywhere in the Ribbon and look for Show Quick Access Toolbar. Click it and the toolbar comes back where it was.
It is above the Ribbon. If you cannot find it below the Ribbon, look at the very top of the window, in the title bar next to the AutoSave switch and the file name. That is the toolbar's other home. Right-click it and choose Show Quick Access Toolbar Below the Ribbon to bring it down where you can see it and read the file name at the same time.
It is below the Ribbon. You might only have a few commands on it, so it might look blank. Hit the Alt key on your keyboard and look for 1, 2, 3, 4 etc. If you see those numbers, those are commands on your Quick Access Toolbar.
It is empty. If you (or someone) removed every command from your Quick Access Toolbar, all you will see is the Customize button, and it will not light up with a number when you press the Alt key.

An empty QAT still shows the Customize Quick Access Toolbar command, but it does not light up with the Alt key. Simply add some commands to your Quick Access Toolbar to access its shortcuts.
How to Customize the Quick Access Toolbar
Customizing the Quick Access Toolbar can take a little bit of time as you figure out the best setup for your situation. Aside from that, it’s a very easy and flexible process. By flexible, I mean that you can add, remove, and rearrange commands on the fly to best suit the tasks you are doing.
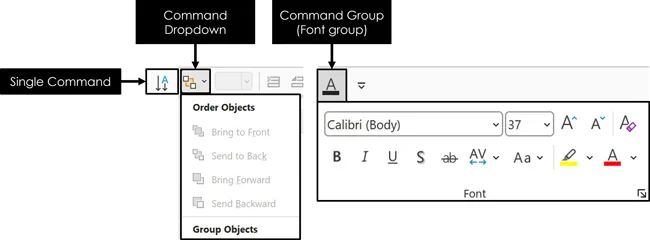
As pictured above, you can customize your toolbar with:
Single commands
Dropdowns (multiple options for a single command)
Groups of commands (adding multiple options and dropdowns)
The advantage of adding a dropdown or group of commands is that you get to put multiple commands and features in a single slot on your Quick Access Toolbar (see my 7 QAT tips below for more details).
There are a couple of ways to customize the Quick Access Toolbar, and we’ll go through them all below.
1. Adding and removing commands using your Ribbon
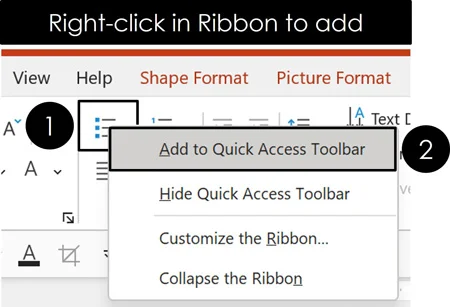
To add a command, dropdown, or group of commands to your Quick Access Toolbar, simply:
Right-click the command, dropdown, or group of commands
Select Add to Quick Access Toolbar
Your selection is then added to the end of your toolbar. You will learn how to rearrange the commands on your toolbar in just a minute.
This works on whole Ribbon groups too (or groups from PowerPoint add-ins). Right-click the name at the bottom of any group (Font, Paragraph, Arrange, Shape Styles) and select Add Group to Quick Access Toolbar. The entire group lands on your toolbar as one dropdown, which means the Shape Format commands you can normally only reach once a shape is selected are one click away from anywhere.
Some commands are not on the Ribbon at all, so there is nothing to right-click. For those, open the Quick Access Toolbar dialog box (next section), change the Choose commands from dropdown to Commands Not in the Ribbon, and scroll. Convert to Freeform, individual shapes like Rectangle and Line, and a long list of others live there.
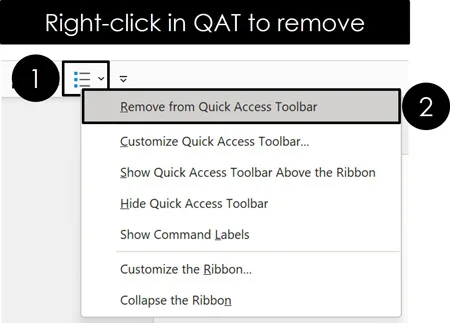
To remove a command, dropdown, or group of commands, simply:
Right-click the command, dropdown, or group on your QAT
Select Remove from Quick Access Toolbar
You can alternatively add and remove commands using the Quick Access Toolbar tab in the Options dialog box for Word, Excel, or PowerPoint.
2. Adding and removing commands using the Quick Access Toolbar dialog box
An alternate way to add, remove, and rearrange commands to your Quick Access Toolbar is to use the PowerPoint options dialog box. This gives you the most options for what you can do with your QAT.
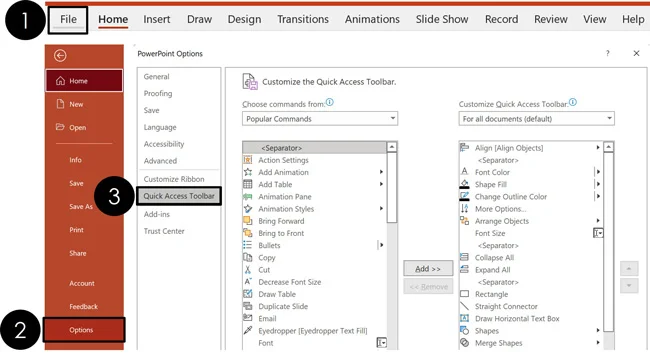
To open the PowerPoint Options dialog box to edit your Quick Access Toolbar:
Click the File tab
Select Options
Select Quick Access Toolbar on the left
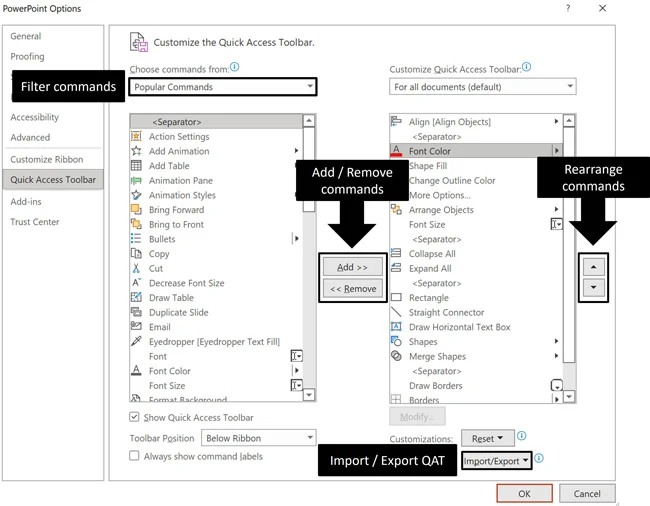
Once you are in the dialog box, you can:
Filter the commands based on the different Ribbon groups (including commands that are not in the Ribbon)
Add or remove commands
Rearrange the commands on the right using the up and down arrows
Import and export your Quick Access Toolbar
If you want to add a section break to your QAT, you will find it at the top of the most popular commands. Simply select the Separator and click the Add button as pictured below.
Another important aspect about this dialog box is that you can designate whether you add the commands to your global QAT or to your presentation level QAT, which we will discuss next.
3. Global QAT versus a Local QAT
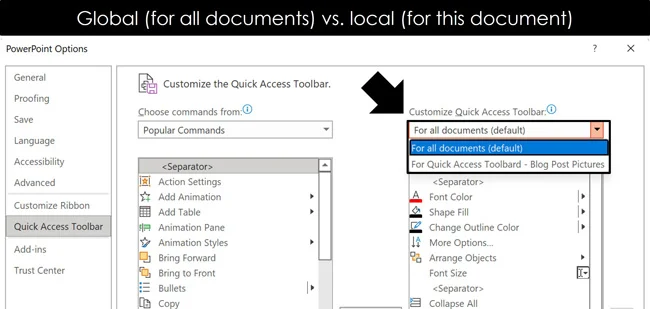
In the Quick Access Toolbar dialog box, you have the option to use your custom QAT for all your documents, or just for the specific document you are in. This is what I refer to as a Global QAT versus a Local QAT.
If you add the command to your global QAT (the default option), it will show up whenever you open a file for that specific program. For example, adding the Alignment Tool to your global QAT for PowerPoint, means that any time you open a PowerPoint presentation the Alignment Tool will be there.
If you only want a specific set of commands to appear for a particular document, click on For all documents (default) to open the dropdown and select the current document. Any commands added this way will appear at the end of your global QAT whenever you open this specific document.
This is useful if there is a document you’re creating that requires a special set of additional commands.
Four things to know before you build a local QAT:
You can only add local commands from the Options dialog box. Right-clicking a command in the Ribbon always adds it to your global toolbar.
A local QAT cannot be exported or imported on its own. The export file below only carries your global toolbar.
Resetting your global QAT leaves the local one alone, and the reverse is also true.
The local toolbar is saved inside the file, so it survives when you duplicate the presentation. That makes it handy for a team template that ships with its own commands.
Rearranging Commands on Your Quick Access Toolbar (Shortcuts)
The reason that rearranging commands on your Quick Access Toolbar is important is that their keyboard shortcuts are dictated by their placement. This gives you the opportunity to choose which shortcuts you use to access these commands.
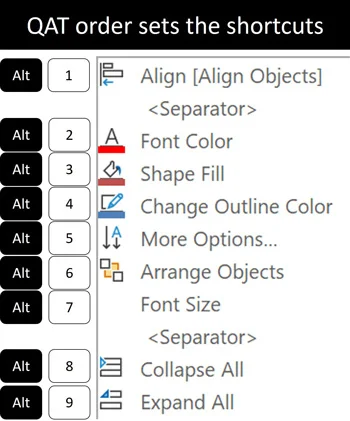
For example, the first command on your Quick Access Toolbar will always have the keyboard shortcut Alt, 1. The second command will always have the keyboard shortcut Alt, 2.
This allows you to rearrange the commands and features in the most logical order so you can use your Alt key to activate them. This is one of the biggest timesaving tricks of the Microsoft Office suite!
To open the PowerPoint Options dialog box to edit your Quick Access Toolbar:
Click the File tab
Select Options
Select Quick Access Toolbar on the left
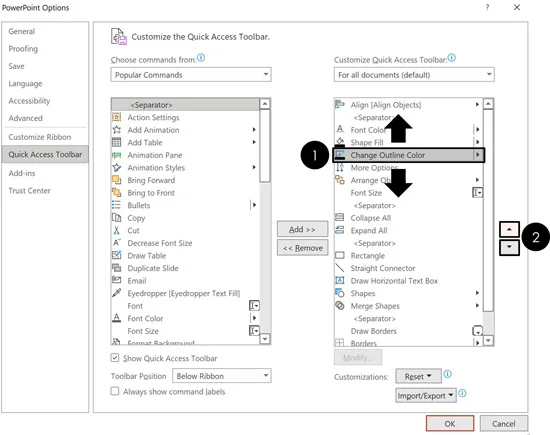
In the dialog box, to rearrange the commands on your toolbar, simply:
Select the command you want to move
Click the up or down arrow
Again, the order of your commands dictates the Alt driven keyboard shortcut to access it. The first command on the toolbar will always be Alt, 1. The second Alt, 2, up to Alt, 9. Past nine, the badges become Alt, 0, 9 counting down to Alt, 0, 1, then Alt, 0, A onward.
You never need to memorize any of it. Press Alt and read the KeyTip for the command you want. You also don't need to hold done the 0 and A to make it work. Just tap the first letter, then the second letter.
7 tips for setting up your Quick Access Toolbar
Having a toolbar is easy. Having one that saves you an hour a week takes a little strategy. These are the seven rules I teach in our courses.
Unhide it and put it below the Ribbon. You cannot use a toolbar you cannot see, and below the Ribbon gives you more slots, keeps the file name visible in the title bar, and puts the commands closer to your slide.
Do not add commands that already have easy shortcuts. Save (Ctrl + S ), Undo (Ctrl + Z ) and Redo (Ctrl + Y or F4 ). Learn those and keep the toolbar for commands that don't have keyboard shortcuts.
Add the commands that are buried. A command that takes four or five Ribbon keystrokes to reach (Alt, H, G, A, T for Align Top) becomes two on the toolbar (Alt, 1, T). Anything shallower is faster from the Ribbon.
Position 1 is the Alignment tool. It is the single most-used command in slide building, it has no shortcut of its own, and at Alt, 1 it becomes the fastest thing on your keyboard.
Put your formatting commands next, in a sequence. Font Color, Shape Fill and Shape Outline at Alt, 2, Alt, 3 and Alt, 4 means you format any selected object with three keystrokes you never have to think about.
Use dropdowns and groups to save slots. One Arrange dropdown at Alt, 6 gives you ten commands in one space (send to back, bring to front, rotate, flip, align).
Split the toolbar into a keyboard section and a mouse section. Commands you fire by shortcut go first, in numbered positions. Commands you will click anyway (Rectangle, Line, Text Box, anything that needs a drag) go at the end, where a number is wasted on them.
Resetting Your Quick Access Toolbar
If you don’t like how your Quick Access Toolbar is set up, you can always reset it to the default for each of the Microsoft Office programs. As the toolbar is unique to each program, you will need to do this for each one.
The first step to resetting your Quick Access Toolbar is to navigate to the PowerPoint Options dialog box.
To open the PowerPoint Options dialog box to edit your Quick Access Toolbar:
Click the File tab
Select Options
Select Quick Access Toolbar on the left
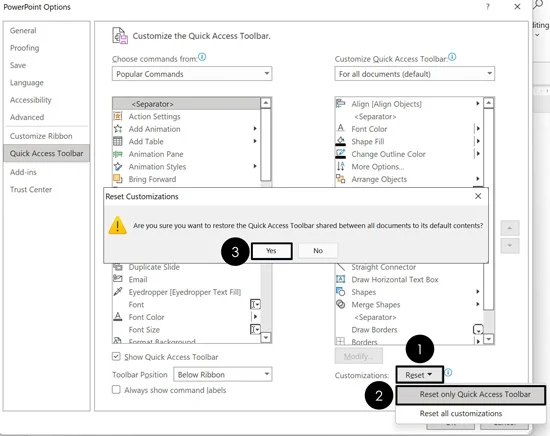
Once you are inside the PowerPoint Options dialog box, to reset your Quick Access Toolbar, simply:
Open the Reset dropdown
Select Reset only Quick Access Toolbar
Resetting your Quick Access Toolbar reverts it back to its default settings. Depending on your version of Microsoft Office, your toolbar might reset with a different number of commands.
Once you have your Quick Access Toolbar customized, you can share it with your team so that everyone has the same setup.
The Quick Access Toolbar does not travel with your Microsoft Office documents. Instead, it is a customized file installed on your computer for Word, PowerPoint, and Excel. That means that to share your toolbar customizations with colleagues, you’ll need to export and import it on each computer.
The first step for both processes is to first navigate to the PowerPoint Options dialog box and select the Quick Access Toolbar, as pictured below.
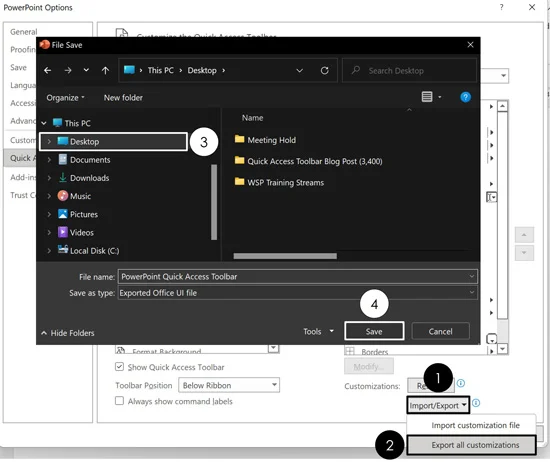
1. How to export a Quick Access Toolbar
Once you are inside the PowerPoint Options dialog box, to export your Quick Access Toolbar, simply:
Open the Import/Export dropdown
Select Export
Choose a destination on your computer
Click OK
Your QAT then exports as a .exportedUI file that your clients and colleagues can then import into PowerPoint.
The position of the QAT in relation to the Ribbon (above or below) does not save with the exported file. So the person who imports the file will need to adjust that setting on their own.
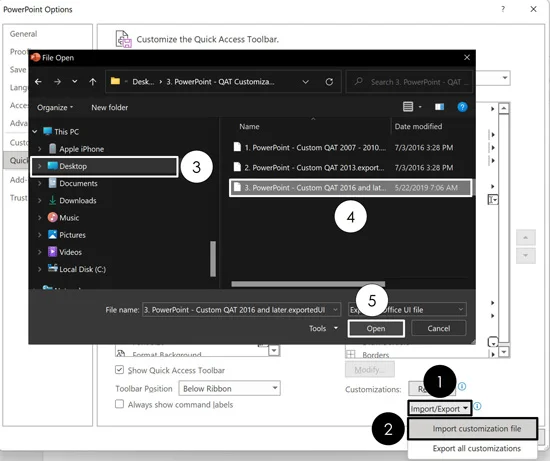
2. How to import a Quick Access Toolbar
Once you are in the PowerPoint Options dialog box, to import a Quick Access Toolbar, simply:
Open the Import/Export dropdown
Choose Import
Navigate to the saved QAT file (.exportedUI filetype)
Click Open
Importing a new QAT overwrites whatever toolbar you are using. There is currently no way to amend a toolbar while importing it.
Note: Importing a custom QAT file does not change where it is positioned in relation to the Ribbon (above or below). If you need the toolbar to be in a different position than it is now, you will have to change that yourself here in the Options dialog box, by adjusting the Toolbar Position dropdown selection.
3. Troubleshooting importing a QAT file
Based on my experience training professionals in the real world, I’ve collected a few issues that might arise when trying to import a customized QAT.
Here is what might happen and how to troubleshoot it:
A Quick Access Toolbar can only be imported into the Microsoft Office program it was created for (or exported from). This means that you cannot import a toolbar created for Word into Microsoft Excel. In the same way you cannot import a toolbar created for PowerPoint into Microsoft Word. If the toolbar is not properly importing into the correct Microsoft office program, double check the file was created for the program you’re trying to import it into.
A Quick Access Toolbar file can only be imported from within one of the Microsoft office programs. You cannot double-click the file on your desktop to open it up or install it. You must use the Import dialog box.
If you do not see the QAT file when you try to import it, double check the file you are importing is not in a zipped folder. For whatever reason, QAT files do not display if they have been zipped.
QAT files can only be imported and exported on Windows based versions of the Microsoft Office Suite. If you are trying to share your toolbar with Mac users, you will instead need to manually recreate the toolbar on their computers.
If you import a QAT file and the commands do not properly display, try importing the same QAT file a second time. Sometimes the import process doesn’t fully execute. To fix it, just import the same file a second time.
If you import a file and the dialog box still looks the same, do not panic. The imported commands often do not appear in the preview list until you click OK and the dialog closes. Check the toolbar itself, not the dialog.
Exported toolbars work across PowerPoint, Word and Excel. Outlook and OneNote do not support importing or exporting a Quick Access Toolbar, so a file from PowerPoint will not load there.
Quick Access Toolbar FAQs
Quick Access Toolbar FAQs
Q: What is the Quick Access Toolbar in PowerPoint?
The Quick Access Toolbar, or QAT, is a customizable row of commands that stays available no matter which Ribbon tab you are using. It is designed to keep the commands you use most within easy reach.
Q: Where is the Quick Access Toolbar, and how do I bring it back if it is missing?
The Quick Access Toolbar can appear below the Ribbon or in the title bar at the top of PowerPoint. I recommend putting it below the Ribbon because you can fit more commands and keep the file name easier to see.
If you cannot find it in either location, right-click anywhere in the Ribbon and select Show Quick Access Toolbar.
If the toolbar looks almost empty, nothing is necessarily wrong. Newer Microsoft 365 builds can hide it, and a fresh install ships it with only a handful of commands. Add a few and the Alt numbers come back.
Q: How do I customize the Quick Access Toolbar in PowerPoint?
Right-click any command in the Ribbon and select Add to Quick Access Toolbar. The command will be added to the end of your QAT.
To reorder commands, remove them, or find commands that are not currently on the Ribbon, open the QAT menu and select More Commands. On Windows, you can also go to File > Options > Quick Access Toolbar.
The order matters, especially if you use KeyTips, so put the commands you use most near the beginning.
Q: Can I create keyboard shortcuts with the Quick Access Toolbar?
Yes, on both Windows and Mac. Microsoft Office calls these KeyTips.
On Windows, press and release Alt and Office displays a KeyTip for each command. The first QAT command is typically Alt, 1, the second Alt, 2, and so on. Rearranging your toolbar effectively lets you assign easy keyboard access to commands that may not have useful built-in shortcuts.
One thing that trips people up: tap and release each key in turn. Do not hold them down together. If your Alt shortcuts still will not respond, see our guide to shortcuts that are not working.
Mac now supports KeyTips too, although you may need to turn them on first. If you’re on a Mac, see Microsoft's guide on how to turn on KeyTips in Microsoft Office for Mac.
Q: What should I put on my Quick Access Toolbar?
Start with commands you use constantly, especially commands that do not already have convenient keyboard shortcuts or that are buried several clicks deep in the Ribbon.
For PowerPoint, I like putting Align in the first position, followed by frequently used formatting commands such as Font Color, Shape Fill, and Shape Outline, plus an Arrange command for layering, rotating, and flipping objects.
Skip commands such as Save, Undo, and Redo if you already use their built-in keyboard shortcuts. The goal is not to fill the QAT. It is to make your most repetitive PowerPoint work faster.
Q: Why can’t I find a command to add to my Quick Access Toolbar?
Open the Choose commands from dropdown and select All Commands. This reveals many commands that are difficult or impossible to find on the Ribbon.
Also keep in mind that some older commands use names you might not expect, and not every individual Ribbon control can be added to the QAT.
Q: Can I share my Quick Access Toolbar with my team?
Yes, on Windows. Go to File > Options > Quick Access Toolbar, open the Import/Export dropdown, and select Export all customizations. PowerPoint creates an .exportedUI file that another person can import from the same menu.
Importing that file replaces the other person's existing Ribbon and QAT customizations, so they should export their current setup first if they might want it back.
Also, do not double-click the .exportedUI file. It needs to be imported from inside PowerPoint.
Q: Does the Quick Access Toolbar work in Word, Excel, and PowerPoint?
Yes. Word, Excel, and PowerPoint each have their own customizable Quick Access Toolbar.
That also means customizing your PowerPoint QAT does not automatically give you the same toolbar in Word or Excel. You can build each one around the commands you use most in that particular program.
Q: Why does my Quick Access Toolbar look different after an Office update?
Microsoft has changed the QAT several times over the years. Recent versions can hide the toolbar entirely, ship it nearly empty on a fresh install, and show text labels beside the icons.
If you see command names beside your icons, open the QAT menu and choose Hide Command Labels.
If your custom commands appear to be missing entirely, first make sure the QAT is visible and that you are looking in the correct Office program, since PowerPoint, Word, and Excel each have their own toolbar.
Takeaways
The Quick Access Toolbar is one of the first things I recommend setting up in PowerPoint. A few well-chosen commands can save you a lot of unnecessary trips through the Ribbon.
Put your toolbar below the Ribbon. This keeps your commands closer to your slide and leaves more room for the file name at the top of your window.
Start with the commands you keep hunting for. In PowerPoint, I recommend Align, Font Color, Shape Fill and Shape Outline. Give the tools you use all day a place you can easily reach.
Put your keyboard favorites first. On Windows, your toolbar order determines your numbered shortcuts. Keep the commands you use from the keyboard near the beginning and the ones you prefer to click farther along.
Save toolbar space for commands that need it. If you already use Ctrl + S to save and Ctrl + Z to undo, those buttons do not need prime spots on your QAT.
Use dropdowns and groups to fit more tools. You can keep several related commands in one toolbar slot. Just remember that opening a dropdown like Align is the first step. You still choose the alignment you want.
Back up your setup once you like it. On Windows, export your customizations so you can restore them or share them with your team. Before importing someone else’s setup, export your own, because importing replaces your existing Ribbon and QAT customizations.
Good on you for looking this up.
Start with five commands and use them on your next presentation. You can refine your toolbar as you work. Those little time savings add up, especially when you have a whole deck standing between you and Happy Hour.
About the Author

Nuts & Bolts
With our famous PowerPoint tips, training and self-paced courses, we help presenters save hours and gain peace of mind. Discover the career-changing wow moments that will transform not just the way you approach your presentations, but also how you tackle your work tasks in general.