Knowing how to copy and paste on your keyboard in the Microsoft Office Suite is a mission critical time-saving task for all knowledge workers. That is because you can copy and paste just about anything on your computer to save you from otherwise having to manually recreate it.
Why bother recreating the wheel, when you can instead just copy and paste (and tweak) your existing content, right?
And while most people are limited in the number of ways they know how to copy and paste content, I’ve additionally included alternative – better ways – to copy and paste and save even more time as you work.
The better you are at using the commands, features, and keyboard shortcuts described below, the more time you will save as you will have different tools to help you speed through your work.
The Copy and Paste commands
How do you copy and paste? You either use the Copy and Paste commands, or the Copy and Paste keyboard shortcuts.
As copying and pasting content is something you will do a million times a day at your job, I recommend learning the keyboard shortcuts. That said, you do not have to use shortcuts to copy and paste content.
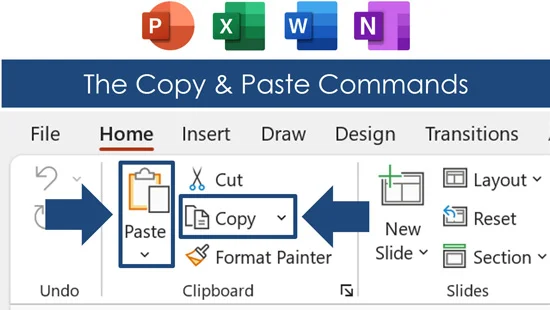
Thankfully, you will find these commands in the same place inside each of the Microsoft Office Programs as highlighted below.
1. Home tab: Copy and Paste
The first place you can find the Copy and Paste commands is on the Home tab of any of the Microsoft Office programs (Word, Excel, and PowerPoint).
To use these commands simply:
- Select something in your document that you want to Copy
- On the Home tab, click Copy
- Click into your document where you want the results pasted
- On the Home tab, click Paste
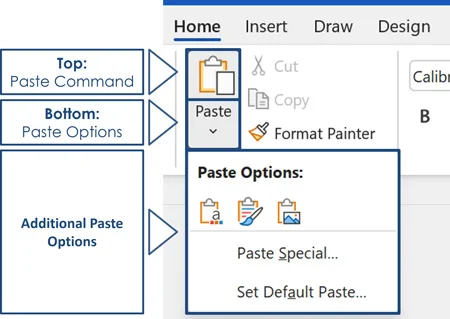
Note: The Paste button in the Ribbon is a two-part button, with a top and bottom portion. Clicking the top part of the button pastes your content as is. Clicking the bottom part (with the downward arrow) gives you additional paste options for your content.
2. Right-Click: Copy and Paste
An alternative way to copy and paste things inside the Microsoft office suite is to select something and right-click it with your mouse.
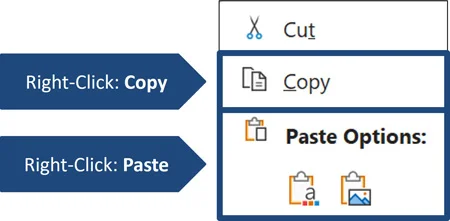
Selecting Copy and Paste in the right-click menu is obviously faster than moving your mouse back and forth to the Home tab, but it is not the fastest way to do it yet (see the Copy and Paste shortcuts below).
Copying and Pasting Keyboard Shortcuts
The Copy and Paste keyboard shortcuts are the fastest way to copy and paste content inside the Microsoft Office Suite. Because copying and pasting content is an action every knowledge worker performs daily, I highly recommend learning how to copy and paste on your keyboard to save time.
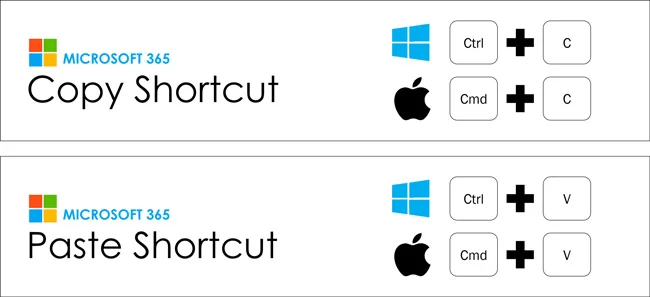
The shortcuts are Ctrl+C to Copy and Ctrl+V to Paste on your keyboard. These shortcuts are easy to remember as the starting letter of each word corresponds to the command’s name. C for Copy and P for Paste.
To copy and paste something in the Microsoft Office suite using these keyboard shortcuts, simply:
- Select an object or block of text
- Hit Ctrl+C on your keyboard
- Click into the document where you want to paste your object
- Hit Ctrl+V to paste
Using these shortcuts is faster than navigating through the Ribbon or the right-click menu (as discussed above).
NOTE: As you paste content using your keyboard, you’ll notice the Paste Options button appears in the lower righthand corner of the content you pasted in as you see in the picture below. These options will save you a ton of time as you copy and paste between programs.
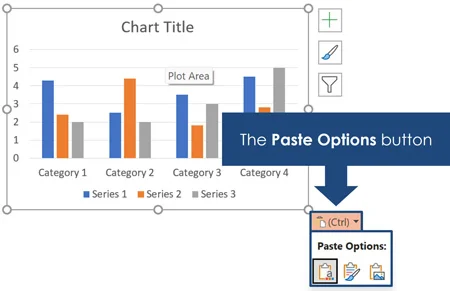
To expand your knowledge and learn how to use the Paste Options button to control the formatting of your content as you paste things between your Office documents, read our guide here.
Copy and Paste Shortcut Alternatives
Besides the classic Copy and Paste shortcuts discussed, there are additional ones that are incredibly useful to know.
Why are they better? Simply because they are often faster (requiring fewer keys) and more accurate depending on what you are trying to accomplish.
There are two specific caveats to the following copy and paste shortcuts:
- The shortcuts below are not compatible with the Microsoft Office clipboard (even if you have turned it on). The only shortcuts that ever feed the Microsoft Office Clipboard are Ctrl+C to Copy and Ctrl+X to Cut.
- The below shortcuts do not give you access to the Paste Options button to control the formatting of your content as you copy and paste. If you do want to use the Paste Options button to control the formatting of your content, you will need to use the classic Ctrl+C to Copy and Ctrl+V to Paste shortcuts.
Even with these two caveats, I bet you will find that you use the following keyboard shortcuts more than the classic Ctrl+C to copy and Ctrl+V to paste shortcuts.
1. Drag and Copy (Word, Excel, PowerPoint)
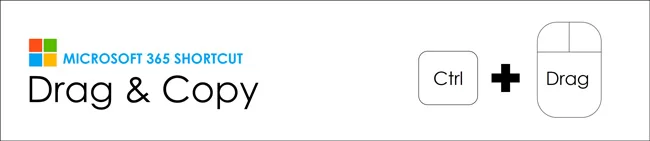
Ctrl+Drag is one of the best kept shortcut secrets for copying and pasting content. That is because it copies and pastes your content in one elegant keyboard-plus-mouse movement, placing the copy of your content exactly where you want it in your document.
To test this out, simply start dragging a piece of content in Word, Excel, or PowerPoint with your mouse. Then, before you let go with your mouse, hold the Ctrl key on your keyboard. Holding the Ctrl key, you will see a plus sign as part of your cursor indicating that you are creating a copy of your content.
Below are examples of what the plus sign looks like in the different Microsoft Office programs.
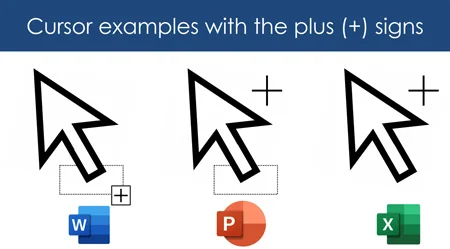
Note: If you are having trouble making this shortcut work, try dragging your piece of content first with your mouse before you add the control key on your keyboard.
Beyond copying and pasting normal objects, ranges of cells or blocks of text, you can additionally use this shortcut to:
- Ctrl+Drag slides in the Thumbnail view of PowerPoint to create copies of them
- Ctrl+Drag files and/or folders on your computer to create copies of them
- Ctrl+Drag worksheets in Excel to create copies of them
2. Drag, Copy, and Align in PowerPoint

Ctrl+Shift+Drag is one of the BEST PowerPoint shortcuts. That is because it allows you to copy, paste and align your content in one elegant swoop using your mouse.
To make this shortcut work, all you need to do is add the Shift key to the Ctrl+Drag sequence. Doing so, the copied and pasted content is forced into perfect horizonal or vertical alignment with the original object.
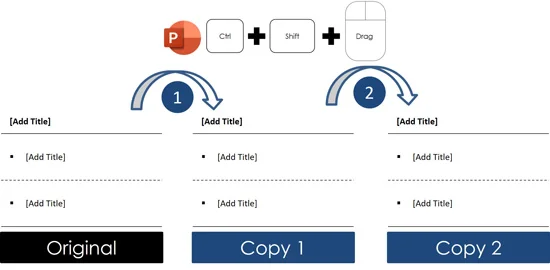
In the picture above, I have used Ctrl+Shift+Drag to create two copies of the original column on the left. The advantage of this shortcut is the two copies on the right are in perfect horizontal alignment with the original. I did not need to use the alignment tool at all.
In many cases in PowerPoint, using Ctrl+Shift+Drag is a lot faster than having to copy, paste, and align manually. Go ahead and give it a shot, I bet it quickly becomes one of your favorite PowerPoint shortcuts.
Note: When creating perfectly aligned copies of your charts, it is often easiest to first start to drag your chart to the new location on your slide before holding down the Control and Shift keys.
Alternatively, you can move your content in perfect horizontal or vertical alignment without copying and pasting it. Simply use Shift+Drag to move your content in perfect alignment somewhere else on your slide.
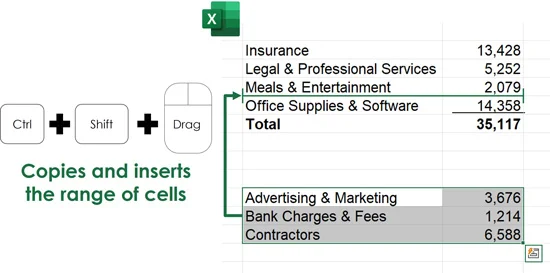
3. Drag, Copy, and Insert in Excel

Ctrl+Shift+Drag is a great Excel shortcut that allows you to create a copy of a range of cells and insert that range of cells within another range of cells without overwriting anything.
As you Ctrl+Shift+Drag your range of cells, a little crossbar pops up showing you where your content will be copied and pasted into. As the range of cells is added, all your content is moved down in your Excel spreadsheet (without overwriting anything) to make room for your added content.
Ctrl+Shift+Drag makes moving things around within your spreadsheet super easy. You can alternatively use Shift+Drag in Excel to move content around in your spreadsheet without copying and pasting it.
To expand your knowledge and learn how to copy and paste formatting in Excel using the Paste Special shortcut, read our guide here.
4. Duplicate in PowerPoint (Crl+D)

Ctrl + D in PowerPoint is the Duplicate shortcut. While it achieves the same thing, the Duplicate shortcut is twice as fast as Ctrl+C to Copy and a Ctrl+V to Paste. That’s because it is just two shortcut keys instead of four.
On top of that, the Duplicate shortcut includes a hidden jump feature in PowerPoint that is useful for quickly scaling out your slide layouts. This is how it works.
Each time you create a duplicate of your object (using Ctrl+D), the new duplicated copy jumps the same direction and same distance as your last manual movement.
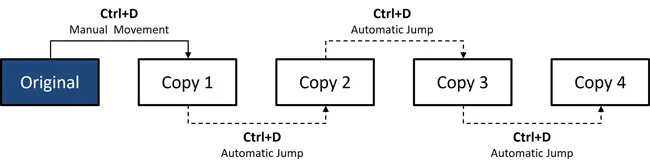
For example, let’s say you Ctrl+D to Duplicate a rectangle on your slide, and then move the duplicate of your rectangle to the right. Each time you subsequently hit Ctrl+D on your keyboard, you will get a new copy of your rectangle that is positioned the same distance and same direction away from your last duplicated rectangle.
In other words, PowerPoint remembers your last manual movement (direction and distance) and jumps each new duplicate of your object the same way. This is incredibly helpful for quickly creating layouts with lots of repeated elements that need to be perfectly distributed.
To expand your knowledge and learn more about the Duplicate shortcut in Powerpoint (and its shift-sister Duplicate Slide shortcut), read our guide here.
5. Copy Down in Excel (Ctrl+D)
In Excel, Ctrl+D is the Copy Down shortcut (or fill down shortcut).
Ctrl+D copies the contents of the topmost cell in your selected range and pastes the contents down the range you have selected. This includes copying and pasting formulas, formatting, and/or any cell references.
The best way to use this shortcut is to setup your formulas and/or cell references the way you want them, and then Ctrl+D to copy and paste them down your column of content. If you do not select a range of cells and hit Ctrl+D, Excel copies the contents of the cell directly above it.
Ctrl+D can be used on a single column of cells or multiple columns of cells. Either way, it is the content of the topmost cell or cells that is copied down.
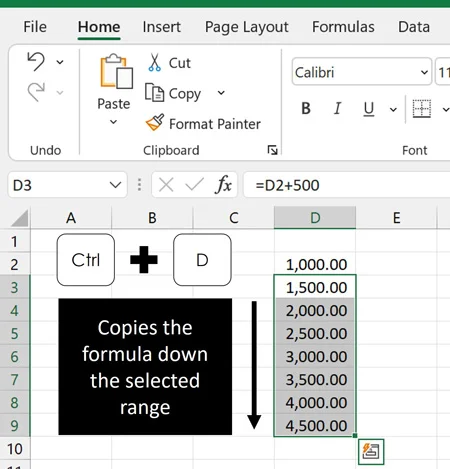
For example, if you want to create a column of numbers increasing by 500, you can use the Ctrl+D shortcut like this:
- In cell D2 type the number 1,000
- In cell D3 type the formula =D1+500 (giving you the number 1,500)
- Select the range AD to A9
- Hit Ctrl+D to duplicate your formula down the selected range
As you can see in the picture above, this gives you the range of numbers from 1,000 to 4,500 in increments of 500. Using the Copy Down shortcut like this is significantly faster than having to manually type these numbers into an Excel spreadsheet.
6. Copy Right in Excel (Ctrl+R)
In Excel, Ctrl+R is your Copy Right shortcut. When filling in a spreadsheet, this is often faster than trying to use the Copy and Paste shortcuts discussed above.
Ctrl+R copies the contents of the leftmost cell within your selected range and pastes the contents to the right of your selected range. This includes copying and pasting formulas, formatting, and/or any cell references you have typed into your spreadsheet.
Like the Copy Down shortcut, the Copy Right shortcut overwrites everything within the range you have selected. If you do not select a range within your spreadsheet, and simply select a single cell, Excel copies the contents from the cell directly to the left of your selection.
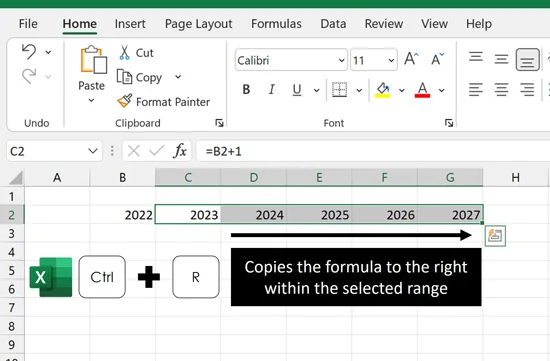
For example, if you are trying to create the years 2022 to 2027 across the top of your spreadsheet, you can quickly do so with the Ctrl+R shortcut as follows:
- In cell B2 type the year 2022
- In cell C2 write the formula =B2+1 (giving you the year 2023 in C2)
- Select the range C2 through G2
- Hit Ctrl+R to fill in the range
In this example, notice that because we used the relative reference of the previous cell plus one, each subsequent cell adds one year to the preceding year, giving you the full range of years 2022 to 2027.
7. Right-click and Drag shortcut (Word, Excel, and PowerPoint)
Another way to copy and paste involves using your mouse and keyboard together.
In PowerPoint, if you select a block of text or piece of content and hold the right-click button down on your mouse as you drag it, when you let go with your mouse you will be presented with the following options:
- Move here
- Copy here
- Link here
- Create Hyperlink Here
Selecting Copy here (or hitting C on your keyboard) copies and pastes the content you selected to that part of your document.
This right-click and drag shortcut works in Word, Excel and PowerPoint and the options you get will depend on the program you are using and the type of content you are copying.
Copy and Paste Formatting Shortcuts
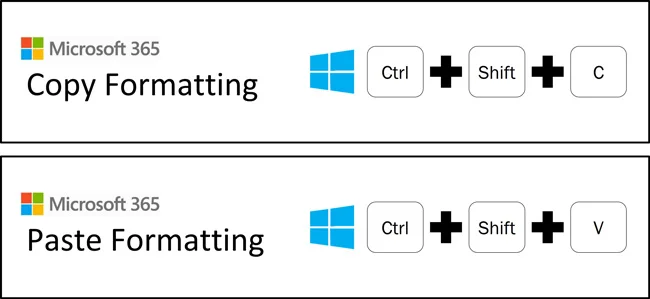
One of the best and most underappreciated sets of keyboard shortcuts in Word and PowerPoint is the copy and paste formatting shortcuts, officially known as the Pick Up Style (Ctrl+Shift+C) and Apply Style (Ctrl+Shift+V) shortcuts, but it is easier to remember them as the Copy Formatting and Paste Formatting shortcuts.
This set of keyboard shortcuts allows you to copy object and/or text formatting and apply it to something else without having to manually recreate it. As formatting can consume 40% or more of your time in the Microsoft Office Suite, this is a killer set of keyboard shortcuts to learn.
When copying an object’s formatting, all of its formatting is copied including
- Fill color
- Outline color
- Outline weight
- Font Style
- Font Size
- Special effects, etc.
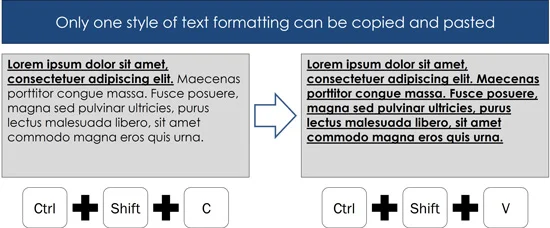
The only thing to be aware of is that when copying formatted text, the Pick Up Style shortcut only stores one style of formatted text. That means that however the first character of your selected text is formatted, that’s what will be applied when you paste its formatting.
For example, if the first character of your selected text is bold and underlined, then all the text formatting you paste will be bold and underlined as pictured below.
To be clear, before you can paste an object’s formatting, you first must copy its formatting using. To expand your knowledge and learn more about copying and pasting formatting using the Format Painter, read our guide here.
Copying and Pasting Animations in PowerPoint

Just like copying and pasting formatting, in PowerPoint you can also copy and paste your animated sequences. The great thing about this shortcut is it copies your entire animated sequence, allowing you quickly apply it other objects within your presentation.
To use this shortcut, simply:
- Animate an object the way you want it
- Select your object
- Hit Alt+Shift+C on your keyboard to copy your animations
- Click the object you want to apply those animations to
You can continue to click other objects to apply your animations too. Once you are doing pasting your animated sequence to other objects, hit the Esc key to finish.
This is another great way to save time in PowerPoint, by first setting up the animated sequence you want, and then applying the entire sequence to other objects, instead of having to build them manually from scratch each time
Conclusion
The copy and paste shortcuts are critical for all knowledge workers to know because they save you a huge amount of time. And going one step further beyond the basic shortcuts allows you to not only copy and paste objects, but also slides, formatting, etc.
As discussed above, there are a variety of other ways to copy and paste content, copy and paste formatting, and even copy and paste animated sequences in PowerPoint.
If you enjoyed the depth of this article, you can learn more about how we empower busy people with tools to boost their workday productivity here.
About the Author

Taylor Croonquist
Co-Founder, Nuts & Bolts Speed Training
Taylor Croonquist is a PowerPoint expert and trainer. Over a career spanning the globe, from consulting in New York and investment banking in China, Taylor has truly seen it all in PowerPoint. Through necessity and a natural tech savvy, Taylor honed his PowerPoint skills to the point of even blowing the minds of the Microsoft PowerPoint programming team. When he's not busy crafting PowerPoint training, you can find him reading a sci-fi series or scuba diving.