Did someone use the wrong font throughout your presentation, and now it is your job as the analyst or associate to change the font on all your slides before your big pitch? Before you make the mistake of sweeping through your presentation and changing all the fonts manually (which is a complete waste of your time), read on to see how you can get PowerPoint to automatically do this for you by using the Replace Fonts command.
Just be warned that replacing fonts does NOT guarantee that the wrong fonts will not re-appear within your presentation as other people continue to work on it. On top of that, you will need to double check your charts too. See my replace fonts warnings below.
NOTE: One of the secrets to being wicked fast at PowerPoint, is understanding how to get PowerPoint to do more of the heavy lifting for you.
I worked in consulting and investment banking for over 10 years, and would constantly see my peers and colleagues wasting time in PowerPoint like this. They just didn’t know what they didn’t know.
To jump a head of the curve, and radically improve your speed and productivity in PowerPoint, check out my PowerPoint Pro membership. It’s only $37/month and you can cancel at anytime.
Changing fonts on all your slides
NOTE: Some fonts work better than others in PowerPoint. Before replacing your fonts in PowerPoint, I recommend double-checking that you are using fonts that safely translate between all versions of PowerPoint (including Mac vs. PC versions of PowerPoint). To see my recommend lists of safe fonts in PowerPoint, read my guide on PowerPoint fonts.
How to change fonts on all slides

To change your fonts on all slides in PowerPoint, simply:
- Navigate to the Home tab
- Click the Replace dropdown arrow (don’t just select replace)
- Select Replace Fonts
- Click the Font Style you want to replace (Replace:)
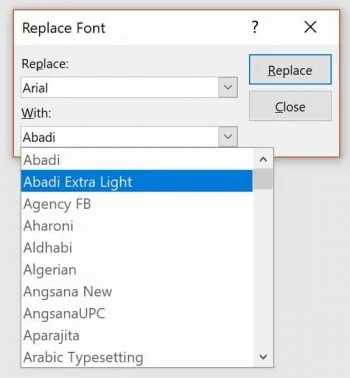
- Select the Font Style you want to replace it with (With:)
- Click Replace
PowerPoint then replaces all the font styles within your presentation (including those on your Slide Master).
Just be aware that the Replace section (pictured below) will only show you a list of the fonts styles that are currently within your presentation.
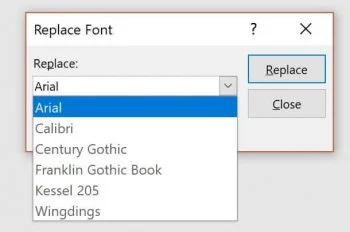
That means that if you don’t see a specific font listed there, you can safely assume that it does not exist in your presentation. The only exception to this rule is if that font style is in one of your charts. See the section When Replace Fonts Doesn’t Work section below.
This also means that you can use the Replace Font dropdown to spot-check edits people have made to your presentation. If they have added a font style they are not supposed to use, it will show up here.
Opening the Replace Font – With dropdown (pictured below), shows you all the available font styles on your computer. If a font you are looking for is not listed here, that means it’s not installed on your computer. You’ll have to do that before you can use it in PowerPoint.
Just remember that not all font styles will show up properly in all versions of PowerPoint (the Mac and Windows versions of PowerPoint have vastly different font styles available to them).
That’s why if you are not sure which version of PowerPoint your clients or colleagues are using, it’s best to use one of the safe fonts.
Take your PPT skills to the next level
Break free from PowerPoint struggle and reclaim your time. Amplify your PowerPoint knowledge with proven advanced methods taught in the PowerPoint Pro Membership.When replacing PowerPoint fonts works
The Replace Fonts command specifically works with the following object classes (and places in PowerPoint):
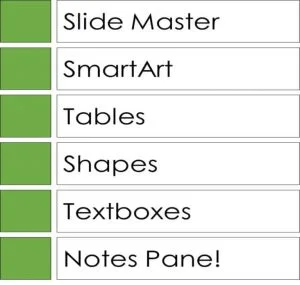
That means that you can safely assume that your Slide Master, SmartArt objects, tables, shapes, text boxes and anything that is in your notes pane will be changed.
NOTE: Although the Replace Fonts command changes the font styles in your Notes Pane, keep in mind that you will only see those font style changes when you print your presentation with notes. For help with this, read my guide on printing PowerPoint with notes.
When replacing PowerPoint fonts doesn't work

The one place where the Replace Fonts command DOES NOT work is with your PowerPoint charts. For whatever reason, the command is not able to change the Font Styles for axes, data labels, chart titles, etc. So, keep in mind that you will need to replace the Font Styles in your charts manually.
Again, the Replace Fonts command will not change the font style of any of these elements within your presentation (no matter how much dreaming you do). That means you’ll need to double-check all your charts (and switch those fonts out manually) before calling your presentation final.
Replacing fonts warning
Even after you use the Replace Fonts command to change the font styles in your presentation, there is one place where bad fonts can still show up. That is when you insert new shapes and text boxes into your presentation.
This is a common error that occurs when someone accidentally sets your default shapes and text boxes to the wrong formatting. To fix this, you need to set new default formatting styles for both your shapes and your textboxes.
To do that, follow the steps below for both your shapes and your text boxes (as PowerPoint considers them as different object classes).
NOTE: Setting the default formatting of your presentation is part of the process of creating a PowerPoint template. If you need help and guidance doing this, see my guide on how to create a PowerPoint template.
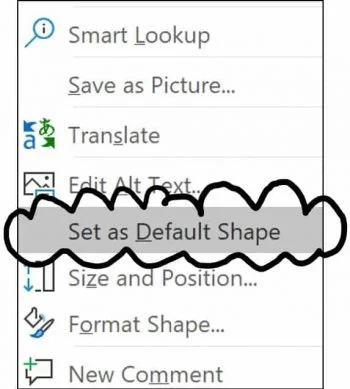
1. Changing the default formatting of your shapes
Before you set new formatting for your shapes, you first need to format a shape the way you want it.
- Format a shape the way you want it
- Right-click the shape
- Select Set as Default Shape
When formatting a shape, go the distance and set everything:
- Font Style
- Font Size
- Shape Fill
- Shape Outline Color
- Shape Outline Weight
- Etc.
The more formatting you save to your shape, the more time you will save in PowerPoint. It is said that 40% or more of your time in PowerPoint is spent formatting things (statistic here). So, the more formatting you save into your shape, the more time you will save yourself.
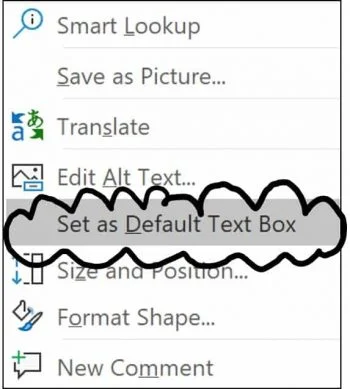
2. Changing the default formatting of your text boxes
- Manually format your text box however you want it (including the correct font style you want all text boxes to all have in the future).
- Right-click your text box.
- Select Set as Default Text Box.
Conclusion
Replacing your fonts in PowerPoint manually is NOT a great use of your time. Instead, use the Replace Fonts dialog box to speed up the process. Just make sure you double check that set your font styles as default for your shapes and text boxes so that bad fonts don’t continue to show up in your presentation.
As a general speed training rule for PowerPoint, the more you can get PowerPoint to do these kinds of tasks for you, the more time you will save, and the sooner you will make it to Happy Hour.
To learn more about our PowerPoint training services and how to improve your presentation skills, visit us here.
About the Author

Taylor Croonquist
Co-Founder, Nuts & Bolts Speed Training
Taylor Croonquist is a PowerPoint expert and trainer. Over a career spanning the globe, from consulting in New York and investment banking in China, Taylor has truly seen it all in PowerPoint. Through necessity and a natural tech savvy, Taylor honed his PowerPoint skills to the point of even blowing the minds of the Microsoft PowerPoint programming team. When he's not busy crafting PowerPoint training, you can find him reading a sci-fi series or scuba diving.
Take your PowerPoint skills to the next level
Get access to our complete training library, new tutorials every month, and the same techniques we teach in our corporate workshops. Join the 260,000+ professionals who have trained with us.
See Membership Options