In this post you’ll learn all about how to use pictures in PowerPoint and where to find them online.
In short, using pictures in your presentations seems like a very basic skill, but there are a few key things that even the most advanced PowerPoint users don’t know..
Plus, there are a ton of cool advanced tricks for working with them. Learn all the cool things you can do with PowerPoint pictures here.
Why use pictures in PowerPoint
Images are almost considered a MUST in most presentation today, and rarely does a day go by where we don’t hear the old saw about a picture being worth a thousand… yeah, you know it.
And while it’s easy to roll our eyes at this, you can deny that a picture can greatly and instantly improve the look of most slides.
While pictures don’t replace good storytelling (see our guide here), they certainly can enhance it.
Examples of PowerPoint pictures (before and after)
Whether you just add one image, add many images, or turn your pictures into full screen visuals, the difference is clear.
Take a look at these before / after clippings of slides, and you’ll see that the ones on the right are much more engaging.


While adding a picture can make your slide more visually attractive, do keep in mind that the image has to match your content.
Don’t simply add in any old picture… keep it highly relevant and make sure it adds to (and doesn’t distract from) your message.
Where to go to get PowerPoint pictures
Here are a few places you can go to get free and copyright-free PowerPoint images onlines:
- Pixabay – Awesome site for 100% free and Creative Commons CC0 licensed images, illustrations, vectors, and videos.
- Pexels – We love this site. It’s a compilation of 100% copyright-free images from around the web. They also have a section of their site dedicated to videos. Note: They have a super-handy free unofficial add-in for PowerPoint and Word add-in that you can download and install here.
- Gratisography – All kinds of great photos that are anything but stock. Typically features conceptual images and funny images too!
- Negative Space – This is one of our favorite sites for 100% free and Creative Commons CC0 licensed images, with everything from landscapes, to conceptual images, to product images…all around great!
To learn about other PowerPoint resources we recommend, read out guide here.
How to insert pictures in PowerPoint
Pictures can be inserted onto your slide from two places: from within your computer or table, or from the web.
Method #1: From your computer
To insert a picture from your computer into PowerPoint, you have two options:
Option 1: Simply drag a picture file from wherever it is on your computer onto the slide, using your mouse.
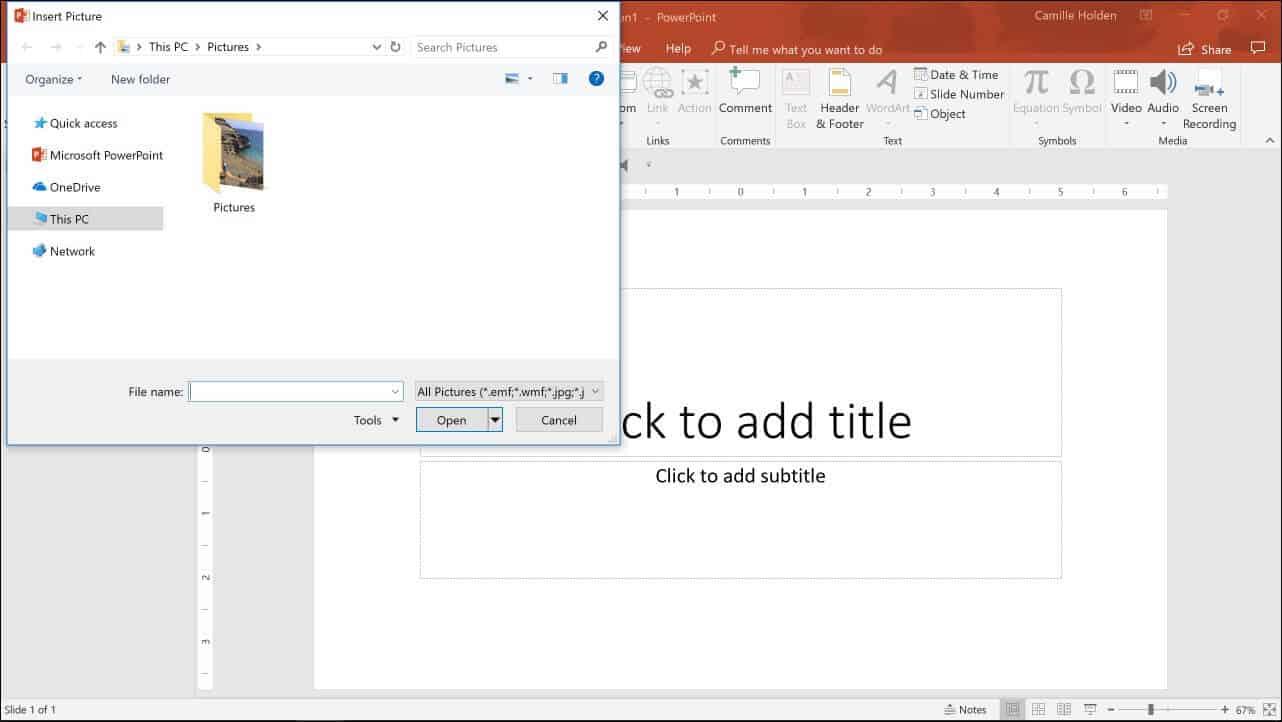
Option 2: Go up to the Insert tab, and select Pictures, navigate to where your picture is in your system and then click on Insert.

Here are the picture types you can insert into PowerPoint:
- JPG
- JPEG
- PNG
- GIF
- TIF
- TIFF
- BMP
- EMZ
- WMZ
- PCZ
- SVG
- EMF
- WMF
- JFIF
- JPE
- DIB
- RLE
- PICT
- WPG
Method #2: From the web
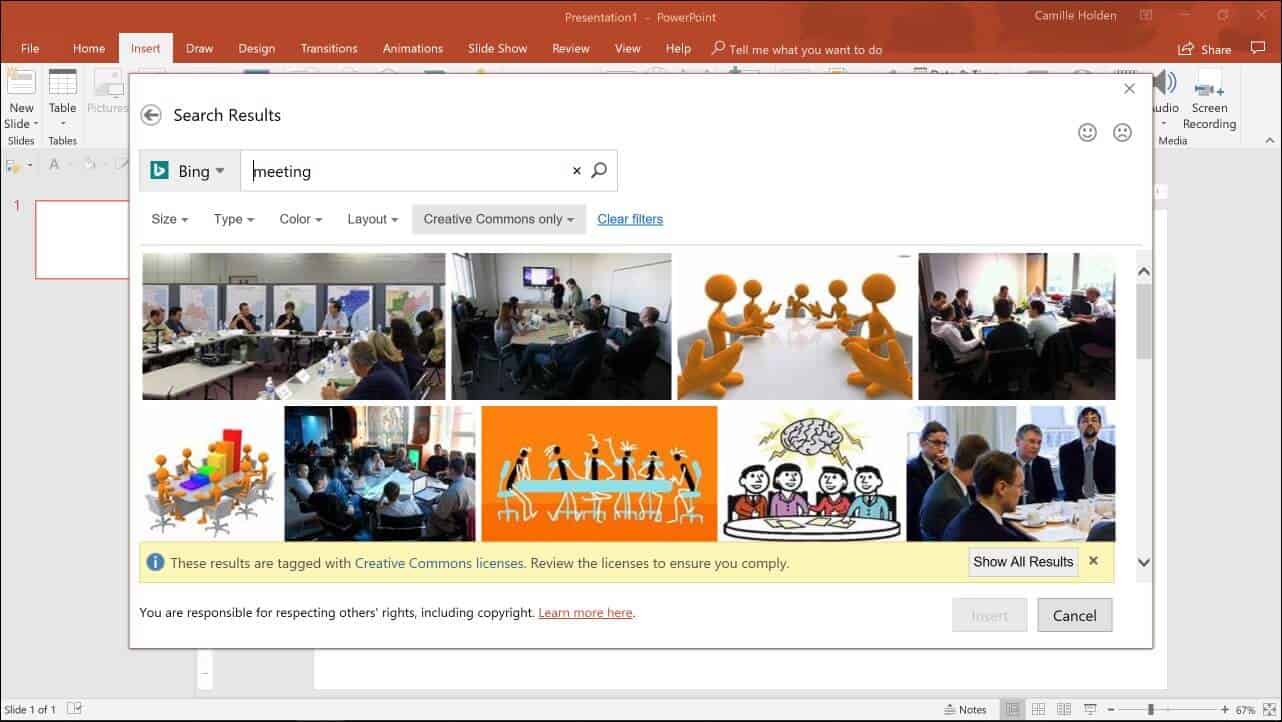
If you don’t already have a picture you want to use on your computer, you can find one on the web directly within PowerPoint. To insert a picture from the web into PowerPoint, simply:
- Go to the Insert tab
- Select Online Pictures
- Type in a keyword to search for an image in the Bing search engine

4. Select your image (or multiples images) and click on Insert
PowerPoint will download and insert the picture(s) you selected on your slide, along with any copyright information you might need.
Note: You have several search filter settings you can adjust in the Online Pictures dialog box:
- Size (small, medium, large and extra large)
- Type (photograph, clipart, line drawing, animated GIF, transparent)
- Color (color only, black & white, and 12 colors)
- Layout (square, wide, tall)
- Copyright (all, Creative Commons Only) – see section below about how to legally use pictures in your presentations.
These filters can help you more quickly sift through the hundreds – or even thousands – of images and graphics available to you.
PowerPoint Pictures Do’s and don’ts
Like with anything in PowerPoint, there is always the risk that you will overuse a feature and shoot yourself in the foot.
But beyond some of the obvious don’ts (like don’t crowd your slide with too many pictures, or don’t stretch and warp your images beyond recognition)… there are some other incredibly important rules to keep in mind with pictures in PowerPoint.
Do use pictures legally
Very few people actually stop and think about the images they’re inserting into their PowerPoint slides. Do you have the right to use those images?
Chances are that if you’ve simply Googled for an image and copy-pasted it into your presentation, that you don’t actually have the right to display and distribute that image without getting prior permission from its author.
So when you’re searching for images, whether in Bing through the Online Pictures tool in PowerPoint, or in Google or Flickr, make sure that you have the filters set for Creative Commons licensed images.
And double-check whether the license requires you to credit the author (and all other requirements that may be associated with the license).
You can learn more about legally using images in PowerPoint slides here.
Don’t use low quality or warped images
You’d be surprised at how often we see low quality and pixelated images being used in presentations. Not only do they look terrible to begin with, but they’ll likely look EVEN WORSE on a large overhead projector.

So make sure you’re always using the highest quality picture possible. If you need help compressing an image in PowerPoint, see our guide here.
Another design sin is to stretch and warp your pictures.

To avoid warping, make sure to hold the Shift key when you’re enlarging or shrinking your pictures.
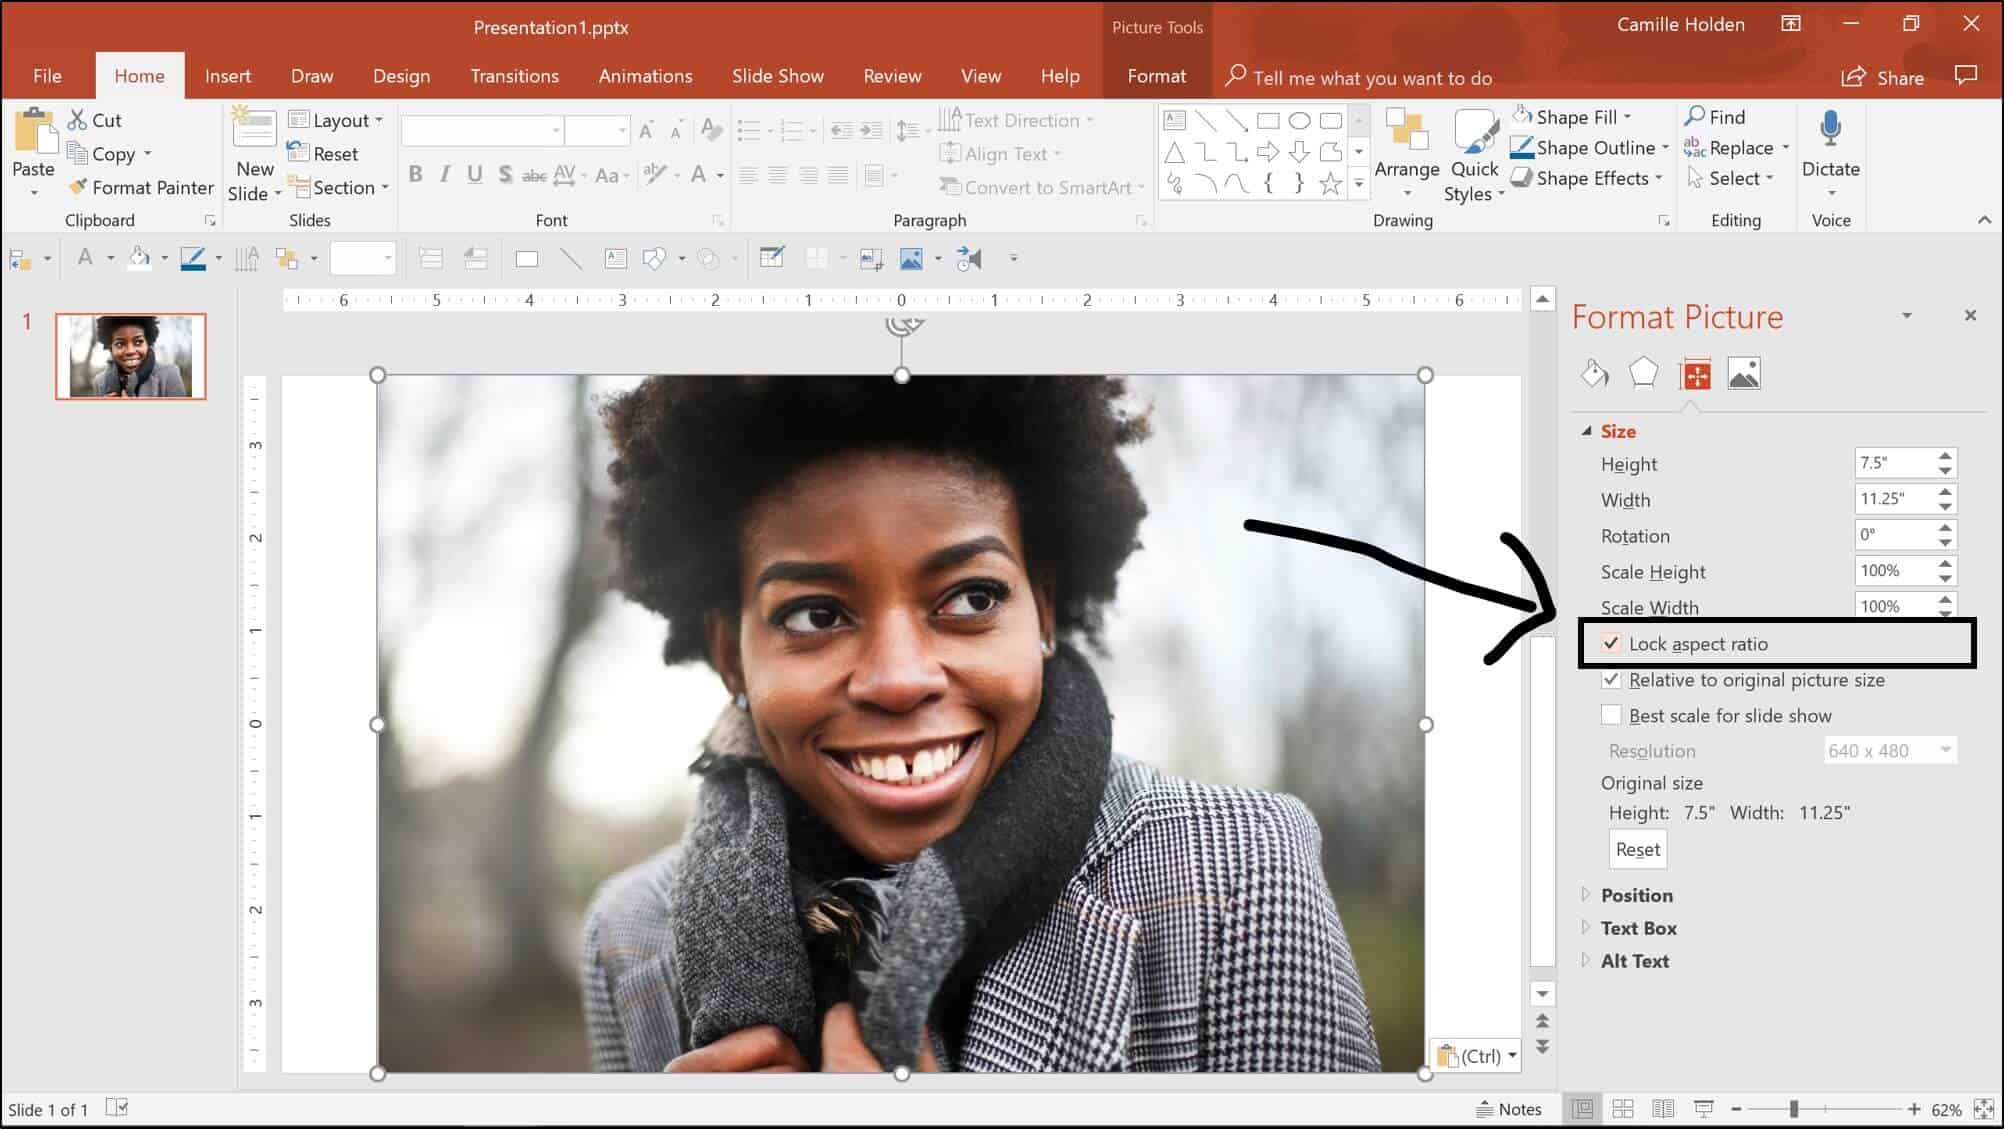
You can also make sure that the picture is set not to warp (see image below), by:
- Right-click the picture and select Format Picture
- Go to the Size & Position tab
- Open up the Size options
- Tick the box next to Lock aspect ratio

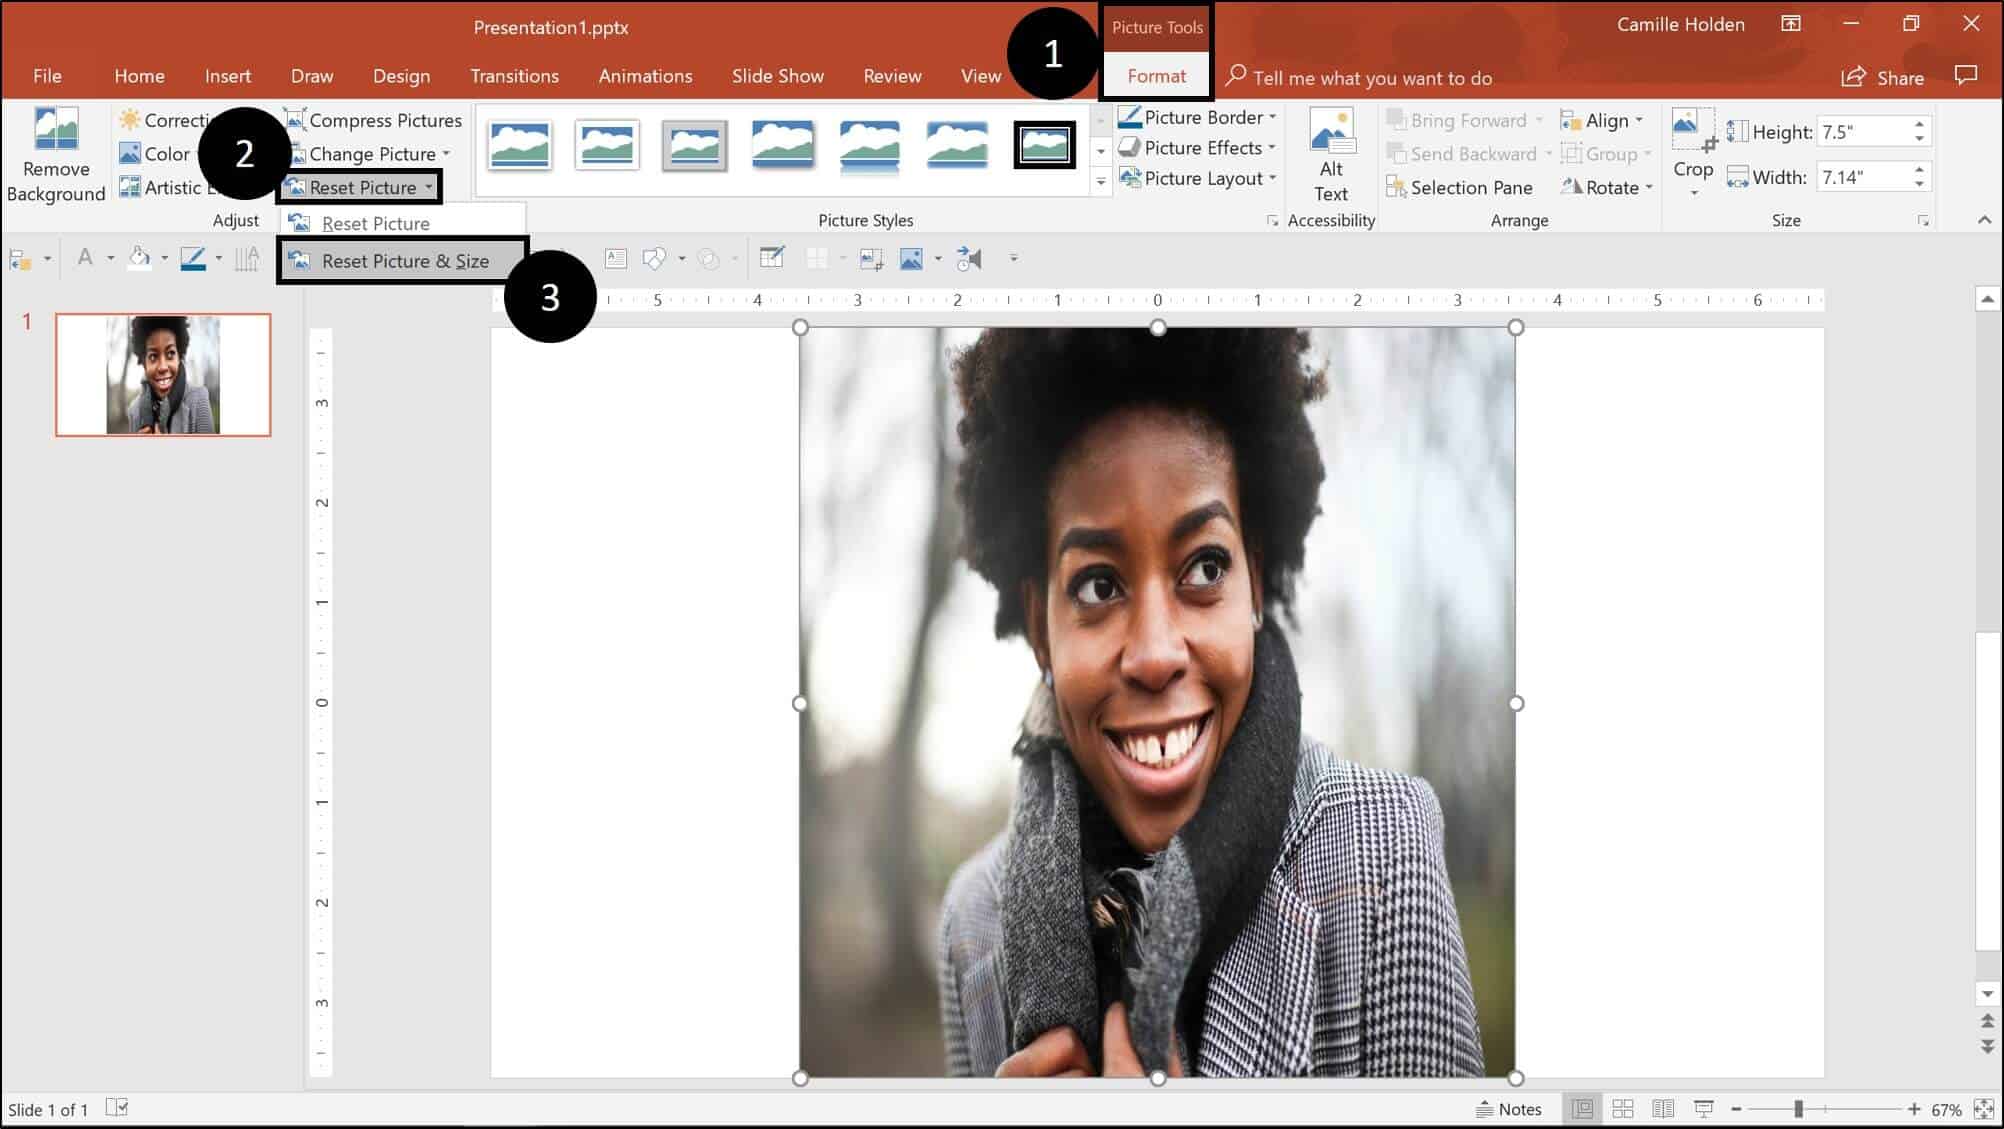
Also, if your picture gets accidentally warped, you can reset its size and dimensions by:
- Go up to the Picture Tools Format tab
- Select the dropdown arrow for Reset Picture
- Click on Reset Picture & Size

Do crop your pictures to make them better fit your layout (or even go full screen)
If your image isn’t fitting nicely into your layout, you can crop it so that it fills in your slide space better.To see how to crop images in PowerPoint, click here
Do compress images to make your file size smaller
If you’re finding that your presentation is running slow, or if it’s too large to share with the people that need it, then you can reduce its size from within PowerPoint.
Depending on the number of photos in your presentation and how you compress them, you can reduce the size of your presentation by as much as 80%. For details, see our guide here.
Cool things you can do in PowerPoint with your pictures
There is an almost infinite number of things you can do with pictures in PowerPoint. Here are some of the articles we’ve written about a few of them:
- Make an image background transparent, click here
- Create a 3D pop-out picture effect, click here
- Create a color pop trick with your images, click here
- Learn how to make a fast photo collage, click here
- Turn a photo into a painting (without painting it), click here
- Turn a photo into a sketch (without sketching it), click here
The case for NOT using pictures in PowerPoint
At the risk of sounds like a contrarian… sometimes you’re better off not using pictures, and instead using storytelling through words.
This Inc.com article by Kindra Hall about when a picture isn’t worth a thousand words, makes a good case for avoiding using images and letting your audience’s imagination fill in the picture that you’re painting with words.
Of course, this storytelling method is more relevant for presentations that are delivered live (rather than ones that are printed and/or emailed).
Conclusion
Pictures are a critical element to a successful presentation.
That’s why it’s important to understand all of the options available to you and what to look out for.
While using a good image can dramatically improve your presentation, using a bad or warped image can make your presentation look tacky.
If you enjoyed this tutorial, you can learn more about our online training courses and free PowerPoint resources here.
