Are you ready to learn how to password protect PowerPoint presentations so that others cannot edit or copy and paste your content? A password is a presentation-level setting, which means it saves inside the file itself and travels with your deck everywhere it goes.
Before you get started though, please remember this. If you forget the password you created in the steps below, you will not be able to recover your password, or unlock your presentation.
Now before you password protect your presentation, it’s important to first understand the difference between the two types of Passwords you can use to protect your PowerPoint presentations.
Two Types of PowerPoint Passwords
PowerPoint has two different styles or types of passwords you can add to your presentation which determine what someone can and can’t do with your presentation.
While the difference between the two pop-up windows as you can see in the picture below appears small, the difference is big.
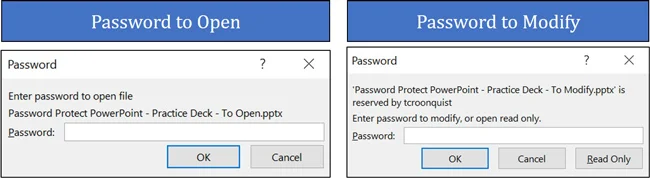
1. Password to Open
Adding a password to open forces you (or whoever opens your presentation) to input a password to be able to not only see but edit the content of your presentation.
If they do not know the correct (case-sensitive) password, they cannot open, review or modify your presentation in any way. Just keep in mind that there is NO WAY to recover a forgotten password.
So if you password protect your presentation AND forget your password, you too will not be able to open or edit your presentation.
2. Password to Modify
Adding a password to Modify gives your clients and colleagues two different ways to access your presentation.
They can enter the correct password and get full editing rights to your document (just like a normal presentation).
They can choose to open your file in a Read-Only format, allowing them to view (but not edit) your PowerPoint presentation.
To give someone the Read-Only option pictured below to access your presentation, you must use the password to Modify option.
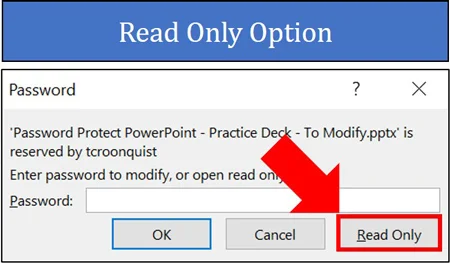
In the Read-Only version of your presentation, people can still print, save your file as a PDF and run your presentation in the Slideshow modes. To see all the slideshow shortcuts and techniques, check out our ultimate slideshow guide here.
On top of that, all of your PowerPoint animations, effects, hyperlinks, etc. will still work in the Read-Only version of your document. But other than reviewing your document, people will NOT be able to edit, modify or copy and paste any of your content.
How to add a password to PowerPoint
To password protect your PowerPoint presentation using either the Password to Open or Password to Modify options, follow the steps below.
1. Open the PowerPoint presentation you want to password protect
The only way to add a password to a specific presentation is from within the presentation itself. So as a first step, find and open the presentation that you want to password-protect.
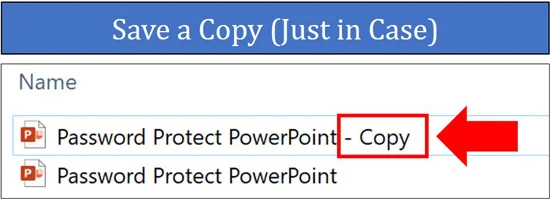
As a best practice, I recommend creating a non-password-protected copy of your presentation and saving it on your computer. That way if you forget your password, you can always open the non-password-protected version on your computer.
To create a copy of your presentation, simply Ctrl + C to copy and Ctrl + V to paste it inside a File Explorer window.
2. Open the Save As dialog box
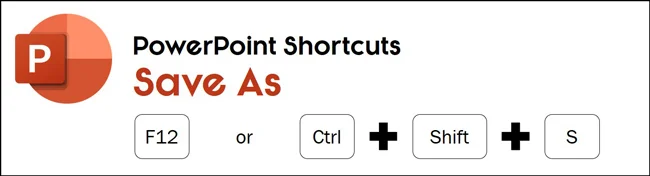
The FASTEST way to access the Save As dialog box from within PowerPoint is using your keyboard shortcuts. You can use either of the two keyboard shortcuts (whichever is easier for you to remember):
F12 for Save As
Ctrl + Shift + S for Save As
If you hit F12 and nothing happens, that means that your function keys are reversed. In this case, try adding the Function key to the sequence: Fn + F12.
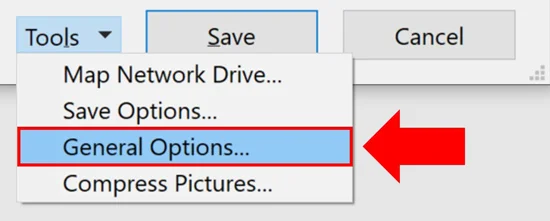
3. Open the Tools dropdown
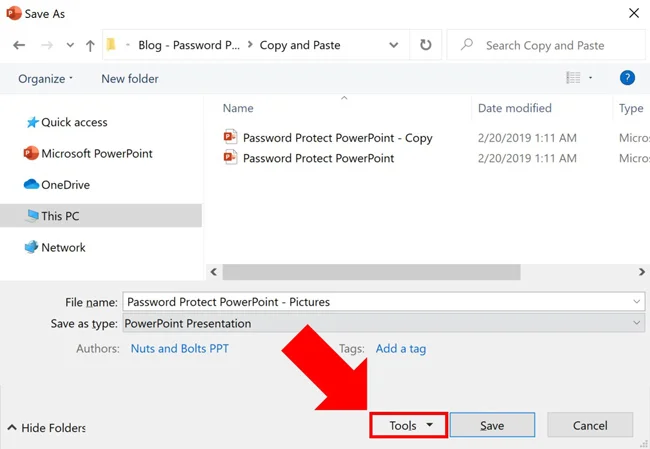
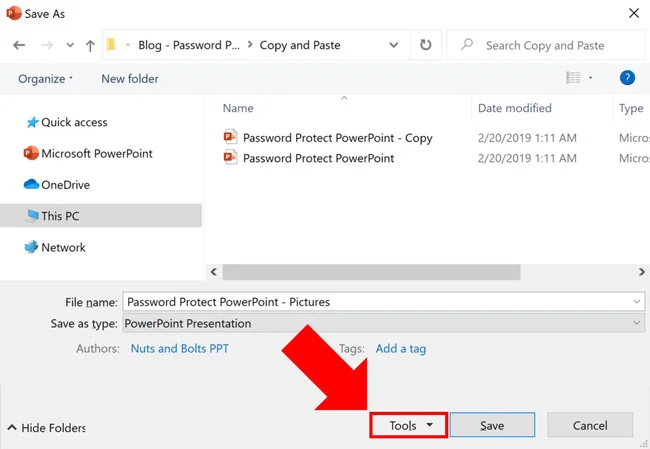
Inside the Save As dialog box, open the Tools dropdown (it is right next to the Save button as pictured above).
The Save As dialog box is also the trick to converting PowerPoint to PDF.
4. Select General Options
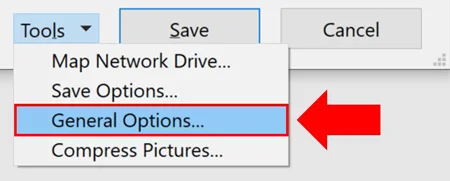
Inside the Tools dropdown, select General Options. This is where you can add/remove passwords to your PowerPoint presentations.
5. Enter your password (Open or Modify)
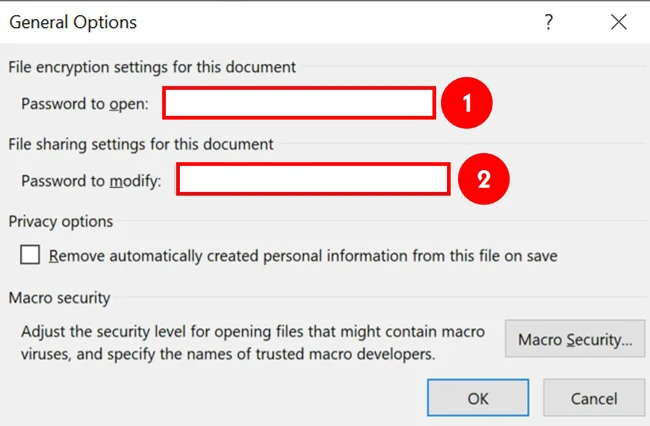
Inside the General Options dialog box, decide which type of password to add to your presentation (see my explanation of both types at the top of this page).
Your two options are:
Password to Open
Password to Modify
To get started, simply click into the input box for the type of password you want to protect PowerPoint with (Open or Modify) and type your password.
Remember too that passwords are case-sensitive, so be careful you don’t have the Caps Lock key on when you enter your password. Thankfully, you get the chance to confirm your password in the next step.
6. Confirm your Password
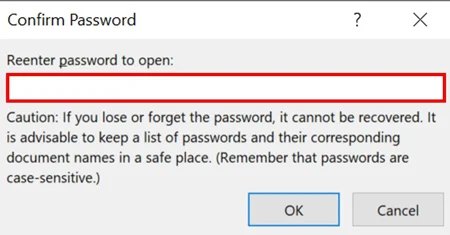
This is your chance to confirm you have typed the correct password for your presentation. As there is no way to view the password you have typed, I recommend taking care here to make sure you type what you think you typed.
If you make a mistake and the two passwords are not the same, you get the following error notification.
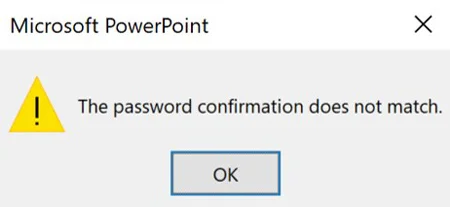
Clicking OK, you can either re-type your password correctly or select Cancel to exit out of the Confirm Password dialog box.
PowerPoint will not allow you to add a password to your presentation unless you can first confirm your password.
7. Rename your Presentation (Recommended)
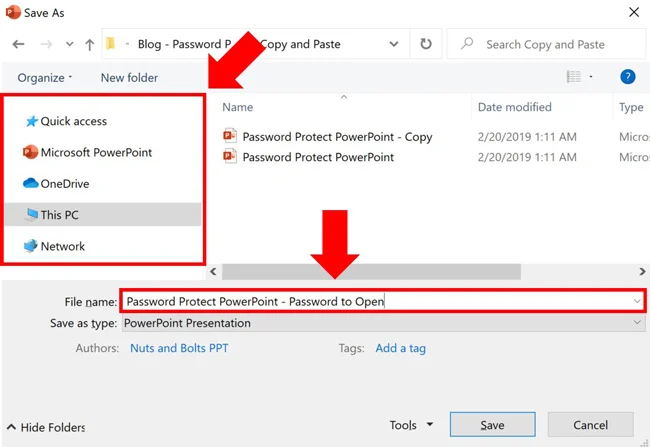
While renaming your password-protected presentation is optional, to me this is a critical best practice.
I personally like to add “- with Password” or “PW” or “Password to Open” to identify the document as having a password. This also helps you distinguish it from your original (non-password protected) document that you hopefully saved in step #1 above.
In this step, you can also choose where to save your password-protected document on your computer by navigating between your folders.
8. Save and Close your document
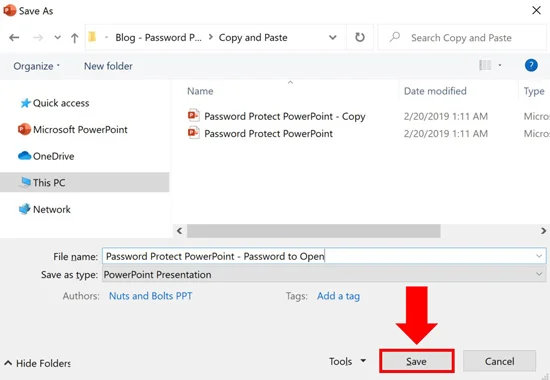
Once you have selected a location on your computer to save your password-protected presentation, click Save and then close out of your document to trigger the password.
As long as you have your document open, you will not need to enter the password to open it (as it is already open). Closing the document triggers the password gate to close, requiring a password to open it again.
9. Double-check your password works properly
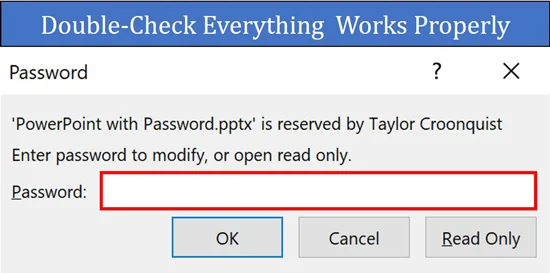
Before you send off your document as final, double-check that your password properly works. This is especially important if you created a non-password-protected version of your presentation, to make sure you are working with the correct file.
Find your protected presentation on your computer and double-click it to open it up. If the document immediately opens without asking you to enter a password, it means that:
You selected the non-password-protected version of your document
You never closed your PowerPoint presentation after adding your password (see step #8 above)
You made a mistake somewhere along the way and should start over
Either way, double-checking this now will save you from accidentally sending your client the wrong file.
Once your password is properly added to your presentation, opening the document forces you to enter a password to continue. Once you see the dialog box, try entering your password to make sure you have the right one.
How to remove a password from PowerPoint
Tired of always having to enter in a password to edit your presentation? Well, let’s look at how to remove a password from your presentation.
For example, you added a password to your presentation to work with a specific client, and now that project is over. So you want to remove the password so you and your team can access it without always having to enter a password.
Removing a password is very similar to adding a password. Simply follow these steps.
1. Find and open the password-protected presentation
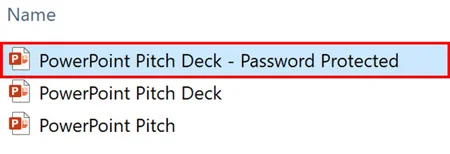
The only way to remove a password from PowerPoint is from within the password-protected presentation.
Navigate to the file on your computer, and double-click it to open it. If a dialog box does not pop open asking you for a password to continue, it means one of two things:
You have selected the wrong presentation
Your presentation is not password-protected
Notice how easy it is to see which presentation is password-protected in the picture above? That is why I recommend adding a qualifier in the name of any PowerPoint presentation you password protect.
2. Enter the correct password and click OK
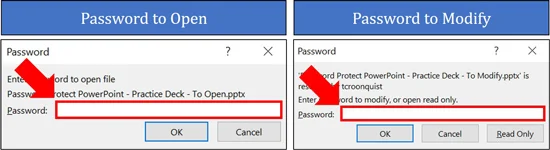
Regardless of whether you have a Password to Open or a Password to Modify, enter the correct password and click OK to get full editing rights to your document.
You cannot remove a password in the Read-Only version of PowerPoint that you can access with the Password to Modify.
If you do not know the password to the presentation, you cannot remove the password from the document (sorry). This is why I recommend saving a non-password-protected version of your file first.
3. Open the Save As dialog box
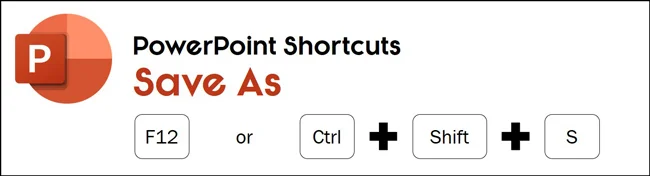
Once you have successfully opened the password-protected presentation, now you can remove the password. To get started, hit F12 or Ctrl + Shift + S to open the Save As dialog box.
4. Open the Tools dropdown
Inside the Save As dialog box, click to open the Tools dropdown.
5. Select General Options
Inside the Tools dropdown, select General Options to remove the password from your presentation.
6. Select and delete the password
Depending on what type of password was added to your presentation, you should see a sequence of circles or asterisks marks in either the Password to Open or Password to Modify option as pictured below.
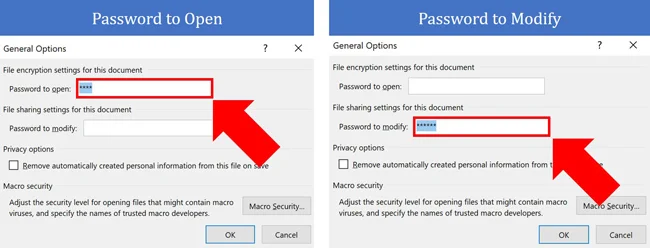
Simply select the password in the dialog box and hit either Delete or Backspace on your keyboard.
Two things you cannot do in this dialog box are:
You cannot view the password. So if you open a password-protected presentation on your computer, your colleague cannot sneak a peek at the password when you are not looking.
You cannot password-protect your presentation with both types of passwords. You will either have a Password to open or a Password to modify, never both (it is impossible).
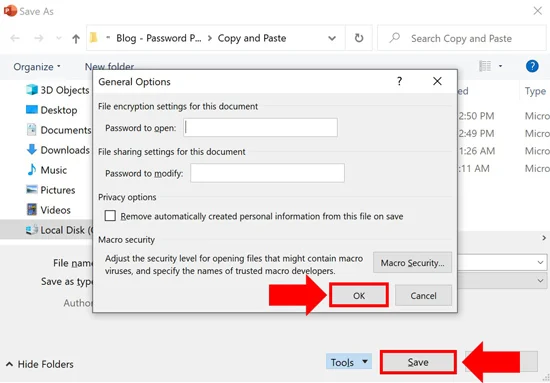
7. Click OK and then Save
After deleting the password, click OK and then click Save.
This saves your presentation without the password, allowing you to open the file without having to use a password in the future. If you like, you can also choose to rename your file now that it is no longer password-protected.
8. Double-check the password is removed
Before you forget, double-check that the password has been removed from your presentation.
Close your PowerPoint presentation (Ctrl + W on your keyboard) and then reopen. If you are again asked to enter a password to open or modify the presentation then something went wrong along the way.
If this happens to you, don’t sweat it. It is better to figure this out now (and fix the problem) rather than having your client or colleague email you about the issue.
PowerPoint Password Tips
I cannot stress this enough, DO NOT forget your password.
A number of people have asked whether it is possible to recover a password they have forgotten. Unfortunately, there is no way to retrieve a forgotten password like this that I know of.
This is why I recommend saving a copy of your original presentation (a non-password protected version) before adding a password to it. That way if you forget your password, you can always go back to the original (non-password protected) document, without having to recreate the wheel.
A few additional PowerPoint password tips are:
Tip #1. Passwords are case sensitive, so watch out for upper case letters.
That means that locking PowerPoint with the uppercase password ‘OPEN SESAME’ is treated differently than the lowercase password ‘open sesame.’
Tip #2. Make your passwords easy to remember
One way to make your passwords easy to remember is to either reference the client’s name in the password or just use the first four letters.
An example using the client’s name could be microsoft open (I recommend using lower-case) if your client is Microsoft
An example using the first four letters for a file called “Quarterly Report” would be quar open (again making it all lower case so it is easier to remember).
Tip #3. Don’t use the same password for all of your presentations
Just like you shouldn’t use the same password for all your personal things, you don’t want to use the same password to open all of your presentations. That is because if someone figures that out, they will be able to open all of your password-protected presentations.
Tip #4. Develop a naming convention that makes sense for you
For help developing a naming convention for your passwords so they are always easy to remember, check out the following tips by GrowMap here.
Q&A: Password protecting PowerPoint
Q: How do I add a password to a PowerPoint presentation?
In PowerPoint for Windows, press F12 to open the Save As dialog box, then choose Tools > General Options. Enter a Password to Open or Password to Modify, confirm your password, and save the presentation. Before sending it off, close and reopen the file to check that everything works.
Q: What is the difference between Password to Open and Password to Modify?
A Password to Open requires a password before someone can view the presentation. A Password to Modify, used on its own, lets people open the presentation as read-only without entering the password. Choose based on whether you need to restrict access to the slides or limit editing.
Q: Does a PowerPoint password stop people from copying my slides?
Don’t count on a Password to Modify for that. It restricts editing, but it does not encrypt the presentation or prevent someone from saving a separate copy. If the slides contain confidential information, use a Password to Open to restrict who can view them in the first place.
Q: What happens if I forget my PowerPoint password?
PowerPoint does not provide a built-in reset for a forgotten Password to Open. Check your password manager, ask the person who created the file, or look for a backup you can access. This is why I recommend saving your password somewhere secure before you close the presentation.
Q: How do I remove a password from a PowerPoint presentation?
Open the presentation using the correct password, then return to Save As > Tools > General Options. Clear the password from the relevant box, click OK, and save the file. Close and reopen it to confirm that the password prompt is gone.
Q: Why isn’t PowerPoint asking for a password after I added one?
Start by saving the presentation, closing it completely, and reopening it. Adding a password does not lock a presentation you already have open. If you kept an original copy too, double-check that you are testing the protected version. Two nearly identical filenames can make this surprisingly easy to miss.
Takeaways
Before you send off a password protected PowerPoint presentation, here are the things worth remembering:
Use Password to Open to restrict access. Someone needs the password before they can view your slides.
Use Password to Modify to limit editing. Used on its own, it lets recipients open the presentation as read-only without the password.
Don’t treat a modify password as copy protection. Recipients can still save a separate copy of the presentation.
Save a long, unique password in your password manager. You should not have to rely on remembering it six months from now.
Keep any unprotected backup somewhere private. A backup can save you from rebuilding your slides, but it needs to stay out of the wrong hands.
Remove passwords through the same General Options dialog box. Clear the relevant password field and save the presentation.
Test the exact file you plan to send. Close it, reopen it, and make sure the password works. Catching a mix-up now beats an email from your client later.
Give recipients a heads up. Let them know the presentation requires a password and how they can get it.
A quick check before sharing helps you avoid both problems: sending a file anyone can open and sending one your intended recipient cannot.
About the Author

Taylor Croonquist
Co-Founder, Nuts & Bolts Speed Training
Taylor Croonquist is a PowerPoint expert and trainer. Over a career spanning the globe, from consulting in New York and investment banking in China, Taylor has truly seen it all in PowerPoint. Through necessity and a natural tech savvy, Taylor honed his PowerPoint skills to the point of even blowing the minds of the Microsoft PowerPoint programming team. When he's not busy crafting PowerPoint training, you can find him reading a sci-fi series or scuba diving.