I hope you are as excited as I am about learning your Windows 10 keyboard shortcuts!
That’s because knowing the right shortcuts is the fastest way to double your productivity in Windows 10 (no joke). Using the shortcuts in this article you’ll be able to speed up your workflow by quickly splitting your screen, switching between windows, multitask across virtual desktops, and more!
On top of that, I’ve included several extra tips and tricks and some double-dippers you can use when browsing the internet. If your keyboard shortcuts are not working properly, read our troubleshooting guide here.
The Top 25 Windows Shortcuts in Action
The best way to learn your Windows 10 keyboard shortcuts
Learning your keyboard shortcuts is like learning a foreign language.
Instead of trying to learn the language all at once, it’s better to start small – building up your vocabulary and confidence – before getting too far ahead of yourself.
The same is true with your Windows 10 shortcuts, and the best place to start building your shortcut vocabulary is with the activities you perform daily within the program.
For example, splitting your screen in Windows 10 to multi-task across files or virtual desktops, minimizing windows, finding programs, or setting with Windows search or finding files and documents with the Windows File Explorer, etc.
If you first learn the shortcuts for the activities like these (that you already perform daily), that will not only speed up what you are currently doing in Windows 10, it will also build up your confidence, making it even more exciting to learn more.
Windows Search (Cortana)

Windows key (start typing) or Ctrl + Esc (start typing)
Windows search (or Cortana shortcut) is THE most useful shortcut that exists in Windows 10.
That’s because it allows you to hit the Windows key (or Ctrl + Esc) and find almost anything on your computer faster than you could find it digging around yourself.
In fact, Windows search is often so good that you don’t have to type the full name of what you are looking for.
See the half-written search results below that still work!
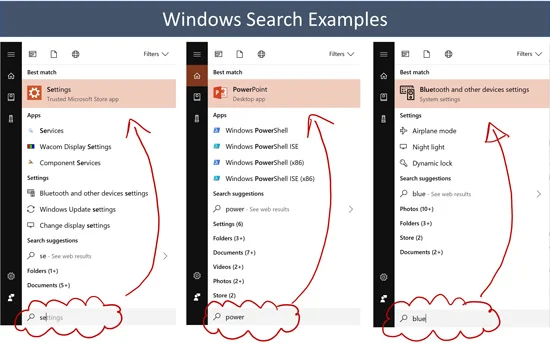
Windows search examples:
- Hit the Win key (or Ctrl + Esc) and type Settings to find your computer settings
- Hit the Win key (or Ctrl + Esc) and type PowerPoint and you get PowerPoint
- Hit the Win key (or Ctrl + Esc) and type Bluetooth and you get your Bluetooth and other Device settings
Although you can use this Windows 10 shortcut to search for anything on your computer, it’s typically best at finding specific programs, applications or computer settings.
If you are instead looking for a specific file or document on your computer, you are better off using the Windows File Explorer shortcut instead. That’s because it has better filtering options that you can leverage as discussed further below.
Shortcut Your Favorite Windows 10 Program

Windows Key + 1 (after you set it up)
Whatever program, application or setting you most frequently use on your computer, is a great candidate for the first position on your Windows taskbar.
What I call your million-dollar Windows Shortcut.
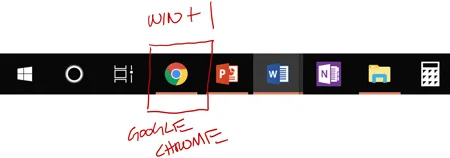
That’s because once you set it (which takes just a couple of seconds as described below), it allows you to access that program, application or setting by simply hitting Win + 1 on your keyboard.
For example, in the picture below I have Google Chrome set up in the first position my taskbar, allowing me to simply hit Win + 1 on my keyboard to launch it.
Here’s an example of how to set up Microsoft PowerPoint as your million-dollar Windows shortcut.
- Hit the Win key and type PowerPoint
- Right-click PowerPoint
- Select Pin to taskbar
- Click and drag the PowerPoint icon into the first position in on your taskbar
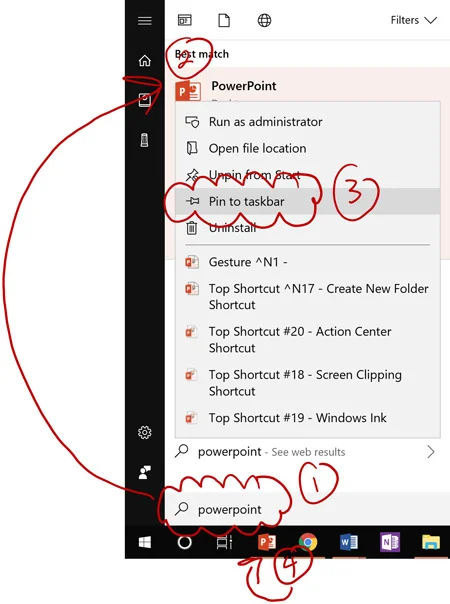
With PowerPoint now in the first position on your taskbar, you can now open PowerPoint at any time by simply hitting the Win + 1 key on your keyboard.
If you want to go to the next level, you can additionall
y add your other most frequently used programs to your taskbar, creating Win + (1, 2, 3, etc.) shortcuts across your taskbar.
The only program I DON’T recommend putting on your taskbar as a shortcut, is the Windows File Explorer command, as that already has it’s own dedicated keyboard shortcut.
File Explorer (Windows Explorer)

Windows Key + E
While Windows Search is great for finding programs, applications and other system-level settings, Windows File Explorer is great at finding your documents and files.
That’s because not only does File Explorer allow you to more efficiently dig through your computer, it also includes filtering options that make it easier for you to narrow down your search results.
Hitting Win + E launches the File Explorer, giving you a wide variety of search options, filters and navigational features to find your files, folders and documents (see picture below).
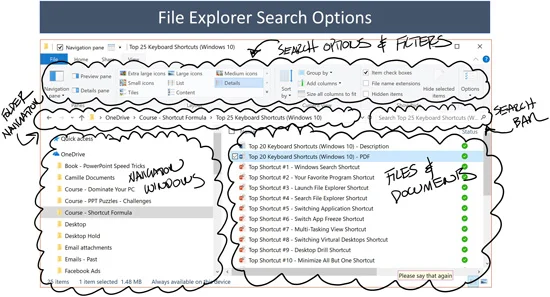 When used properly, File Explorer will save you hours of otherwise mind-numbing clicking around on your computer trying to find something.
File Explorer Search

Ctrl + E (from inside a File Explorer window)
With Windows File Explorer open, you can quickly search your current folder by hitting Ctrl + E on your keyboard.
Hitting Ctrl + E immediately jumps you into the File Explorer Search box (upper right-hand corner in the picture below), allowing you to type what you are looking for to find it faster.
Ctrl + E also works for most modern web browsers like Google Chrome, jumping you into the URL of the web browser where you can directly type your search query.
Yet another reason why Ctrl + E is one of the best Windows 10 shortcuts you can.

Switch Windows (Files, Folders and Applications)

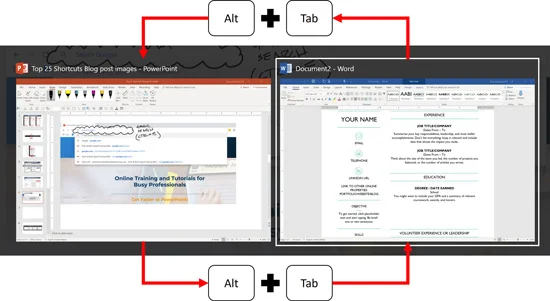
Alt + Tab
The Alt + Tab shortcut allows you to switch between windows (switching between your two most recent files, whatever they are.).
For example, if you are working in Microsoft PowerPoint and then open a Microsoft Word document:
- Hitting Alt + Tab jumps you back to your PowerPoint file (because it was your last active file before you opened Word).
- Hitting Alt + Tab again (from within your PowerPoint file) jumps you back to your Microsoft Word (because it was your last active file prior to switching to PowerPoint).
 Ctrl + Alt + Tab
A cool shortcut on top of the Alt Tab switch shortcut is the Alt Tab Switch Freeze shortcut:
Ctrl + Alt + Tab
.
Ctrl + Alt + Tab
A cool shortcut on top of the Alt Tab switch shortcut is the Alt Tab Switch Freeze shortcut:
Ctrl + Alt + Tab
.
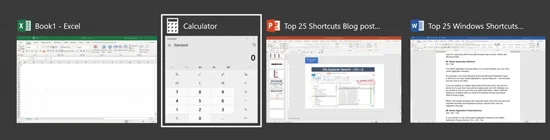
By freezing the Alt+Tab switch window, instead of just jumping to your last active file or folder, you can instead see all your open files and programs and choose which one you want to switch to.
Windows Multitasking View

Win + Tab
Like the Alt Tab Switch Freeze shortcut (Ctrl + Alt + Tab), Windows 10 now has a Multitasking View shortcut.
The new Multitasking view not only displays your all of your open applications, files and folders, it also allows you to create / work with virtual desktops and scroll backwards in time through your documents.
To open the Multitasking view, simply hit Win + Tab on your keyboard as pictured below.
Note: the multitasking view displays the open files, folders, and applications on the current virtual desktop you are on.
To see what’s open on other virtual desktops (assuming you have more than one) simply select that virtual desktop at the top of the window.
Switch Virtual Desktops

Windows Key + Ctrl + Arrows Keys (← or →)
Another way you can multi-task using Windows shortcuts, is using more than one virtual desktop to set up your work environment, and then use the Win + Ctrl + ← and Win + Ctrl + → to switch between your desktops.
A virtual desktop is simply a copy of your Windows desktop allowing you to open a new set of files on the copy of your desktop so that they won’t stack up on top of the current files you have open.
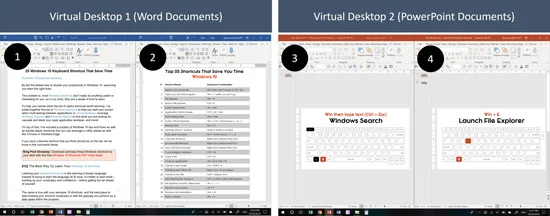
For example, on one virtual desktop you could have two Word documents set up in a split screen formation (see further below) and on a second virtual desktop you could have two PowerPoint files open in split screen.
Using the switch virtual desktop shortcuts, you could then switch between those four documents without having to rearrange anything. As pictured below.
Using virtual desktops like this to multi-task is an advanced Windows 10 trick, but it’s worth working gup to as you become better at working with your keyboard shortcuts.
Minimize Windows (Windows Desktop Drill)

Windows Key + D
If you too like to work with lots of open files and windows on your computer, this could become your favorite Windows 10 keyboard shortcut.
That’s because it solves the challenge of getting to your desktop when you have a bunch of windows open. Hitting Win + D takes you immediately to your Windows Desktop, minimizing all open windows.
Hitting Win + D once minimizes all your windows, allowing you to open something that’s on your desktop.
Hitting Win + D a second time restores all your open file and program windows, so that you can continue working on them as normal.
I personally use this keyboard shortcut about 100 times per day to minimize and maximize windows (or at least it feels like it).
Minimize Windows (All But One)
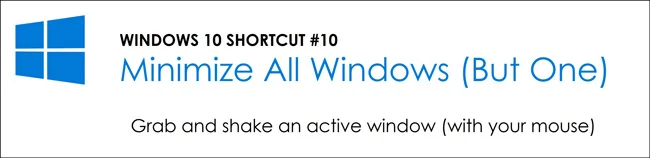
Grab and shake an active window (with your mouse)
This is another cool keyboard shortcut to minimize windows.
If you grab an active window with your mouse and shake it back and forth, it will minimize all but the active window you are shaking with your mouse.
This is EXTREMELY useful when you want to attach a document on your desktop to email to send to a friend or colleague. Simply grab your open email application window with your mouse (Outlook, Gmail, etc.), shake it back and forth and volia.
From there, simply click and drag the file on your computer into the email and you are done.
Split Screen (Windows Snap)
Windows Key + Arrow Keys (← ↑ → ↓)
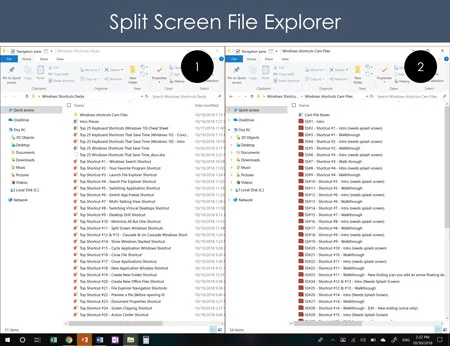
In Windows 10 you can split your screen between two, three and even four active files or windows at the same time as pictured below.
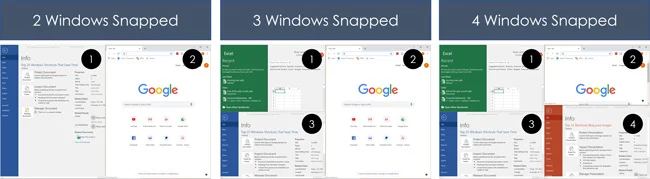
To do this, you can either click and drag the files to the edges of our computer screen or use the keyboard shortcuts below.
Win + ↑ maximizes a non-maximized window.
Win + ↓ minimizes a non-minimized window.
Win + → snaps a window to the right side of your screen.
Win + ← snaps a Window to the left side of your screen.
To arrange a window into one of the four corners of your computer screen using these split screen shortcuts, simply:
Win + ← or → to snap the window the left or right side of your screen
Win + ↑ or ↓ to snap the window into the top or bottom of your screen
Note: If you slit screen two PowerPoint files side-by-side, you can click and drag slides between two files (creating copies of the slide in the new presentation).
Cascade Windows

Right-click the Windows Taskbar and hit D
If you have a lot of open files open, a fast way to see what you’re working with is to right-click the Windows Taskbar and hit D to Cascade your windows as pictured below.
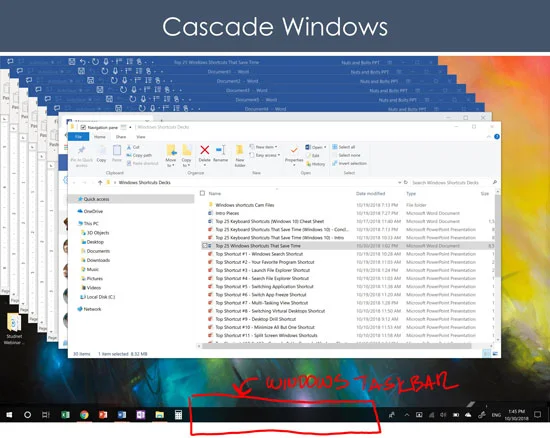
With all your open files in this cascade formation, you can then find more of what you are looking for or close out of the specific windows you no longer want open.
Un-cascade Windows

Right-click the Windows Taskbar and hit U
Once you’ve used the Cascade Window shortcut, you can undo the cascade by right-clicking on your taskbar and hitting U.
This shortcut will undo the Cascade effect and return all your open files in Windows to the previous state that they were in before you used the cascade shortcut.
Note: to be able to use the un-cascade Windows shortcut you first have to either use the Cascade Windows, Show Windows Stacked or Show Windows Side-by-Side commands.
Show Windows Stacked / Side-By-Side

Right-click Windows Taskbar then hit E
Instead of cascading your windows, you can also stack your windows if you prefer to see what you have open.
Simply right-click the windows taskbar and hit E.
How your Windows stack on your computer screen depends on the number of files you have open, and what types of files you have open.
Immediately after stacking your windows, you can always undo the stacked arrangement by right-clicking on the Taskbar and hitting U.
Note: although stacked Windows can appear to be snapped into the different corners of your screen, they are not. Windows are simply resized and floating on your screen, different than using the Windows Snap shortcuts discussed earlier.
Cycle Files of a Program

Ctrl + F6
The cycle program shortcut (Ctrl + F6), switches you between the open files of the current program you are in, regardless of how many other open files and windows you have open.
For example, if you have 10 PowerPoint files and Word documents open all at the same time:
- Hitting Ctrl + F6 from any of your open PowerPoint files will cycle you through your PowerPoint files.
- Hitting Ctrl + F6 from any of your Word documents will cycle you through your Word documents.
This is yet another way you can use Windows 10 shortcuts to multitask across multiple files.
Close File Shortcut

Ctrl + W
When working with lots of open files in Windows 10, at some point you will want to start closing out of them to RAM on your computer. You can quickly do that with the Ctrl + W shortcut.
Ctrl + W closes you out of your current active file, without closing the application itself.
For example, hitting Ctrl + W on an open Word file will close out of that Word file (giving you the option to save any changes you made to the document), without closing out of the Microsoft Word application itself.
You can also double up on this Ctrl + W shortcut in the Windows multitasking view, using it to close out of your open files directly from your keyboard.
Close Application Shortcut

Alt + F4
Different than the Ctrl + W shortcut, the Alt + F4 shortcut will not only close the active file you’re working with (giving you the option to save any changes you made to the file), it will also close out of the application itself (assuming it’s the last open file of that application).
For example, if you’re working on a Word document and you hit Alt + F4, Windows 10 will not only close the active Word document, it will also close of the Microsoft Word application itself.
On top of that, if you are active on your Windows desktop, the Alt + F4 shortcut launches your Windows Shutdown options.
NOTE: To learn why Alt+F4 is often confused with Ctrl+W, read our guide here.
18. New Program Window

Ctrl + N (from within a Microsoft Office Program)
Inside the Microsoft Office suite, Ctrl + N creates new blank documents for you on the fly.
For example, if you are working on the Microsoft PowerPoint presentation, hitting Ctrl + N creates a new blank PowerPoint presentation. Outside of the Microsoft Office Suite though, you can also use it in File Explorer to make rearranging files on your computer fast and easy.
For example, using Ctrl + N inside of the File Explorer window, and then snapping those windows into a split-screen arrangement, so that you can quickly click and drag files between the folders.
19. Create A New Folder

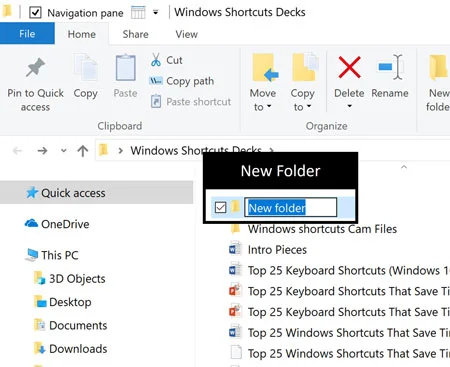
Ctrl + Shift + N
Hitting Ctrl + Shift + N on your keyboard automatically creates a new blank folder in Windows 10 as pictured below.
This makes it extremely easy to create new folders on the fly to better organize your files (especially when you use the file Explorer split screen option discussed in Shortcut #18 above).
20. Create a New Microsoft Office File

Right-click, W and select your document type
After creating a new blank folder and computer, a fast with a loaded up with Microsoft office files is with the create new office file shortcut sequence.
To create a new blank file that you can automatically rename without having to save the file, simply:
- From within a folder right-click with your mouse
- Hit W on your keyboard to open the New options
- Select your file type you want to create with your mouse
21. File Explorer Forward / Backward
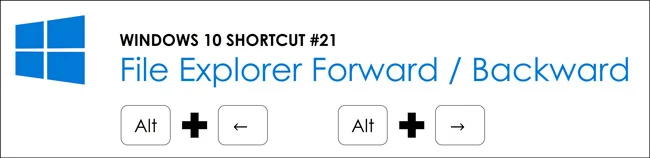
Alt + ← and Alt + →
As you crawl through the different folders on your computer looking for your documents, you’ll often want to move backwards or forwards through your search.
You can easily do that using your File Explorer navigation shortcuts.
Alt + ← moves you backwards through your search history.
Alt + → moves you forwards through your search history.
It’s important to note that these shortcuts only move you forwards and backwards through your search history (the specific files you’ve opened). They do not walk you through your folder hierarchy unless you’ve manually clicked through it yourself.
To move up a folder hierarchy from the folder you are currently in, you can instead use the Alt + ↑ shortcut instead.
Works in web browsers too!
In addition to working in your Windows File Explorer, these Alt + → forwards and Alt + ← backwards shortcuts also work for moving forwards and backwards through your search history when surfing the web (Chrome, Firefox, Microsoft Edge, etc.).
That’s one of the reasons why these File Explorer shortcuts made this top 25 keyboard shortcuts list.
22. Preview Pane (Windows Explorer)
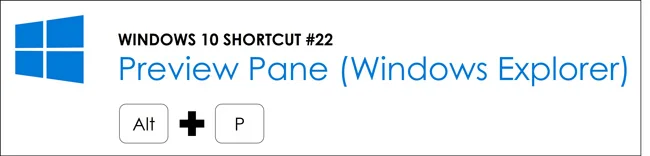
Alt + P (from within Windows File Explorer)
When trying to find the right file in File Explorer, instead of opening and closing a bunch of random documents, you can instead use the Alt + P preview pane shortcut to find the right file first before opening it.
Hitting Alt + P once activates the Windows Explorer Preview Pane as pictured below with the PowerPoint file.
With the preview pane open, you can then scroll through your document to make sure it’s the right one before you open it and/or resize the Preview Pane to see more or less of your document.
Note: Hitting Alt + P a second time closes the Preview Pane.
Because the Preview Pane uses your system resources to generate the preview, it’s best to keep it closed when you don’t need it so it doesn’t slow down your computer.
23. Document Property Shortcut

Alt + double-click a document
A fast way to see the file properties of a document is to hold down the Alt key and double-click it with your mouse.
Doing so opens up the Document Properties of the file, allowing you to see its size, the date it was created and/or modified and/or adjust other document properties from within the dialog box.
I primarily use this document properties shortcut to find the size of a file and see when it was last modified. This document properties shortcut works both in the Windows File Explorer and with any file or folder on your desktop.
24. How to take a screenshot in Windows

Windows Key + Shift + S
There are several ways to take a screenshot in windows including the Windows Snipping Tool here and the new Windows Ink Workspace here.
While those applications work, you can also take screenshots in Windows (saving them to your clipboard) using the Win + Shift + S shortcut.
Hitting Win + Shift + S freezes your screen (you’ll see a white transparent overlay) and then allows you to click and drag the section of the screen you want to capture.
This is the fastest way I know of to capture your screen in Windows 10 and is how I created most of the visuals for this blog post.
Once you have your screen shot captured, you can then Ctrl + V to paste the clipping into PowerPoint and use your inking shortcuts to mark it up.
For help with your ink shortcuts in PowerPoint, click here.
25. Action Center Shortcut (Computer Settings)

Windows Key + A
At some point you will want to adjust your system levels settings, change the brightness of your screen, project your screen onto another monitor, turn Airplane mode on/off, etc.
That’s what the Win + A shortcut is good for.
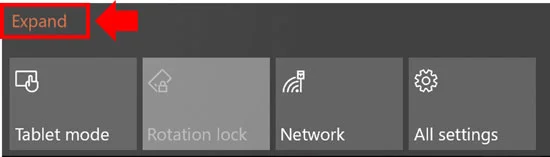
Win + A opens what is called your Action Center and is where you can find your most frequently used system level settings. This saves you from otherwise having to dig around your computer settings to find them.
If you only see four system settings when you hit Win + A on your keyboard, simply click the Expand to see your other system settings.
Conclusion
So those are our top 25 Windows 10 keyboard shortcuts.
Keyboard shortcuts like this are the fastest way to double your productivity in Windows 10. That’s why it’s worth your time to learn the shortcuts for the tasks you perform regularly.
If you want to learn how to fast-track everything you do in PowerPoint as well, check out our PowerPoint training services here.
About the Author

Taylor Croonquist
Co-Founder, Nuts & Bolts Speed Training
Taylor Croonquist is a PowerPoint expert and trainer. Over a career spanning the globe, from consulting in New York and investment banking in China, Taylor has truly seen it all in PowerPoint. Through necessity and a natural tech savvy, Taylor honed his PowerPoint skills to the point of even blowing the minds of the Microsoft PowerPoint programming team. When he's not busy crafting PowerPoint training, you can find him reading a sci-fi series or scuba diving.