In this article, you will learn how to create the mouseover text effect in PowerPoint. The secret making this work is to use the ScreenTip functionality of hyperlinks in PowerPoint.
This effect is also called the popup text effect, mouse hover effect, image popup effect, etc.
Regardless of what you call it, the effect is the same, and it’s the ScreenTip functionality of hyperlinks that allows you to do this as you can see in the picture below.

And while you can use hyperlinks to make your presentations more interactive, it’s often this ScreenTip functionality of hyperlinks that are most useful.
To expand your knowledge and learn how to insert, remove, and change the color of hyperlinks in PowerPoint, read our guide here.
To expand your knowledge and learn how to insert, remove, and change the color of hyperlinks in PowerPoint, see my guide on hyperlinking in PowerPoint.
Creating the mouseover text effect in PowerPoint
If this is the first time you are creating this effect in PowerPoint, do not worry. This might seem complicated at first, but it is easy and straight forward, and it always involves the same steps.
The trick again is using the ScreenTip functionality of hyperlinks in PowerPoint to display that pop up text effect when you hover your mouse over an object. To get started, simply follow these steps.
Take your PPT skills to the next level
Break free from PowerPoint struggle and reclaim your time. Amplify your PowerPoint knowledge with proven advanced methods taught in the PowerPoint Pro Membership.Insert a hyperlink
Step 1. Select the object that you want to display the mouse over text for and launch the insert hyperlink dialog box, which you can do one of two ways:
Way #1: Right-click the object, and in the right-click menu select “Hyperlink” to open the Insert Hyperlink dialog box.
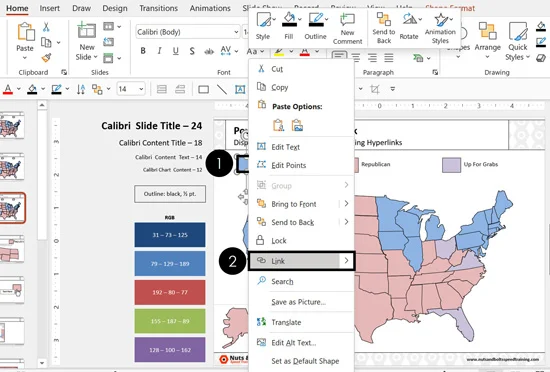
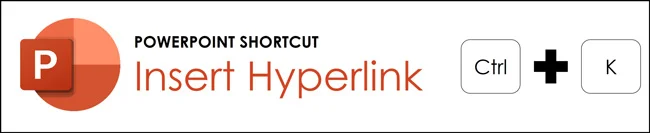
Way #2: Hit Ctrl+K on your keyboard to insert the hyperlink
If you plan to insert a lot of hyperlinks, we recommend memorizing the hyperlink keyboard shortcut (Ctrl+K).
Navigate to Place in This Document
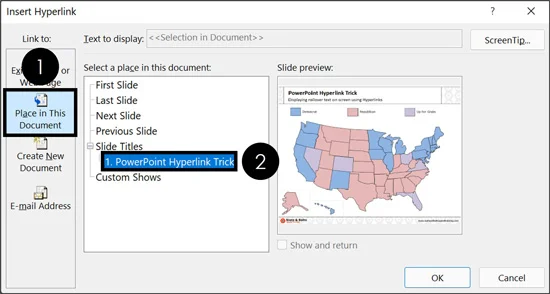
Step 2. Within the Insert Hyperlink dialog box, navigate to the Place in this Document section on the left, and then on the right, select the slide that you are creating the hyperlink on.
This not only ensures that if you accidentally activate the hyperlink when you present your presentation (by clicking on it) you remain on the same slide within your presentation, but it also opens the ScreenTip functionality which we will use in the next step.
Open the ScreenTip Dialog Box
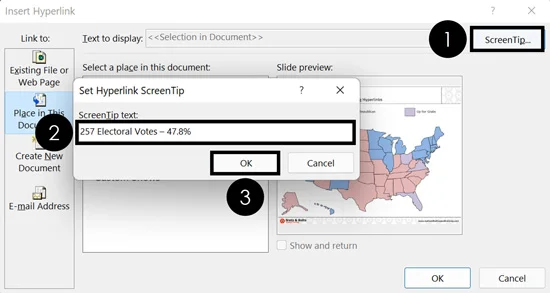
Step 3. To add the text that you want to display when you mouse over your object, follow these steps:
- Click the ScreenTip command (upper right-hand corner of the dialog box)
- Type the mouseover text you want to display
- Click OK
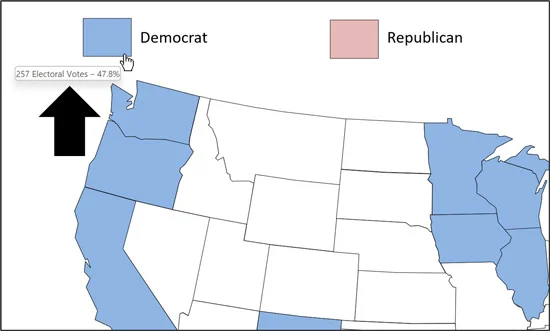
In this example, I’ve typed the number of electoral votes for the voting map I want to present. But you can type anything.
You might be wondering if you can link to an Excel document with the data you want to display. The answer is no. You need to input the text you want to display.
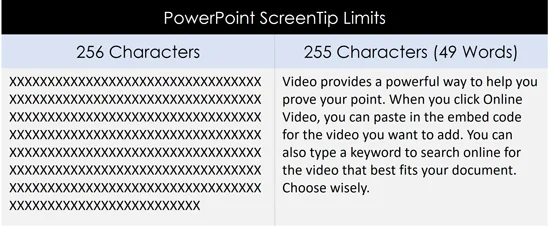
How much text can you display in the mouseover text effect?
The ScreenTip box is limited to 256 characters of text (including spaces and punctuation). 256 characters equates to approximately 49 words. That means you will have to choose your mouseover text wisely.
Below you can see what the text limitations are to get a sense of how much text you can type into your ScreenTip. Less is more as the ScreenTips always display as small text.
NOTE: There is no spell check functionality within the ScreenTip dialog box, so double check your spelling before copying and pasting your text into it. After inputting your spell checked (don’t forget to spell check), click OK to close out of the dialog box and return to your PowerPoint slide.
Displaying Your Mouseover Text
Step 4. Once you have added your ScreenTip text, to display the text, simply run your presentation as a slide show, then hover your mouse over the object to display the text.
- Hit Shift+F5 to run your presentation from your current slide
- Hover your mouse over your object and wait a second
In slide show mode, hover your mouse cursor over the object with the hyperlink, and the Screen Tip should appear and display your text. If you wait a second or two and nothing happens, go back and check the Streen Tip dialog box to make sure your text was properly input into the dialog box.
Go ahead and click your object too. Notice that because we set the hyperlink to navigate to the same slide the effect is on, even if you accidentally click the object, you remain on the same slide, instead of jumping to a new slide.
NOTE: If you save your PowerPoint presentation as a PDF, all your screen tip mouseover text will be lost in the PDF. To expand your knowledge and learn more, see our guide on converting PowerPoint to a PDF.
Conclusion
This screen tip trick is great for creating interactive presentations and graphics that you want to walk someone through in your presentation. This also combines nicely with using trigger animations to make things appear and disappear as you are presenting.
Just remember to use these effects sparingly to emphasize a point. That last thing you want to do is add this effect all over the place. Adding too many effects like this can be distracting during a presentation, decreasing the effectiveness of your presentation.
For other great PowerPoint tutorials and speed training courses to help get you to Happy Hour, check us out here.
About the Author

Nuts & Bolts
With our famous PowerPoint tips, training and self-paced courses, we help presenters save hours and gain peace of mind. Discover the career-changing wow moments that will transform not just the way you approach your presentations, but also how you tackle your work tasks in general.
Take your PowerPoint skills to the next level
Get access to our complete training library, new tutorials every month, and the same techniques we teach in our corporate workshops. Join the 260,000+ professionals who have trained with us.
See Membership Options