What is the difference between Shapes, Text Boxes, and Placeholders in PowerPoint? And more importantly, what is the best way to use them to build your slides?
In this article, you will learn the best practices for working with these objects.
This is a direct response to the below question I received from Lindsay.

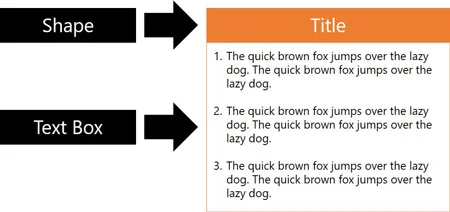
As Shapes and Text Boxes are two of the most basic objects you will use in PowerPoint to create presentations, being able to use and format them effectively is vital.
Click play below to see my video response, or scroll down the page for more details.
Shapes vs. Text Boxes vs. Placeholders
To learn everything you need to know about PowerPoint to use it successfully in the real world, check out our PowerPoint Pro Membership here.
PowerPoint Placeholders
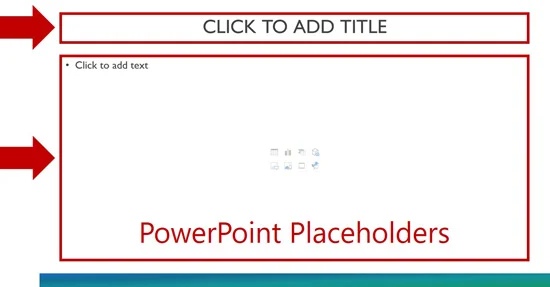
PowerPoint Placeholders are different than Shapes and Text Boxes as they are inserted, edited and managed in the Slide Master View. You can identify them by the “Click to add title” or “Click to add text” prompt text.
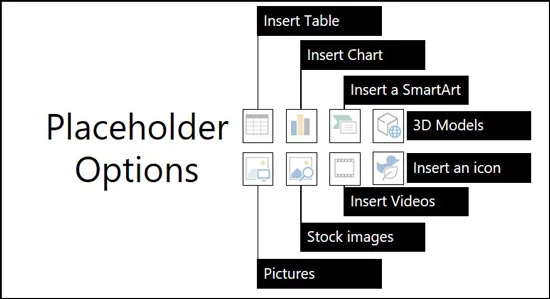
You can also spot them by the icons displayed in their center, which allow you to insert:
Tables
Charts
SmartArt graphics
3D Models
Pictures
Stock images
Videos
Icons
To get all of these options, you need to be using the latest version of Microsoft Office – Microsoft 365. To get a copy of it from the Microsoft store, click here.
The goal of placeholders is to create a standardized template that all of your slides follow. This makes creating professional and consistent looking slides faster and easier.
Different than Shapes and Text Boxes, Placeholders can only be inserted and globally formatted in the Slide Master view of PowerPoint. So, let us take a quick look.

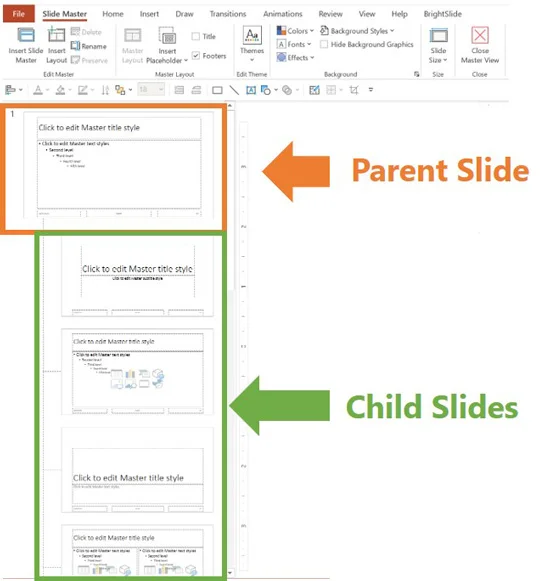
To navigate to your Slide Master, simply click into the View tab and click on Slide Master.
On the left side of your screen, you’ll notice here that you have a Parent Slide and the Child Slide layouts. This is where you would normally see your slides in the Normal View of PowerPoint.
While the Slide Master View is beyond the scope of this article (check out our article on creating a custom template here), here are some key points to keep in mind.
The Parent Slide is where you format the placeholders so that they are the same across all of your slides. This would include things like your Titles, Slide Numbers, Footers, etc.
The Child Slides are where you can make edits that will only be reflected on those individual slide layouts.
When designing your slide layouts, you can add any type of placeholder you want using the Insert Placeholder dropdown menu. The Content placeholder at the top is a catch-all, allowing you to insert any object you want. The other placeholders you see in the picture below, only allow for specific objects.
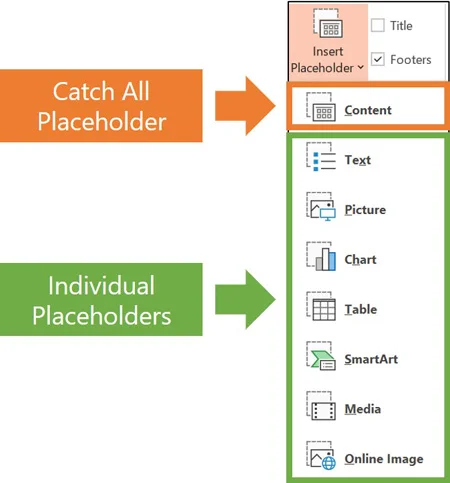
For example, if you add a Picture Placeholder to your slide, you will only be allowed to insert a picture into that placeholder when editing that slide. In the same way, you can insert a placeholder for a chart, a table, a SmartArt graphic etc.
In this way, you can you create your unique custom template to fit any presentation. While creating a custom template takes a lot of work, the time you invest is well worth it. That’s because, once you have one set up, it can save you and your team HUNDREDS of hours of effort building and editing slides.
To learn step-by-step how to create a PowerPoint template from scratch, read our step-by-step guide here.
If you do not want to build your own custom template, but still want to use a professional one that works the way it is supposed to, read our recommended places to find one here.
Shapes vs. Text Boxes (Explained)
In contrast to Placeholders, Shapes and Text Boxes are mostly designed to be used in the Normal View in PowerPoint.
If you add a Shape or Text Box to the Slide Master, it will not be editable in the Normal View. Instead, it will just be a static element. However, if you insert one in the Normal View, you’ll be able to edit and format it normally.
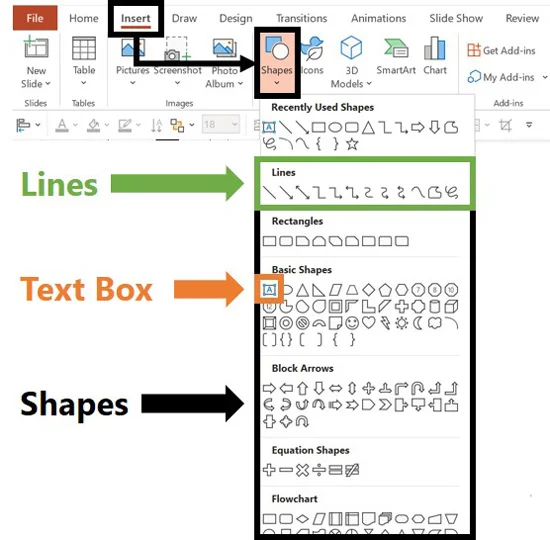
To insert a Shape or Text Box in PowerPoint, simply:
Navigate to the Insert tab
Open the Shapes dropdown menu
Select a shape or a text box
Draw the shape or text box on your slide
The main difference between a Shape and a Text Box is the default formatting that they start with.

By default, PowerPoint Text Boxes start with:
Vertical Alignment set to Top
Text set to Resize shape to fit text
By default, a PowerPoint Shape starts with:
Vertical Alignment set to Middle
Text set to Do not Autofit
Assuming you are using the rectangle shape, there is no other distinction between a Shape and a Text Box.
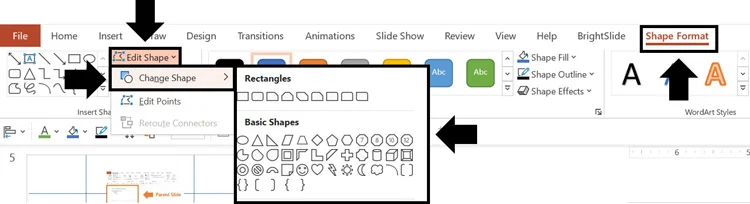
On top of that, as you can see in the picture above, you can easily change any Shape or Text Box into another shape if you:
Select your shape or text box
Select the Shape Format tab
Open the Edit Shape dropdown menu
Open the Change Shape options
Choose a new shape
You can use this feature to not only convert shapes into other shapes (like ovals and triangles), but also to convert text boxes into shapes.
Setting your default Text Box formatting
The first thing to know about setting your default formatting, is that it can take absolutely ALL the formatting options available in PowerPoint.
So think through and apply all of the settings you want to set, including shape fill, shape outline, shape outline weight, font style, font size, interior margins, etc.
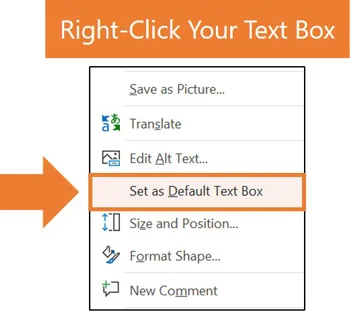
To default the formatting for your PowerPoint Text Boxes, simply:
Apply your desired formatting to a Text Box
Right-click your Text Box
Select Set as Default Text Box
Besides setting your fill color, outline color, margins, etc., I also recommend the following two settings in the Format Shape dialog box:
Vertical Alignment Middle
Do not Autofit
Selecting Do not Autofit ensures that your text boxes will not resize to fit the text you type into them. This is extremely annoying and unnecessary, in my opinion.
To open the Format Shape dialog box to make these adjustments, simply right-click your Text Box and select Size and Position in the right-click menu. Then navigate find the Text Box options.
Keep in mind that setting your Text Box this way, effectively makes in just like a Shape, as discussed earlier.
Setting your default Shape formatting
Just like with your text boxes, it is wise to think through ALL of the formatting options you want to be applied to your shapes before setting your default formatting. That includes your interior margins, horizontal text alignment, vertical text alignment, bullet points, etc.
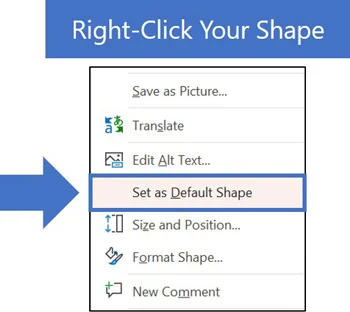
To default the formatting of your PowerPoint Shapes, simply:
Apply the desired formatting to a Shape
Right-click your Shape
Select Set as Default Shape
Keep in mind that the default formatting includes all of your shape options in PowerPoint. For example, if you set your default shape fill to blue, all of the shapes you insert will have that blue fill. That’s true for your triangles, ovals, trapezoids, etc., too.
When thinking of what formatting to set for your Shapes, consider what you have already set as your default Text Box formatting.
Instead of using the same exact formatting, consider mixing them up so you can use your Text Boxes one way, and your Shapes another.
For example, if you are creating lots of boxes, the Text Box formatting could be set to your title formatting, and your Shapes could be set to your content formatting.
Setting your default Line formatting
When setting the default formatting for your lines, I recommend only setting its outline color and outline weight.
Although you do have options for arrowheads and dashed lines, having these show up on a line by default tends to confuse people.
Most professionals do not know that in PowerPoint an arrow line is just a line with an arrow option added to it. So, if you set your default formatting for your lines to include arrowheads, it will throw most people off.
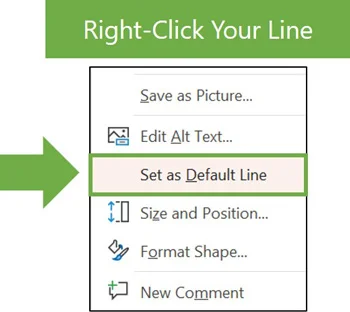
To set the default formatting for your PowerPoint Lines, simply:
Apply your desired formatting to a Line
Right-click your Line
Select Set as Default Line
NOTE: The horizontal or vertical direction of your line is not set in the default formatting. After setting its formatting, you can still draw the line on your slide in any direction you like.
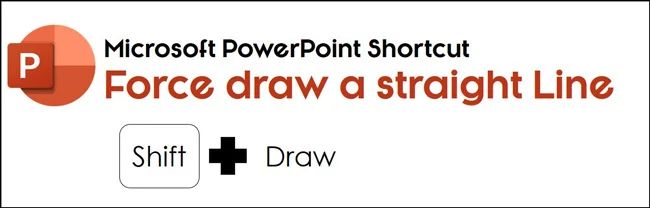
If you did not already know, the secret to drawing a straight line in PowerPoint is to hold the Shift key as you draw it on your slide. To learn other PowerPoint shortcuts like this that will save you time, read our PowerPoint shortcuts guide here.
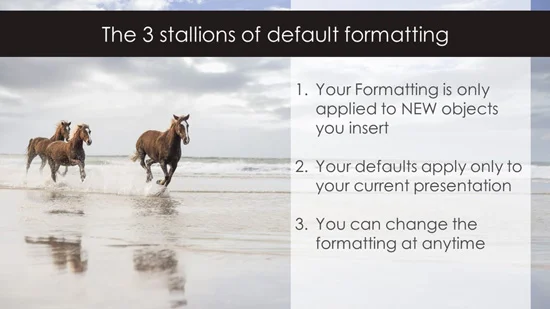
Three Default Formatting Questions (Answered)
The default formatting for your Shapes, Lines and Text Boxes is all set and managed in the Normal View in PowerPoint. Not the Slide Master View as you might expect.
Here are 3 common questions (what I call the three stallions of default formatting) you might have about setting the default formatting.
Final Thoughts
Kudos to you for taking the time to understand the differences between Shapes, Text Boxes, and Placeholders in PowerPoint.
That might be more than you ever thought you wanted to know about these object classes! However, understanding how they work is a huge step forward in improving not only your PowerPoint skills but also the professionalism of your presentations.
When combined with the ability to default the formatting of your objects, this allows you to save a ton of time when building and editing your PowerPoint slides.
If you enjoyed this article and want to learn more about our website and discover other helpful resources, visit us here.
About the Author

Taylor Croonquist
Co-Founder, Nuts & Bolts Speed Training
Taylor Croonquist is a PowerPoint expert and trainer. Over a career spanning the globe, from consulting in New York and investment banking in China, Taylor has truly seen it all in PowerPoint. Through necessity and a natural tech savvy, Taylor honed his PowerPoint skills to the point of even blowing the minds of the Microsoft PowerPoint programming team. When he's not busy crafting PowerPoint training, you can find him reading a sci-fi series or scuba diving.