In this tutorial, you’ll learn how to change your slide size in PowerPoint.
That way you can create slides for any situation including on-screen presentations, printed documents, posters, postcards, handouts, etc.
First off, the two most used PowerPoint slide sizes are:
- 16:9 ratio for onscreen presentations and new overhead projectors. This is the default setting for the latest versions of PowerPoint.
- 4:3 ratio for printing slides on standard 8.5 x 11 pieces of paper as handouts.
When starting with a blank PowerPoint presentation, changing your slide size is super easy and straightforward. If not, there are a few issues you’ll need to deal with, each covered below.
That’s why it’s worth figuring out what slide size you need BEFORE you build your presentation. If you later convert your presentation to a different size, it can be painful!
It’s just like the old carpenter saying, “measure twice and cut once.” In PowerPoint, you’ll want to “ask twice (to double confirm the required size) and build once.”
Changing your PowerPoint slide size does not make your PowerPoint presentation larger or smaller. To reduce your PowerPoint file size, you need to learn how to compress a PowerPoint presentation.
Table of Contents
How to change your PowerPoint slide size
By default, new PowerPoint presentations start in the 16:9 slide size format.
This is the NEW standard for most modern overhead projects and monitors and is recommended for most presentations. That said, you can easily change your slide size to something else.
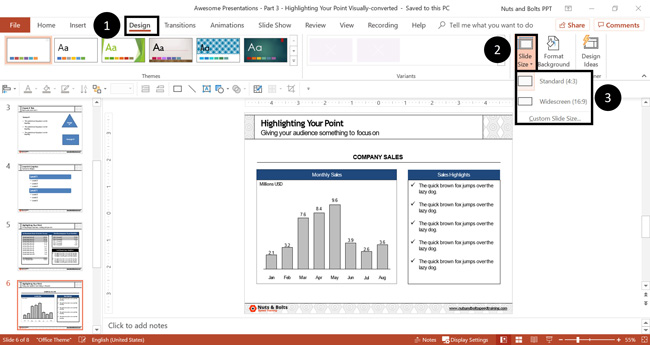
To change your slide size in PowerPoint, simply:
- Navigate to the Design tab
- Open the Slide Size drop down menu
- Select 4:3, 16:9 or Custom Slide Size (see options below)
When starting with a blank presentation, you are now good to go. You will not have to worry about any of the conversion issues discussed below.
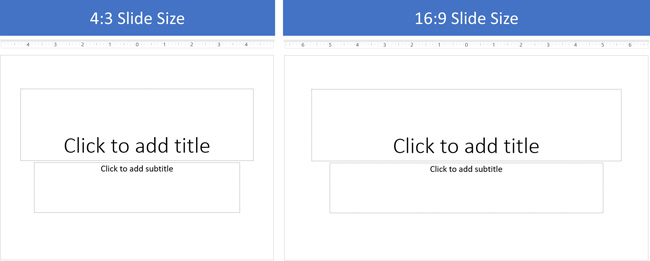
Notice too, how much wider the 16:9 slide size is versus the 4:3 slide size in the picture below. The new size gives you more room for the content on your slides.
When you are converting an existing presentation to a new slide size, you will additionally be given the following prompt:
“You are scaling to a new slide size. Would you like to maximize the size of your content, or scale it down to ensure it will fit on the new slide?
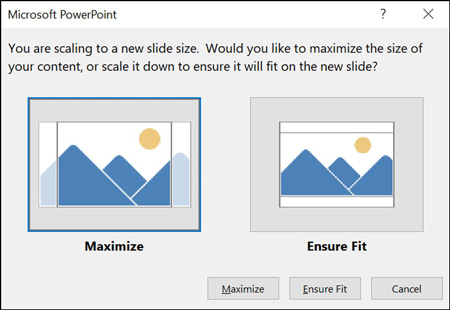
Maximize leaves all your content as is on your slide, even if it no longer fits on the new slide size that you selected.
Ensure Fit scales down your content in proportion to the new slide size you have selected. You will only see this option when moving from a larger slide size to a smaller one.
Custom PowerPoint slide sizes
Choosing Custom for your slide size gives you additional options to work with. Inside the dialog box you can choose your size on the left and your orientation on the right.
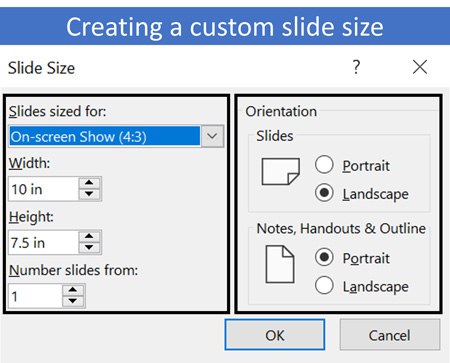
On top of that, you can also input your own custom slide size. However, I recommend using one of the preset PowerPoint dimension options.
- On-screen show (4:3)
- Letter Paper (8.5×11 in)
- A3 Paper (297×420 mm)
- B4 (ISO) Paper (250×353 mm)
- B5 (ISO) Paper (176×250 mm)
- 35mm Slides
- Overhead
- Banner
- On-screen Show (16:9)
- On-screen show (16:10)
- Widescreen
- Custom
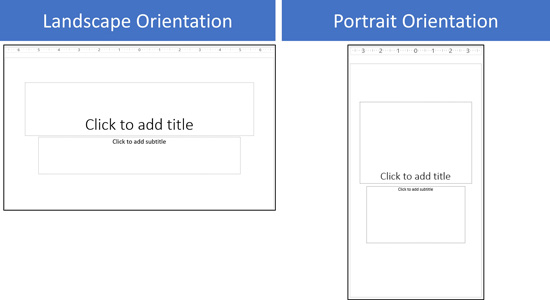
For your orientation options on the right-hand side of the dialog box, you can choose between Landscape and Portrait.
In most situations, you will want one of the default settings. Best practice is Landscape for your presentation slides and Portrait for your printed notes, handouts and outlines.
Issues when converting 4:3 to the 16:9 slide size in PowerPoint
When converting an existing 4:3 presentation with content into the 16:9 format, you are not given any conversion options. Instead, PowerPoint simply does the conversion for you, which can create several problems.
There are two issues you will face in the new 16:9 slide size.
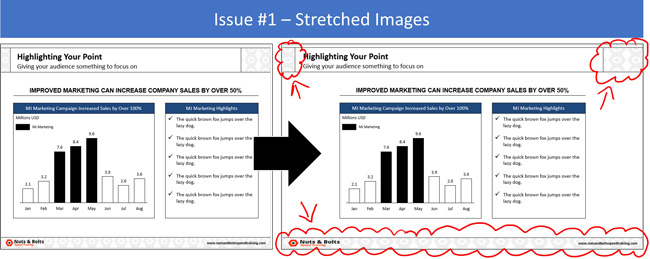
The first issue is that all the images on your slide master (including company logos) will be stretched to fit the new, larger slide size.
To fix the stretched images, you will need to fix those images (or reinsert them) on your slide master, as if you were creating a PowerPoint template from scratch.
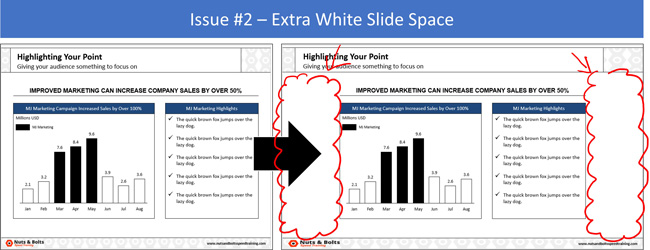
The second issue you will face in the larger 16:9 slide size is that you will have a lot of extra white space on your slides.
While you can leave the space blank, doing so will make your content look weird. Ideally you don’t want a lot of white empty space like that on your slides. Especially since all your font sizes will be so small.
That’s why if you have the time, I recommend resizing your content to fill in the white space. You can do this by either increasing the font size of your content, or adding additional visuals that support your message.
Issues when converting 16:9 to the 4:3 slide size in PowerPoint
When converting an existing 16:9 presentation to the 4:3 slide size, you are given the option to either Maximize or Ensure Fit (both covered below).
1. The Maximize option
This option means that the content on your slides will not be resized to fit the 4:3 slide size. The same is true if you move to any smaller slide size.
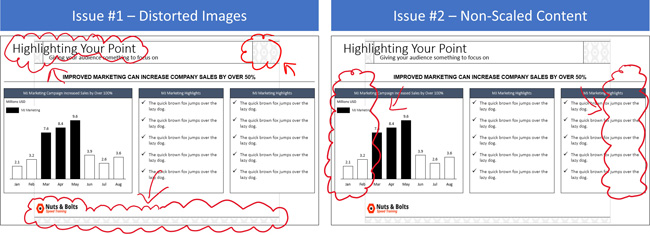
Maximize Issue #1: All the images on your slide master (including your company logo) will be distorted.
You might also have issues with other content placeholders, slide backgrounds or anything else that was built on your slide master. For these issues, you’ll first need to navigate to your Slide Master. Once you are there, you either adjust (or rebuild) your PowerPoint template so that everything fits properly.
Maximize Issue #2: Your content will not be scaled down to the smaller slide size. Instead, you’ll have overhanging content as pictured above.
For these kinds of spacing issues, you will need to work through your slides to adjust your content.
One recommendation as you move from the larger 16:9 slide size to 4:3, is to break up your slides. Take the contents from one larger slide and break it into two (or even three) separate slides.
Breaking up your content is preferable to just cramming more content on the smaller slide space. Doing so will make your content easier to read when presented on an overhead projector.
2. The Ensure Fit option
This option means that PowerPoint will scale down your content to fit the smaller slide size based on the size you selected.
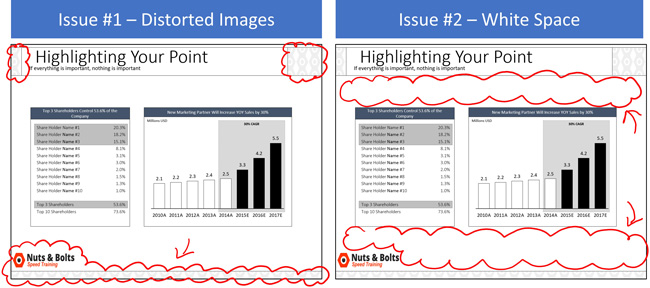
Ensure Fit Issue #1: Distorted images, slide backgrounds and anything else that PowerPoint had to automatically resize on your slide master.
To fix these issues, you’ll need to navigate to your slide master and adjust (or rebuild) your template to make everything fit.
Ensure Fit Issue #2: Your content will be scaled down to fit your new slide size, leaving you with a lot of white space. In addition, all your font sizes will be smaller, making them hard to read.
For small content like this, you’ll need to work through your slides and resize your content accordingly. Keep in mind the people at the back of the room too when choosing a new font style and size.
Saving your custom slide size as a PowerPoint theme
If want to use your own custom slide size for all your future PowerPoint presentations, you can save and set it as a PowerPoint theme.
This is a two-step process as discussed below.
1. Save your custom slide size as a theme
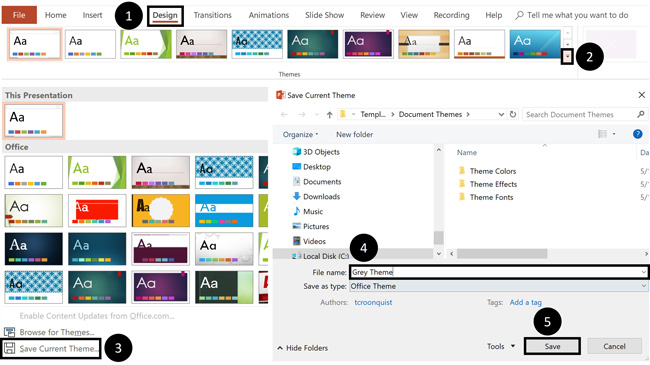
To save your custom slide size (and settings) as your own custom PowerPoint theme, simply:
- Navigate to the Design tab
- Open the More options
- Click Save Current Theme
- Name your Theme (and don’t change the file location it saves to)
- Click Save
2. Set your custom theme as the default
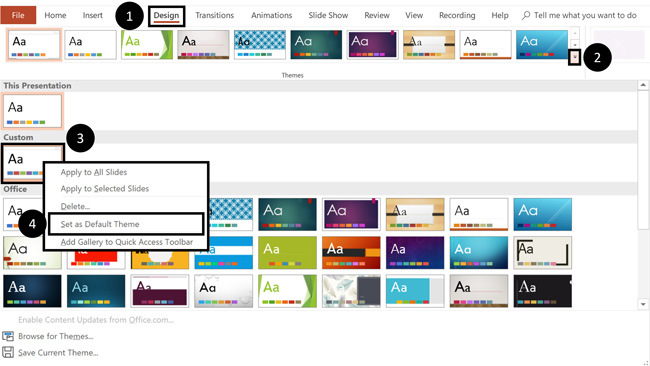
To set a custom PowerPoint theme as the default for all your future presentations, simply:
- Navigate to the Design tab
- Open the More options
- Right-click your custom theme
- Select Set as Default Presentation
- Close out of PowerPoint (and do not save any presentations if it prompts you)
Once you’ve set your own custom theme as the Default Presentation, it will open every time you start PowerPoint. This saves you from always having to switch your slide sizes.
Conclusion
So that’s how you can change your PowerPoint slide size, either before or after you create your presentation.
And although you are given a lot of flexibility in the slide sizes you can choose from, I recommend using the default slide sizes as used by most people.
It’s also important to remember that switching slide sizes after you have built your presentation can be a total pain. So, to the extent possible, figure out your PowerPoint slide size first before you build out your presentation.
If you enjoyed the depth of this article, you’ll love our PowerPoint training courses and other free resources that you can learn more about here.
🔒 Unlock the PowerPoint Shortcuts Trusted by Industry Leaders KKR, American Express, HSBC, and More!
Join over 114,880 professionals from diverse fields including consulting, investment banking, advertising, marketing, sales, and business development who have supercharged their PowerPoint game with our proven methods.
✅ Customize compelling presentations effortlessly.
✅ Master time-saving techniques for faster deck creation.
✅ Boost your career prospects with top-notch PowerPoint skills.
Get FREE access to the Critical PowerPoint Shortcuts module of our premium training course by entering your name and email below.
DISCLAIMER: PC Users Only!
We respect your privacy and will keep your info safe and confidential.
