In this article, you’ll learn how to convert PowerPoint to Word so that you can edit your handouts or speaker notes directly in Microsoft Word.

The only issue you need to be aware of is the content on your slides.
Converting PPT to Word does NOT convert the content of your slides into a Microsoft Word document. Instead, the process exports your slides as thumbnails in one of five following handout layouts:
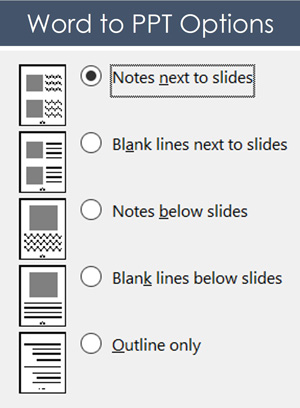
The five handout options when converting PowerPoint to Word are:
- Notes next to slides
- Blank lines next to slides
- Notes below slides
- Blank lines below slides
- Outline only
There is currently no way to convert the content of your individual slides – text boxes, shapes, SmartArt graphics, etc. – into a native Word document. For that, you will unfortunately have to copy and paste your information manually, slide by slide.
Below you’ll find a variety of methods to convert your PowerPoint slides to Word. Choose the method that works best for you.
NOTE: If you are just trying to convert your slides into the PDF file format, you DO NOT need to convert your PowerPoint presentation into a Word document first. Instead, you can simply save your PowerPoint presentation in the PDF file format. Read our guide here for details.
Table of Contents
[Watch] Convert PowerPoint to Word (Speaker Notes Only)
You are currently viewing a placeholder content from Youtube. To access the actual content, click the button below. Please note that doing so will share data with third-party providers.
More InformationExporting your slides to Microsoft Word like this embeds your slides as thumbnails within a table.
While you cannot edit the individual PowerPoint slides, you can manipulate the table to format your handouts any way you like.
To see an example of how to convert PowerPoint speaker notes to Word without the thumbnail, watch the short video above. To learn more different ways you can print PowerPoint notes, read our guide here.
How to Convert PowerPoint to Word
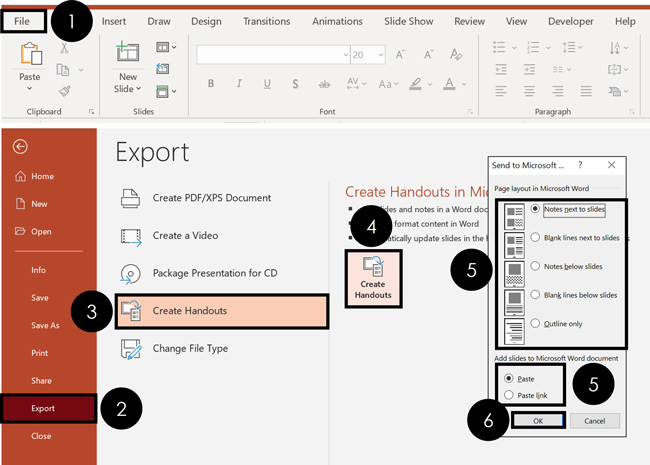
To convert your PowerPoint slides into Microsoft Word handouts, simply:
- Navigate to the File tab
- Select Export
- Click on the Create Handouts section
- Select the Create Handouts command
- Choose your Handout Type
- Select Paste or Paste Link (explained below)
- Click OK
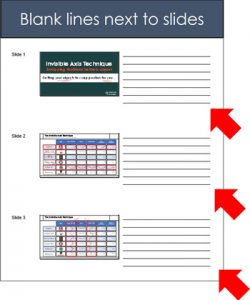
As a result, Microsoft Word opens, and your PowerPoint slides are converted into handouts based on your selection. For example, here’s how your slides look for the ‘Blank lines next to slides’ option.
Paste vs. Paste Link Options
At the bottom of the Send to Microsoft Word dialog box, you are given the option to Paste or Paste link (as pictured below).
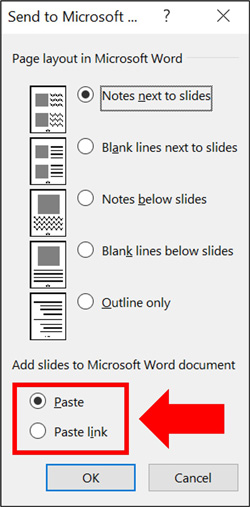
Paste: Exports your slides to Microsoft Word as a standalone file. Any updates or edits you make to your slides in PowerPoint will not be reflected in Word.
If you update your slides and want those changes reflected in Word, you will need to export your slides all over again.
Paste link: Exports your slides to Word as linked thumbnail images. Any edits you make to your slides in PowerPoint will be automatically updated within the thumbnail images inside Word.
This is all great. However, there are two caveats to the Paste link option to be aware of. Read on to see what they are.
Caveat #1: Only the PowerPoint thumbnails are linked to Word
The link created only updates the thumbnails of your slides in Word.
That means that if you export your slides to Word with your Speaker Notes beneath the slides, and you later update those speaker notes in PowerPoint, your changes will not be reflected in the Word document.
You’ll need to follow the steps above to convert PPT to Word all over again, to have your changes accurately reflected.
Caveat #2: The Word thumbnails only live in Word
Any updates and edits you make to your slides in PowerPoint will be updated in Microsoft Word.
But if you delete slide thumbnails in Word or move things around, none of those changes will be reflected in PowerPoint.
In fact, any changes like these will be overwritten as soon as PowerPoint pushes its latest updates back to Word.
How to View linked PowerPoint Slides in Microsoft Word
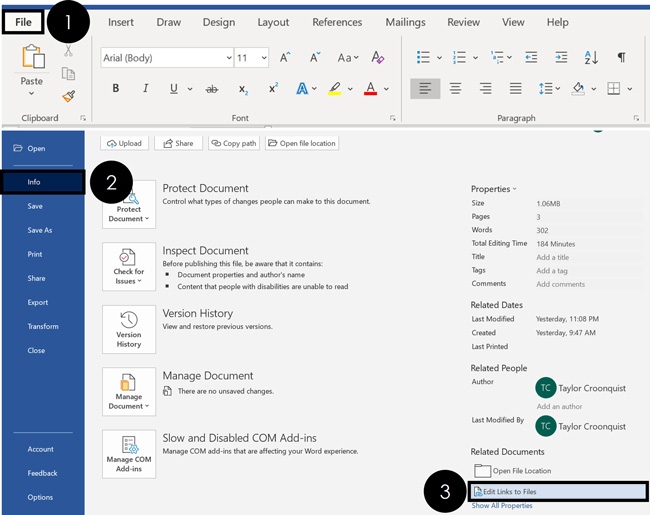
To view any linked PowerPoint slides you have in Microsoft Word, simply:
- Navigate to the File tab
- Select the Info tab
- Click Edit Links to Files
This opens the Links dialog box, which you can see below.
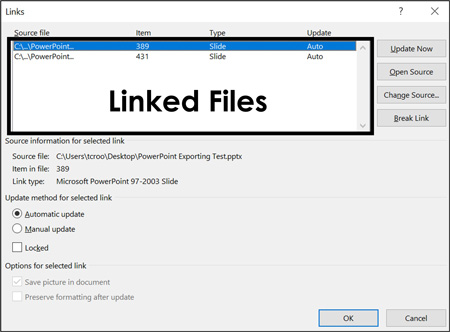
This is where you can update, edit, and manage any linked files to your Word document. Here is a quick rundown of what each of these options does:
Update Now: This forces Word to update based on whatever is in your PowerPoint file. This normally happens by default whenever you save your PowerPoint presentation, but you can control when it happens here.
Open Source: This will open the PowerPoint presentation from which these slides are linked. This can be faster than trying to find the original presentation you used to create your handouts.
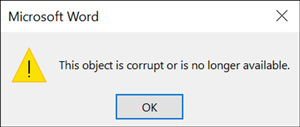
NOTE: If you move your PowerPoint presentation to a different place on your computer or change its file name after you convert PowerPoint to Word, you will get the following error: “This object is corrupt or no longer available”.
To fix this, simply use the Change Source option to re-locate the file. It’s either in a different location on your computer or has a new name.
Change Source: This allows you to change which PowerPoint file you are linked to. It’s useful if you have updated the name of your PowerPoint file after you converted it to Word.
To maintain an active link between PowerPoint and Word, the PowerPoint file’s name needs to be the same.
Break Link: This allows you to break the PowerPoint to Word links for individual slides. When you break the link to a slide (as discussed further below), it will no longer update in Word as you edit it in PowerPoint.
Update method for selected link: If you don’t want your files to automatically update, you can choose to manually update them instead.
How to Update a Linked PowerPoint Slide
Now that you know how to link PowerPoint slides to Word, there are two ways that you can update the links. Both methods achieve the same goal, so just pick the one that makes the most sense (and is easiest to remember) for you.
1. Right-click the slides in Word
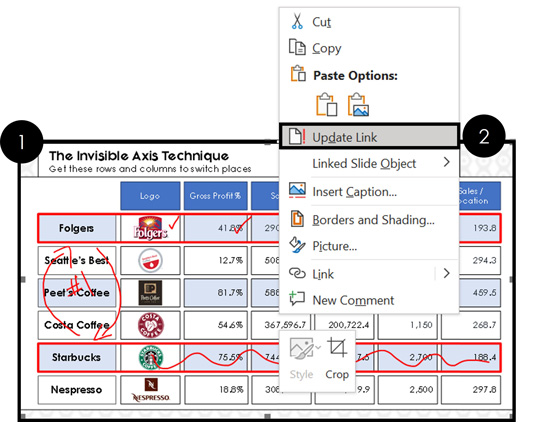
To update an individual linked PowerPoint slide in Word, simply:
- Navigate to the slide you want to update
- Right-click the slide’s thumbnail picture in Word
- Select Update Link
NOTE: This only updates the converted PowerPoint slide you selected. If you want to update the rest of your slides, you’ll need to right-click them individually or use the next technique.
2. Use the Edit Links to Files command
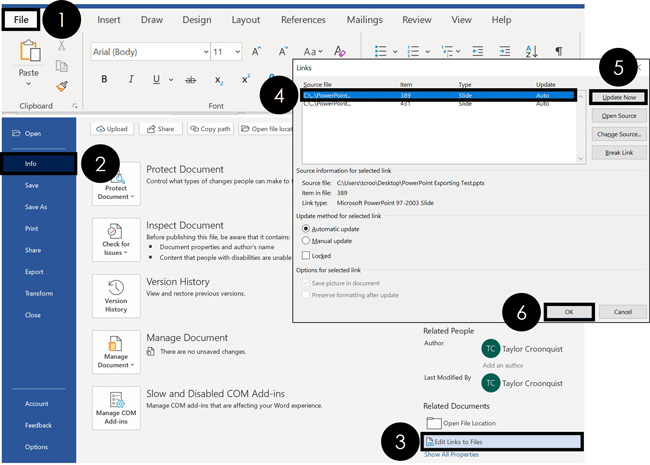
To update all your linked PowerPoint slides in Microsoft Word, simply:
- Navigate to the File tab
- Click the Info tab
- Select Edit Links to Files
- Select the slide you want to update
- Click Update Now
- Click OK
If you have multiple slides you want to update, you can continue selecting slides and updating them in Word.
If your document is set to Automatic Update, you can also just close and reopen Word to have all of your links automatically update (as long as you have saved and closed your PowerPoint presentation).
How to Break Linked PowerPoint Slides in Word
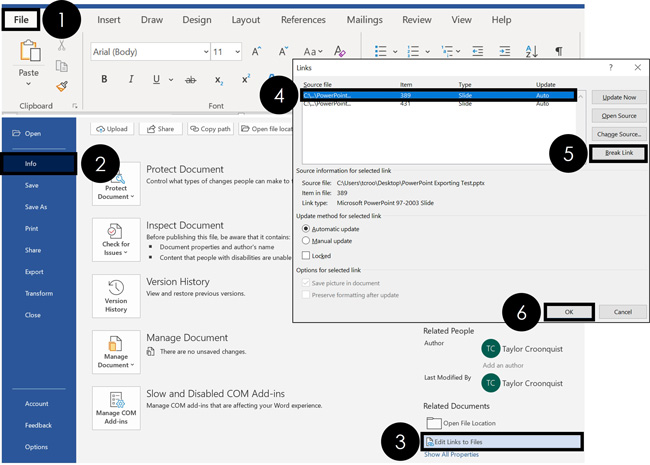
To break the links between your PowerPoint and Word files, from within Microsoft Word, simply:
- Navigate to the File tab
- Click the Info tab
- Select Edit Links to Files
- Select the linked slide you want to break
- Click Break Link
- Click OK
Because each PowerPoint slide thumbnail is considered a link, if you want to remove all the links, you will need to click on each slide and break it individually.
How to Insert PowerPoint into Word (as an embedded presentation)
An alternative to converting PowerPoint to Word as handouts is to instead embed your presentation inside of Microsoft Word.
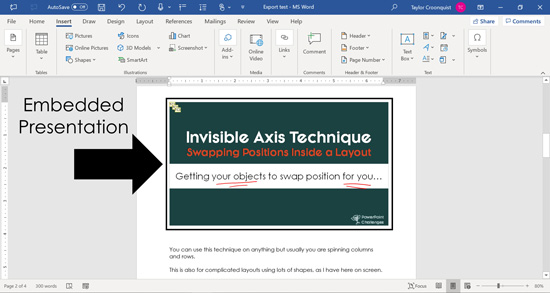
When you do this, instead of inserting pictures of your slides, your entire PowerPoint presentation is is embedded. You can then double-click it to launch your presentation in PowerPoint.

To embed a PowerPoint presentation inside of Word, from within Microsoft Word simply:
- Navigate to the Insert tab
- Open the Object dropdown menu
- Select Object
- Choose Create from file
- Click Browse
- Navigate to and select your PowerPoint file
- Choose Link to File (assuming you want changes to automatically update)
- Click OK
As a result, your PowerPoint presentation becomes embedded in your Word document.
Conclusion
As you can see, there are several ways to convert PowerPoint to Word depending on what you are trying to accomplish. In addition, you have several options to choose from for each method.
Is it worth your time to link the two programs together? That depends on how frequently you need to update your PowerPoint slides (and want those updates reflected in Word). If you decide to go this route, I recommend spending a few extra minutes reviewing the tips above on linking and updating links, so you know what to expect (and how to fix things if your links get broken).
If you decide not to link PowerPoint to Word, you can always easily export your PowerPoint slides to Word whenever you update them. This is my recommendation for you if you are not updating your slides frequently.
If you enjoyed this article and want to learn more about our online training courses and resources, you can visit us here.
🔒 Unlock the PowerPoint Shortcuts Trusted by Industry Leaders KKR, American Express, HSBC, and More!
Join over 114,880 professionals from diverse fields including consulting, investment banking, advertising, marketing, sales, and business development who have supercharged their PowerPoint game with our proven methods.
✅ Customize compelling presentations effortlessly.
✅ Master time-saving techniques for faster deck creation.
✅ Boost your career prospects with top-notch PowerPoint skills.
Get FREE access to the Critical PowerPoint Shortcuts module of our premium training course by entering your name and email below.
DISCLAIMER: PC Users Only!
We respect your privacy and will keep your info safe and confidential.

This is great, but the file size becomes enormous once in word.
Yes this is true. You can check the compression options in Word to try to reduce the file size. Select a picture, go to Picture Format tab > Compress (inside Adjust) and select either Print or Web. It’s the same steps as for PPT, as we cover in our tutorial here: https://nutsandboltsspeedtraining.com/powerpoint-tutorials/powerpoint-compress-images/