There are three different ways to convert Word to PDF inside the Microsoft Office suite. To do this, you do not (I repeat, DO NOT) need any 3rd party applications or software.
The latest versions of Microsoft Office all allow you to Save As, Export and Print your Word documents natively in the PDF file format. And the same is true for Microsoft Excel and Microsoft PowerPoint.
The main advantage of a PDF is that you can share your file with a client or prospect and they cannot easily edit the information. That said, it is now extremely easy to convert PDF files back into an editable Word document format, so do be careful.
If you are in a rush, I recommend using the first method (saving Word as a PDF). If you have a few extra moments, I recommend reviewing all three techniques so that you can make the best decision possible when converting to the PDF file format.
NOTE: If you are converting a PowerPoint presentation into the PDF file format, see my converting PowerPoint to PDF guide instead.
Saving Word as a PDF
Saving Word as a PDF is the fastest way to convert to the PDF file format; and it works across the entire Microsoft Office suite too. However, it does lack a number of the page formatting options you get by using technique #3, which I detail below in this article.
Ready to save your Word document as a PDF? Follos these steps.
1. Launch the Save As dialog box

- The fastest way to open the Save As dialog box is to hit F12 on your keyboard.
If you hit F12 and the Save As dialog box does not open, try hitting FN + F12. Your media keys are reversed. For help with this, see my guide on fixing function keys that are not working.
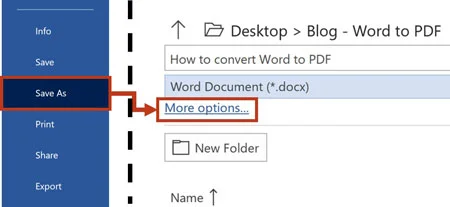
If you can’t get these shortcut keys to work, from within Word, you can alternatively:
- Click the File tab
- Select Save As
- Click More options
2. Change the Save as Type to PDF
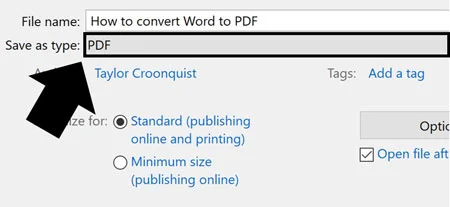
Inside the Save As dialog box, open the Save as Type dropdown and select PDF. This is the how you tell Microsoft Word to convert your file to the PDF format.
3. Choose a location and name your file

Location: Assuming you want your PDF saved in a particular place on your computer so that it is easy to find, this is your chance to choose a location.
Name: Changing the name of your file is optional when converting to the PDF file format. Because you are saving your file in a different format, you will not overwrite your existing Word file with the same name.
4. Choose any advanced options (Optional)
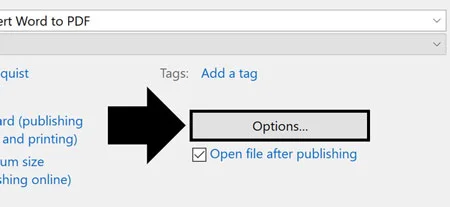
If you have properly set up your Word document using the heading styles and you want to create an interactive PDF, select the Options button.
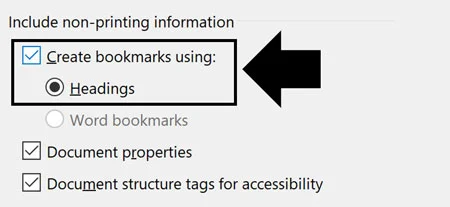
Inside this dialog box, there are a variety of options you can choose from. Here I recommend selecting Create bookmarks using headings.
For help properly setting up your Word document using the header styles (which is how you can create a table of contents in Word), read our guide here.
5. Click Save
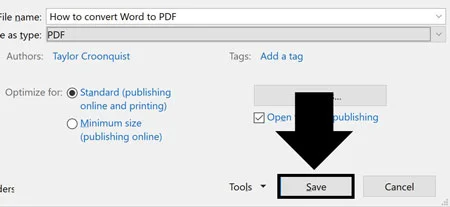
As a final step, click Save and your Word document is converted to a PDF format and saved to the location you selected on your computer.
Exporting Word as a PDF
Exporting Word as a PDF is very similar to the technique mentioned above.
The main difference between these two techniques is how you navigate to that Save As dialog box. As converting files to the PDF format is something that a lot of people do (and can’t easily figure out), Microsoft has added the Export command in the backstage view.
Follow the steps below to see how it’s done. This is not better or worse than saving as a PDF, but if it’s easier for you to remember (as it doesn’t require memorizing the F12 shortcut) then this could be your favorite method.
For additional page formatting options, see the third technique below using the Microsoft Print to PDF option.
1. Navigate to the File tab in your Word ribbon
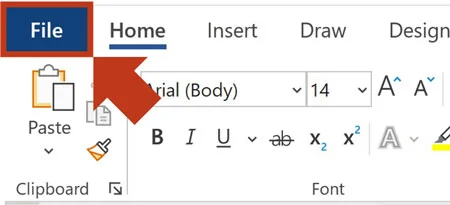
Inside Microsoft Word, click the File tab to open the backstage view.
This is the same technique you can use in Excel and PowerPoint to export your financial models and presentations to the PDF format. That’s the advantage of using the Microsoft Office suite.
2. Select the Export command

In the backstage view of Microsoft Word, click the Export command on the left. This is the same process as in PowerPoint and Excel if you want to export those files as a PDF.
3. PDF/XPS document
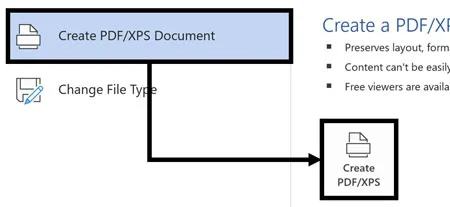
After clicking Export, the Create PDF/XPS Document option should be selected, so you simply need to click the Create PDF/XPS command on the right.
What is an XPS document?
It’s basically Microsoft’s version of a PDF document. For all intents and purposes, a PDF and an XPS document are the same thing. So don’t let the XPS name throw you off.
4. Choose a location and name

As you are creating a new document on your computer, you will need to specify a location to export your document as a PDF.
This is also your chance to rename your file. As a PDF and a Word document are 100% different file types, you do not need to rename your file.
You can have the exact same name for your Word and PDF files without having to worry about one overwriting the other.
5. Select any advanced options
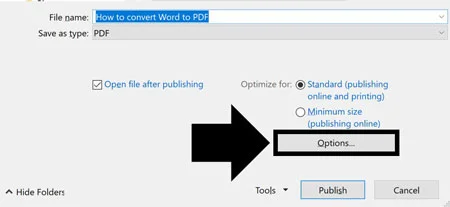
This is an optional step, but you can click on Options to specify any advanced options you want applied to your PDF.
Most of these you don’t need to worry about, but if you have properly used the heading styles to format your Word document, you can choose to create bookmarks based on your styles.
6. Click Publish
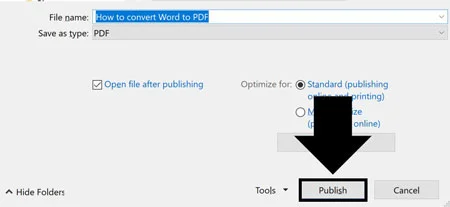
When you are done making your selections, click Publish and Word will export your Word document as a PDF file to the location you specified on your computer.
If you left the Open file after publishing option selected in the previous step, the document will immediately open on your computer when it is finished.
I recommend reviewing your PDF file for any mistakes or missing elements like page numbers before sending it along to your clients or colleagues.
Printing Word as a PDF
If you are looking for the most options when converting Word to PDF, this is your best solution.
Because this conversion process is driven through the print dialog box, it gives you the most choice for paper size, collation and other printing options.
However, if you don’t need many options here, the first technique mentioned in this article – Save as a PDF – is the fastest way to do it.
1. Open the Print dialog box

The fastest way to open the Print dialog box is to hit Ctrl + P ion your keyboard from inside Microsoft Word. The same is true when working in Excel and PowerPoint too. That’s the beauty of learning your shortcuts.
If you want to learn the best Windows 10 shortcuts that will save you time (and get you to Happy Hour), read our guide here.
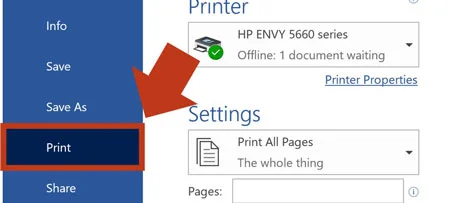
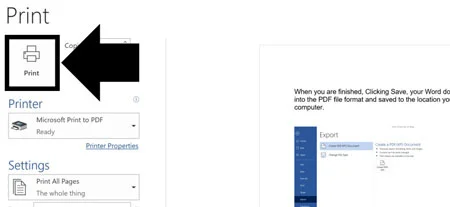
If you don’t like keyboard shortcuts, you can also get to the Print dialog box by clicking the File tab, and clicking Print in the backstage view as pictured below.
2. Select the Microsoft Print to PDF printer
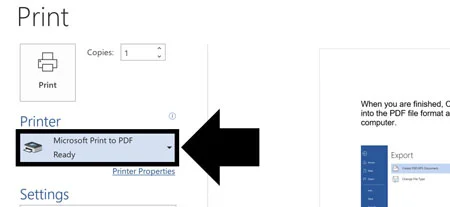
The trick to printing your file as a PDF is to select Microsoft Print to PDF as a printer.
This is a default printer that comes with Microsoft Office and requires no 3rd party applications or software. That said, if you have Adobe Acrobat installed on your computer, you will likely find an Adobe printer here that does the same thing.
Open up the printer drop-down (the downward arrow) and select Microsoft Print to PDF.
3. Select your other printing options
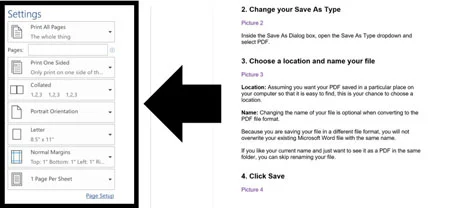
Being able to select many printing options for your PDF is the main benefit of this technique.
So choose your paper size, margins, collation, orientation and anything else you want to change about how your Word document converts to a PDF.
4. Click Print
Once you have selected your printing options, click Print at the top of the Print dialog box.
Because you are printing as a PDF to your computer, there is no point in specifying a specific number of copies.
5. Choose a name and location on your computer
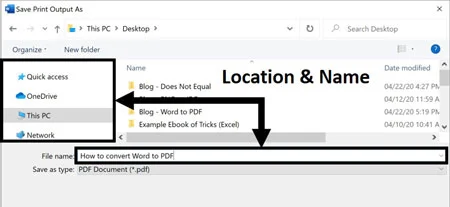
After clicking Print, you will need to specify a location on your computer to print your PDF to. Use the navigational tools on the left of the dialog box to find your project folder or select your desktop.
Changing the name of your file is optional. Because a Word document and a PDF file are different file types, your two files can have the same exact name without one overwriting the other.
6. Select Save
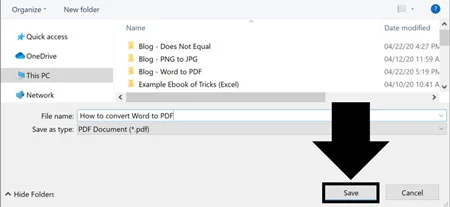
After selecting a location on your computer, click Save and Microsoft Word will print your file as a PDF to the location you selected on your computer.
Once the file has printed, you can then click and drag it into an email to send it to your client.
Conclusion
So those are the three different ways you can convert Word to PDF directly from within Microsoft Office.
If you had to only remember one of these methods, I recommend memorizing the F12 Save as PDF technique as it is the fastest way to do this.
Just note that it pre-assumes that your document is all set up properly and ready to go. If you need to review your print settings or set up specific margins or paper sizes, then the Print dialog box gives you the most options for converting Word to PDF.
If you enjoyed this tutorial and want to learn more about our courses and other services, visit us here.
About the Author

Taylor Croonquist
Co-Founder, Nuts & Bolts Speed Training
Taylor Croonquist is a PowerPoint expert and trainer. Over a career spanning the globe, from consulting in New York and investment banking in China, Taylor has truly seen it all in PowerPoint. Through necessity and a natural tech savvy, Taylor honed his PowerPoint skills to the point of even blowing the minds of the Microsoft PowerPoint programming team. When he's not busy crafting PowerPoint training, you can find him reading a sci-fi series or scuba diving.