In this article you’ll learn all of the different Select All shortcuts in Word, Excel and PowerPoint, and how to use Select All to quickly grab things like:
- Objects (PowerPoint)
- Text with similar formatting (Word)
- Formulas (Excel)
- Constants (Excel)
- Comments (Excel)
- And more!
This allows you to quickly grab EXACTLY what you need in each of the programs when you need it. This saves you from otherwise having to manually selecting everything yourself, one-by-one.
Select All shortcut (A Must Know)
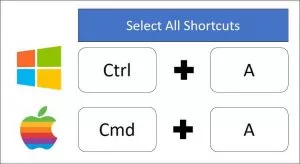
Select All shortcut (PC Users): Ctrl + A
Select All shortcut (Mac Users) Cmd + A
That said there are a variety of different ways you can use the shortcut in Word, Excel and PowerPoint to finish your tasks faster and get you to Happy Hour (all discussed below).
How to best use the Select All command?
In short, this command is best used to quickly grab all the text, numbers, objects, formulas etc. that you want to quickly format or work with.
This allows you to quickly make changes to everything at once. For example:
- Change the font style of all the text in a Word document
- Grab all the formulas or constants in an Excel spreadsheet to change their font color
- Grab all your PowerPoint objects on a slide to change their shape fill
Which makes sense, right?
Why bother doing things manually (one-by-one) when you can select all your objects at once.
And it’s this kind of know-how why one person leaves the office at a decent hour, while another wastes away at the office all night.
How to Select All in Word

You have 4 different types of selection options in Microsoft Word.
And if you are on a PC, you can additionally shortcut all of these using your Ribbon Guides (details below).
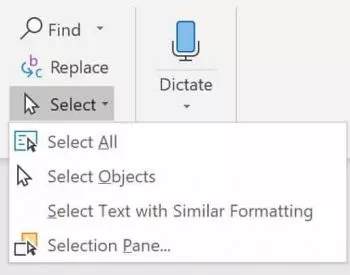
1. Select All (Ctrl + A)
Selects everything within your document so that you can make all the formatting edits that you want at the same time.
Clicking this command with your mouse is the same as hitting Ctrl + A on your keyboard (Cmd + A on a Mac).
2. Select Objects
Changes your mouse cursor into an arrow symbol that allows you to select an element (chart, picture, SmartArt graphic, etc.) as an object.
This is different than when you click things with your mouse. When you click with your mouse, you normally click into the object as if you are going to edit it.
The Select Objects command ensures that you select the object itself. That way you can cut and paste it, or move it around within your document.
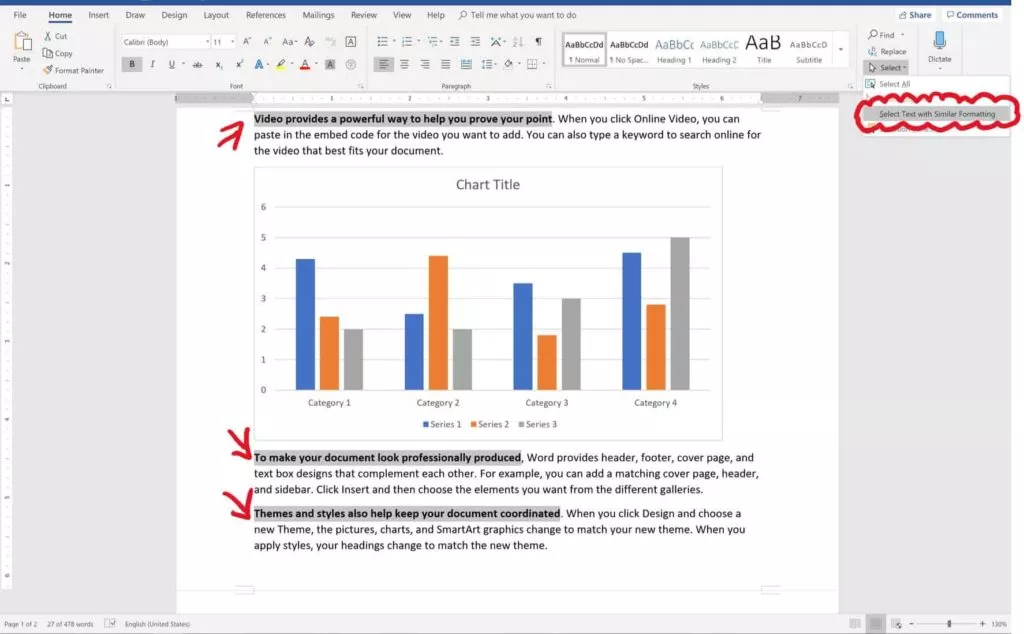
3. Select Text with Similar Formatting
Selects all of the text within a Word document that matches the formatting of the text that you have already selected.
This is one of the coolest features in Microsoft Word that hardly anyone knows about. This command grabs all of the same formatted text within a document, so you can change it’s formatting all at once.
Ahem… amazing!
4. The Selection Pane in Word (Alt + F10)
Opens or closes the Selection Pane in Microsoft Word.
Inside the Selection Pane you can see (and quickly manipulate) all the objects in a Word document.
Similar to the Selection Pane in PowerPoint, it only only shows you the objects on the current page you are currently working on.
That means that if you have 100 charts in your Word document but only 1 chart on your current page, you will only see 1 chart in the Selection Pane.
Select All Shortcuts in Word (Ribbon Guides)
Instead of using your mouse to access the selection commands, on a PC you can use your Ribbon Guides.
To use these shortcuts, simply hit the Alt key on your keyboard. Hitting the Alt key, you will see alphabetical sequences to the commands across your Ribbon.
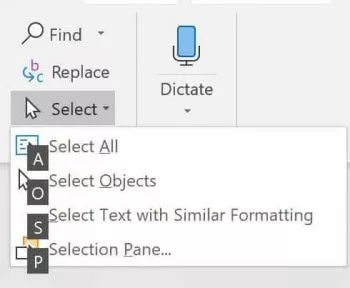
On a PC, your select all Ribbon Guide shortcuts are:
- Select All: Alt, H, SL, A
- Select Objects: Alt, H, SL, O
- Select Text with Similar Formatting: Alt, H, SL, S
- Selection Pane: Alt, H, SL, P
Note: When using your Ribbon Guide shortcuts in Word, you do not need to hold them down. Instead, simply hit and let go of them one at a time (following the letters forward).
To learn more about the Microsoft Office ribbon, see this guide by Microsoft here.
Select All in Excel
Because there are so many more inputs that can go into an Excel spreadsheet, there are 7 different selection commands in Excel (all covered below)
1. Select All (Ctrl + A)
Hitting Ctrl + A triggers the Select All command (which is otherwise not up in your Excel ribbon.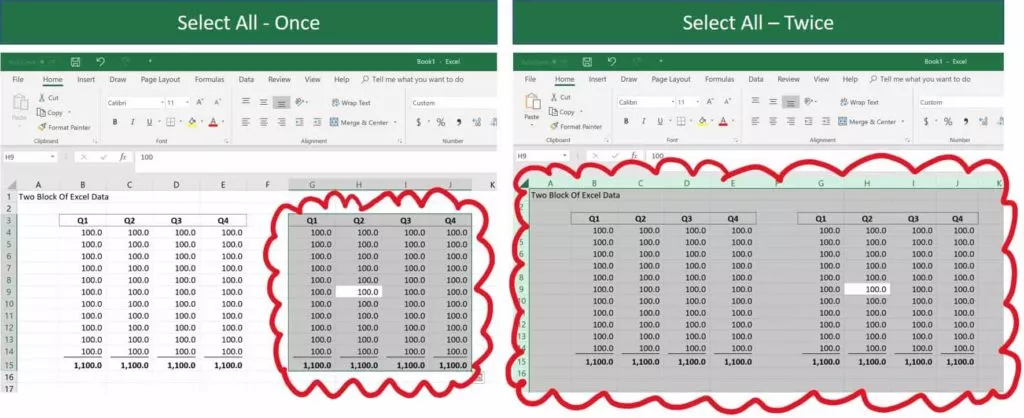
It’s also important to note that the Select All command works a little bit differently in Excel.
Using the command once, first selects the block of cells that you are currently active in.
Using the command a second time, then selects everything within your spreadsheet.
See images above for hitting it once, then twice.
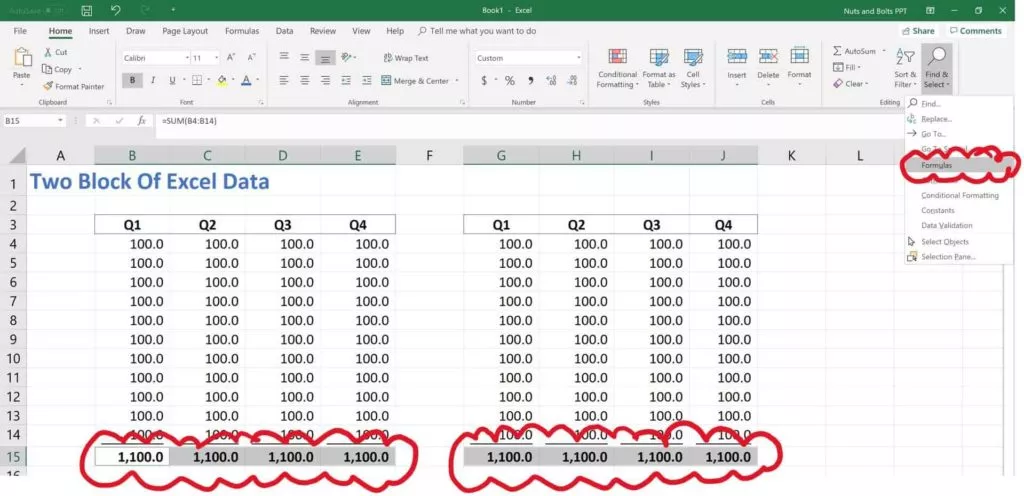
2. Select Formulas
Clicking Formulas will grab all the formulas in your current spreadsheet (pictured below).
This is a fast way and easy way to quickly identify and change the formatting of any formulas in your spreadsheet.
3. Select Comments
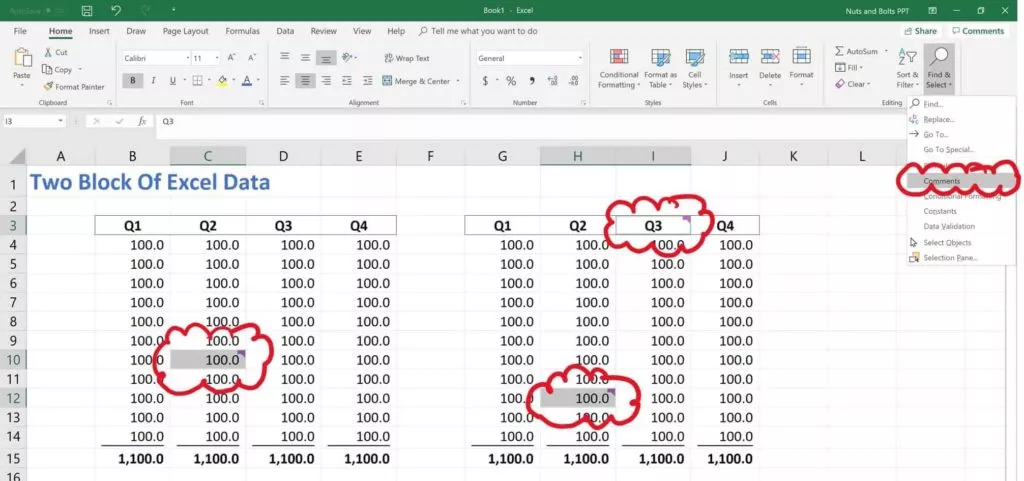
Clicking Comments automatically selects all of the comments in your spreadsheet (pictured below).
Comments show up in your spreadsheet as little markers in the upper-right hand corner of your cells. If you don’t want to waste time searching for them, simply use these command.
This allows you to quickly grab all the comments in your spreadsheet and format the cells.
4. Select Conditional Formatting
Clicking Conditional Formatting selects any cells within your spreadsheet that have conditional formatting in them.
This allows you to spot check or change the conditional formatting rules for those specific cells.
To learn more about conditional formatting rules, and how to use them, see this article by Microsoft here.
5. Select Constants
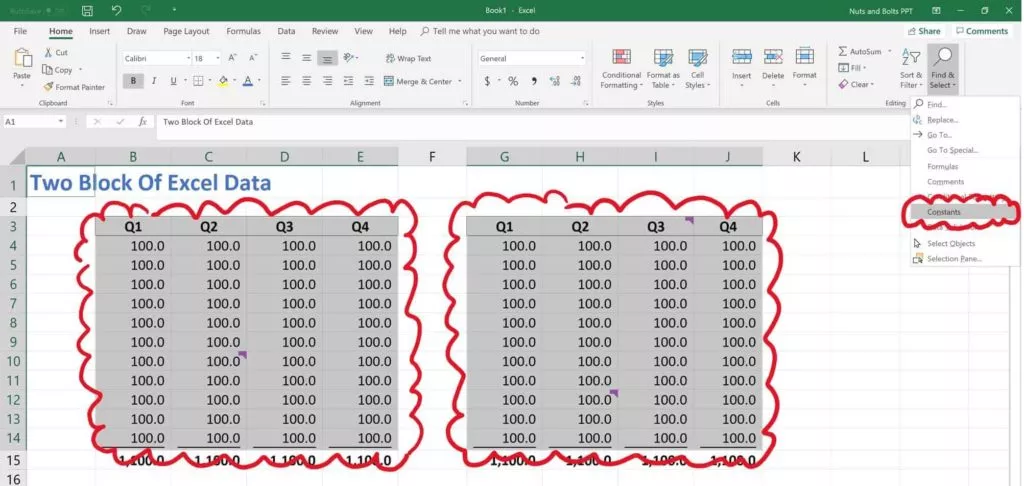
Selects all the constant values in your spreadsheet (i.e. values that are not formula-driven).
This is a fast and easy way to find all of the inputs that someone is using in their financial model or spreadsheet so that you can double-check their assumptions (pictured below).
6. Select Objects
Turns your cursor into an arrow that allows you to select objects that are within your spreadsheet (charts, pictures, SmartArt graphics etc.).
This is useful when you have a large spreadsheet or dashboard and you want to just select a single graphic without accidentally selecting the cells around it.
7. The Selection Pane in Excel (Alt + F10)
Opens the Selection Pane in Excel, showing you all of the charts, pictures, SmartArt graphics, etc., that are currently within your active spreadsheet.
Just keep in mind that the Selection Pane will only show you objects that are within the current sheet you are on. It will not show you objects that are on other sheets within your Excel file.
Select All Shortcuts in Excel (Ribbon Guides):
On top of using your mouse to activate the different Select commands in Excel, if you are on a PC, you can also use your Ribbon Guides to shortcut these commands (see key combinations below).
If you use any of these selection commands A LOT when working in Excel and are on a PC, I highly recommend learning these key combinations to save you time.
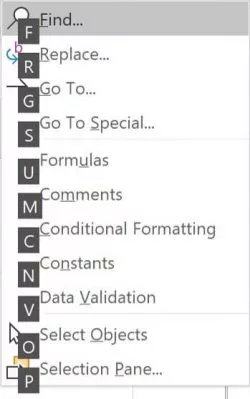
On a PC, your Ribbon Guide Shortcuts to these different commands are:
- Formulas: Alt, H, FD, U
- Comments: Alt, H, FD, M
- Conditional Formatting: Alt, H, FD, C
- Constants: Alt, H, FD, N
- Data Validation: Alt, H, FD, V
- Select Objects: Alt, H, FD, O
- Selection Pane: Alt, H, FD, P
Note: When using your Ribbon Guide shortcuts, you do not need to hold down the keys to make them work. Instead, simply hit and let go of them one at a time.
Select All in PowerPoint

You have 3 different types of selection options in PowerPoint (all of which you can shortcut on a PC using your Ribbon Guide shortcuts as discussed further below).
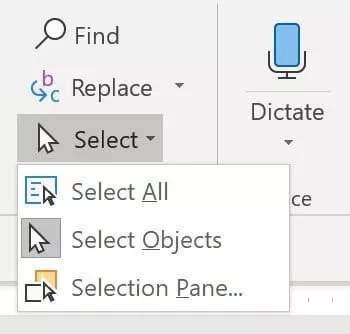
1. Select All (Ctrl + A)
Selects all of the objects that are currently on your slide.
This shortcut works in all of the different PowerPoint views including:
- The Normal View
- The Slide Master View
- The Handout Master View
- The Notes Master View, etc.
To learn more about setting up these different views in PowerPoint, see our guide on custom PowerPoint templates here.
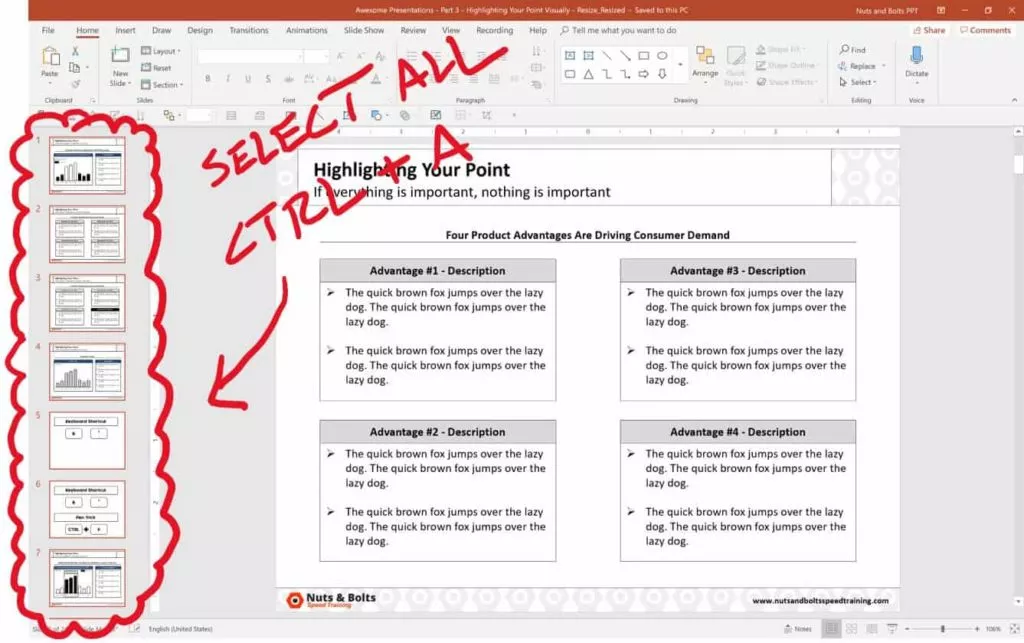
On top of that, if you first click into the thumbnail view (pictured below) you can use the command to grab all of your slides. This allows you to copy and paste those slides, apply a new layout, reset the slides, etc.
2. Select Objects
This is the default selection option in PowerPoint, allowing you to select objects (shapes, text boxes, charts, SmartArt graphics, etc.) which is what all of your slides are made of.
3. Selection Pane in PowerPoint (Alt + F10)
Opens the Selection Pane in PowerPoint, giving you a bird’s eye view of everything that is on your slide (even if it is buried beneath something else).
To learn other useful PowerPoint shortcuts like this to save you time in the program, see our guide here.
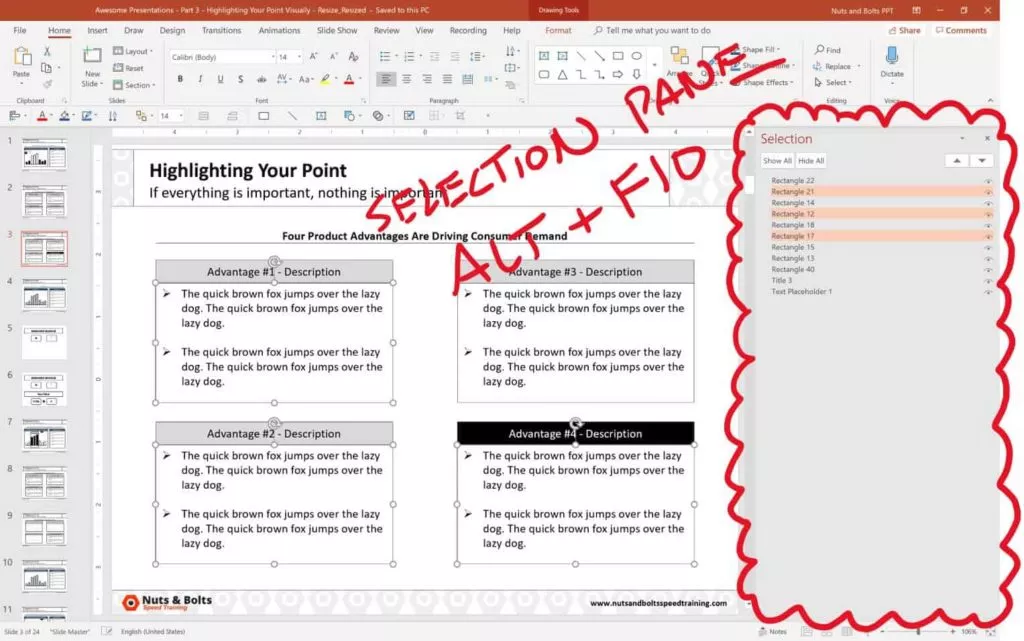
Selection Pane Shortcuts in PowerPoint
To learn more about how to use the Selection Pane shortcuts in PowerPoint, watch the short video below.You are currently viewing a placeholder content from Youtube. To access the actual content, click the button below. Please note that doing so will share data with third-party providers.
More InformationInverse selected objects in PowerPoint
Another way to cleverly use the Select All command in PowerPoint is to ‘inverse-select’ your objects.
For example, let’s say you want to select EVERYTHING on your slide except for the title.
To do so, follow these steps:
- Hit Ctrl + A to select everything on your slide
- While holding the Shift key or the Ctrl key, select your Title to un-select it
Doing so leaves you with everything on your slide selected except for your slide title (or whatever else you unselected by holding the Shift or Ctrl key).
Select All shortcuts in PowerPoint (Ribbon Guides)
Besides navigating these selection commands using your mouse, you can also use your Ribbon Guide shortcuts to access them if you are on a PC.
To use your Ribbon Guide shortcuts, simply hit and let go of the Alt key, and then follow the alphabetical or numerical queues to find your command (all shortcut combinations are listed below).
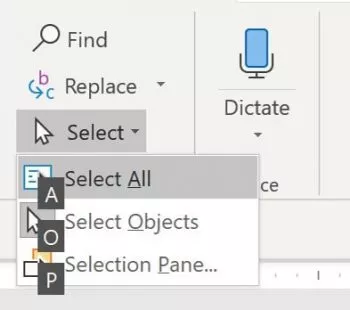
- Select All: Alt, H, SL, A
- Select Objects: Alt, H, SL, O
- Selection Pane: Alt, H, SL, P
Note: When using your Ribbon Guide shortcuts, you do not need to hold down the keys to make them work. Instead, simply hit and let go of them one at a time.
Conclusion
So those all the different ways you can Select All in Word, Excel and PowerPoint, and the different Select All shortcuts available to you if you are on a PC version of Microsoft Office.
Knowing how to properly use these, allows you to quickly grab exactly what you’re looking for so you can format it. This saves you time and gets you once step closer to Happy Hour.
If you are interested in taking your PowerPoint skills to the next level, you can learn more about our online courses and training here.
