Have you ever wondered how to create burning (or flaming) text backgrounds?
In this tutorial, you’ll learn how to use PowerPoint animations to liven up any text (or other object) with a simple moving background effect like you can see below.
You’ll learn how to create a video, picture and shine motion background using these animation techniques.
Create Moving Text Backgrounds like Flaming Text
Part #1: Make your text mask
The basic rundown of this motion background text effect is this:- You cut your text out of a solid rectangle
- You run your moving background behind the cut out pieces (to create the animated text effect)
1. Insert your solid shape
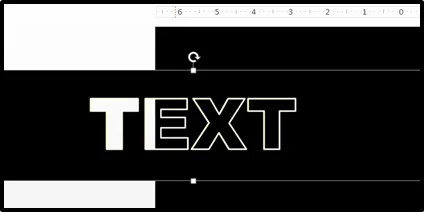
First make a shape with the text that you want to put in. I’ll keep it simple and start with a rectangle, so I’ll go to Insert -> Shapes , choose the rectangle, then draw it across the slide. The result should look like rectangle with 3 stripes in the figure to the right below.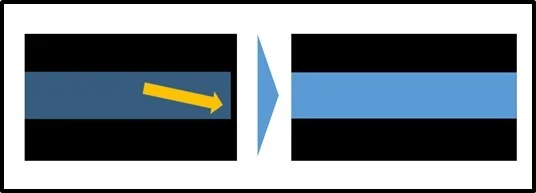
2. Add your text
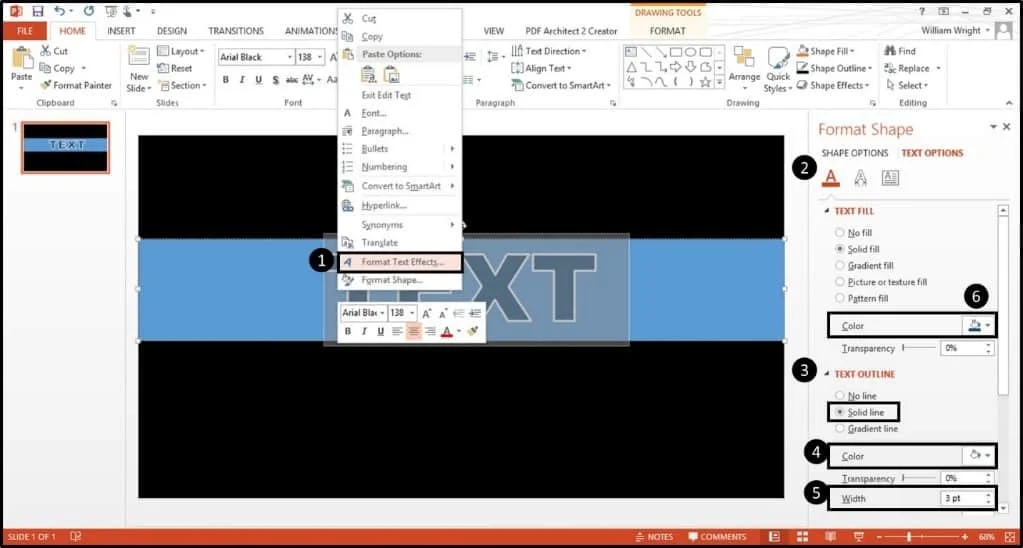
Now we need to add the text that will be cut out, so I’ll just write the word TEXT here as an example. Make sure you use a nice, fat, bold font for best results – I’ll use Arial Black in this case. Ok now we can either add an outline to the letters or not.
I’ll go ahead and add one as a demonstration by right clicking the text, then going to Format Text Effects, then under Text Options, going to Text Fill on the left and scrolling down and making the text outline solid, white, at 3 points in width to make it nice and visible.
I’ve also temporarily made the text fill darker so you can see the outline better.
Ok now we can either add an outline to the letters or not.
I’ll go ahead and add one as a demonstration by right clicking the text, then going to Format Text Effects, then under Text Options, going to Text Fill on the left and scrolling down and making the text outline solid, white, at 3 points in width to make it nice and visible.
I’ve also temporarily made the text fill darker so you can see the outline better.
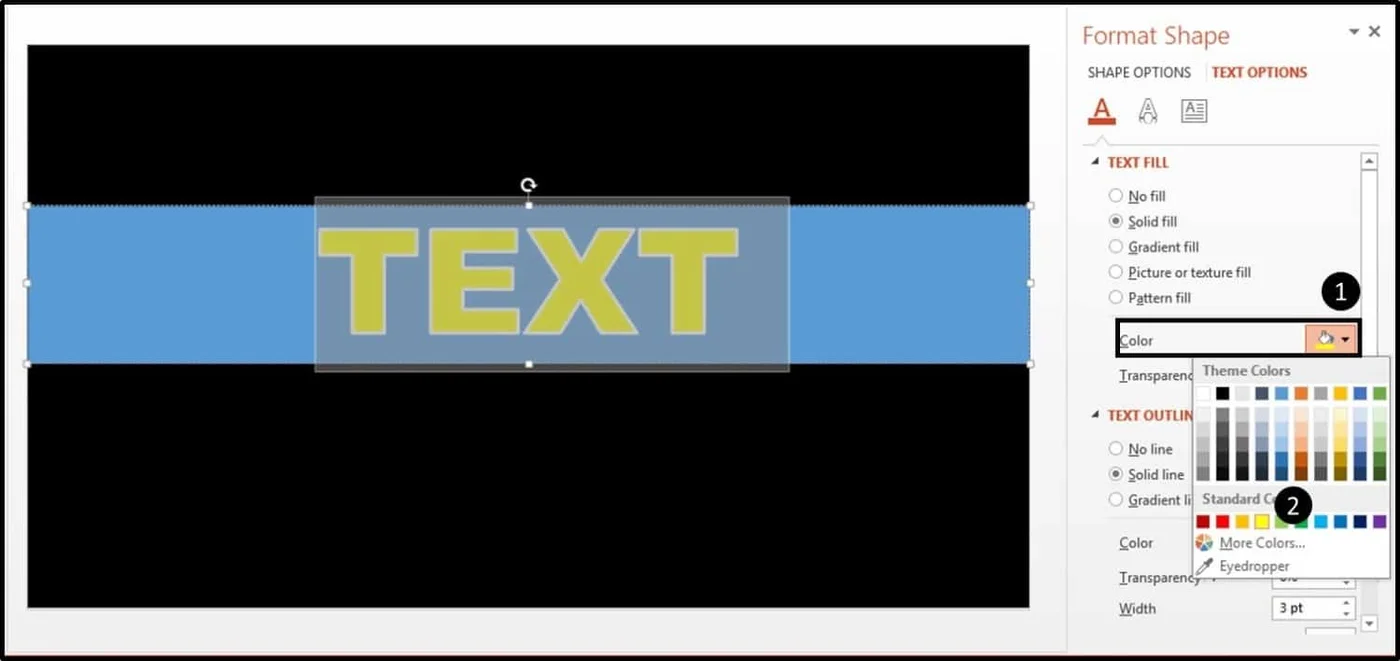
 Now the text fill will be cut out for our mask, so while I made it dark here, I recommend that you make that color close to the text outline color, so much lighter.
This is because when you cut out the text fill (which we’ll do in a little bit), small bits of the fill color will still remain at the edge – see below what I mean when the dark blue text fill is used.
>
Now the text fill will be cut out for our mask, so while I made it dark here, I recommend that you make that color close to the text outline color, so much lighter.
This is because when you cut out the text fill (which we’ll do in a little bit), small bits of the fill color will still remain at the edge – see below what I mean when the dark blue text fill is used.
>
 Therefore, by making the fill close to the outline color, we’ll make this edge barely noticeable, so let’s change the dark blue to a yellow text fill – still under the text fill menu.
3. Hide your mask
Now to hide the rectangle, let’s make the shape fill (the blue color) the same as our background (black), and take out the rectangle shape outline. So still under the Format Shape menu, we go to Shape Options, then Fill on the very left, make it a solid black fill, and choose “no line” for the outline.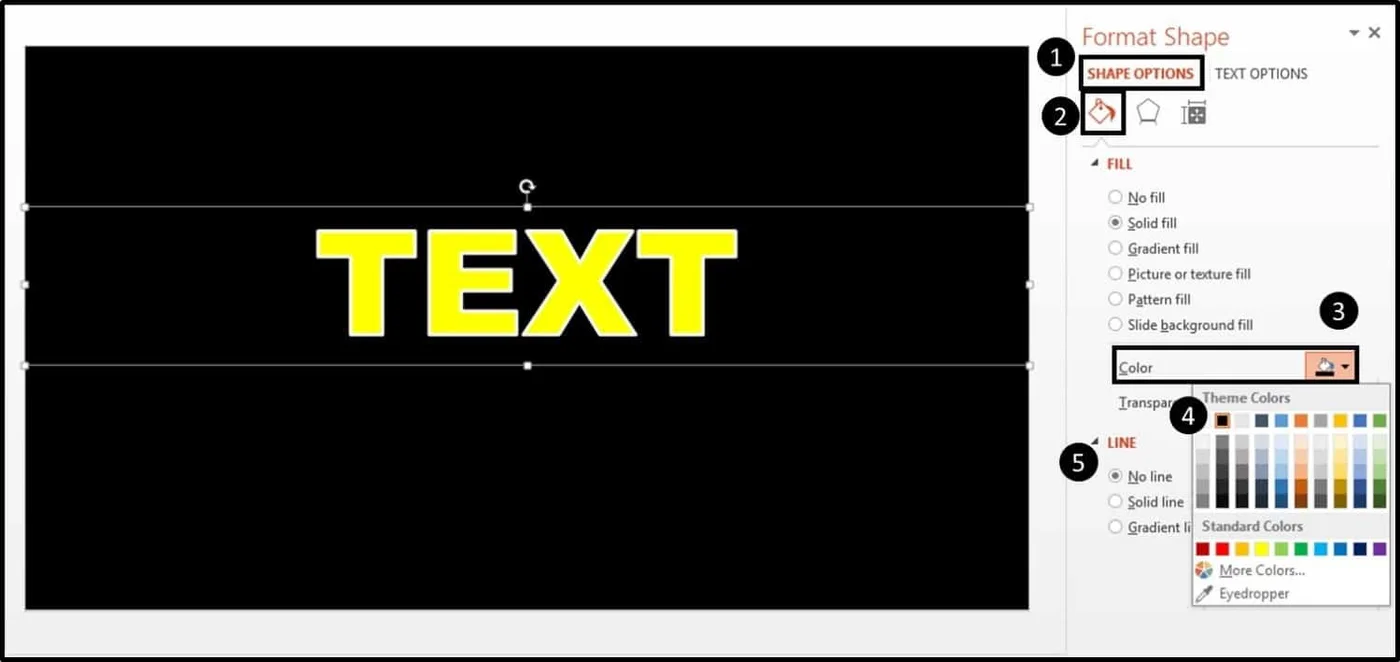 Ok now we have our mask built, and we’ve come to the fun part.
4. Paste your mask as a picture
Let’s cut the mask (CTRL + X on a PC) and when we paste, paste as a picture by right clicking, going to Paste, and choosing the picture option. Alternatively (and especially if you have an earlier version of PowerPoint), you can paste as a picture by going to the Home tab, then choosing Paste on the left, hitting Paste Special, and choosing one of the picture formats from the list, as shown in the graphic below.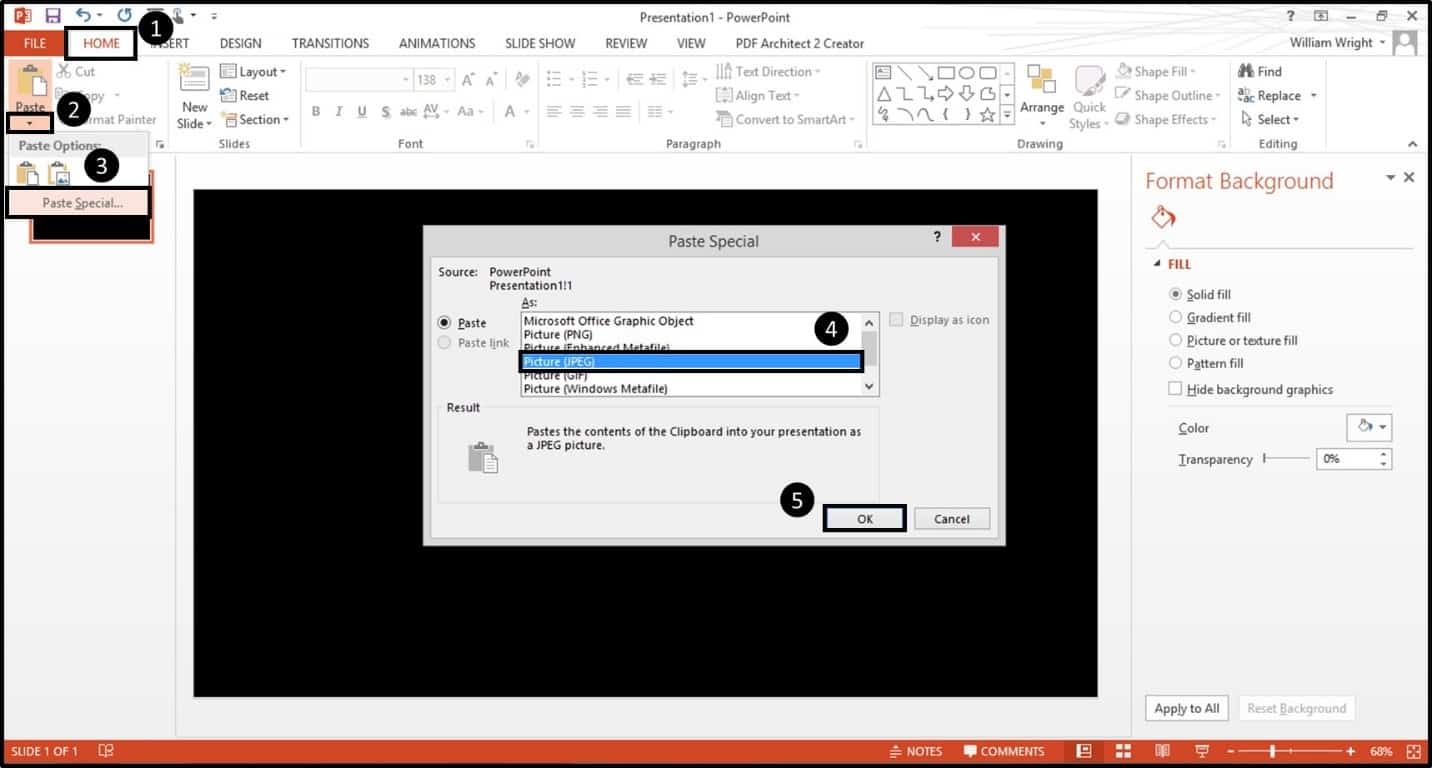 Now that we have our mask picture pasted, we go to
Format
,
Color
, and
Set Transparent Color
.
Now that we have our mask picture pasted, we go to
Format
,
Color
, and
Set Transparent Color
.
 And we click anywhere on the yellow text fill with the wand – and there you go!
The yellow part is now gone and the mask has a cut-out in the shape of the text, which you can see if I drag the text off the slide.
And we click anywhere on the yellow text fill with the wand – and there you go!
The yellow part is now gone and the mask has a cut-out in the shape of the text, which you can see if I drag the text off the slide.
Part #2: Make your background
We’re now ready to make our background. For this you have several options: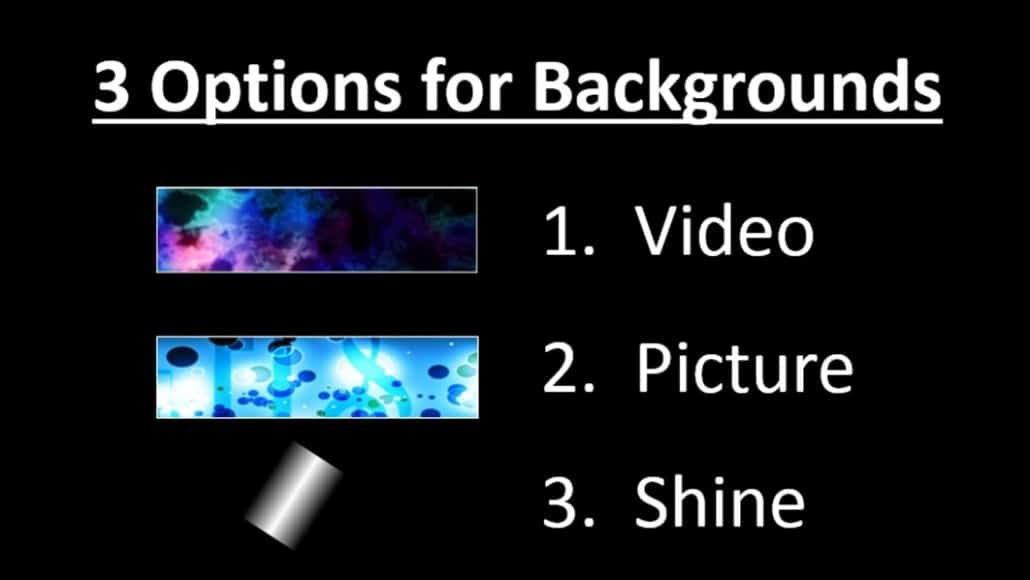 ul class=””>
- The first option which is my favorite, is to embed a video, although it only works on PowerPoint 2010 and later. Motion Backgrounds For Free is a really good site for free motion video backgrounds that I used in this tutorial, as everything is free to use for any project (none of the confusing licensing language!). You just have to quickly register with your email.
- Even though the video option is my favorite, if you have an earlier version of PowerPoint, you can still create a really neat effect using a picture and making it move. I like using Stock Photos For Free (from the same folks as the video site).
- And finally you can create a shine effect to your text. And this involves creating a thick rectangle with a gradient.
 Now remove the shape outline and tilt it forward slightly. This bar will pass across and behind the mask layer to create the effect.
Part #3: Add your PowerPoint animations
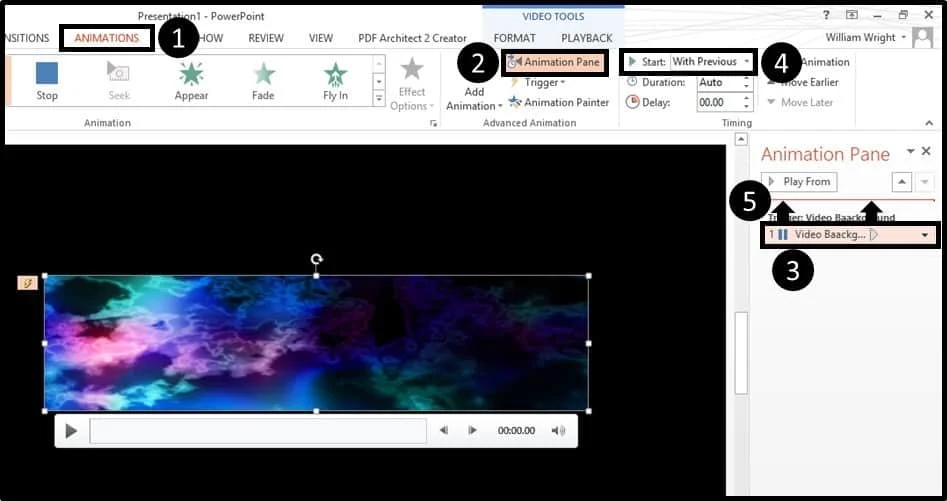
We’ve now made our mask and looked at different kinds of backgrounds. Let’s put it all together and add animation.1. Animation for Video
For the video background it’s pretty straightforward. Just insert the video by going to Insert -> Media -> Video -> Video on my PC. Crop or shrink the video so that it’s smaller than your mask, as we’re going to want the video to go entirely behind the mask.
After this, open up the Animation Pane and make the video playback animation Start with Previous and then remove the trigger by selecting the animation and dragging it to the top of the Animation Pane.
Crop or shrink the video so that it’s smaller than your mask, as we’re going to want the video to go entirely behind the mask.
After this, open up the Animation Pane and make the video playback animation Start with Previous and then remove the trigger by selecting the animation and dragging it to the top of the Animation Pane.
 Ok great! Let’s copy and paste the mask from before on top of the video.
You can see what it looks like here:
Ok great! Let’s copy and paste the mask from before on top of the video.
You can see what it looks like here:
2. Animation for Pictures
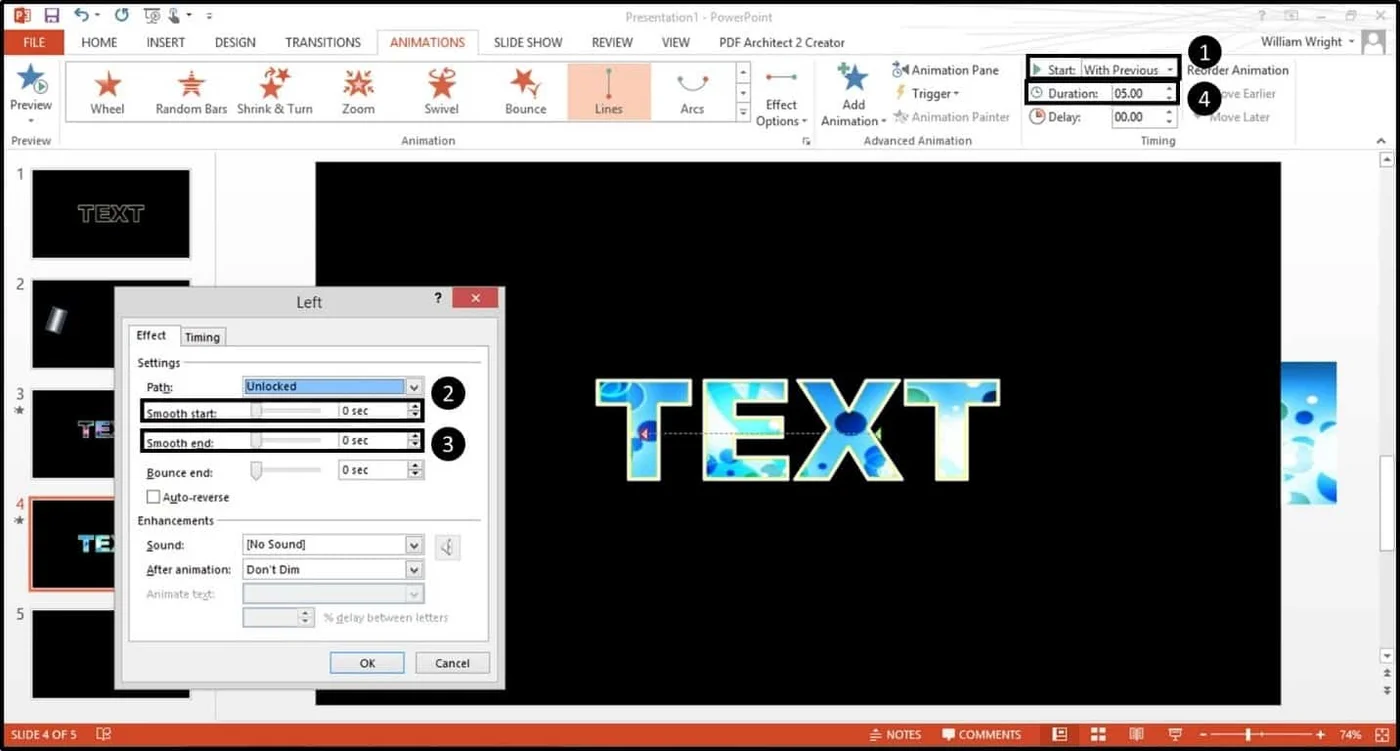
Let’s now look at how to animate the picture background – again, this is a great technique for earlier versions of PowerPoint, in which the video doesn’t work in the right way for this trick. Here we use just a regular background picture with some blue dots on it that I got Stockphotosforfree.com , which is the free stock image site I mentioned earlier. Once we’ve chosen the picture, there are different animation effects you can add to make it move to make the text come to life – let’s just take a look at a few. Some animations that could work well, for example, are Spin, Teeter, and Grow & Shrink. But I’m actually going to make a motion path to the left for this by going to the Animation tab and selecting the motion path animation at the bottom. PowerPoint 2013 gives a preview of where the motion path is going to land which is really helpful.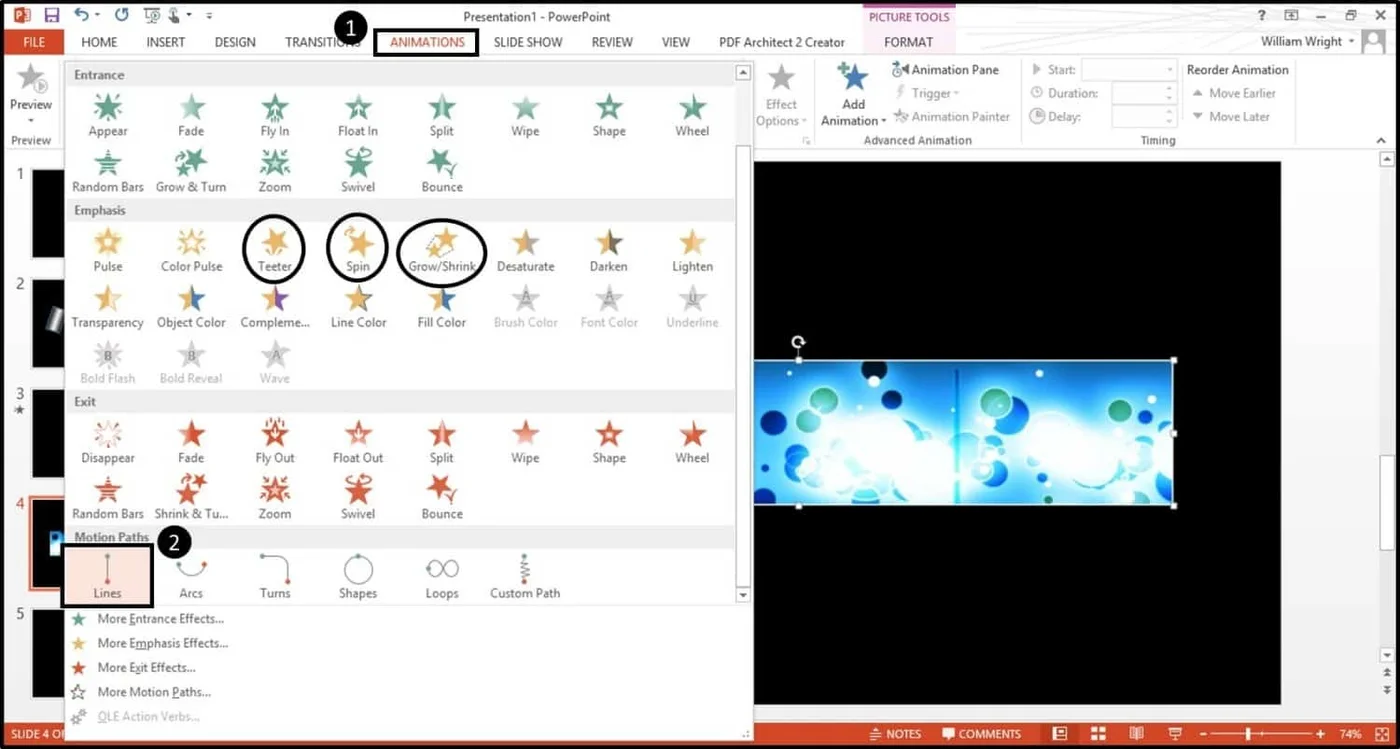 In the Timing section, make it Start with Previous.
Then, click on Effect Options and when the menu pops up, take out Smooth Start and Smooth End by dragging the bar to the left. Hit OK.
Now we decrease the speed at which the motion path moves by increasing the timing to 5 seconds.
Finally, copy and paste your mask again on top of the picture.
In the Timing section, make it Start with Previous.
Then, click on Effect Options and when the menu pops up, take out Smooth Start and Smooth End by dragging the bar to the left. Hit OK.
Now we decrease the speed at which the motion path moves by increasing the timing to 5 seconds.
Finally, copy and paste your mask again on top of the picture.
 Note:
Be sure to test it out. If the picture went too far to the left, just make the picture longer by stretching to the left.
And now you have your picture background!
Be sure to play around with other animation effects on the picture to see what looks coolest.
Note:
Be sure to test it out. If the picture went too far to the left, just make the picture longer by stretching to the left.
And now you have your picture background!
Be sure to play around with other animation effects on the picture to see what looks coolest.
3. Creating a shine animation
And now let’s move to the last background type, which is shine. For the shine, let’s start with adding a grey rectangle in the shape of the mask so that our text will look grey as well. I’ve found that the classic shine effect is usually done on a grey background, though it can technically be done on any color.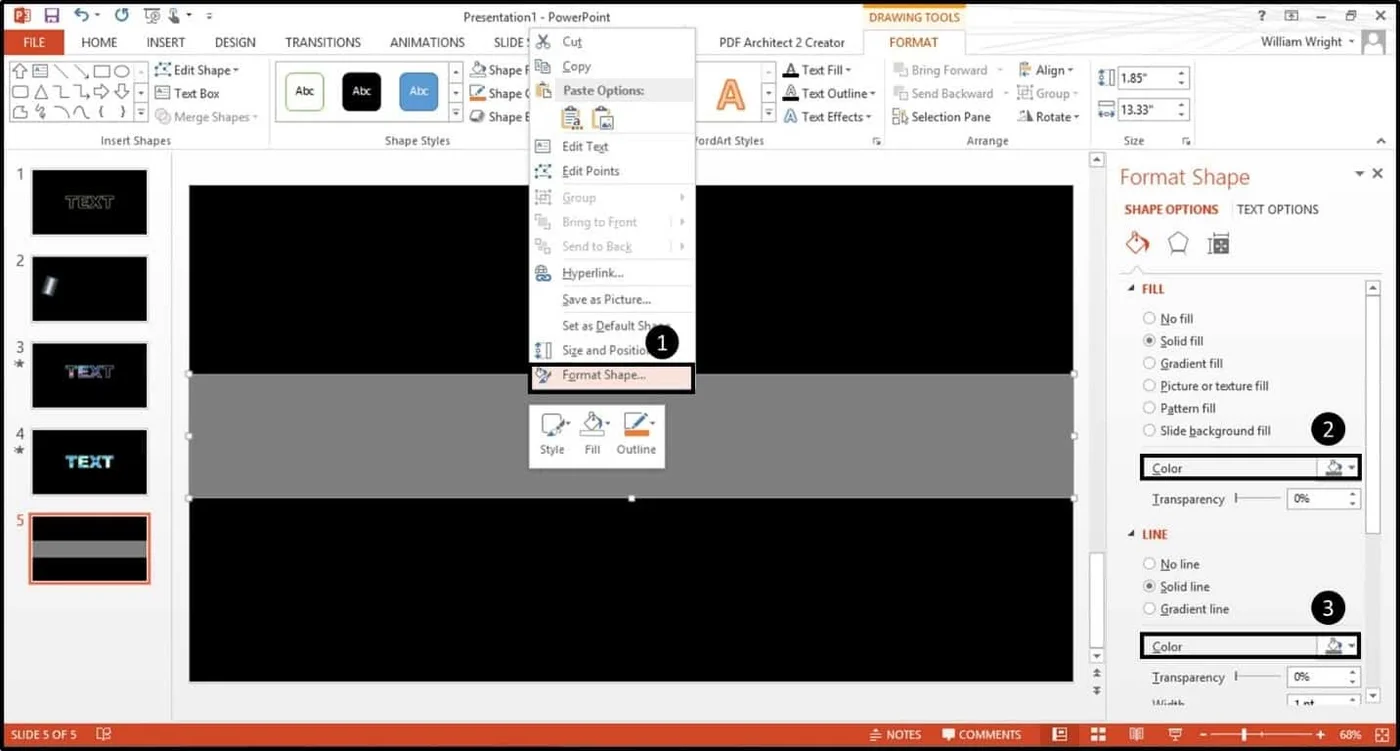 Then add the shine bar that we made earlier.
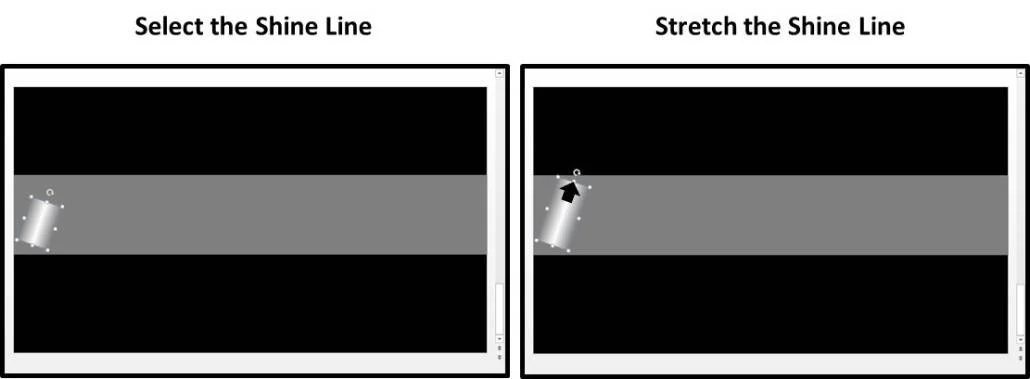
Stretch it out so it’s nice and large, as you want to make sure that it’s long enough to fill the entire text mask.
Then add the shine bar that we made earlier.
Stretch it out so it’s nice and large, as you want to make sure that it’s long enough to fill the entire text mask.
 Now let’s copy and paste the mask layer in here – note how the shine line is now behind it (you can see the outline of it on the left in the graphic below).
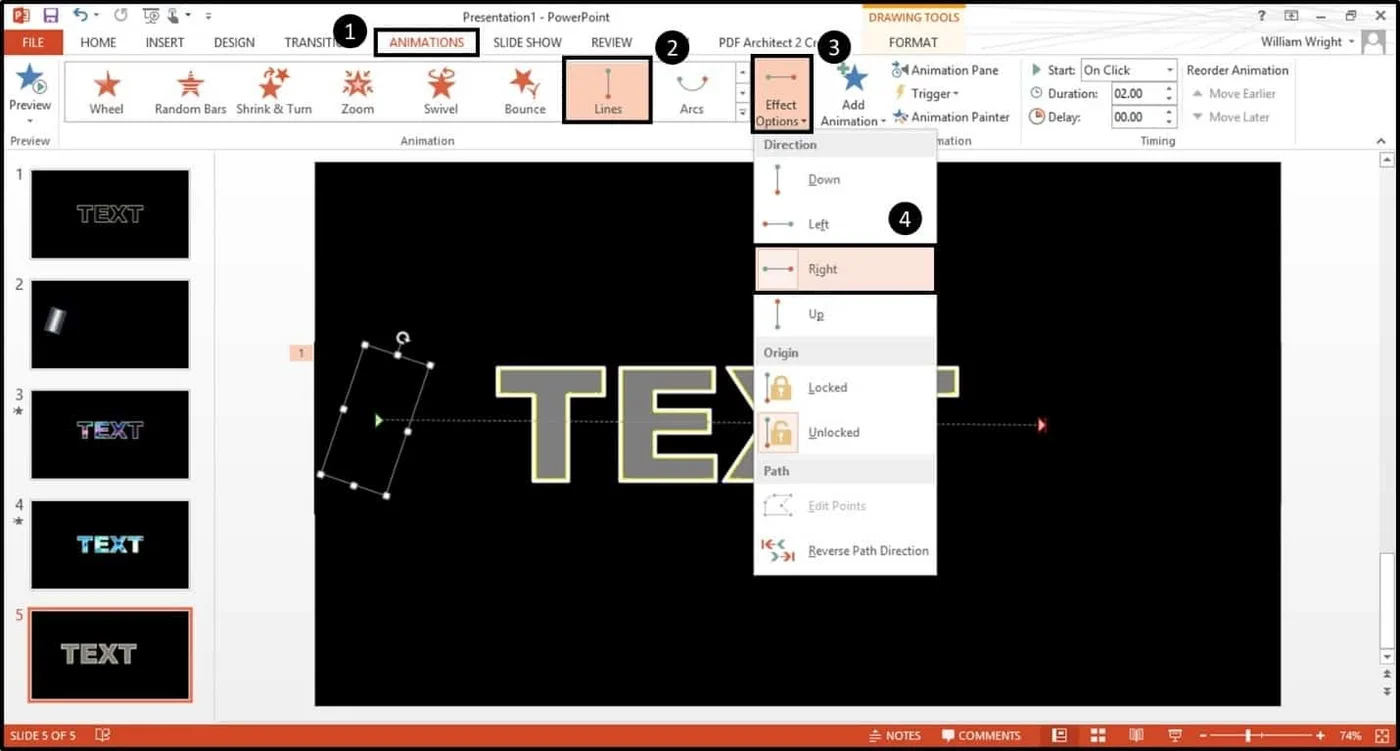
Then, let’s add a motion path to the right so it can pass across and behind the text. Again, we go to the Animations tab and select the motion path.
Let’s change the direction to go right.
Now let’s copy and paste the mask layer in here – note how the shine line is now behind it (you can see the outline of it on the left in the graphic below).
Then, let’s add a motion path to the right so it can pass across and behind the text. Again, we go to the Animations tab and select the motion path.
Let’s change the direction to go right.
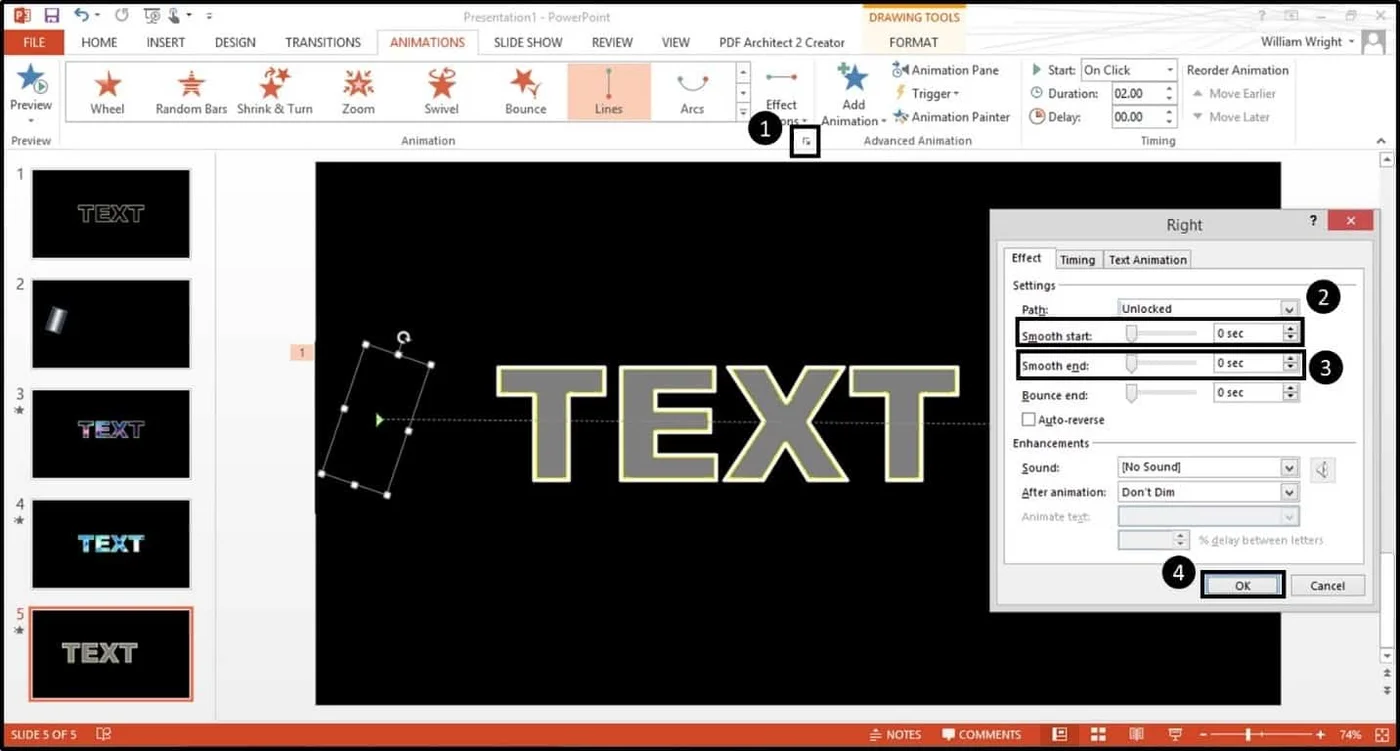
 Just as we did before, get rid of the Smooth Start and Smooth End by going into Effect Options. Hit Ok.
 Great, our Shine effect is now done!
To see what it looks like, in comparison to the other two, I’ve put all three backgrounds together below:
Great, our Shine effect is now done!
To see what it looks like, in comparison to the other two, I’ve put all three backgrounds together below:
Conclusion
As you can see, this effect can dramatically enhance your presentations – and it’s one that is especially good for corporate settings as well, since it’s cool but could be professional as well.
The technique of creating a mask layer with a cutout can be used for much more than just text, too.
You can remove any color within any picture or make masks from various shapes as well using the same process – the possibilities are endless, which is why this is one of my favorite effects!
You can also click here to download the slides and follow along with me.
Hope you enjoyed – it’s a really good one to add to your animation repertoire. Go and experiment with it to see what combinations you can come up with!
To learn more about our online training courses and other PowerPoint resources, visit us here.
What’s Next?
About the Author

Spicy Presentations
Yulia Barnakova is passionate about helping people develop the skills and learning mindset to thrive in the digital age. She is always experimenting with emerging technologies and has been recognized by Microsoft as a Most Valuable Professional for her creative presentation technology tutorials, which have more than 8 million views on YouTube. Her recent TEDx Talk, Think You're Not Tech Savvy? Here's Why You Are, shows how everyone can (and must) develop the mindset and skill set to embrace technology.