In this post you’ll how to make a watermark in PowerPoint for all your slides as a PowerPoint background.
This is commonly used in PowerPoint to add a draft or confidential stamp to all your slides so that someone doesn’t accidentally send them along as final before they are ready.
What is a watermark in PowerPoint?
A watermark is often grey text (as you can see DRAFT in the picture below), or a washed-out image that appears on all your slides behind your content.
This allows you to mark all your slides at once for a variety of purposes, like adding DRAFT or CONFIDENTIAL to your presentation.

The trick to properly making a watermark like this is knowing where to add it in PowerPoint so that it automatically appears on all your slides at once.
The last thing you want to do is make the mistake of trying to manually add (or update) your watermark individually on all your slides, one at a time.
How to create a watermark in PowerPoint
To get access to all our best PowerPoint speed training courses and resources for one affordable monthly price, check out our PowerPoint Pro Membership here.
Two important questions about your watermark in PowerPoint
Before you make your first watermark in PowerPoint using any of the below techniques, you’ll first want to answer the following two questions.
The reason these questions are important is that they dictate where you add watermark, and what method you use to create it in PowerPoint. There are always a variety of different ways to accomplish the same thing in PowerPoint, so it’s best to know WHAT you want to create before you spend any time creating it.
1. Where do you want your watermark?
That is, do you want your watermark to appear on all the slides within your presentation, or just a few individual slides?
If you want your watermark to appear on all of your slides, then you will want to add it on the Parent slide as pictured below.

If instead you only want your watermark on a few individual slides, you’ll want to add it to just the child slide layouts in question where you want it to appear in your presentation.

2. Do you want an editable watermark?
That is, do you want to be able to edit the watermark in the future?
The answer to this question determines whether you add it to your slide, or whether you add it as a slide background as an image (explained below).
Where to place your watermark?
Regardless of what kind of watermark you want to create for your slides, you want to do this on your Slide Master.
That’s because when you properly add it to your slide master, it will then show up on ALL the slides within your presentation (with a few exceptions discussed below).
That not only means that you can add it once, and have it show up everywhere within your presentation, it also means that if you later want to change or edit your watermark, you can edit it in one place, and have those edits reflected throughout your entire presentation.

To open your slide master in PowerPoint, simply:
- Navigate to the View Tab
- Select Slide Master
You can also jump to your slide master by holding the Shift key and clicking the Normal Icon at the bottom of your PowerPoint workspace (a hidden PowerPoint shortcut).
How to create a text watermark

To create a text watermark on your Parent slide, follow these steps.
- Insert a Text Box (from the insert tab)
- Type the word DRAFT
- Change the font (size, style, color) as per your choice
- Drag your text to where you want it to be on your slide
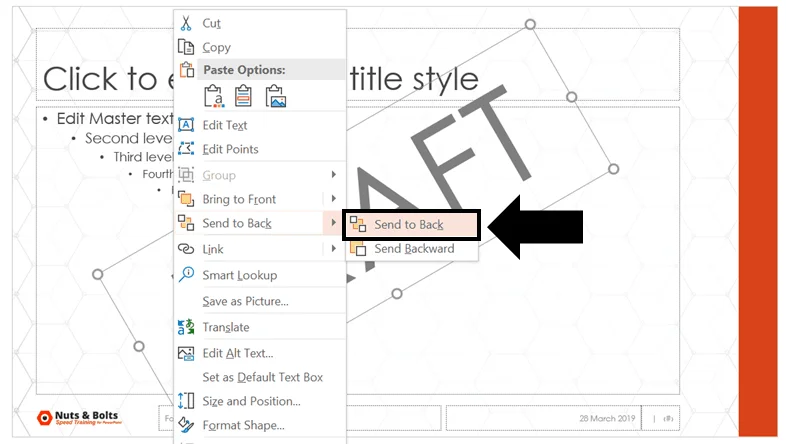
- Send the image to back (so it’s behind your content)
To send to back, simply right-click the text watermark you created and select Send to Back.
How to create a picture watermark

To add a picture watermark to your Parent slide (so it’s not editable).
- Insert an image or photo (like your company logo).
- Resize and orient your picture where you want it to be.
- Send it to the back (so that it shows up behind your content).
On top of that, you can also choose to washout or recolor your logo if you want.

To washout or recolor your photo, simply:
- Select your photo
- Navigate to the Drawing Tools Format tab
- Select the Color drop down
- Select Washout (or a grey color)
You can see the difference between the original and the washed out logo below.

There are a variety of other picture formatting options you can choose, but I think the washout effect works best for marking your slides like this.
How to make an uneditable watermark
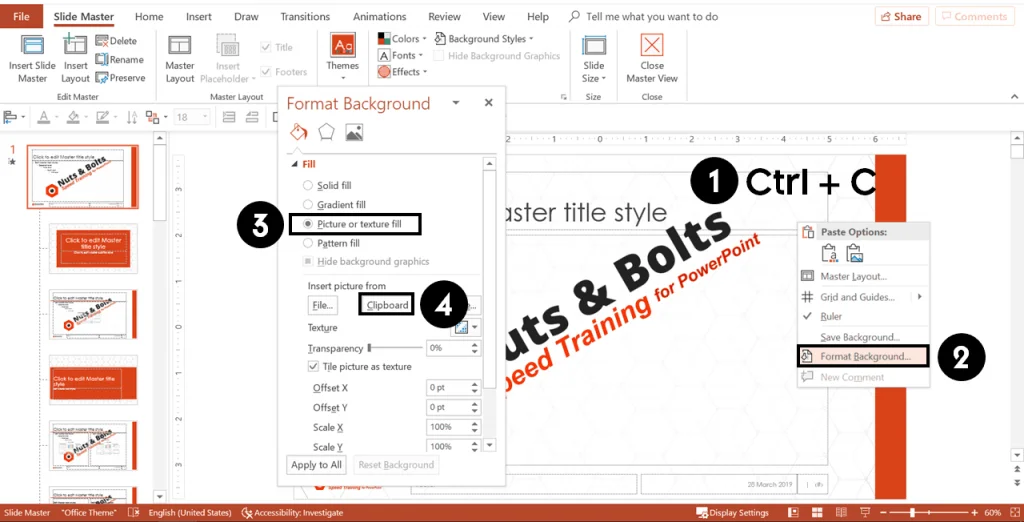
If you don’t want someone to be able to edit your watermark, you’ll want to add it as a slide background image to your slide. To do that, simply:
- Ctrl+C to Copy the elements you want to add as the watermark to your slide background.
- Right-click off the edge of your slide and select Format Background
- Select Picture or texture fill
- Choose Clipboard
After you’ve added it as your slide background image, you can select and delete the original graphic you used (text or picture).
If you like, you can even duplicate lots of little draft watermarks and add them all to your slide as pictured below. Read our insider guides to learn more about the Copy shortcut and the Paste shortcut.

For help creating this kind of effect (plus some other pointers), see the video at the top of this page to see the step-by-step instructions and pointers.
Troubleshooting your watermarks

If you properly add your watermark but still find that it’s not showing up on all your slides, the likely issue is that some of your child slide layouts have the Hide Background graphics option checked.
To fix this, navigate to your PowerPoint Slide Master and for the layouts where it is not showing up, make sure you uncheck Hide Background Graphics.
NOTE: The Hide Background Graphics option will only show up for your Child Slide layouts, it will be greyed out on your Parent slide.
How to watermark photos

To watermark a photo in PowerPoint, follow these steps.
- Insert your the image or text that you want to use as a watermark on your photo.
- Select your image and holding Shift select your text or image (so they are both selected)
- Hit Ctrl + C to copy both images
- Hit Alt + Shift + V for Paste Special
- Select either the PNG or JPEG file format
- Click OK
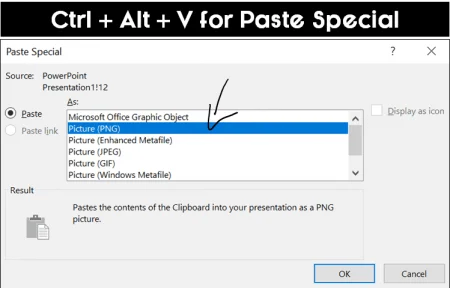
Clicking okay, PowerPoint creates a single image out of your original photo and your watermark text or image, thereby watermarking your image.
To expand your knowledge and learn how to compress your images if they are too large, read our guide here.
Conclusion
So that’s how to make a watermark in PowerPoint, and the different things you need to take into consideration.
Regardless of what type of watermark you create, the key is to build it out on your slide master. That way you can update all of the slides within your presentation at once.
If you enjoyed this tutorial, you’ll also love our other PowerPoint training courses and videos that you can learn more about here.
About the Author

Camille Holden
Co-Founder, Nuts & Bolts Speed Training
Camille Holden is a PowerPoint expert, a trainer and a presentation designer. After years working in the trenches, fine-tuning hundreds of her colleagues' last minute panic-attack presentations, Camille cultivated her PowerPoint skills through tricks, work-arounds, and fine-tuned techniques for getting more done. When she's not helping clients build gorgeous and functional presentations, you can find her singing jazz or doing yoga.