Everyone knows that to get the most out of Microsoft Office (PowerPoint, Excel, Word, etc.), you should be using your keyboard for just about everything, right? Easier said than done?
Not necessarily!
The Quick Access Toolbar, or “QAT”, makes it easy for anyone (including YOU) to add rocket fuel to your fingers and quickly become a PowerPoint power user!
Version Tip: There is some operating system prejudice here…the QAT is only available for PC based versions of Microsoft Office (users of the Mac version of Microsoft Office, you’re out of luck).
What is the Quick Access Toolbar?
Put simply, the QAT is like your wallet or purse…it’s THE place to put all the stuff that you need close at hand because it’s always with you.
For example…where do you put your business cards….in your wallet or purse, of course. Why? To avoid the embarrassing:
“…whoops, I didn’t bring my cards with me….give me yours and I’ll send you my contact information later.”
In the same sense, where should you put the commands you use all the time…on your QAT. Why? To avoid the embarrassing:
“…let me see, I think it was in the Home Tab…nope, maybe in was on the Insert Tab, nope…how about the Review Tab?”
I know, it happens sometimes, but this is simply not the best use of your time, especially when there is a much better way!
Like wallet or purse for PowerPoint… but better!
So the QAT is like your wallet or purse, but it gets even better than that.
Not only does it hold the commands you frequently use, but it also creates ALT driven shortcuts to those commands. So for example, if you put the Alignment Tool in the first position on your QAT, its shortcut is now Alt, 1.
Super simple, right? Simple yet powerful! If your wallet or purse did that with your business cards, it would be like having “clap-on” business cards.
“It’s very nice to meet you”…clap clap…”here’s my business card!”
That’s exactly what that the QAT does for you with your most frequently used commands….which is exactly how you can boost your PowerPoint skills and quickly become a keyboard power user.
What’s currently on your Quick Access Toolbar?
If you don’t know, then it’s probably the default commands, which is okay for now…but let’s quickly check.
Fire up PowerPoint, and then hit and let go of the ALT key (that’s the shortcut), and look for a sequence of numbers either directly above or directly below your PowerPoint Ribbon (it’s one or the other):
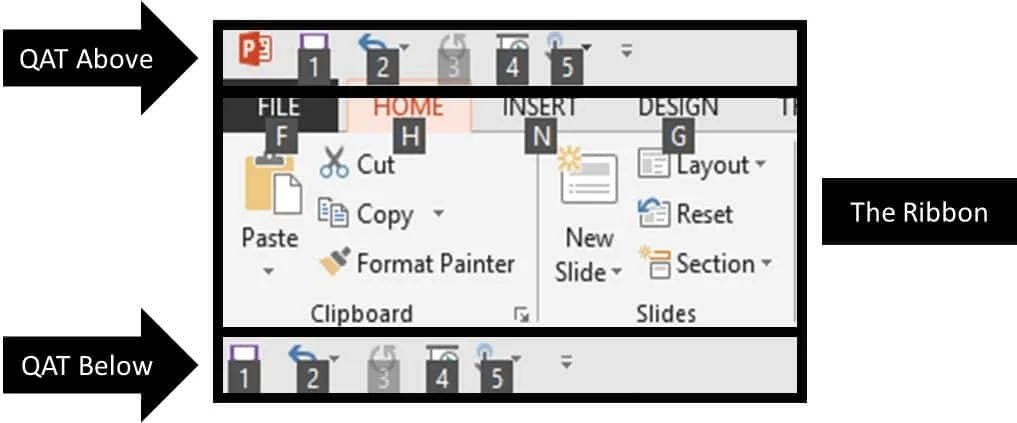
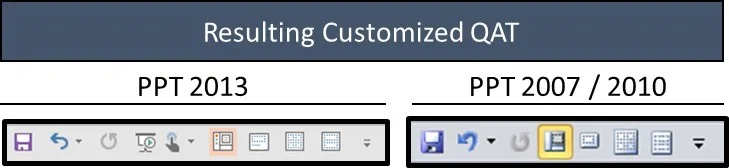
If your QAT matches one of the pictures below based on your version of PowerPoint, BINGO! you are about to reap the rewards of a massive time-saving jackpot.

If you didn’t get to yell “bingo” (dang!), there is still a lot of good stuff for you below!
How to customize the Quick Access Toolbar
Let’s suppose we are helping a friend out and want to customize their QAT.
Our friend, Bill (no, his last name is not Gates), spends his time in PowerPoint designing the company’s standard PowerPoint presentations and templates. As such, he CONSTANTLY clicks back and forth between the different Master Views in his presentations with his mouse.
Now, assuming that we don’t’ know ANYTHING about working in the different Master Views, we can still set Bill up for speed using his QAT… which is why he is going to owe us a fancy cup of coffee when we are finished.
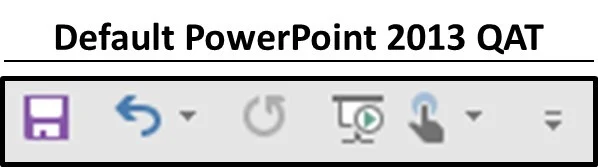
Looking at Bill’s QAT, he is using PowerPoint 2013 with the default setup (nothing wrong there).
Sitting down at his computer, Bill says: Let’s do this!
Adding commands to the QAT
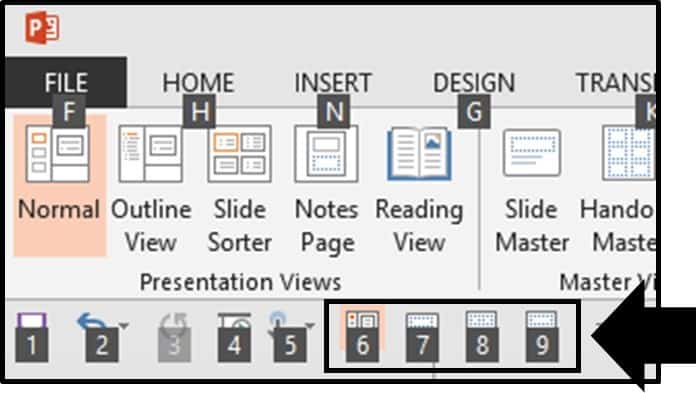
Let’s walk through how to add the four Master Views to the PowerPoint QAT.
First, navigate to the View tab, and you can see the four commands that we are going to add to the QAT. Let’s start at the far left:
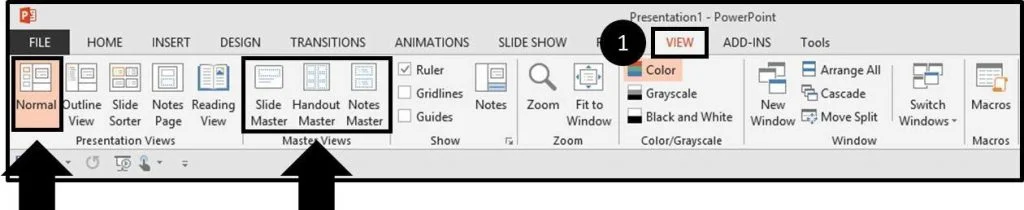
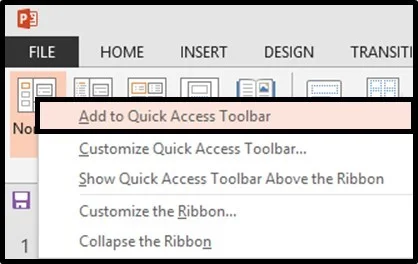
Right-click the Normal command, and in the right-click menu select ‘Add to Quick Access Toolbar’.
Repeat for the following commands:
- Right-click the Slide Master command, select ‘Add to Quick Access Toolbar’
- Right-click the Handout Master command, select ‘Add to Quick Access Toolbar’
- Right-click the Notes Master command, select ‘Add to Quick Access Toolbar’
Your resulting QAT should look like the picture on the left if you are using PowerPoint 2013, or the picture on the right if you are using PowerPoint 2007 or 2010.
Using Your Quick Access Toolbar
The QAT can be used with the mouse as an easy way to find a hidden command and click on it.
But the BEST way to use the QAT, is to see it as a shortcut generator. Let’s demonstrate.
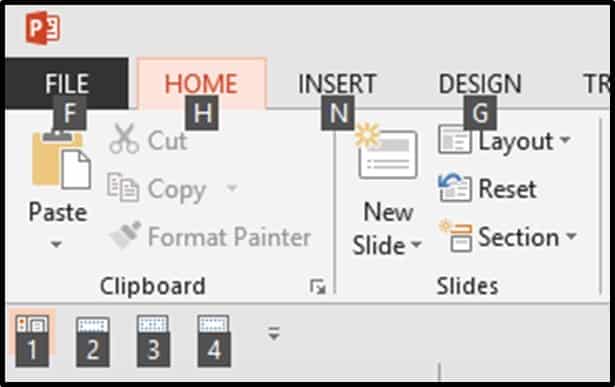
To fire off the shortcuts, simply hit and then let go of the ALT key, and you can see the numbers there on Bill’s QAT….numbers 6 through 9 in 2013 (4 through 7 in PowerPoint 2010 or 2007).
With the numbers now visible, hit lucky number 8, and you jump to the Handout View of your presentation.
Bonus Tip: the next time you want to tweak your PowerPoint handouts (most people don’t realize this is an option), this is the place to do it.

“Well how do I get back to the normal view?”, Bill asks.
From your keyboard, hit and let go of the ALT key, the numbers pop back up, hit the number 6…and boom…your are back in the Normal View, all directly from your keyboard!
Not bad, for a start, but let’s make these four commands even easier by changing their numbers to 1 through 4.
Rearranging the order of commands on the QAT
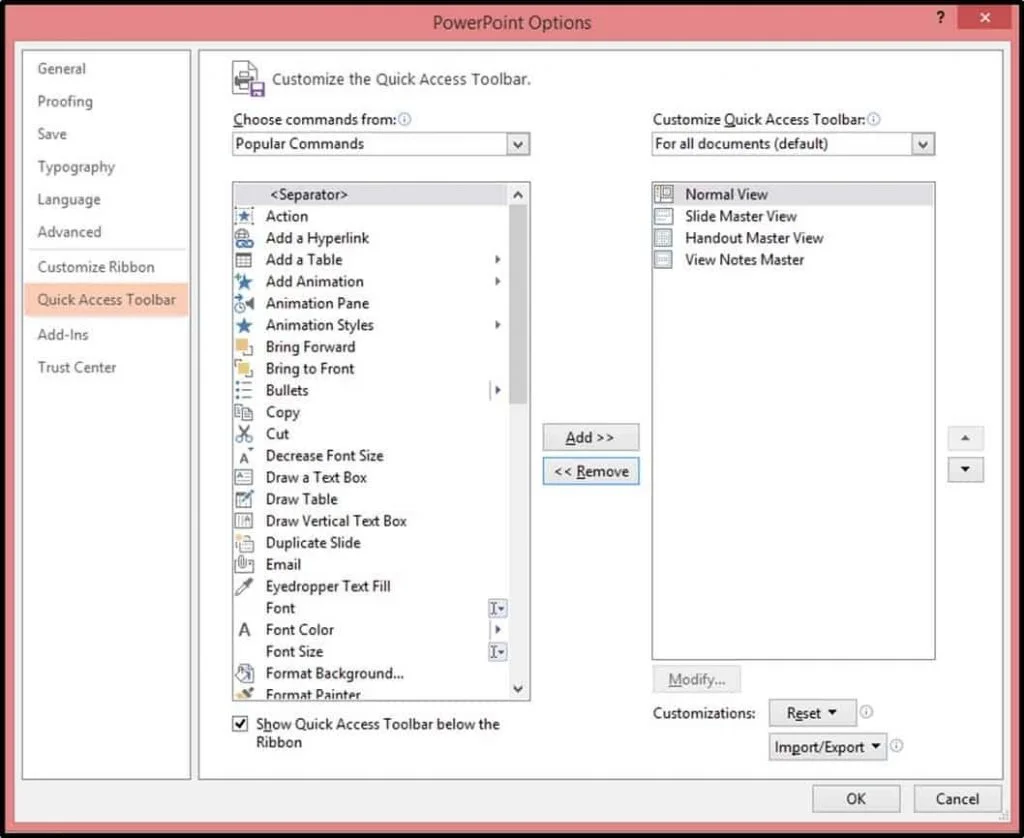
Click the downward facing arrow at the end of the QAT, and in the menu that opens, select “More Commands” near the bottom, and a dialog box opens.
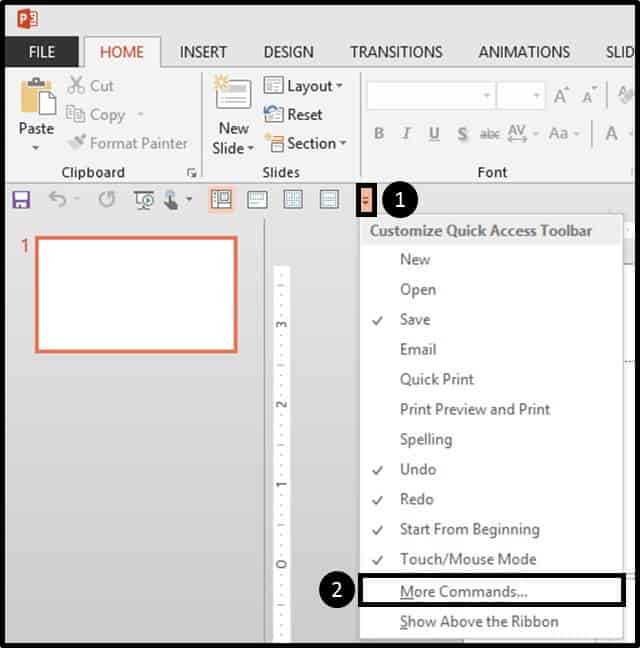
Now there is a lot of stuff that you can do in this dialog, but for now, let’s just click the top command in the ribbon on the far right…the save icon…and then click remove.
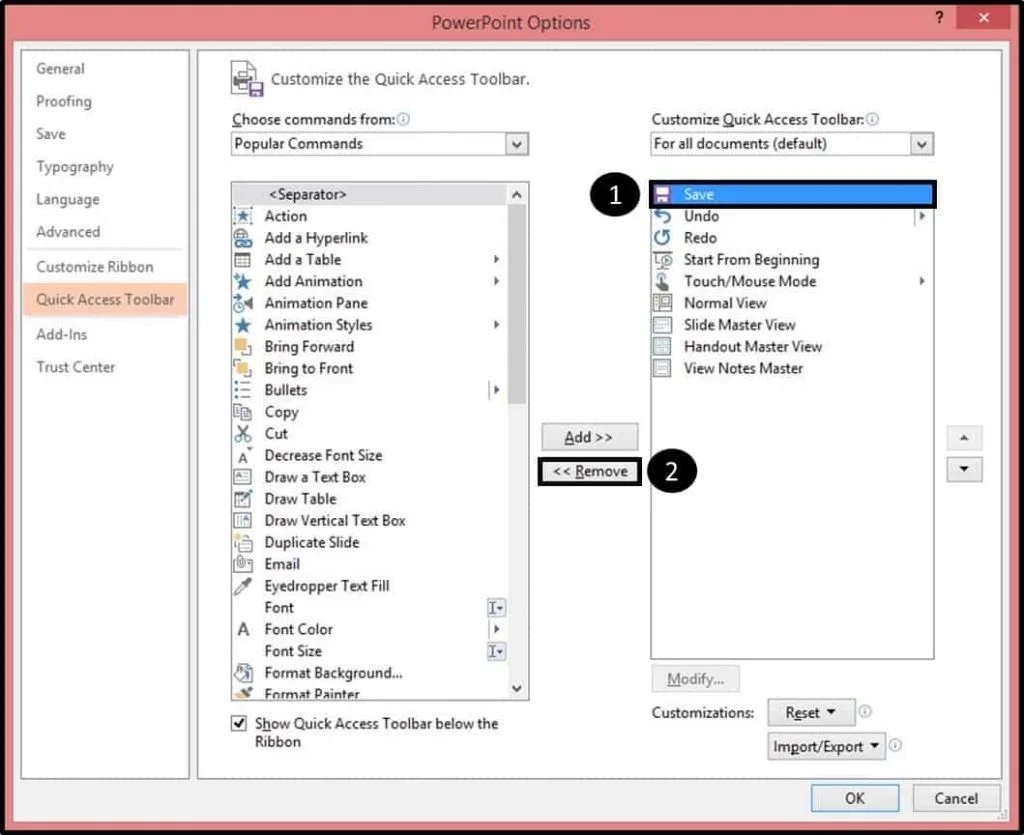
Continue removing commands from the QAT until only the four master views are left there on the right, and then click ‘OK’ to close out the dialog box.
Back in presentation, Bill is now all set up…so let’s walk him through it. Hit and then let go of the ALT key, and you can see the commands there on the QAT.
- Alt, 1 is the Normal View
- Alt, 2 is the Slide Master View
- Alt, 3 is the Handout Master View
- Alt, 4 is the Notes Master View
Bill is impressed, and he can now flip easily between his views directly from his keyboard. Looks like we’ve earned our cup of coffee!
What’s Next?
About the Author

Taylor Croonquist
Co-Founder, Nuts & Bolts Speed Training
Taylor Croonquist is a PowerPoint expert and trainer. Over a career spanning the globe, from consulting in New York and investment banking in China, Taylor has truly seen it all in PowerPoint. Through necessity and a natural tech savvy, Taylor honed his PowerPoint skills to the point of even blowing the minds of the Microsoft PowerPoint programming team. When he's not busy crafting PowerPoint training, you can find him reading a sci-fi series or scuba diving.