CTRL+M, or Control-M, is the keyboard shortcut to add a new slide in PowerPoint. However, there is more to this shortcut than just adding a new slide. Read on to learn how to get the most out of the New Slide shortcut in PowerPoint.
Take your PPT skills to the next level
Break free from PowerPoint struggle and reclaim your time. Amplify your PowerPoint knowledge with proven advanced methods taught in the PowerPoint Pro Membership.What does Ctrl + M do?
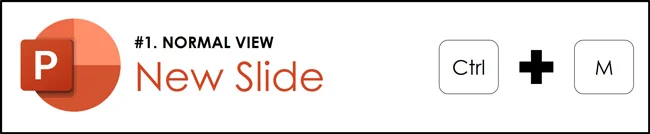
First off (and most commonly), CTRL+M is the New Slide shortcut. Hitting CTRL+M in the Normal View of PowerPoint adds a new blank slide to your presentation, following the same-slide rule. That is, the new slide added to your presentation is a blank version of the slide layout you are currently working on.
The only exception to this same-slide rule involves the title slide of your presentation, which I’ll discuss why this is more complicated than you might think in PowerPoint in the next section below
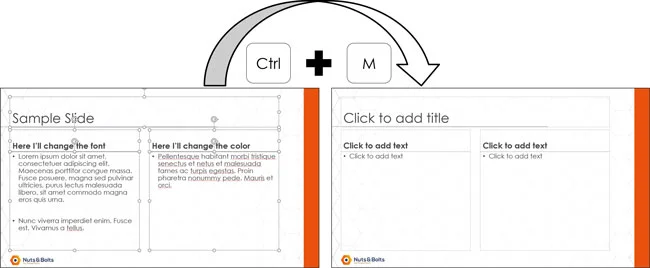
For example, if you are currently working on a Two Content layout and hit the New Slide shortcut (CTRL+M), a new blank Two Content layout is added to your presentation.
In the same way, if you are working on a Title and Content layout and hit CTRL+M, a new blank Title and Content layout is added to your presentation.
This not only saves you time by adding slides using a keyboard shortcut, but it also adds the appropriate slide based on the slide layout you are currently working with.
On top of that, you can save even more time as you use this shortcut by taking advantage of the title placeholder trick that I’ll discuss below. But before we do that, let’s talk about the exception to the Same-Slide Rule.
The second use of CTRL+M in PowerPoint is as the Show/Hide Ink shortcut in the Presentation View (or Slide Show view) of your presentation.
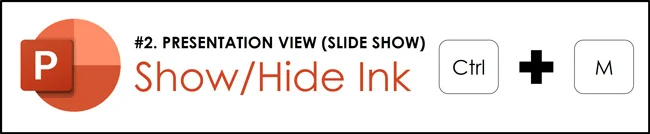
The Show/Hide Ink shortcut shows or hides any ink annotations you’ve made to your slides, either in the Normal View or Presentation View. Obviously, for this shortcut to work, you not only have to add ink annotations to your slides (see details below), but you also must be in the Presentation View (or Slide Show View).
Otherwise, hitting CTRL+M will add a new slide to your presentation (as discussed above).
To expand your knowledge, see how to start a slideshow in PowerPoint.
CTRL+M Title Slide Exception
The exception to the Same-Slide Rule for the New Slide shortcut (CTRL+M) is when working with the title slide of your presentation.
Hitting CTRL+M on the title slide of your presentation does not add a second title slide. Instead, it adds the next layout in your presentation, as defined by the slide master.
The catch here is understanding WHAT PowerPoint considers as your Title Slide. The Title Slide of your presentation in PowerPoint is simply defined as the first layout listed on your PowerPoint Slide Master after the Parent Slide layout.
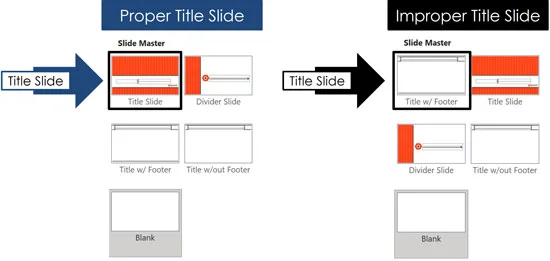
If your PowerPoint template has been built properly, the first layout in your presentation should be your Title Slide. That said, it is common for people to rearrange slides in the Slide Master View and accidentally put a divider slide or content placeholder slide as the first slide of the presentation.
If this happens to you, whenever you hit CTRL+M on that specific layout, you will not get a new blank layout. Instead, you will get the next slide layout in your presentation.
Notice in the picture below on the left, the Title w/ Footer layout is currently in the Title Slide position. As such, PowerPoint will consider the Title w/ Footer layout as the Title Slide (which is not what we want in this case).
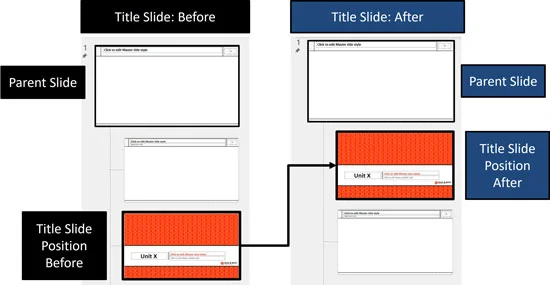
How do you fix this issue? You simply need to navigate to the Slide Master View of your presentation (View Tab -> Slide Master) and drag the correct Title Slide layout to the first position under the Parent Slide Layout.
To expand your knowledge and learn how to create your own PowerPoint template from scratch, and rearrange your layouts in the Slide Master View, read our guide here.
New Slide Shortcut Title Placeholder Trick
There is a timesaving trick you can use with the New Slide shortcut. That trick is that the Title Placeholder of your new blank slide immediately becomes active. This means after hitting CTRL+M, you can save time by immediately typing the title of your new slide.
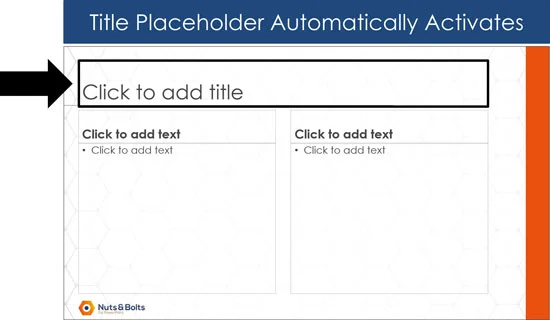
Using this Title Placeholder trick, you can use the New Slide shortcut to quickly create the framework of your presentation by quickly typing the titles of the new slides you create. Once you are done building out the framework of your presentation, then you can go back and work on the visual content.
New Slide Shortcuts: CTRL+M vs. CTRL+Enter

Two keyboard shortcuts that are often confused and misunderstood in PowerPoint are CTRL+M vs. CTRL+ENTER. Both keyboard shortcuts add new slides to your presentation, but they do it in different ways.
As discussed above, CTRL+M immediately adds a new blank layout your presentation based on the slide layout you are currently working on (unless you are on the Title Slide layout).
CTRL+ENTER also adds a new slide to your presentation based on the current layout you are currently working on, but only after it first cycles through all the content placeholders on your slide.
In contrast, CTRL+M never cycles through your placeholders. The shortcut simply adds a new blank slide to your presentation. That’s it.
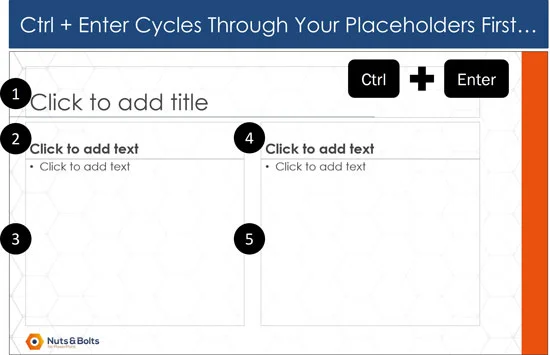
For example, if you have five content placeholders on your slide as pictured above, hitting Ctrl+Enter jumps you between those different placeholders (allowing you to fill them in with text). Only after you reach the lats placeholder on your slide does Ctrl+Enter add a new layout to your presentation.
In this way, you can use this shortcut to quickly cycle through and fill in the content placeholders on your slides before adding a new blank layout.
Consultants use this Ctrl+Enter trick all the time when they need to not only draft out the framework of their presentation, but also fill in some of the main points. After they draft out their framework, then they go back and add the visuals (or send it to someone else to fill them in for them).
Show/Hide Ink Shortcut
The other use of CTRL+M in PowerPoint is to show or hide ink annotations on your slides. This shortcut works for both ink annotations you added in the Normal View of PowerPoint (using the Drawing tab) or ink annotations you’ve added in the Presentation View (i.e., while giving your presentation).
There are three different ways you can draw on your slides in PowerPoint, each described below:
Option #1. If you have a touch screen computer (like a Microsoft Surface) that includes a stylus, you can use your stylus to directly write on your screen to add ink annotations to your PowerPoint slides. As soon as your stylus gets close to your screen, PowerPoint activates the Draw tab, and the ink is added directly to your slides.
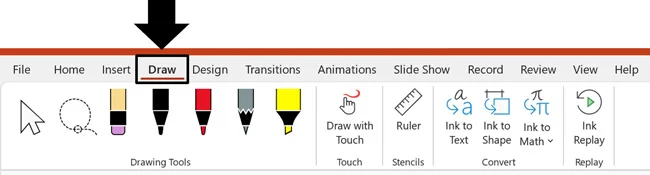
Option #2. If you do not have a touch screen computer, you can use the Drawing tab in the Normal View in PowerPoint. Simply open the tab, click the pen type you want and use your mouse to annotate your slides.
To continue annotating your slides in the Presentation View (or Slide Show Mode) of PowerPoint, you can use the PowerPoint keyboard shortcuts like CTRL+P for Pen or CTRL+I for Highlighter. After hitting the shortcut, your mouse cursor turns into the pen or highlight icon, allowing you use to use your mouse to draw on your screen.
To see how to draw in PowerPoint using these ink shortcuts, watch the short video below.
To expand your knowledge and learn how to use PowerPoint’s built in laser pointer to highlight things in the presentation view of PowerPoint, read our guide here.
Option #3. If you do not have a touch screen computer and need more precision than that PowerPoint ink shortcuts allow, I recommend getting a Wamco tablet (or equivalent). These tools will map your screen to the tablet that sits next to your computer, allowing you to draw on your screen via the tablet (see Wamco tablets here).
The Wamco tablet is not limited to annotating PowerPoint either. You can use the tool to draw in any ink friendly program, or even use the tablet to navigate your computer.
Conclusion
CTRL+M is a great time-saving shortcut for both adding new slides to your presentations (which you will do a lot of) AND showing or hiding your ink annotations in the Presentation View of PowerPoint.
As far as adding new slides to your presentation, the Same-Slide Rule and the title trick, make it easy to both control what slides are added to your presentation as you use the shortcut AND allows you to immediately start filling your slide in.
Remember, CTRL+M and CTRL+ENTER are similar in that they will both add new slides to your presentation, but the sequence of events that happens is different.
To expand your knowledge and learn some insider secrets for working with some basic keyboard shortcuts that everyone should know, see our guides below.
If you enjoyed this article and want to learn more about our PowerPoint training courses and other useful resources, visit us here.
About the Author

Nuts & Bolts
With our famous PowerPoint tips, training and self-paced courses, we help presenters save hours and gain peace of mind. Discover the career-changing wow moments that will transform not just the way you approach your presentations, but also how you tackle your work tasks in general.