In this article, you’ll learn how to hide comments in Word so that they don’t interfere with your workflow. The three different options available to you are:
- Hide your comments only – Show Markup
- Collapse your comments – Display for Review – Simple Markup
- Hide your comments and tracked changes – Display for Review – No Markup
Here is how your document might look with your comments visible, collapsed, or hidden.

While comments are a GREAT way to mark up your Word documents for review, they are extremely distracting and take up a lot of space.
That’s why knowing how to hide and collapse them in Word is such a valuable skill to learn.
Note: If your document doesn’t have any comments in it, you will not be able to hide them. You first need to add comments to Word before you can hide them.
[Watch] Hiding Comments in Word
You are currently viewing a placeholder content from Youtube. To access the actual content, click the button below. Please note that doing so will share data with third-party providers.
More InformationHide Comments Only (Show Markup)
This option works best when you want to hide your comments without hiding your other tracked changes and revisions. That way you can continue working on your document without being distracted by the comments.
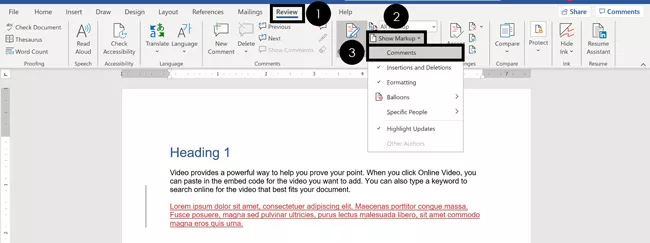
To hide your comments only in Word, simply:
- Navigate to the Review tab
- Open the Show Markup dropdown menu (click on the downward facing arrow at the end)
- De-select Comments
Note: If you are leaving comments for other people in Word, make sure they are constructive and actionable. See Articulate’s guide on actionable comments here for guidance.
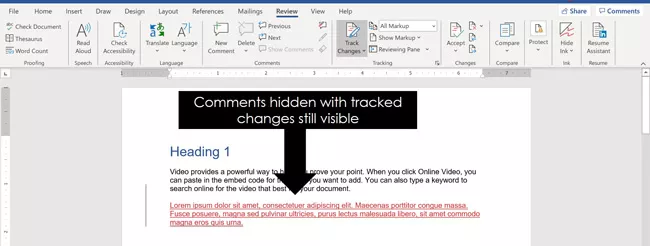
De-selecting Comments hides your comments without affecting any of your other markups or tracked changes. This allows you to focus on updating the content within your document without being distracted by the comments, as pictured below.
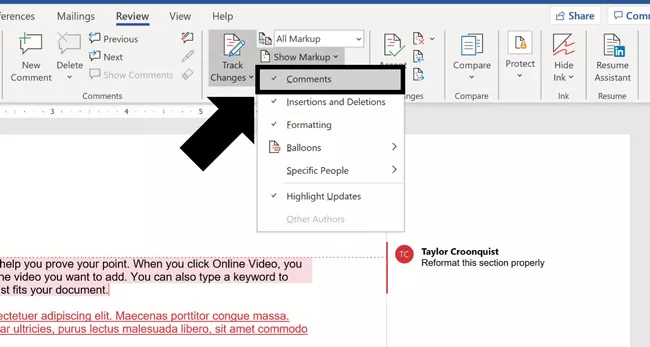
To later bring your comments back, simply turn the setting back on (as pictured below):
- Navigate to the Review tab
- Open the Show Markup dropdown menu (click on the downward facing arrow at the end)
- Select Comments
Note: Make sure you re-select comments after you are finished updating your document, so they don’t remain hidden forever.
To do that, simply open the Show Markup dropdown menu and put a check mark next to Comments.
The reason this is important is because hidden comments will remain hidden until you re-select them. This is a common rookie mistake because if someone does not know how to hide comments in Word, they will not know how to un-hide them. So, they won’t know what to work on.
If do want to permanently hide your comments, you can simply delete your comments in Word.
Collapse Comments (Simple Markup)
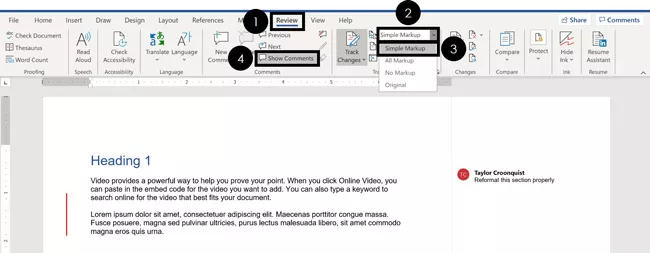
To hide your comments using the Simple Markup view, simply:
- Navigate to the Review tab
- Open the Display Review dropdown menu (click on the downward facing arrow at the end)
- Select Simple Markup
- Toggle the Show Comments command
The Simple Markup allows you to both review any tracked changes within your document, as well as toggle between two different views for your comments:
- Normal comment view
- Collapsed comment view
When your comments are collapsed, they appear as little icons on the right-side of your document, as pictured below.
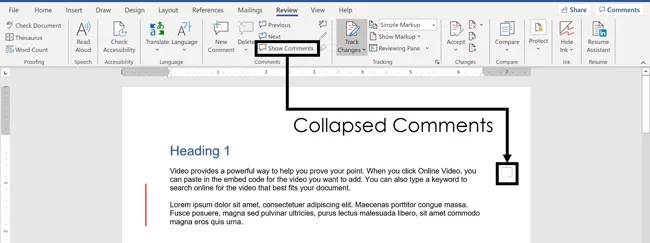
With your comments collapsed, you can click on the comment icon with your mouse to quickly view the individual comment.
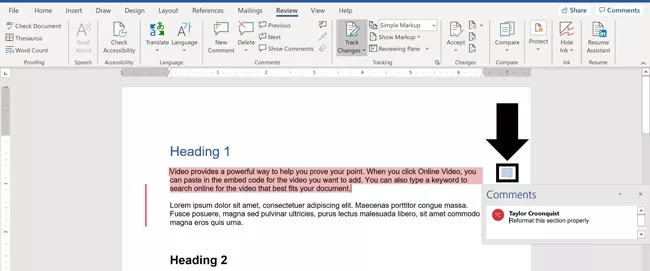
If you save and close your document in the Simple Markup view, Word will reopen in that same exact view. That means that if someone does not know how to hide comments in Word, they might not be able to view them.
To ensure the next person sees your comments (including you), I recommend saving your file with the All Markup view selected.
Note: The only way to unlock and use the Show Comments command in Word is to first select the Simple Markup view for your document.
Hide Comments/Tracked Changes (No Markup)
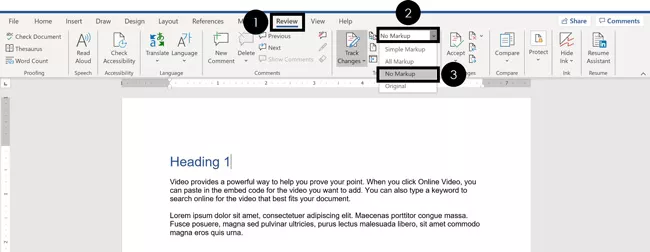
To hide your comments and track changes using the No Markup view, simply:
- Navigate to the Review tab
- Open the Display Review dropdown menu (click on the downward facing arrow at the end)
- Choose No Markup
The No Markup view hides all of of your comments and your tracked changes within your document. This is best for reviewing what your document will look like if you were to accept all tracked changes.
Warning: Choosing Original for your Display Review also removes all the comments and tracked changes from your document. However, all the markup is also permanently removed.

Original reverts your document back to its original state before any comments or tracked changes were made to it.
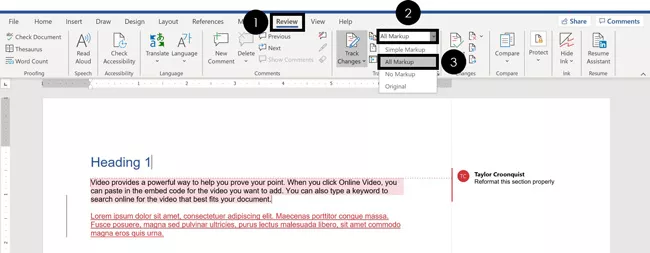
When you want to see your comments and markup again, simply do the reverse:
- Navigate to the Review tab
- Open the Display for Review dropdown menu (click on the downward facing arrow at the end)
- Select All Markup
The All Markup view displays not only your comments, but also any tracked changes within your document. This is also the default view that all Word documents open in.
Conclusion
So that’s how to hide comments in Word, and some of the different options you have depending on how you want to work on your document.
Comments are a fantastic way to mark up your document for review.
Just remember that hiding your comments in some of the views will permanently hide them until they are turned back on. This can lead to confusion on your team if someone doesn’t know how to un-hide the comments.
That’s why I recommend always turning back on your comments and tracked changes after you finish.
Another way to make your Word document easier to read and navigate is to add a table of contents to Word.
If you enjoyed this tutorial and want to learn more ways to boost your Microsoft Office skills, visit us here.
