In this article, you’ll learn how to add page numbers in Word and other advanced tricks for getting your page numbers right.
And while page numbers are something we rarely chat about, they are essential to any long-form piece of writing.
Applying a sequence to your pages helps you stay organized and will truly benefit your readers. It not only allows them to easily cite pages and find a specific part of your document, but it also helps your readers determine the length of the document.
How to Add Page Numbers in Word (PC)

To add page numbers to the bottom of your Word document, simply:
- Navigate to Insert tab
- Open the Page Number dropdown
- Choose the Bottom of Page option
- Select your preferred page number style
By selecting the page number style, your page number will be added to that section of your document. When you are done, simply select Close Header and Footer to return to the normal editing view of your document.

In the same way, you can add page numbers to the top, margins or current position of your document.
If you insert page numbers and later want to change their position or style, you can simply use the Page Number drop-down to select a new style or position.
You can have multiple sets of page numbers in different locations within the same Word document. That means you’ll need to review your document and remove any page numbers from places you don’t want in your document, as discussed below.
Note: If you have lots of comments within your Word document, adding and removing page numbers is easier if you first hide your comments. To learn how to hide comments in Word, read our guide here.
How to Format Page Numbers (PC)

To open the Format Page dialog box, simply:
- Navigate to the Insert tab
- Open the Page Number dropdown
- Select Page Number Format
- Make your selections inside the Page Number Format dialog box (all discussed below)
- Click OK

Inside the Page Number Format dialog box, you’ll find the following options.
Number Format

Number Format will let you choose what type of numbers you would like to use as your page numbers. You can choose from numerical, alphabetical, or roman numerals.
Include Chapter Number

You can only use Include chapter number when your document has been formatted in a Chapter style. Your Word document will recognize it is a Chapter when a combination of Headings (Heading 1- 9) and a separator is used in conjunction. Separators include hyphens (-), period (.), colon (:), emdash (—), and em-dash (–).
If you do not first format your document to include chapter numbers you will receive the following message:
There is no chapter number to include in the caption or page number. To apply chapter numbers use the Bullets and Numbering command on the Format menu and select a multilevel list style that is linked to the Heading styles.
Page Numbering

Under Page Numbering, if you select Continue from the previous section your page numbers will begin from the first page of your document or the previous section.
Start at: [blank] is helpful if you would like your document to start its page numbering after one. This is handy if part of your document is in another file. For example, if you input Start at: 20, then the first page of your document will be numbered 20 and follow a numeral sequence from there.
How to Remove Page Numbers in Word (PC)

To remove all the page numbers from your Word document, simply:
- Navigate to the Insert tab
- Open the Page Number dropdown
- Select Remove Page Numbers
Selecting Remove Page Numbers immediately removes all of the page numbers within your document. Regardless of where your page number exists (Header, Footer, or Margins).
If you have added page numbers to multiple locations within your document (the Header, Footer and/or Page margins) and only want one of them removed, you’ll need to manually remove the page numbers you don’t want.

For example, to remove your page numbers from just your Footer, simply:
- Navigate to the Insert tab
- Open the Footer dropdown
- Select Remove Footer
If your footer has more than just a page number, you can also select Edit Footer and manually delete your page number.
How to Add Page Numbers in Word (Mac)
Adding page numbers for Word on a Mac is same-same-but-different than on a PC.
1. Use the Page Numbers Dialog Box

To add page numbers to your Word Document in Mac. Follow these steps:
- Navigate to the Insert tab
- Select Page Number
- In the drop-down menu select Page Number again.
- The Page Numbers dialog box will appear.
- Select how you would like to format your Page Numbers then select OK.
Page Numbers Dialog Box
In the Page Numbers Dialog box, you can choose from the following options.

Position will determine where on the page your page number will be placed. You can choose from Top of page (Header) or Bottom of page (Footer).
You have the following options in Alignment: Right, Left, Center, Inside, or Outside. It determines where in the Footer or Header your page number will go.
‘Inside’ means that your page number will appear on the left-hand side of the first page. Then on the right-hand side of your next page and so on. Alternating each time.
‘Outside’ means that your page number will appear on the right-hand side of your document on the first page. Then it will appear on the left side of the document and so on. Alternating on each page. This type of alignment is used most often when printing booklets or when printing double-sided sheets.
Finally, Show number on first page means the first page of your document will have a page number. If you deselect this option then Page #1 will appear on the 2nd page of the document. This is useful if you are incorporating a cover page into your document.
2. How to Add Page Numbers in Word Header or Footer

These steps will help you add a page number template into the Header or Footer of your Word Document.
- Navigate to the Insert tab
- Hover over the Footer or Header tab – depending on whether you would like your page number.
- A dropdown menu of Built-in Headers and Footers will appear. Many of these stylized headers and footers include page numbers. Choose the right template for you.
How to Remove Page Numbers in Word (Mac)


To remove all page numbers from your Word document, follow these steps:
- Navigate Insert tab
- Open the Page Number dropdown
- Select Remove Page Numbers. Your page numbers will instantly disappear.
How to Format Page Numbers in Word (Mac)

To format pages numbers in Word follow these simple steps:
- Navigate to the Insert tab
- Open the Page Number dropdown
- Select Format Page Numbers and the Page Number Format dialog box will appear
- Make your selections (all discussed below)
- Click OK
Inside the Page Number Format dialog box, you’ll find the following options.

Number Format

Number Format will let you choose what type of numbers you would like to use from the dropdown menu. You can choose from numerical, alphabetical, or roman numerals.
Include Chapter Number
You can only use Include chapter number when your document has been formatted in a Chapter style. Your Word document will recognize it is a Chapter when a combination of Headings (Heading 1- 9) and a separator is used in conjunction. Separators include hyphens (-), period (.), colon (:), emdash (—), and em-dash (–).
If you do not first format your document to include chapter numbers you will receive the following error message:
There is no chapter number to include in the caption or page number. To apply chapter numbers use the Bullets and Numbering command on the Format menu and select a multilevel list style that is linked to the Heading styles.
Page Numbers
Under Page Numbering, if you select Continue from the previous section your page numbers will begin from the first page of your document or the previous section.
Start at: [blank] is helpful if you would like your document to start its page numbering after one. This is handy if part of your document is in another file. For example, if you input Start at: 20, then the first page of your document will be numbered 20 and follow a numeral sequence from there (21, 22, 23…).
How to Add Different Page Numbers to Different Sections of One Word Document
If a single Word document has different sections you may require each section to have its own set of page numbers and page number formats. This is important for things like introductions and appendices.
For example, it is common for appendices to follow roman numerals (i, ii, iii…) whereas the body of the text will follow a traditional sequential order (1, 2, 3…).
Follow these steps to add groups of page numbers to different sections of one Word document:


- Select with your cursor the area on the page you would like the page numbering to stop, start, or change.
- Navigate to the Layout tab
- Select Breaks
- Select Next Page under Section Breaks from the dropdown menu. This will move all text to the next page of your document.
- Double click on the Header or Footer of the new page. The Header and Footer tab will appear in the Ribbon guide.
- Deselect Link to Previous. This will isolate the remaining pages so that they are not linked to the previous section.
- While still under the Header and Footer tab, select Page Number from the Ribbon Guide. Then select Page Number or Format Page Number to add page numbers to your new section.

How to Style Your Page Numbers
If you want to change the typography, font size, or color of your page numbers follow these steps:

- Double click the Header or Footer – wherever your page numbers are located. Select a page number. Whatever you do to one page number, will be done to all the page numbers in your document or section.
- Navigate to the Home tab in the Ribbon guide to style your page number.
- Alternatively, select the Style Pane for more formatting options.
- When you are done select Close Header or Footer to get back to regular viewing mode or simply click outside of the Header or Footer.
While you are in your Header or Footer you can also insert text or images. It is popular to include the title of your document here so your page numbers begin to look something like this: Title Example: 1, Title Example: 2, Title Example: 3. Or you can include the total page numbers so it looks like 1 of 100, 2 of 100, 3 of 100.
Logos and watermarks in the Header or Footer, with your page numbers, are marks of a professional document as well.
For even more text effects, open the Font Dialog Box. Start by selecting your page number, then hold Command + D for Mac users or Ctrl + D for PC users, and the Font Dialog box will appear.

You have more options for text effects in the Font Dialog box then in the Home tab. The text effects include:
- Strikethrough
- Double strikethrough
- Superscript
- Subscript
- Small caps and
- All caps
Again bear in mind that whatever you do to one page number will be applied to all the page numbers in your document or section.
How to Eliminate the Page Number on the First Page of Your Word Document
In the Header and Footer tab for Mac users or in the Design tab for PC users you also have the option to select Different first page. Alternatively, by double-clicking on the Header or Footer, the Header and Footer tab or Design tab will appear.

If you select ‘Different first page’, then the page number on your first page will disappear. Subsequently, you can create your own custom header or footer for that first page.

For Mac users, you can eliminate your first pages’ number early on by de-selecting ‘Show number on first page’ when the Page Numbers dialog box appears.
How to Add Different Odd and Even Page Numbers in Your Word Document
If you want to jazz up your document by alternating the style of page numbers on your odd and even pages then you need to select the ‘Different odd and even page’ button.

PC users can navigate there by selecting the Design tab in the Ribbon guide and then selecting the ‘Different odd and even page’ button.
Mac users must navigate to the Header and Footer tab in the Ribbon guide then select the ‘Different odd and even page’ button.
Alternatively, both PC & Mac users can navigate to the Header and Footer tab by double-clicking on the Header or Footer.
The style of the numbers on your odd and your even pages will be different. However, the styles will carry on through your document. This option can be combined with ‘Different first page’ on the first page of your document.
How to Add Last Name and Page Number in Word
To add your last name before the page number (and have it show up on all of the pages within your document) simply add page numbers to your Word document then follow these steps:
- Double-click into your Header or Footer tab from the Ribbon guide.
- Type your last name before or after the page number
- Close the Header or Footer
Your last name will appear beside the page number on every page of your document.
My Page Numbers in Word Have Disappeared!
If your page numbers seem to have disappeared then a couple of things could have happened. It may be one of the following:

- You could have accidentally deleted your page numbers. Try the Undo button.
- Hold Ctrl + Z to Undo on PC
- Hold Command + Z to Undo on Mac
- You are in Web Layout, Draft, or Outline view. To fix this, navigate to the bottom of the page and select the Print Layout view.
How to Add Page Numbers in the Word Mobile App

To add page numbers to your Word document on your Mobile App. Follow these steps:
- Select the Hometab from the toolbar at the top of your screen
- Then select Home and Insert
- Scroll down under you reach Page Numbers and select your formatting.

Select Format Page Numbers to choose from different numerical styles, alphabetical page numbering, and roman numerals.
Select Include Page Count if you would like to include the total page count in your page numbering. For example, Page 1 of 5. Otherwise, deselect it and your page number will simply indicate the number of the page it is. For example Page 1.
Then, select the position of your page numbers from Top Left, Top Centre, Top Right, Bottom Left, Bottom Right, and Bottom Centre.
Once you have selected the position of your page numbers, the keyboard will appear and you will be able to choose how you would like to style your page number (bold, italic, underlined, color, and highlight).
How to Remove Numbers in the Word Mobile App

To remove page numbers on the Mobile App, follow the steps above but instead of formatting your page numbers scroll to the bottom of the feed. Then, select Remove Page Numbers.
How to Print your Numbered Pages Collated
If you are printing multiple copies of your numbered document, then you most likely would like them to be printed collated. The difference between collated printing and uncollated printing is that uncollated printing does not come out sequentially.
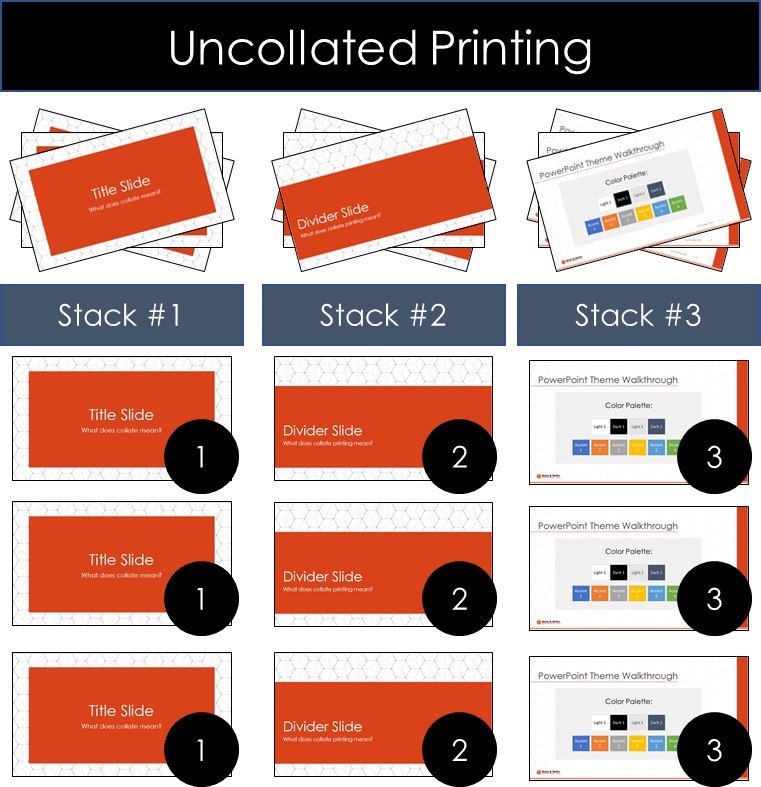
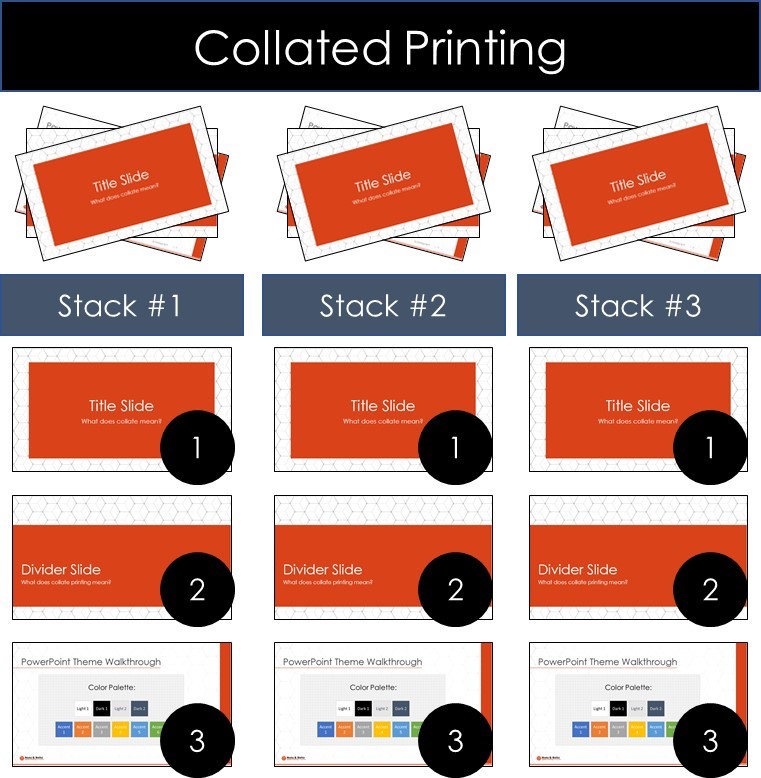
Whereas collated printing intuitively dispenses pages in a numeral order (1, 2, 3, 4…). It can be an extremely time-intensive task to separate your numbered document into a sequential order.

Therefore, to print collated follow these steps.
- Navigate to File at the top left of your screen
- Select Print and the Print Dialog box will appear
- Under ‘Copies’ ensure that the ‘Collated’ box is checked.
- Then select Print to print your document
If you are printing double-sided and would like your page numbers to be on the same side then ensure you have selected the outside or inside page number Alignment. This means that your numbers will be on opposite sides when you are viewing your document in Print Layout.
However once printed, your page numbers will be on the same side of your document, regardless of which side of the document the reader is looking at.
Numbered pages can be printed onto any size of paper – in landscape or portrait orientation.
What to Look For in a Page Number Header or Footer
When choosing a page number Header or Footer ensure that it is in line with your brand and corporation. Otherwise, keep it simple.
You want the message behind your document to be the main focus. Therefore, your page number Header or Footer should not distracting. Colors are ok, but they should not be too loud. If you use colors, ensure they muted.
Page number Header and Footers should be consistent throughout your document. Odd and even pages are fine but switching your Header and Footer at every page would be very distracting.
If you are feeling ambitious and would like to create your own Header or Footer, check out these advanced tips to build a Header and Footer in Word from TechRepublic here.
Our Favourite Built-in Page Number Footers and Headers
These templates are all available for free on the PC and Mac versions of Word.
The following footer has a clean minimalist design that will not distract from your document’s main message. The date is subtle and could also be swapped out for the title of your paper. This is a template that could be used for any kind of document, whether it be a school paper, a financial report, or a proposal.

This footer is tasteful and has a whimsical quality. However, it would not be appropriate for all sectors of the workforce. This template can be used as inspiration for people who would like to use their own watermark or logo in conjunction with their page numbers.

This header has a modern appeal and adds a splash of color to the document without being too distracting. This header would be appropriate in most written documents.

Conclusion
There is more to adding page numbers in Word then initially meets the eye. However, once you have mastered adding and formatting page numbers in Word you have unlocked a powerful skill for organizing your long-form documents which will ultimately please your readers and demonstrate your professionalism.
Another way you can make your document look professional is to insert a table of contents or to use Find and Replace for bulk changes. To learn all about tables of contents in Word read our guide here or to learn how to use Find and Replace in word read our guide here. If you enjoyed this tutorial and want to learn more ways to improve your Microsoft Office skills, visit us here.