In this article, you’ll learn how to add comments in Word, as well as two ways to quickly navigate your comments.

Adding comments in Word is a fantastic way to mark up your documents without having to directly edit the contents of your document. It’s like adding sticky note reminders for yourself (or your colleagues) without messing up your content.
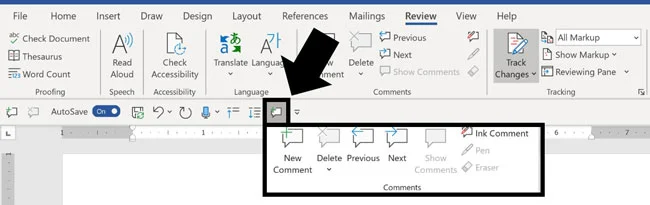
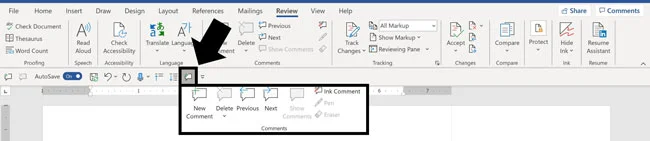
If you frequently work with lots of comments in Word, I recommend adding the Comments Groupto your Quick Access Toolbar, as pictured below. That way you can quickly get at the commenting commands, without having to dig through your Ribbon, which I will show you how to do below.
Once you are done adding comments, you can learn how to remove all comments in Word here.
[Update] How to turn off modern comments in Word
Microsoft has introduced a new comment system in Word, giving you two options to choose from:
- Classic Comments (as described in this blog post)
- Modern Comments
To follow along with this blog post, you will first need to disable the modern comments system using the Word options dialog box, as I only cover the classic comments system here.
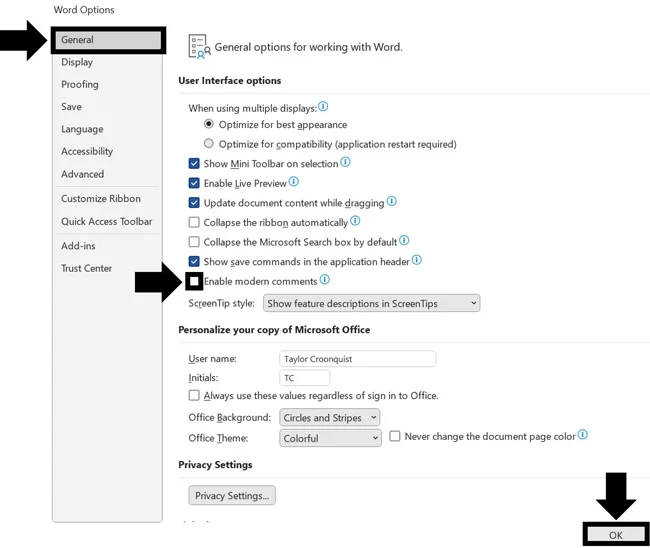
To disable modern comments in Word, simply:
- Click the File tab in Word
- Select Options (at the bottom left of your screen)
- In the Word options dialog box, find the General tab
- Unselect Enable modern comments
- Click OK
Adding Comments in Word
1. Microsoft Ribbon (Adding Comments)
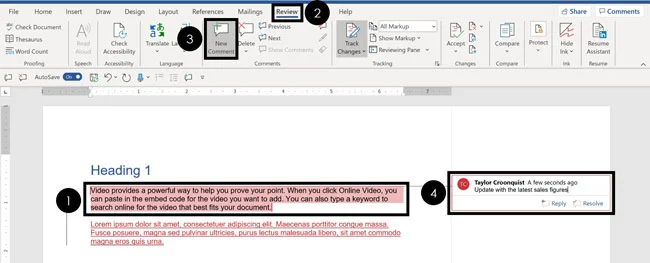 To add a comment to something in Word, simply:
- Select the text (or object) you want to comment on
- Navigate to the Review tab
- Click NewComment
- Write your comment
Comment Writing Tip: Make sure that the comments you add to Word are actionable and constructive.
There’s nothing worse than trying to update a document based on vague comments that don’t make much sense.
2. Right-Click Menu (Adding Comments)
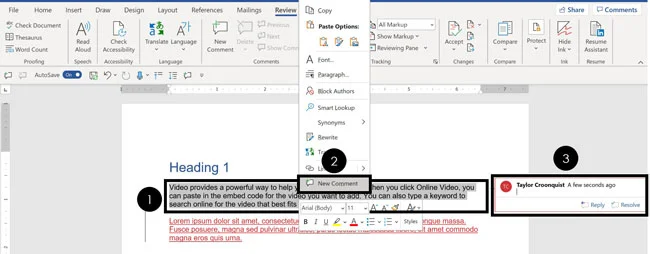
To add a comment using the right-click menu, simply:
- Select and Right-Click what you want to comment on
- Select New Comment
- Write your comment
This is the fastest way to add comments in Word, as you don’t have to continually navigate back and forth between the contents of your document and the Review tab.
Delete Comment shortcut: You can also right-click any comment within your document and use a shortcut to quickly delete them. To learn how to do that (and a variety of other ways to remove comments in Word), read our guide here.
3. Quick Access Toolbar (Adding Comments)
If you want add, remove and navigate between lots of comments in Microsoft Word, I recommend adding the Comments group to your Quick Access Toolbar (which is super easy to do)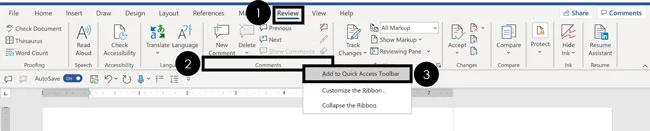 To add the Comments group to your Quick Access Toolbar, simply:
- Navigate to the Review tab
- Right-click the Comments group (anywhere along the bottom)
- Select Add to Quick Access Toolbar
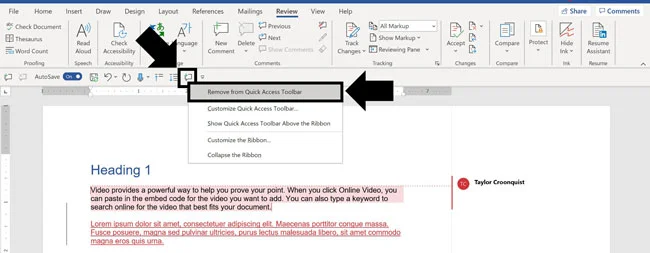
 If you later want to remove the
Comments
group from your Quick Access Toolbar, simply right-click the command and select R
emove from Quick Access Toolbar
, as pictured below.
If you later want to remove the
Comments
group from your Quick Access Toolbar, simply right-click the command and select R
emove from Quick Access Toolbar
, as pictured below.
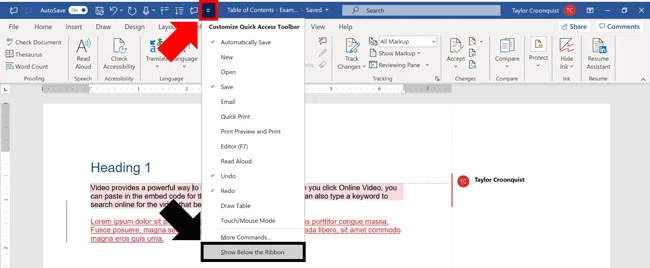
Note: If your Quick Access Toolbar is above your Ribbon, I recommend moving it below your Ribbon.
To do that, simply click the Customize Quick Access Toolbar command and select Show below the Ribbon.
4. Microsoft Ribbon (Navigating Comments)

To use the Previous and Next comment commands, simply:
- Navigate to the Review tab
- Click Previous or Next
Previous takes to you the preceding comment from where you are currently active in your Word document.
Next takes you to the next comment from where you are currently active in your document.
If you have a lot of comments to review, you can also navigate your comments using the Reviewing Pane, discussed below.
Hidden Comments: The cool thing about the Previous and Next commands is that they work even if your comments are hidden. To learn how to hide comments in Word, read our guide here.
/wp:paragraph
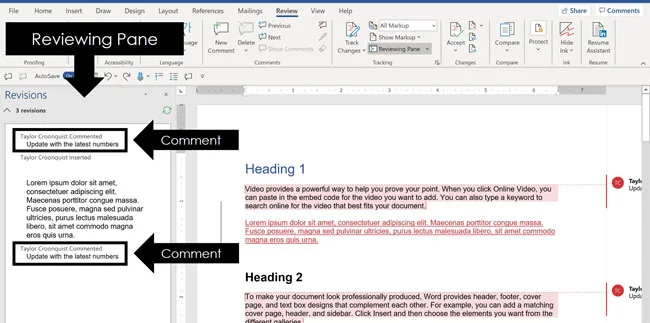
5. Reviewing Pane (Navigating Comments)
 To open the
Reviewing Pane
in Word to review and navigate your comments, simply:
To open the
Reviewing Pane
in Word to review and navigate your comments, simply:
- Navigate to the Review tab
- Open the Reviewing Pane dropdown menu (click the downward facing arrow at the end)
- Choose either Reviewing PaneVertical or Reviewing Pane Horizontal
Conclusion
So those are the basics of adding comments in Word, and two separate ways you can navigate them within your document.
Adding comments is a fantastic way to mark up your documents without editing the underlying content. In this way you can quickly scan through your document and easily remember what you need to change in the future.
If you enjoyed this tutorial and want to learn more ways to improve your Microsoft Office skills, visit us here.
About the Author

Taylor Croonquist
Co-Founder, Nuts & Bolts Speed Training
Taylor Croonquist is a PowerPoint expert and trainer. Over a career spanning the globe, from consulting in New York and investment banking in China, Taylor has truly seen it all in PowerPoint. Through necessity and a natural tech savvy, Taylor honed his PowerPoint skills to the point of even blowing the minds of the Microsoft PowerPoint programming team. When he's not busy crafting PowerPoint training, you can find him reading a sci-fi series or scuba diving.