In this article you’ll learn two different ways to PROPERLY insert the does not equal sign (≠) in Microsoft Word, PowerPoint or Excel.
You do not need to Google the symbol or dig through the archaic symbols dialog boxes to get at it. And please, =/= does not cut it!
If you only occasionally need to type the does not equal sign (or other math symbols), the first section below has you covered (you’ll also improve your knowledge of Microsoft Word too).
If you frequently need to insert math symbols like this, I recommend turning on your Math AutoCorrect feature as discussed in the second section below.
1. How to Type the Does Not Equal Sign (≠)
This technique is the fastest way if you only occasionally need to insert symbols into your Word documents or PowerPoint presentations.
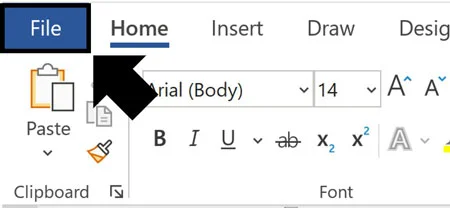
1. Click the Insert Tab
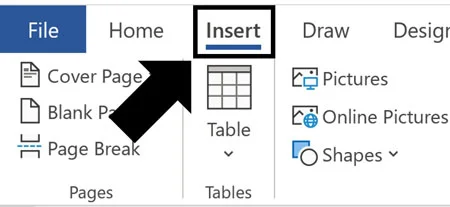
Click into your Word document where you want your symbol, and then click the Insert tab in your Ribbon.
2. Click the Equation Command
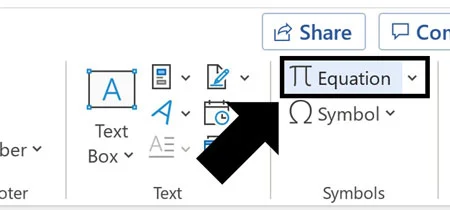
On the far right of your Ribbon in the Symbols group, click the Equation command to insert a Math Region into your document.
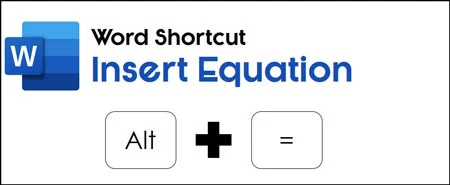
You can also use the insert Math Region shortcut, Alt+= on your keyboard. This not only works in Word, but it also works for inserting equations and symbols in Microsoft PowerPoint too. So it is a double-dipping shortcut (the best).
3. Select or Type Does Not Equal (≠)

Inserting the Math Region, you will now have an Equation tab in your Ribbon (which should automatically become active).
In the Symbols group, you can either click the does not equal sign, or within the Math Region type backslash ne (\ne or \neq).
\ne and \neq are the short codes for the does not equal sign within a Math Region in Word, PowerPoint and Excel (and I’ll show you how to turn these on outside of a Math Region in the next section).
If you type \ne or \neq in the Math Region and hit the Spacebar and it doesn’t work, double-check that you used a backslash (\) and not a forward slash (/). It makes all the difference in the world.
You can stop here if you are okay with the symbol as it is inside of the Math Region, or you can convert it back to normal text characters in the next step.
NOTE: you can obviously use the Equation tab to insert any number of different mathematical symbols into word and convert them back into normal text in the next step.
4. Convert the Does Not Equal Sign Into a Character
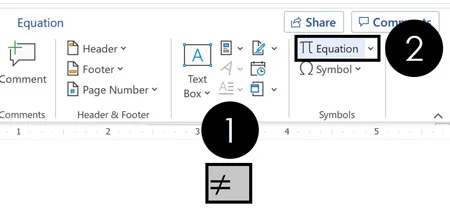
Highlight your does not equal sign, then click the Insert tab and click Equation again. This converts whatever is in your equation, back into normal text within your document.
You can alternatively just hit the insert Math Region shortcut again (Ctrl+=). Hitting it once inserts a Math Region into your document. Hitting it a second time converts any symbols inside the Math Region back into normal text.
To expand your knowledge and learn how to subscript and superscript in Word, Excel, and PowerPoint, read our guide here.
2. Turning on Math AutoCorrect to Type ≠ Faster
While you can always type short codes into Math Regions, you can also turn the feature on to work outside of the Math Regions in your Word, PowerPoint and Excel files.
This is useful if you frequently need to insert math symbols into your document like the does not equal sign. I will also include some of the most common short codes for common math symbols at the end of this post.
1. Click the File tab
To turn on your Math AutoCorrect feature, click the File tab and then navigate to the bottom of the Backstage view and select options.
2. Click Options
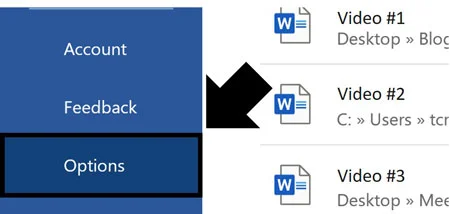
At the bottom-left of the backstage view, click Options.
3. Choose Proofing
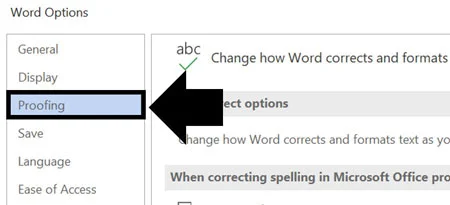
In the Word Options dialog box, select the Proofing group to open the proofing options.
4. Select AutoCorrect Options
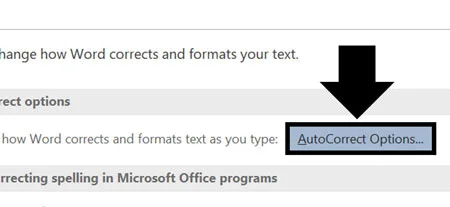
Inside the Proofing options, select the AutoCorrect Options… command.
5. Turn on Math AutoCorrect
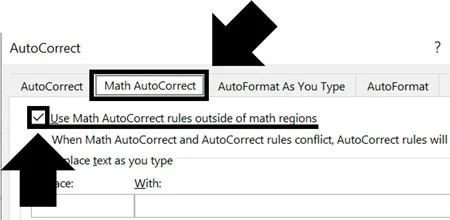
Inside the AutoCorrect dialog box:
- Select the Math AutoCorrect option at the top
- Choose Use Math AutoCorrect outside of Math regions
- Click OK
6. Type \ne or \neq for Does Not Equal (≠)

With that option turned on in Word, you can now type the following to insert the does not equal sign.
- \ne then hit Spacebar
- \neq then hit Spacebar
If that does not work for you, make sure you used a backslash (\) and not a forward slash (/)
3. Short Codes for Common Math Symbols
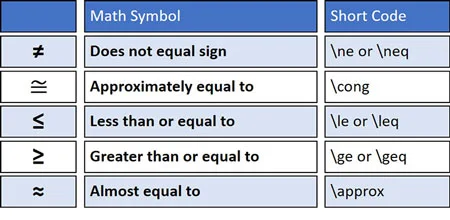
With the Math AutoCorrect feature turned on, you can use these common short codes to quickly insert math symbols in Microsoft Word, Excel or PowerPoint files.
- Does not equal sign (≠): \ne or \neq
- Approximately equal to (≅): \cong
- Less than or equal to (≤): \le or \leq
- Greater than or equal to (≥): \ge or \geq
- Almost equal to (≈): \approx
Final Thoughts
So those are two different ways to get at the does not equal sign and other math symbols in Microsoft Word.
Which of these methods is best depends on how frequently you need to insert symbols. If you need to insert lots of symbols into your Word documents and PowerPoint presentations, it’s worth the time to turn on the Math AutoCorrect feature outside of Math Regions and learn your short codes. It will save you a ton of time over your professional career.
To learn other ways to save time and boost your skills, visit us here.
About the Author

Taylor Croonquist
Co-Founder, Nuts & Bolts Speed Training
Taylor Croonquist is a PowerPoint expert and trainer. Over a career spanning the globe, from consulting in New York and investment banking in China, Taylor has truly seen it all in PowerPoint. Through necessity and a natural tech savvy, Taylor honed his PowerPoint skills to the point of even blowing the minds of the Microsoft PowerPoint programming team. When he's not busy crafting PowerPoint training, you can find him reading a sci-fi series or scuba diving.