There are a lot more ways to underline text in Word, Excel, and PowerPoint than you realize. To help you out with this, I pulled together all the available options into one place, so that you can see what they look like.
As you will see, the three ways to underline text include:
- The underline shortcut (recommended)
- The underline command
- The Font dialog box
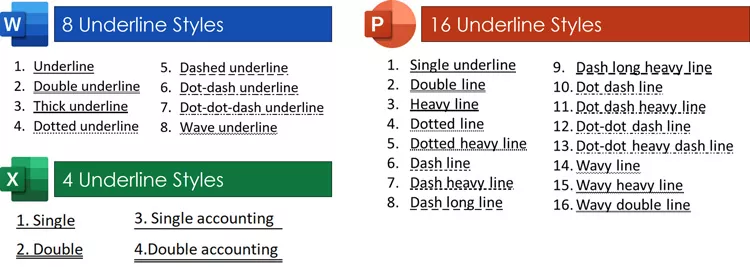
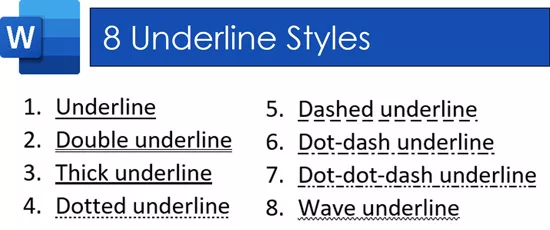
While these all accomplish the same task, the Font dialog box gives you the most underlining options in Word, Excel, and PowerPoint. As you can see in the picture below, there are 8 underline styles in Word, 16 styles in PowerPoint, and 4 styles in Excel.
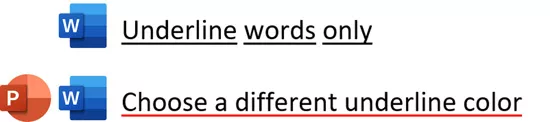
It’s worth noting that in Microsoft Word you can underline words only. And in Word and PowerPoint, you can change the color of your underline (compared to your text)t, as pictured below.
As you can see, there are a lot of options for underlining text in the Microsoft Office Suite depending on which program you are working in. Below, I’ve broken out each one into its own section so you can navigate directly to the underline style you are trying to create.
As most of the time you will probably just want to add a single underline to your text, the shortcut is the fastest way to do this.
1. The Underline Text Shortcut
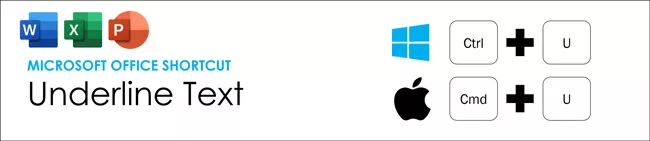
The fastest way to underline text in the Microsoft Office Suite (or any word processing program), is Ctrl+U on a PC and Cmd+U on a Mac.
Using the shortcut once applies the underline effect. Using the shortcut a second time removes the underline effect.
Note: The Ctrl+U Underline shortcut only allows you to add a single, solid underline beneath your text. If you want to double underline your text, or create a dashed underline effect, you need to use the underline style options discussed below. For help with this, read our guide here
2. The Underline Command
The underline command gives you more options than the Ctrl+U shortcut discussed above as it includes a ‘more options’ area.
A. Using the Underline command
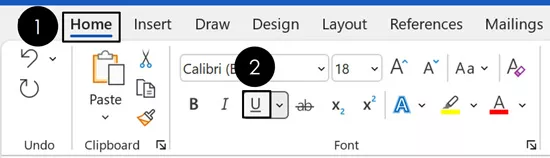
Another fast way to underline text in Word, Excel, and PowerPoint is to simply click the Underline command on the Home tab in the Ribbon.
Simply select the text you want to underline and click the command to add your underline. Clicking the command a second time removes the underline effect.
B. Using the Underline command style options in Word
The Underline command in Word is a two-part button. While clicking the button on the left underlines your text (discussed above), clicking the downward facing arrow on the right gives you additional line style options to choose from.
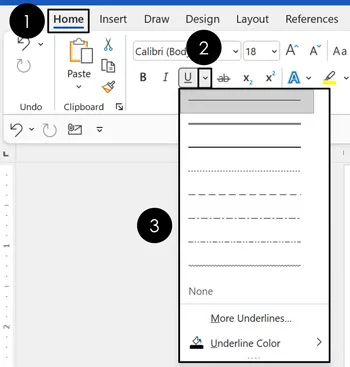
To choose a different underline style in Word, simply select your text and then follow these steps:
- Navigate to the Home tab
- Click the Underline style arrow
- Choose an underline style
There are a total of eight underline styles in Word you can choose from, as pictured below. To see the additional options in Excel and PowerPoint, you will need to use the Font dialog box discussed next.
Note: If you do not select your text first, the underline style you choose will be applied to whatever text you type next. To stop underling your text, simply click the command a second time or hit Ctrl+U on your keyboard.
3. Underlining text using the Font dialog box

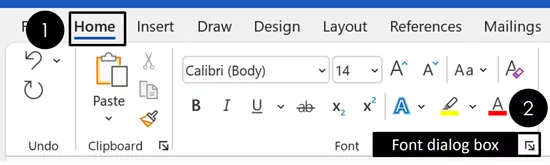
There are multiple ways to open the Font dialog box. The simplest (and fastest way) is to use the Font dialog box shortcut. This shortcut works in Word, Excel, and PowerPoint, so it’s a triple dipper shortcut.
Another way to open the Font dialog box is to click the diagonal facing arrow in the corner of the Font group. Clicking this arrow accomplishes the same task.
As a speed training tip – although there is no difference between using the shortcut and clicking the diagonal facing arrow, as the shortcut is significantly faster, I recommend learning the Ctrl+Shift+F shortcut.
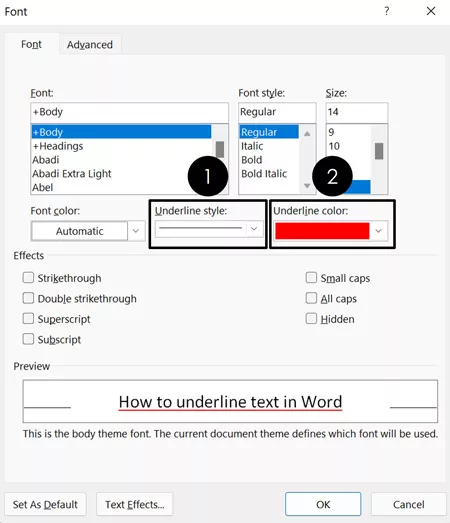
As you can see in the picture above, inside the Font dialog box, you can:
- Choose your underline style
- Choose your underline color
The Font dialog box is also where you can access a number of other text effects like strikethrough, double strikethrough, etc. As you will see in the next section, the Font dialog box is also the trick to underlining words only in Microsoft Word.
To expand your knowledge and learn the strikethrough shortcut to quickly cross out text in Word, Excel, and PowerPoint, read our guide here.
Microsoft Word: How to Underline Words Only
Microsoft Word includes the ability to underline words only. This means that you do not need to select the words individually and apply the underline to create the desired effect.
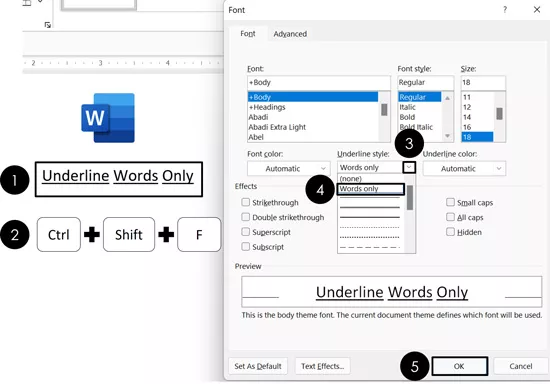
To underline your words only in Word, simply:
- Select your text
- Open the Font dialog box (Ctrl+Shift+F)
- Open the Underline style options
- Select Words Only
- Click OK
Doing so creates the ‘underline words only’ effect, without you having to manually do it yourself. You can also change the color of your underlines as you will see in the next section.
Note: This Words Only underline option does not exist in PowerPoint or Excel. If you want to create the same effect in these programs, you will need to underline your words individually, or take a screenshot of your text in Word and use it in the other programs.
How to Change the Color of Your Underlined Text
In Word and PowerPoint, you can also choose an underline color that is different from your text. This does not work in Microsoft Excel.
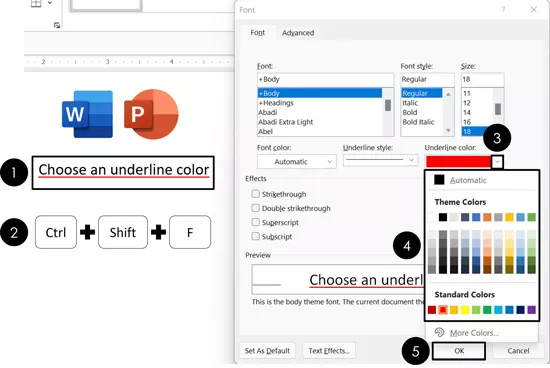
To change the color of your underlined text, simply:
- Select your text
- Open the Font dialog box (Ctrl+Shift+F)
- Open the Underline color options
- Choose an underline color (I picked red)
- Click OK
When picking an underline color that is different than your font color, it is best not to pick colors that are hard to read. See some examples below.
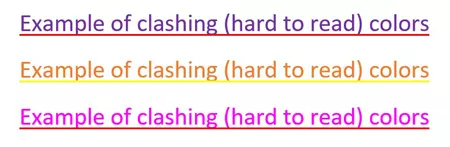
If your font is black, you can use almost any color for your underline. To make your document look more professional, I recommend picking an underline color that complements your logo or other design elements within your document.
Conclusion
Those are the different ways to underline text in the Microsoft Office Suite.
For most of your underlining text needs, I recommend learning and using the Ctrl+U keyboard shortcut. It’s faster than the other methods discussed above but does not provide the extra options like changing the underline color or underlining words only.
If you enjoyed the depth of this guide and want to learn more about our speed training courses and resources, visit us here.