The Quick Access Toolbar or QAT, is the best productivity feature ever added to the Microsoft Office Suite.
That said, most professionals have no idea how to use it to radically improve their speed and productivity in PowerPoint. To help you out, I’ve pulled this guide together.
Table of Contents
[Watch] The Quick Access Tooblar (PC Users Only)
You are currently viewing a placeholder content from Youtube. To access the actual content, click the button below. Please note that doing so will share data with third-party providers.
More InformationWhat is the Quick Access Toolbar?
The Quick Access Toolbar (or QAT for short) is the customizable toolbar of commands and features inside each of the Microsoft Office Suite programs (Word, Excel, PowerPoint, etc.). The purpose of this toolbar is to help you quickly access your most frequently used commands and features to speed up your workflow.
The toolbar was introduced in Microsoft Office 2013, and it is arguably the best productivity feature that Microsoft has ever added to its Office Suite. The two main reasons it is the best are:
- The QAT is 100% customizable, allowing you to add the commands and features you use most during your workday
- On Windows based versions of Microsoft Office, the QAT creates easy to use Alt driven shortcuts of the commands and features you add to it (even if those commands and features don’t have shortcuts associated with them)
NOTE: Customizations you make to the Quick Access Toolbar only display on your computer. The QAT does not travel with your Microsoft Office documents. That means that if you want to share your toolbar with your colleagues or clients, you will need to export it from your computer and import it on theirs (details below).
Take your PPT skills to the next level
Where is the Quick Access Toolbar?
The Quick Access toolbar is either above or below the ribbon in Microsoft Word, Excel, and PowerPoint.
And in the latest version of Microsoft Office (Microsoft 365) you have the option to hide your Quick Access Toolbar too (see next section).
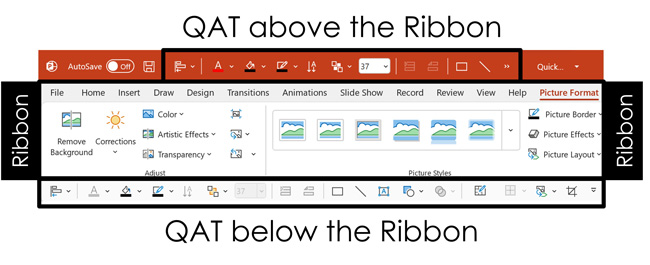
Notice in the picture above how many more commands you can put on your QAT when you place it below the Ribbon. This is one reason I recommend always putting your Quick Access Toolbar below the Ribbon.
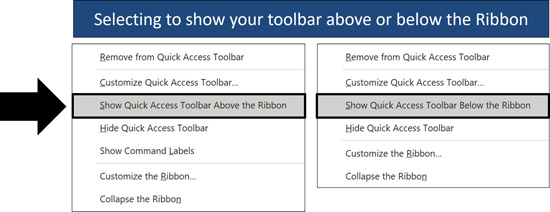
To change the location of your Quick Access Toolbar, simply:
- Right-click anywhere within the Quick Access Toolbar
- Select Show Quick Access Toolbar Above the Ribbon or Show Quick Access Toolbar Above the Ribbon
If you do not see the option to show the toolbar above or below your Ribbon, it means that either:
- You have not right-clicked the actual Quick Access Toolbar (you might have accidentally right-clicked the Ribbon instead, so try again);
- Or your QAT is hidden (see the next section).
How to Show or Hide the Quick Access Toolbar
In the latest version of Microsoft Office (the Microsoft 365 subscription), you can now hide and unhide the Quick Access Toolbar. If you have an earlier version of Office, there is no way to hide your Quick Access Toolbar like this.

To dhow or hide the Quick Access Toolbar, simply:
- Right-click anywhere in the Ribbon
- Select Hide Quick Access Toolbar or Show Quick Access Toolbar
Because the Quick Access Toolbar is such a good productivity feature, I never recommend hiding it. However, if you know for a fact that you’ll never use and customize it with your most frequently used commands and features, then you can choose to hide it to save some space on your screen.
How to Customize the Quick Access Toolbar
Customizing the Quick Access Toolbar can take a little bit of time as you figure out the best setup for your situation. Aside from that, it’s a very easy and flexible process. By flexible, I mean that you can add, remove, and rearrange commands on the fly to best suit the tasks you are doing.
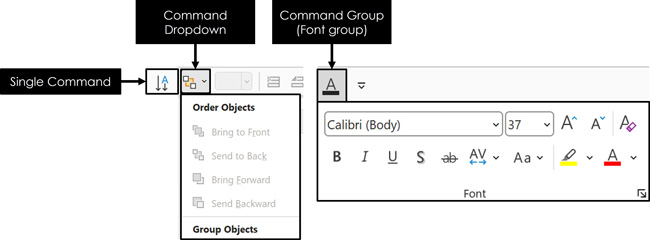
As pictured above, you can customize your toolbar with:
- Single commands
- Dropdowns (multiple options for a single command)
- Groups of commands (adding multiple options and dropdowns)
The advantage of adding a dropdown or group of commands is that you get to put multiple commands and features in a single slot on your Quick Access Toolbar (see my 7 QAT tips below for more details).
There are a couple of ways to customize the Quick Access Toolbar, and we’ll go through them all below.
1. Adding and removing commands using your Ribbon
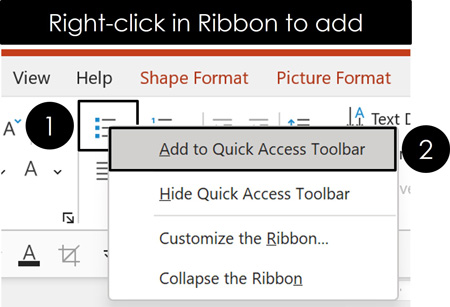
To add a command, dropdown, or group of commands to your Quick Access Tool, simply:
- Right-click the command, dropdown, or group of commands
- Select Add to Quick Access Toolbar
Your selection is then added to the end of your toolbar. You will learn how to rearrange the commands on your toolbar in just a minute.

To remove a command, dropdown, or group of commands, simply:
- Right-click the command, dropdown, or group on your QAT
- Select Remove from Quick Access Toolbar
You can alternatively add and remove commands using the Quick Access Toolbar tab in the Options dialog box for Word, Excel, or PowerPoint.
2. Adding and removing commands using the Quick Access Toolbar dialog box
An alternate way to add, remove, and rearrange commands to your Quick Access Toolbar is to use the PowerPoint options dialog box. This gives you the most options for what you can do with your QAT.
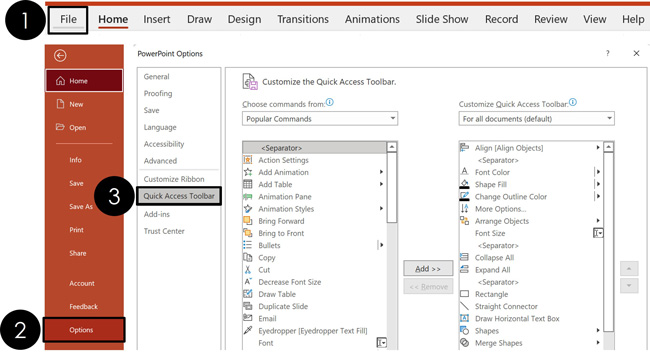
To open the PowerPoint Options dialog box to edit your Quick Access Toolbar:
- Click the File tab
- Select Options
- Select Quick Access Toolbar on the left

Once you are in the dialog box, you can:
- Filter the commands based on the different Ribbon groups (including commands that are not in the Ribbon)
- Add or remove commands
- Rearrange the commands on the right using the up and down arrows
- Import and export your Quick Access Toolbar
If you want to add a section break to your QAT, you will find it at the top of the most popular commands. Simply select the Separator and click the Add button as pictured below.
Another important aspect about this dialog box is that you can designate whether you add the commands to your global QAT or to your presentation level QAT, which we will discuss next.
3. Global QAT versus a Local QAT
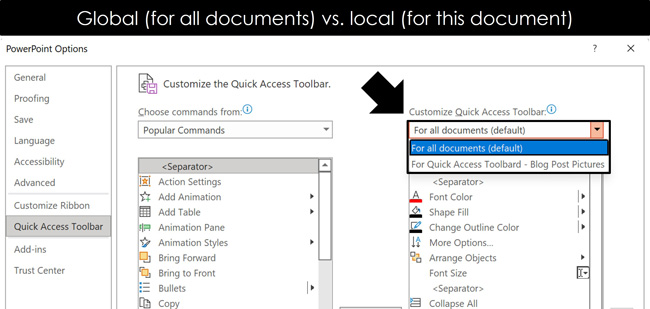
In the Quick Access Toolbar dialog box, you have the option to use your custom QAT for all your documents, or just for the specific document you are in. This is what I refer to as a Global QAT versus a Local QAT.
If you add the command to your global QAT (the default option), it will show up whenever you open a file for that specific program. For example, adding the Alignment Tool to your global QAT for PowerPoint, means that any time you open a PowerPoint presentation the Alignment Tool will be there.
If you only want a specific set of commands to appear for a particular document, click on For all documents (default) to open the dropdown and select the current document. Any commands added this way will appear at the end of your global QAT whenever you open this specific document.
This is useful if there is a document you’re creating that requires a special set of additional commands.
Rearranging Commands on Your Quick Access Toolbar (Shortcuts)
The reason that rearranging commands on your Quick Access Toolbar is important is that their keyboard shortcuts are dictated by their placement. This gives you the opportunity to choose which shortcuts you use to access these commands.
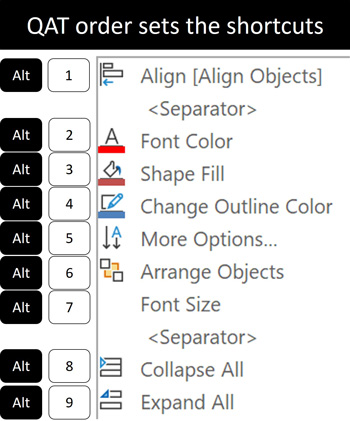
For example, the first command on your Quick Access Toolbar will always have the keyboard shortcut Alt, 1. The second command will always have the keyboard shortcut Alt, 2.
This allows you to rearrange the commands and features in the most logical order so you can use your Alt key to activate them. This is one of the biggest timesaving tricks of the Microsoft Office suite!
To open the PowerPoint Options dialog box to edit your Quick Access Toolbar:
- Click the File tab
- Select Options
- Select Quick Access Toolbar on the left
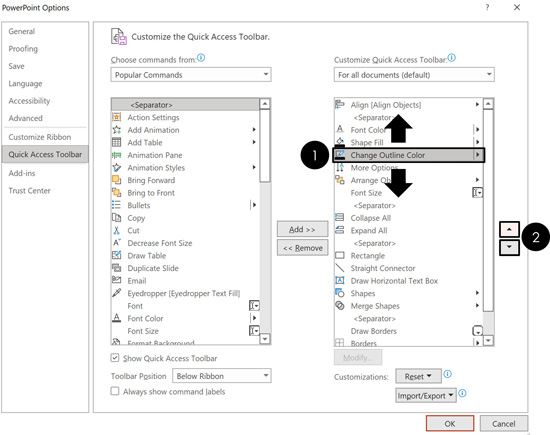
In the dialog box, to rearrange the commands on your toolbar, simply:
- Select the command you want to move
- Click the up or down arrow
Again, the order of your commands dictates the Alt driven keyboard shortcut to access it. The first command on the toolbar will always be Alt, 1. The second command will be Alt, 2, etc.
Resetting Your Quick Access Toolbar
If you don’t like how your Quick Access Toolbar is set up, you can always reset it to the default for each of the Microsoft Office programs. As the toolbar is unique to each program, you will need to do this for each one.
The first step to resetting your Quick Access Toolbar is to navigate to the PowerPoint Options dialog box.
To open the PowerPoint Options dialog box to edit your Quick Access Toolbar:
- Click the File tab
- Select Options
- Select Quick Access Toolbar on the left
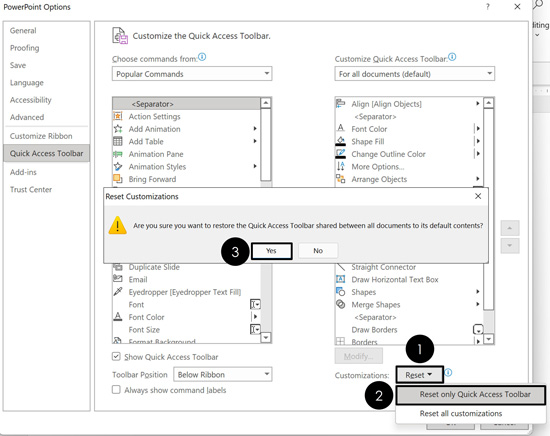
Once you are inside the PowerPoint Options dialog box, to reset your Quick Access Toolbar, simply:
- Open the Reset dropdown
- Select Reset only Quick Access Toolbar
Resetting your Quick Access Toolbar reverts it back to its default settings. Depending on your version of Microsoft Office, your toolbar might reset with a different number of commands.
Once you have your Quick Access Toolbar customized, you can share it with your team so that everyone has the same setup.
Note: The Quick Access Toolbar does not travel with your Microsoft Office documents. Instead, it is a customized file installed on your computer for Word, PowerPoint, and Excel. That means that to share your toolbar customizations with colleagues, you’ll need to export and import it on each computer.
The first step for both processes is to first navigate to the PowerPoint Options dialog box and select the Quick Access Toolbar, as pictured below.
1. How to export a Quick Access Toolbar
2. How to import a Quick Access Toolbar
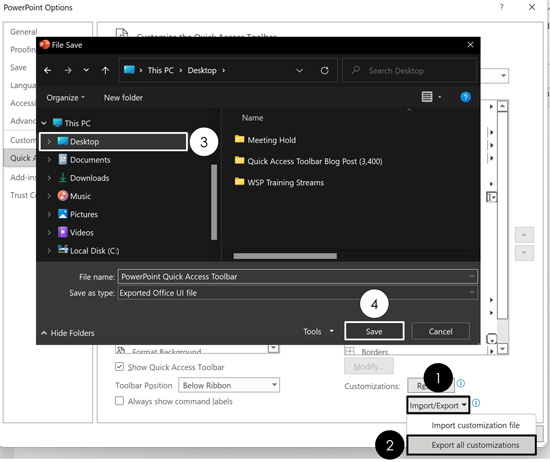
Once you are inside the PowerPoint Options dialog box, to export your Quick Access Toolbar, simply:
- Open the Import/Export dropdown
- Select Export
- Choose a destination on your computer
- Click OK
Your QAT then exports as a .exportedUI file that your clients and colleagues can then import into PowerPoint.
The position of the QAT in relation to the Ribbon (above or below) does not save with the exported file. So the person who imports the file will need to adjust that setting on their own.
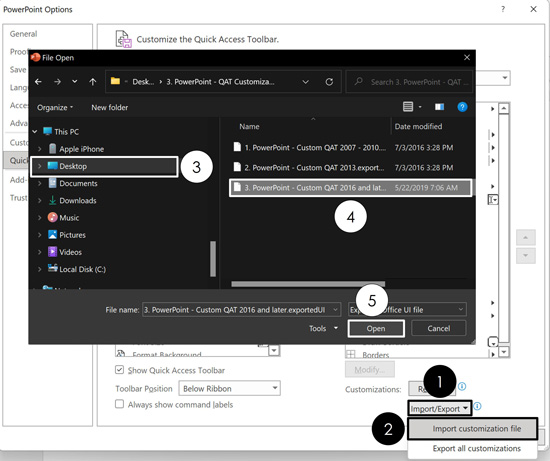
Once you are in the PowerPoint Options dialog box, to import a Quick Access Toolbar, simply:
- Open the Import/Export dropdown
- Choose Import
- Navigate to the saved QAT file (.exportedUI filetype)
- Click Open
Importing a new QAT overwrites whatever toolbar you are using. There is currently no way to amend a toolbar while importing it.
Note: Importing a custom QAT file does not change where it is positioned in relation to the Ribbon (above or below). If you need the toolbar to be in a different position than it is now, you will have to change that yourself here in the Options dialog box, by adjusting the Toolbar Position dropdown selection.
3. Troubleshooting importing a QAT file
Based on my experience training professionals in the real world, I’ve collected a few issues that might arise when trying to import a customized QAT.
Here is what might happen and how to troubleshoot it:
#1. A Quick Access Toolbar can only be imported into the Microsoft Office program it was created for (or exported from). This means that you cannot import a toolbar created for Word into Microsoft Excel. In the same way you cannot import a toolbar created for PowerPoint into Microsoft Word.
If the toolbar is not properly importing into the correct Microsoft office program, double check the file was created for the program you’re trying to import it into.
#2. A Quick Access Toolbar file can only be imported from within one of the Microsoft office programs. You cannot double-click the file on your desktop to open it up or install it. You must use the Import dialog box.
#3. If you do not see the QAT file when you try to import it, double check the file you are importing is not in a zipped folder. For whatever reason, QAT files do not display if they have been zipped.
#4. QAT files can only be imported and exported on Windows based versions of the Microsoft Office Suite. If you are trying to share your toolbar with Mac users, you will instead need to manually recreate the toolbar on their computers.
#5. If you import a QAT file and the commands do not properly display, try importing the same QAT file a second time. Sometimes the import process doesn’t fully execute. To fix it, just import the same file a second time.
Conclusion
The Quick Access Toolbar is the best time-saving tool in the Microsoft Office Suite. That’s because it automatically turns your most frequently used commands and features into easy-to-access keyboard shortcuts, even if they don’t normally have a shortcut.
In this way, you can strategically set up your toolbar to speed up your workflow and get you to Happy Hour.
To get access to my personal customized QAT and see how it will 3x-5x your productivity in PowerPoint, check out my PowerPoint 3X course inside our PowerPoint Pro Membership.
If you enjoyed the depth of this article and want to learn more about our courses and free resources, visit us here.
🔒 Unlock the PowerPoint Shortcuts Trusted by Industry Leaders KKR, American Express, HSBC, and More!
Join over 114,880 professionals from diverse fields including consulting, investment banking, advertising, marketing, sales, and business development who have supercharged their PowerPoint game with our proven methods.
✅ Customize compelling presentations effortlessly.
✅ Master time-saving techniques for faster deck creation.
✅ Boost your career prospects with top-notch PowerPoint skills.
Get FREE access to the Critical PowerPoint Shortcuts module of our premium training course by entering your name and email below.
DISCLAIMER: PC Users Only!
We respect your privacy and will keep your info safe and confidential.