Adding slide numbers in PowerPoint should be an easy and straightforward task, but it is not. The way that PowerPoint manages your slide numbers is confusing.
While confusing and frustrating, the last thing you want to do – and I have done this before myself – is manually add the page numbers to the slides yourself.
Manually adding slide numbers is a classic 101 timewaster that you will instantly regret for two reasons.
The first reason is, manually doing anything in PowerPoint that PowerPoint can automatically do for you (even if it requires a little research), is never an effective use of your time. If you want to have a life outside of the office slaving away in PowerPoint, you will want to push as many of these types of tasks as possible back on to PowerPoint.
The second reason is, after you manually add your slide numbers in PowerPoint, you will have to manually update them again as you add or remove slides from your presentation. If you thought it was tedious to manually add the slide numbers in the first place, believe me when I say that it is ten times as tedious to have to manually update them again, and triple-check that all your slides are numbered correctly.
Follow along with me below and see the advanced trouble shooting video at the bottom of the page if you are still having issues.
NOTE: When printing your slides as handouts, be aware that it is your slide number (NOT the page number) that displays for each page of the speaker notes you print. To learn how to add speaker notes to PowerPoint (and some of the tricks to working with them), read my guide here.
Table of Contents
[Watch] How to add slide numbers in PowerPoint
You are currently viewing a placeholder content from Youtube. To access the actual content, click the button below. Please note that doing so will share data with third-party providers.
More InformationAdding slide numbers in PowerPoint is one of those things that should be simple and easy (like it is in Microsoft Word) …but it’s not.
And just so we are on the same page, in this article you can use the term slide number and page number interchangeably. They are the same thing in this case.
While a lot of people can “properly” add them to the PowerPoint Slide Master, they still can’t get them to properly show up in the Normal View. And if you work in the professional services industry, this is something you’ll want to get right! The last thing you want to do is torpedo the overall quality of your presentation simply because you can’t get your slides properly numbered.
Take your PPT skills to the next level
Setting up your slide numbers in the Slide Master view
When you are adding slide numbers to PowerPoint, or troubleshooting your slide numbers, the first place to check is your Slide Master.
That is because the Slide Number field is driven and controlled by your Slide Master.
Continue reading to see how this is done. If your Slide Numbers are already set up properly on your Slide Master, you move to the next section.
1. Navigate to your Slide Master
In all versions of Microsoft PowerPoint, the slide numbers (or page numbers) for your presentation are driven from the Slide Master View. As such, this is one of the best places to check first if you are having trouble adding slide numbers in PowerPoint, or if your slide numbers are not properly displaying.

To navigate to the Slide Master view in PowerPoint, simply:
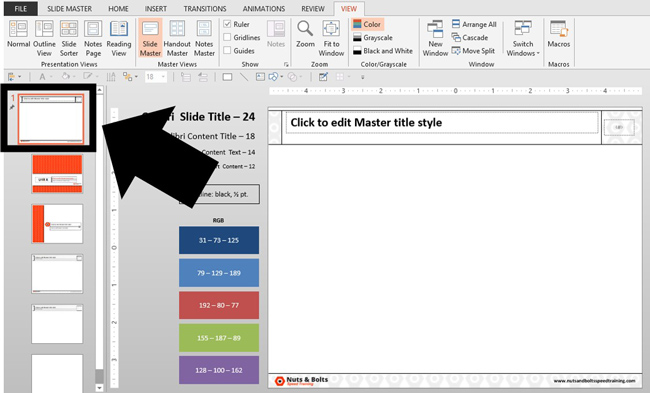
- Navigate to the View tab in your Ribbon
- Select the Slide Master command
If you frequently need to use your Slide Master, you can use the Shift + Normal icon shortcut to jump to the slide master.
2. Navigate to your Parent Slide (the big slide)
In the Slide Master view, navigate to the Parent slide on the top left. This will be the first and largest the slide listed on the left side of your screen.
3. Open the Master Layout dialog box to find the Slide Number field

To open the Master Layout dialog box in PowerPoint, simply:
- Navigate to the Slide Master tab in your Ribbon
- Click Master Layout to open the dialog box
The Master Layout dialog box is where you set the Title, Text, Date, Slide number, and Footer for your PowerPoint presentation. To expand your knowledge and learn how to create a template in PowerPoint, read our guide here.
NOTE: PowerPoint is a contextual program, in that it only displays tabs for the views you are in, or the objects you have selected. If you do not see the Slide Master tab in the ribbon, that means that you have not properly navigated to your Slide Master yet. See step #1 above.
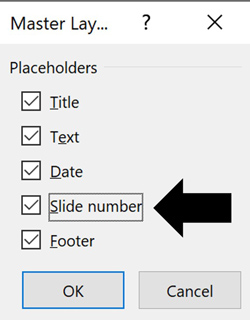
4. Select the Slide Number field
In the Master Layout dialog box, make sure you have a check mark next to Slide number. Selecting this option adds the slide number object to the Parent Slide, that you can then use to automatically add and update all the slides numbers in your presentation (instead of manually adding them yourself).
You can additionally add the Title, Text, Date and/or Footer objects if you don’t already have them on your Parent Slide. These are the fields you will want to set up and properly format if you are building a PowerPoint template for your team or company.
After you select which elements you want to appear on your slides, click OK.
5. Place and format your Slide Number
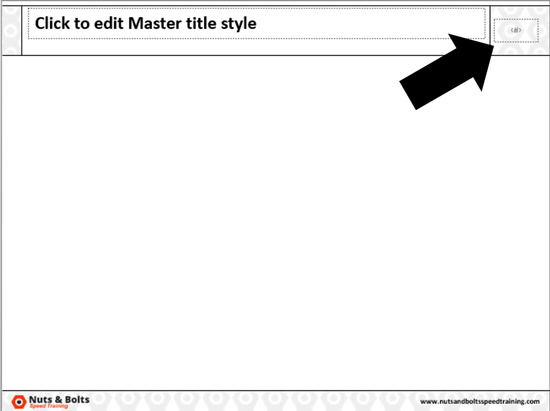
With the slide number added to your Master Slide, you can now format and/or place it wherever you want. In this case, I’ve placed mine in the upper right-hand corner of my slide.
Where you place it on your Parent Slide determines where the numbers show up (by default) on all of your Child Slides. In the below picture, you can see I placed my slide number in the upper right hand corner of my slide.
NOTE: By default, your slide numbers populate to all the Child Slides (the little slides in the Slide Master view) in your presentation. If they do not, you will need to cycle through the Child Slide layouts and delete the old page numbers individually, and then click the Footers icon in the Ribbon to add them back (another area where slide numbers in PowerPoint can be a pain).
To learn how to set up and format the Parent Slide and Child Slides for your PowerPoint template, read my guide here.
6. Close out of the Slide Master view

Before you exit out of the Slide Master view, I recommend double-checking that your slide numbers are properly set up both on the Parent Slide, and all the individual Child Slides. If you accidentally missed one, now is the time to catch it.
Once you are sure the slide numbers are all where they are supposed to be, you can click out of the Slide Master View:
- Click the Slide Master tab
- Select Close Master View
Applying your slide numbers in the Normal View
Once you’ve set up and formatted the Slide Number field in the Slide Master view, you are ready to move on and add them to your presentation.
As an analyst or associate who is in charge of the deck, it is important to keep in mind that just because the Slide Number field is properly set up in the Slide Master, DOES NOT mean they will automatically show up in your presentation.
Continue reading to see the next steps to make sure your slide numbers properly display in PowerPoint.
1. Open the Slide Number dialog box

Now that you have setup (or double-checked) that your slide numbers are set up properly in the Slide Master view, now we can add them here in the Normal View of PowerPoint (woo-hoo). Let’s start by opening the Header and Footer dialog box as follows:
- Navigate to the Insert tab
- Select the Slide Number command
You can alternatively use the Alt + Shift + D keyboard shortcut to open the Header and Footer dialog box. If you want to learn additional PowerPoint shortcuts like this that will save you time, read my shortcut guide here.
Regardless of how you get to the Header and Footer dialog box, this is the best and proper place to add, remove, and/or manage your presentations:
- Date and time
- Slide numbers
- Footers
The goal again is to get PowerPoint to do the heavy lifting for you here. Even if this dialog box is new and a little confusing to you, it is worth getting this right as it will save you a ton of time in the future.
2. Apply your Slide Numbers
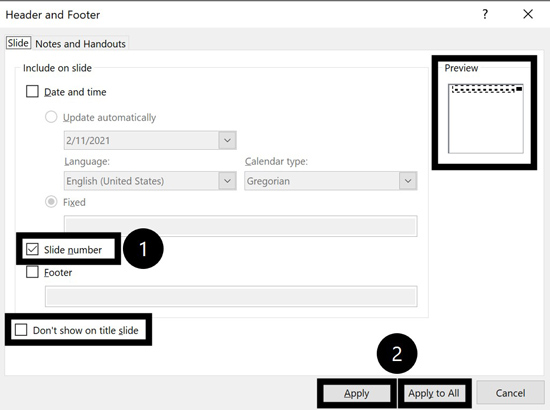
NOTE: The option to “Don’t show on title slide” can easily catch you off guard. That’s because the title slide in PowerPoint is NOT what you probably think it is. For more information, on what the title slide actually is in PowerPoint, read my guide here.
Within the Header and Footer dialog box, make sure there is a checkmark next to the Slide number.
With it selected, you get a preview of where your slide numbers will appear in the upper right-hand corner of the dialog box. After that, select either:
- Apply, applies your slide number to the individual slide you are working on.
- Apply to All, applies slide numbers to all of the slides within your presentation (assuming that each of the Child Slide layouts has your slid number on it).
Assuming you want to add slide numbers to all your slides in PowerPoint, click Apply to All. Clicking Apply to All, PowerPoint automatically adds the slide numbers to all your slides, based on the formatting and positioning you set up on the slide master.
As you can see in the picture below, the slide numbers now display (just as I set them up on the Slide Master).
Troubleshooting slide numbers that won't show up
If you followed along with me above and you still can’t get your slide numbers to properly display in PowerPoint, I have you covered.
In the following video, I highlight a few extra steps you can take to make sure your page numbers show up in PowerPoint.
You are currently viewing a placeholder content from Youtube. To access the actual content, click the button below. Please note that doing so will share data with third-party providers.
More InformationIf you still can’t figure out what is happening with your slide numbers, leave a comment or send me a note and I will do my best to help you out.
Final thoughts
You did the right thing by looking up how to add slide numbers in PowerPoint. The worst possible thing you can do is get so fed up with the PowerPoint page numbering system, that you manually add them yourself.
Another good point to remember is that you can use the Header and Footer dialog box to quickly remove all the slide numbers from your presentation. Simply unselect the Slide number option and click Apply to All and PowerPoint will automatically remove them all from your presentation.
While we all wish that adding page numbers in PowerPoint was as easy as it is in Word, that’s why you are paid the big PowerPoint bucks.
If you enjoyed this slide number tutorial and want to take your PowerPoint skills to the next level, check out our online training courses and other PowerPoint tutorials here.
🔒 Unlock the PowerPoint Shortcuts Trusted by Industry Leaders KKR, American Express, HSBC, and More!
Join over 114,880 professionals from diverse fields including consulting, investment banking, advertising, marketing, sales, and business development who have supercharged their PowerPoint game with our proven methods.
✅ Customize compelling presentations effortlessly.
✅ Master time-saving techniques for faster deck creation.
✅ Boost your career prospects with top-notch PowerPoint skills.
Get FREE access to the Critical PowerPoint Shortcuts module of our premium training course by entering your name and email below.
DISCLAIMER: PC Users Only!
We respect your privacy and will keep your info safe and confidential.
Thanks for your guidance but it doesn’t completely work. I have one Master and two layouts. It will only add the page number to one of the layouts. No matter how many times I try to insert the slide number and apply to all, when ever I add a new slide, it only puts the slide number on one layout but not the other! Very frustrating because I followed all of your steps perfectly.
Thank you thank you thank you. Have been desperately trying to populate a submaster with slide numbers for a day now. The trick of RE-clicking on Title and Footers boxes up in the Maser Slide menu, while selecting my submaster slide, finally did the trick !
So happy to be able to help, Fran! Those little slide numbers can be tricky, despite appearances. Cheers!
Great vid. thanks.
Thanks for commenting, and happy this was a help to you! Cheers!
Thanks for the super-concise speed training on this – I was starting to pull my hair out! Again Microsoft prove they are the most clumsy legacy software developers on the planet!!
Hi Mathias! Glad to have been able to help. Yes, this is still a trickier issue than it should be, but luckily, there is a solution! Cheers
WOW! What an amazing and fast video. I will definitley bookmark this site!!
So happy to hear that, Anna! Thank you and let us know if there’s any other nagging problem we can solve for you. Cheers