 Same – Same But Different
These two PowerPoint shortcuts both create duplicates of things in PowerPoint, but there is a strategic difference worth mentioning.
First off though, these two shortcuts work in all versions of Microsoft PowerPoint. They also work on a Mac.
The duplicate shortcut (CTRL + D) creates a duplicate or copy, any PowerPoint object that you have selected (tables, charts, objects, slides, etc.). Right off the bat, using CTRL+D is twice as fast as a normal CTR+C to copy and CTRL+V to paste.
The duplicate slide shortcut (CTRL + SHIFT + D) creates a duplicate, or copy of the slide you are currently working on. It sounds like a repeat shortcut, but it plays a very strategic role in PowerPoint, and is definitely worth memorizing.
Getting Strategic…
The duplicate slide keyboard shortcut (CTRL + SHIFT + D) works REGARDLESS of what you are doing and what you have selected.
For example, you can be in the middle of typing text or tweaking a chart and simply hit CTRL + SHIFT + D to create a new, duplicate slide. That gives you an insurance policy to go back to your original layout, if you make a bunch of changes that you end up not liking.
As such, learning to add the SHIFT key to the equation is HIGHLY recommended, as it’s the fastest way to create a duplicate slide in PowerPoint.
Same – Same But Different
These two PowerPoint shortcuts both create duplicates of things in PowerPoint, but there is a strategic difference worth mentioning.
First off though, these two shortcuts work in all versions of Microsoft PowerPoint. They also work on a Mac.
The duplicate shortcut (CTRL + D) creates a duplicate or copy, any PowerPoint object that you have selected (tables, charts, objects, slides, etc.). Right off the bat, using CTRL+D is twice as fast as a normal CTR+C to copy and CTRL+V to paste.
The duplicate slide shortcut (CTRL + SHIFT + D) creates a duplicate, or copy of the slide you are currently working on. It sounds like a repeat shortcut, but it plays a very strategic role in PowerPoint, and is definitely worth memorizing.
Getting Strategic…
The duplicate slide keyboard shortcut (CTRL + SHIFT + D) works REGARDLESS of what you are doing and what you have selected.
For example, you can be in the middle of typing text or tweaking a chart and simply hit CTRL + SHIFT + D to create a new, duplicate slide. That gives you an insurance policy to go back to your original layout, if you make a bunch of changes that you end up not liking.
As such, learning to add the SHIFT key to the equation is HIGHLY recommended, as it’s the fastest way to create a duplicate slide in PowerPoint.
 Two Shortcuts, One Sequence
ALT + SHIFT + D is great double dipping shortcut, as it works differently depending on what you are doing in PowerPoint.
But first off, this shortcut works in all PC versions of PowerPoint: PowerPoint 2007, PowerPoint 2010, PowerPoint 2013 AND PowerPoint 2016 (same things as Office 365).
If you’re within a shape (able to type text), hitting ALT + SHIFT + D opens up the Date & Time dialog box allowing you to insert today’s date/time into your shape.
Two Shortcuts, One Sequence
ALT + SHIFT + D is great double dipping shortcut, as it works differently depending on what you are doing in PowerPoint.
But first off, this shortcut works in all PC versions of PowerPoint: PowerPoint 2007, PowerPoint 2010, PowerPoint 2013 AND PowerPoint 2016 (same things as Office 365).
If you’re within a shape (able to type text), hitting ALT + SHIFT + D opens up the Date & Time dialog box allowing you to insert today’s date/time into your shape.
Inserting a new slide shortcuts
 Both flavors of the new slide shortcut work in all versions of PowerPoint (PowerPoint 2007 to PowerPoint 2016), BUT it’s important to note the slight nuances here, as it makes a difference (see the above video for an explanation).
First off, using either the CTRL + ENTER or CTRL + M shortcuts to create a new slide
, you do get a new slide layout based on the previous layout you were using, what we call a same-same layout.
So, for example, if you use the CTRL + M keyboard shortcut while on a two column layout, BOOM…you’ll get a new blank two column layout. Use the same shortcut while working on a divider slide layout and (you guessed it) you’ll get a new divider slide layout.
The only time this same-same layout rule doesn’t work, is with title slides.
If you start on a title slide and use either keyboard shortcut, you will get a blank slide of the next type of slide in your deck…which is the layout directly following your title slide as dictated by your Slide Master.
Both flavors of the new slide shortcut work in all versions of PowerPoint (PowerPoint 2007 to PowerPoint 2016), BUT it’s important to note the slight nuances here, as it makes a difference (see the above video for an explanation).
First off, using either the CTRL + ENTER or CTRL + M shortcuts to create a new slide
, you do get a new slide layout based on the previous layout you were using, what we call a same-same layout.
So, for example, if you use the CTRL + M keyboard shortcut while on a two column layout, BOOM…you’ll get a new blank two column layout. Use the same shortcut while working on a divider slide layout and (you guessed it) you’ll get a new divider slide layout.
The only time this same-same layout rule doesn’t work, is with title slides.
If you start on a title slide and use either keyboard shortcut, you will get a blank slide of the next type of slide in your deck…which is the layout directly following your title slide as dictated by your Slide Master.
New slide shortcuts – PowerPoint pro tips
With the CTRL + M shortcut, after creating a new slide, you can immediately start typing text to add text to your title on the new slide (saving you from having to grab your mouse and click into the title placeholder). With the CTRL + ENTER shortcut, you will first cycle through the placeholders on your slide (making it easy to type text into them) and then create a brand-new slide (after there are no more placeholders to cycle to). This is a favorite of consultant’s as it allows you to quickly knock out the framework of your deck while storyboarding. These bonus tips work in PowerPoint 2007, PowerPoint 2010 and PowerPoint 2013.Inserting and navigating hyperlink shortcuts

How to Create a Hyperlink in PowerPoint
To insert a hyperlink, simply select the object or text that you want to add the hyperlink to and hit CTRL+K on your keyboard to open the Insert Hyperlink dialog box. Note: Hyperlinks don’t work in the Normal View of your presentation, they only work in the Slideshow or Presenter Views of your deck. Creating Hyperlinks in PowerPoint is useful for two main reasons: #1: Navigational Features Adding hyperlinks allows you to create navigational or interactive features in your presentations by allowing you to jump around within your deck (from one slide to another), open other programs, navigate to websites, etc. For example, software engineers use hyperlinks to simulate the opening and closing of different file menus that they have mocked up in PowerPoint. #2: Pop-Up Text Effect You can use the ScreenTip functionality of hyperlinks to display pop-up text when you hover your mouse over an object within your presentation (read our guide here). Dealing with Hyperlink Text Colors If you add a hyperlink to text in PowerPoint you will be stuck with the blue “hyperlink” text formatting, including the underline, which you cannot change or edit. A clever trick for avoiding this pesky formatting, is to add your hyperlink to the shape that your text is within, instead of the text itself. This way you get your hyperlink functionality with your shape, without inheriting the hyperlink formatting on your text. To learn how to hyperlink in PowerPoint read our guide here.Chart formatting and moving shortcuts
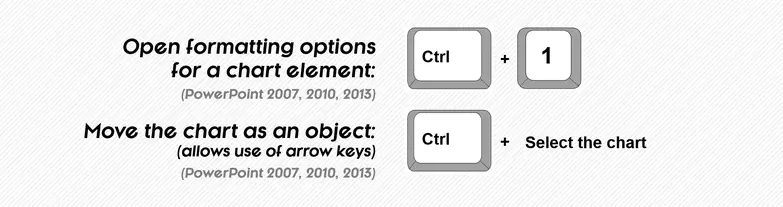 Formatting a Specific Chart Element
You can quickly format any chart element in PowerPoint (same is true in Excel) by selecting it and hitting CTRL + 1 on your keyboard. Hitting CTRL + 1 will open up the format dialog box with the formatting options SPECIFICALLY for the chart element you selected (which is HUGE).
This cool little trick working in PowerPoint 2007, PowerPoint 2010, PowerPoint 2013 AND PowerPoint 2016 (same this as Office 365).
This formatting shortcut is significantly faster than hunting around in the file menus for your chart formatting options… no matter how fast you are at working with your charts!
Copying and pasting formatting and animations

Clipboard Copy Shortcut
The clipboard is a great way to collect a number of items across the Microsoft Office suite, and paste them onto your slides in one go. To turn on the clipboard copy feature of PowerPoint, follow these steps:- From the Home tab, click the downward facing arrow in the Clipboard group, which opens up the clipboard.
- At the bottom of the clipboard, click on Options
- Make sure that the ‘Show Office Clipboard when Ctrl+C is pressed twice’ is selected.
Paste Special PowerPoint Shortcut
After copying an object in PowerPoint, you can paste it as picture by hitting CTRL + ALT + V on your keyboard. Doing so opens up the paste special dialog box, allowing you to choose your preferred picture type, including the Metafile format. Pasting and breaking Metafiles If you’re using a PC version of PowerPoint you can paste an object as one of the metafile formats, and then you can ungroup it into shapes, lines and text To learn how to use the paste special shortcut like this, click here. This is extremely useful when trying to extract information out of a table or break a chart down into things that you can easily format in PowerPoint.
How to Group Things in PowerPoint
CTRL + G is the keyboard shortcut for how to group things in PowerPoint, and it works in all versions of PowerPoint. This is a CRITICAL shortcut to learn as it allows you to quickly move and/or resize multiple objects at the same time as a single group, instead of wasting time moving things around piece by piece.
Objects can also be part of more than one group. For example, you can first group two rectangles together (as a box layout) and then take that box layout and group it together with a chart.
To learn more about grouping in PowerPoint, see our guide here.
Not all PowerPoint objects can be part of a group
You can group most PowerPoint objects: charts, tables, pictures, shapes, lines text boxes, etc.
That said, a few PowerPoint objects that CANNOT grouped (or be part of a group) are: #1) tables, #2) any content containers set on your Slide Master (slide titles, page numbers, footers, etc.) and, #3) SmartArt graphics.
How Do You Ungroup in PowerPoint?
The inverse of grouping objects in PowerPoint is ungrouping them, which you can easily accomplish with the CTRL + SHIFT + G shortcut keys.
In addition to ungrouping already grouped objects, you can also:
- Ungroup SmartArt graphics, which breaks the graphic down into shapes, lines and text boxes.
- Ungroup vector graphics, which breaks them down into shapes
- Ungroup tables and charts if you first paste them as Metafiles
Manipulating shapes shortcuts

Moving, Growing, Rotating, and Duplicating Shapes in PowerPoint
These shortcuts are incredibly simple, and yet, so powerful. Once you learn them, you will never want to reach for your mouse to manipulate your shapes again!
Selection Pane shortcuts

How to use the Selection Pane in PowerPoint
The most useful of the Selection Pane shortcuts in PowerPoint 2010 and 2013 is simply opening and closing it with the ALT + F10 keyboard shortcut. Once the pane is open, you can either navigate ti with your keyboard (for the more advanced keyboard users), or simply use your mouse (which is good enough for most things).
In PowerPoint 2007, the Selection Pane is known as the ‘Selection and Visibility’ pane and must be opened with your mouse (there is no keyboard shortcut for opening and closing it).
To open the pane in PPT 2007, from the Home tab, select the Arrange tool drop down and then select the Selection Pane at the bottom of the dropdown.
Selection Pane Pro Tip
To use ALL of the Selection Pane shortcuts (like collapsing and expanding groups) in PowerPoint 2010 and 2013, you need to get to the Selection Pane by rotating through active panes from your keyboard (using F6)… which is SUPER weird, but that’s how it is.
Let me quickly explain.
Normally, you can click something with your mouse to activate it in PowerPoint. Right? Well this doesn’t work with the a couple of shortcuts for the Selection Pane.
Instead you need to hit F6 on your keyboard to rotate to it… otherwise some of the keyboard shortcuts shown above won’t work.
Subscripts, superscripts, font dialog box, and text formatting shortcuts

How to create subscripts and superscripts in PowerPoint
In PowerPoint 2010 and 2013, you can turn subscript writing on and off with the CTRL + ‘=’ keyboard shortcut, and superscripts on and off with the CTRL + SHIFT + ‘=’ keyboard shortcut.
These same shortcuts work in PowerPoint 2007 to make superscripts and subscripts, except to turn them back off you need to launch the font dialog box, CTRL + T on your keyboard.
Font dialog box pro tip: The Font dialog box is keyboard driven, so after opening it (CTRL + T) you can continue to navigate your options directly from your keyboard.
Look for the underlined letters in the words within the dialog box, which you can activate by holding the ALT key and hitting those letters on your keyboard.
For example, to select the “strikethrough” command within the dialog box, hit ALT + K.
To learn how to use the strikethrough shortcut click here
Text alignment shortcuts

Aligning text in PowerPoint
There are four text alignment shortcuts that allow you to quickly change how you lay your text out within your slide’s text boxes or shapes:
Center Align Text (CTRL + E) is often used for titles, and will align your text in the center of its container.
Left Align Text (CTRL + L) is the most common text alignment option, starting your text alignment form the left.
Right Align Text (CTRL + R) aligns your text to the right, which is useful when building your own titles for bar charts, for example.
Justify Align Text (CTRL + J) spreads your text out between the margins you have set. It’s important to note that the last hanging lines in your paragraphs will not be justified, as that would create weird text spacing.
Working with blocks of text


How to navigate and manipulate text from the keyboard
The above shortcuts are VITAL to your ability as an office worker to increase your word processing speed, whether you are typing in Microsoft PowerPoint or in Microsoft Word.
These shortcuts allow you to quickly navigate, select, edit and rearrange blocks of text… which is likely what you are dong ALL DAY long.
Learning the above shortcuts will DRAMATICALLY improve the speed at which you type and process text.
Arranging PowerPoint windows shortcuts

Flipping through and arranging open presentations
When working with multiple presentations open at the same time, knowing how to cycle forward through them (CTRL + F6) and quickly snap them all side-by-side (CTRL + SHIFT + F10 in PowerPoint 2010 and 2013) is a lifesaver.
Of all the places to lose time when working under a tight deadline, the last thing you want to stumble on is simply flipping through and arranging your presentations.
‘Distraction Free Mode’ and collapsing the Ribbon shortcuts

Clearing the clutter from your workspace
These two shortcuts are a great way to create some visual space on your screen so that you can more easily work on what Cal Newport calls ‘Deep Work’: Professional activities performed in a state of distraction free concentration that push your cognitive capabilities to their limit. These efforts create new value, improve your skill and are hard to replicate.
For more details about these two shortcuts (including the brand-new 2016 one), see our article here.
Gridlines, guides and rulers shortcuts

Better layout options for your presentations
The PowerPoint gridlines (SHIFT + F9), PowerPoint drawing guides (ALT + F9) and PowerPoint ruler (ALT + SHIFT + F9), are all features to help you better layout your content across your slides, improving the professionalism of your presentation.
I find the drawing guides (ALT + F9) much easier to use than the gridlines (SHIFT + F9), as you can manually adjust their position on your slide and quickly add new ones by holding the CTRL key and dragging with your mouse.
An example of using the drawing guides is setting the left side of your slide where you want all of your objects to start on each and every slide. Once the line is set, you can then see that line on all of your slides and layout your content accordingly.
Drawing guides PowerPoint 20013 – New features
PowerPoint 2013 introduced some new (handy) drawing guide features, including:
- Allowing you to change the color of the drawing guides by right-clicking them, making it easier to see what you have laid out on your slide.
- Allowing you to set them on your slide master, so that they cannot be nudged or moved in the normal view.
Turning your PowerPoint ruler on and off is also a convenient shortcut when you are working on a small screen (ALT + SHIFT + F9). Typically you only need the ruler for adjusting your bullet point spacing, so having a quick way to turn it on and off is handy.
Navigating active panes shortcuts
 How to rotate between active panes
These are advanced “keyboard junkie” shortcuts and should be reserved for the hardcore!
What these do is allow you to rotate between the open panes in the PowerPoint environment (of which there are five default ones) and any other panes or dialog boxes that you have open.
The default panes in order are:
- The Workspace
- The command bar (at the bottom of your workspace)
- The Ribbon
- The Notes pane
- The slide thumbnail view on the left side of your screen
You can cycle forward through these panes with the F6 key, or backwards through them with SHIFT + F6, allowing you to get at the various commands in these views directly from your keyboard… sorry mouse!
Rotating to the Outline View and the Selection Pane
I find these shortcuts are best used in combination with the Selection Pane (ALT + F10) and Outline View (CTRL + SHIFT + TAB) shortcuts, as these are the panes most of us need to frequently get to. Also, both of these panes have very useful keyboard shortcuts associated with them.
For example, to use some of the Selection Pane shortcuts, after opening the Selection Pane (ALT + F10), you need to make it the active pane before you can use the other shortcuts associated with it.
So after opening it, hit F6 on your keyboard and you will rotate to it, and use your other select pane shortcuts.
The same is true for the Outline View, except that instead of rotating forwards to it, you need to rotate backwards to it… Don’t ask me why. So after opening the Outline View (CTRL + SHIFT + TAB), you can activate it from you keyboard by hitting SHIFT + F6.
Outline View shortcuts

PowerPoint Outline View
The Outline View is great for managing large presentations, as it allows you to quickly cycle through, rearrange and evaluate your content at a 30,000 foot view.
It’s also a great way to insert and quickly update your content (titles, subtitles and content containers) as a bulleted list.
To quickly open or close the Outline View in any version of PowerPoint, simply use the CTRL + SHIFT + TAB keyboard shortcut.
Using ALL of the Outline View shortcuts
To use all of the Outline View shortcuts, you need to be active in the Outline View from your keyboard… you cannot just select it with your mouse.
After opening the Outline View (CTRL + SHIFT + TAB), you can rotate to it by hitting SHIFT+F6 on your keyboard.
See the Navigating Active Panes shortcuts for more.
To expand your knowledge and learn more about using Outline View in PowerPoint, read our guide here.
Shortcuts for closing and quitting PowerPoint
 Closing vs. quitting PowerPointThe slight nuance between these shortcuts makes a big difference.
NOT unique to PowerPoint: these ‘close file’ and ‘close application’ shortcuts work for all Microsoft Office Programs (Word, Excel, Outline, etc.), and the ALT + F4 shortcut will work for any open window in Windows.Creating and opening presentations

Two shortcuts for opening a presentation
>Here is another subtle difference for the hardcore shortcut user:
- CTRL + O will take you the backstage view in PowerPoint to open a presentation, which is ideal for opening a recent presentation.
- CTRL + F12 will take you directly to a file navigation dialog box to find a presentation on your computer.
It is a subtle difference, but if you are frequently opening and closing presentations, these shortcuts will help you jump start your search more effectively (depending on where you want to start).
Pro tip for remembering these shortcuts
The F12 key is directly above the ‘O’ key, so these are actually pretty easy to remember.
Saving and printing shortcuts


Inking your presentation
You have two inking options in PowerPoint (the pen and the highlighter) which allow you draw on your slides during your presentation to make your point visually.
Once the ink is on your slide, you can either:
- Save the ink in your presentation – Simply hit ESC to exit Slideshow Mode and select Save Ink. Saving the ink turns your annotations into object that you can then resize and position on your slides.
- Hide the ink on the screen – Hit CTRL + M to hide the onscreen ink. Hitting CTRL+M a second time will unhide the ink (i.e. make it reappear).
- Erase the ink on the screen – Hit E on your keyboard and any ink that you have added in Slideshow Mode will be erased. Be careful when using this shortcut though as you cannot undo the erase action.
Pre-inking your presentation… sneaky trick alert!
Besides adding ink to your slides in Slideshow Mode, you can also pre-ink your slides and still use your CTRL + M shortcut to hide and show your ink.
To pre-ink your slide, simply open the ink tools, which you can find on the Review tab. You can then draw on your slides (however you like) and make your notes.
After you have inked your presentation, in Slideshow Mode you can hide or display the ink by hitting CTRL + M on your keyboard… pretty sneaky, no?
Start slideshow shortcuts

How to start a slideshow in PowerPoint
The different shortcuts for starting a slideshow give you flexibility in terms of where you are in your deck and in what View you’re in when you want to start your slideshow.
Start Slideshow from Beginning – Slideshow Shortcuts
- Presentation Mode – F5 will start your slideshow from the beginning of your presentation.
- Presenter View – ALT + F5 will start your slideshow from the current in the normal presentation mode.
Start Slideshow from Current Slide – Slideshow Shortcuts
- Presentation Mode – SHIFT + F5 will start your slideshow from the beginning of your presentation in the Presenter View. This view works in PowerPoint 2013 and in PowerPoint 2010 if you are hooked up to an external monitor.
- Presenter View – ALT + SHIFT + F5 will start your slideshow from the current slide in the new Presenter’s View. This works in PowerPoint 2010 if you are hooked up to an external monitor and in PowerPoint 2013.
I find the Start from Current Slide the most flexible for spot checking your content in fullscreen mode, and rehearsing individual slides in the new Presenter View.
Spot checking for errors
When spot checking your presentation for errors in Slideshow Mode, it’s a best practice to go through your deck multiple times, each time looking for a single type of error (unaligned titles, wrong formatting, etc.).
Although it might appear to take more time, it makes spotting embarrassing presentation errors significantly easier when you are simple-mindedly focused on a specific error.
Navigating slides in a slideshow shortcuts

Navigating your slides in a slideshow
The two easiest ways to jump between the slides in your presentation in Slideshow Mode are:
Method #1: Assuming you know the slide’s number, hit the number on your keyboard and then hit ENTER. For example, if you want to jump to slide number 22, hit 2, then 2, and then ENTER and you will jump to slide #22.
Method #2: Assuming you don’t know your slide’s number, you can hit CTRL+S on your keyboard to see a list of all the different slides and use this dialog box to jump around within your presentation.
A third option is to use hyperlinks, which you can also navigate to from your keyboard in Slideshow mode. See our guide here for details
PowerPoint pro tip: Use the black and white screen shortcuts to save ink
Using the ‘B’ or ‘W’ keys to make your screen black or white during your presentation is much better than adding black or white slides to your presentation for two reasons:
- It gives you more flexibility as to when you blank out your screen to manage your audience.
- It cuts down the size of your deck and SAVES your printer’s toner cartridge, especially if you are using black slides to blank out your screen.
I’ve seen people print decks with many completely black slides (i.e. the points at which the presenter wanted to pause during the presentation) and completely killed the printer’s toner cartridge.
Video and audio playback shortcuts

PowerPoint video and audio shortcuts
PowerPoint 2010 and 2013 now lets you control the multimedia in your presentation directly from your keyboard including pausing and playing your videos or audio (ALT + P), controlling the volume (ALT + ↑↓), and jumping between bookmarks in your videos (ALT + Home / END).
How to create a bookmark in your video
To add a bookmark to your video, select it in PowerPoint, and follow these steps:
- Place the play bar on the video’s timeline in the place where you want your bookmark to be
- Navigate to the Video Tools Playback Tab in the Ribbon
- Select ‘Add Bookmark’
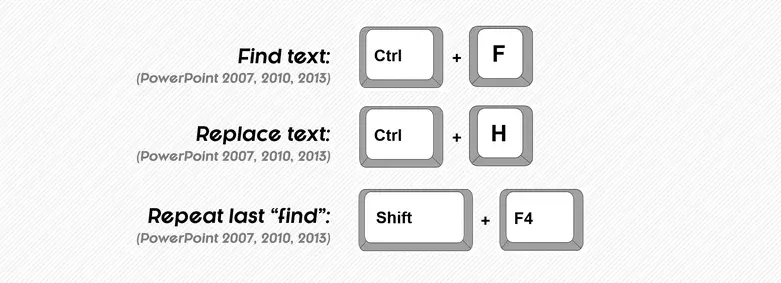
Find and replace shortcuts
What could be a shortcut key for “save as picture” which is appeared using right click to any picture.
Hi Atif! There’s no direct shortcut for that, unfortunately. However, there is what we call a Hybrid Shortcut. If you right-click an image, you can then hit S on your keyboard, and it will launch the Save As dialog box. If you want to do that for a text box or shape, you’ll have to right-click, then hit S, and then hit Enter. Hope that helps!
Cool! Thanks
My pleasure, Atif!