Part #1: Create your snowflakes
1. Choose which snowflake style to make
Snow comes in many styles – large, small, star-shaped, and patterned – just to name a few.
Choosing one really depends on what you like and what style of picture you’re using – some look better with photos (like the Large and Small on the left), and some (like Pattern) go better with illustrations. They are summarized below.

For this tutorial, I’ll create the large soft flakes (left-most option) to go with this cute fluffy seal picture.

2. Change the background color of the slide
Once you know what type of snowflake to make, change the slide background so that it’s not white so you can see what you’re making.
To change the color of the slide, you can change the slide background itself (which I’ve done here) by first right clicking on the slide, then going to Format Background and then choosing a different color from the palette.
You can also just insert a colored rectangle on the slide for the background (although sometimes when you’re trying to click on a snowflake, you can accidentally click on this rectangle, which becomes quite annoying, so I usually just format the slide itself).

3. Insert Your first snowflake
With our “workstation” recolored and ready to go, we can now insert our first snowflake. Just to go the Insert and then Shape menu and select Oval, as shown below.

Holding down Shift (to make it a perfect circle), draw your oval to the size that you want for your snowflake.

Now let’s change the color to white and remove the outline. Right click, go to Format Shape, and then from the menu box, change the color to white in Fill and choose “no line” in the Line options.

Now let’s change the fill color to a gradient to give it a softer, fluffier look. Select Gradient Fill from the Format Shape menu, select Radial, and now let’s play around with the gradient stops, or points.
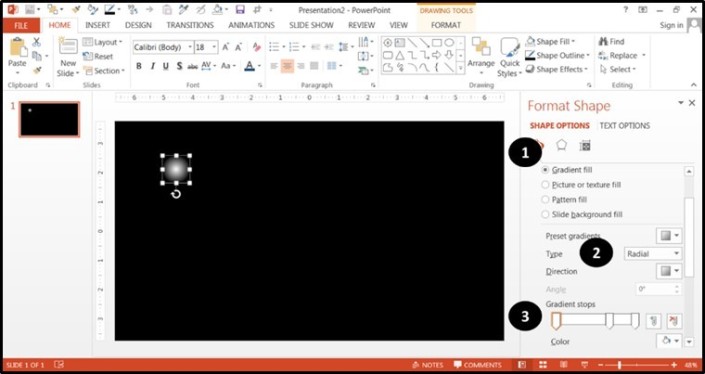
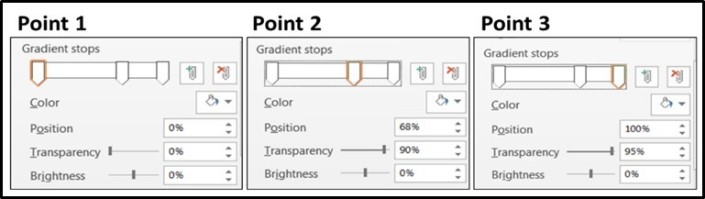
Create 3 gradient points with the following characteristics (these are just a suggestion – feel free to change these to suit your needs):
Once you have that completed, you are done making your snowflake. Now again, I just made the “Large” snowflake here, but if you want to make the others I showed earlier, here’s how you do it:
- Small: Simply reduce the size of the large one and make more of them. It’s the same snowflake type – just smaller.
- Star: For this, you will need to layer a 4-point star on top of a 12-point star – both with a gradient. This is included in the working files for this tutorial, but you can also see how to make the star in more detail in my YouTube tutorial entitled Shooting Star Effect in PowerPoint.
- Pattern: This elaborate snowflake will need to be taken from a vector image that you ungroup. The one I showed earlier is included in the working files, but you can also look for other snowflake patterns in the Microsoft Clipart gallery (see the blog post about vector images for how to do this).
Part #2: Spread your snowflakes
1. Spread out your snowflakes to a small area
Now that you have the first snowflake made, duplicate or copy/paste it several times (CTRL + D or CTRL + C then CTRL + V on a PC) to make a small area of snow. You can also adjust the sizes of the flakes so they’re not all the same size – I always like to do this, as I think it adds a touch of realism.
Make sure the snowflakes are spread the way you like – depending on your picture, lighter or heavier falling snow may make more sense.
Play around with it until you find what looks best.

2. Spread your snowflakes out across the whole slide
After this, select all if the snowflakes (CTRL + A on a PC or just drag a box around the snowflakes) and group them together (CTRL + G on a PC or right click and hit Group).
Now you can spread the snow around the slide much faster. Just like you did with the snowflake, duplicate this group several times on the slide until the whole thing is covered.

3. Prepare your snow for the animation effect
Now, let’s do something that may seem a bit odd now but will make sense later.
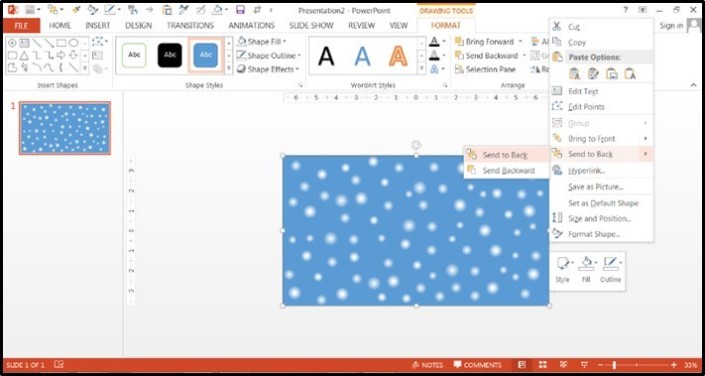
Insert a rectangle on top of the slide and adjust it by dragging the corners so it’s exactly the same size as the slide.

Send it to the back by right clicking and hitting Send to Back. Make sure all of the snowflakes fit into the rectangle, especially at the top and bottom edges.
Now group all of the snowflakes with the rectangle (CTRL + G) and then duplicate (CTRL + D) the rectangle and put the copy exactly above the original.
Finally, let’s make these rectangles transparent on each shape. So select each of the rectangles separately, go to Format, Shape Fill, and then choose No Fill.
Remove the outlines as well by going to Shape Outline and selecting No Outline.
![]()
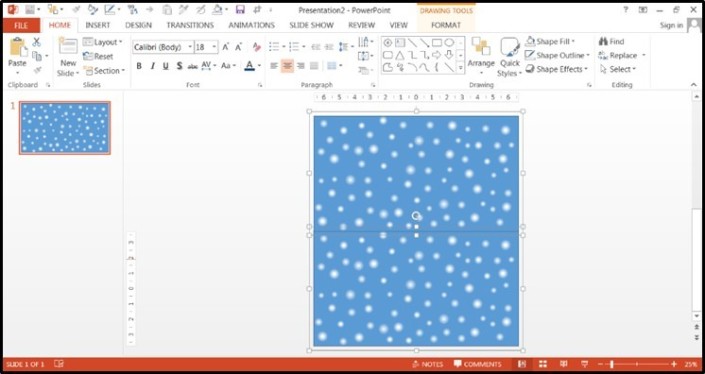
Now Group (CTRL + G) both rectangle/snow combinations so they’re all one object. The final result should look like the picture below.

This step was done to help you perfectly align the snow to the slide, as if you’re even off by a little, the effect will not be smooth.
It took me a long time of failing to align it perfectly before I came up with this technique – so hopefully it saves you some time!
To follow along and create this falling snow effect yourself, simply
Part #3: Animate your snowflakes
1. Add and adjust the motion path animation effect
Now it’s time to animate the snow. Go to the Animations Tab and select the downward motion path. If you grouped everything correctly, the motion path should start at the top of one of the rectangles (the exact middle of the grouped object).

Holding down the Shift key to make sure it’s kept straight, drag it down so that it’s EXACTLY aligned with the very bottom of the slide – the top half of the rectangle should perfectly overlap the bottom half (as they are copies of each other).
If you have PowerPoint 2013, it’s much easier because you have a preview of where the picture will end up.
If you do this correctly, the small arrow of the motion path should end right at the end of the slide, as in the picture below. This is a critical step because if you don’t get it quite right, the animation will be choppy.

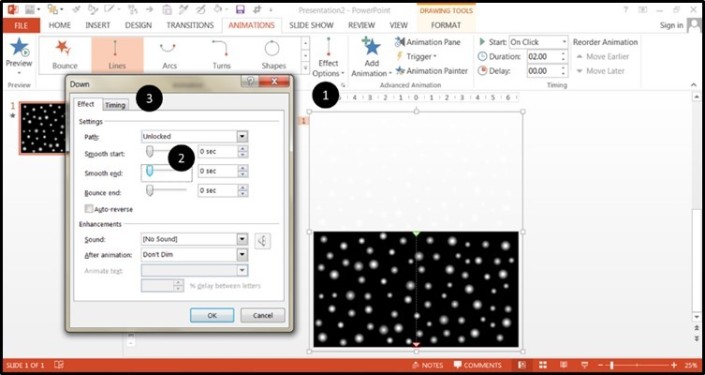
2. Adjust your effect options
Finally, go to the Effect Options in the Animation tab, and set the Smooth Start and Smooth End to zero. Then go to the Timing tab.
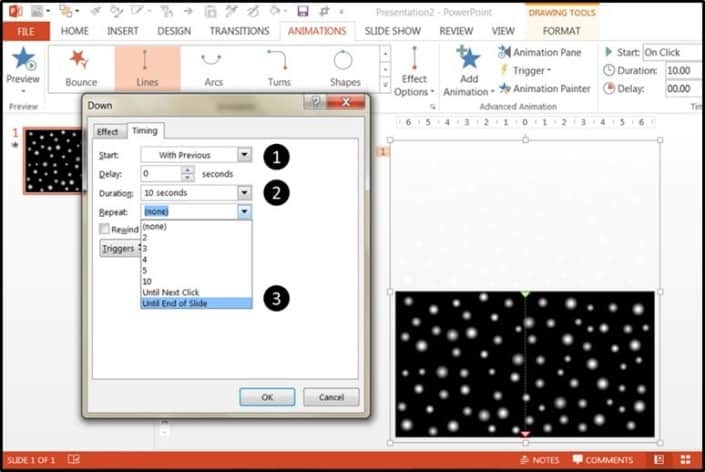
In the Timing Tab, change the Start time to With Previous to make the snow start falling immediately when you go into Presentation mode.
In the Duration menu, change it to 10 seconds – you can make this longer or shorter later to change the speed of the snow.
Finally, in the Repeat menu, select it to repeat Until End of Slide. This will ensure that the snow will fall continuously.
And congrats – you now have your snow!
The very last step is to copy the sn
ow and paste it on top of whatever picture you want to use. The animations will stay intact so you can use and reuse as you like – experiment with different pictures, and have fun with it!
I’ll put it on my baby seal here below.
