Here is a step by step written tutorial showing you how to pull this animated vector image scene off.
I’ve broken the written guide into five parts, so that you can jump around more easily if you like to.
I’ve also marked the different parts of this written guide with the timing of the video tutorial in case you want to jump to that section of the video to see the animated effect we are building. I did my best to add screen shots of the effects throughout this written guide, so bear with me.
Part 1: What’s a vector graphic? – 1:35
Before we get started, here’s an overview of what vector graphics are.
A vector image or vector graphic is basically just shapes that are grouped together to create the image or graphic.
For example, the below roaring lion is an example of a vector image. As you can see, it is just made up of individual pieces, that when combined, create the roaring lion.

As mentioned, the advantage of vector images is that you can modify the shapes that make up the image, delete the pieces that you don’t want and/or take different pieces of different images and combine them to create your own unique ones.
Where can I find free vector images?
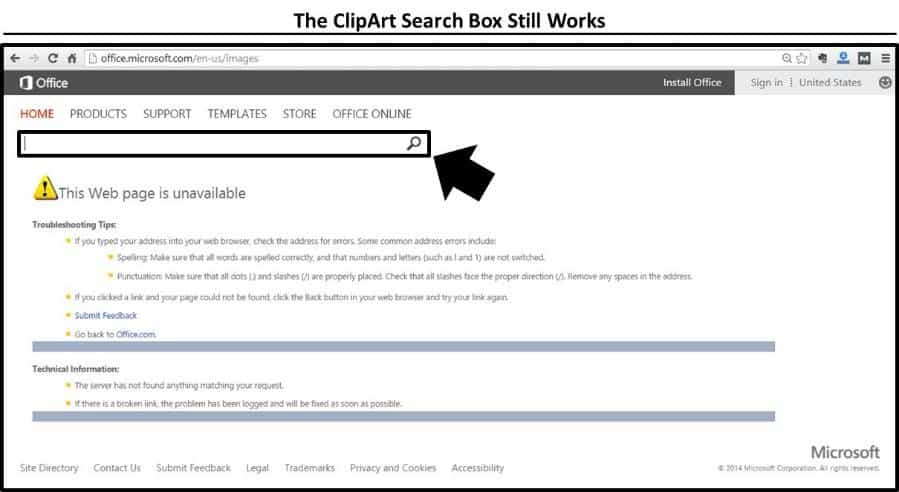
One of my favorite places for finding free vector images is within the Microsoft ClipArt search gallery.
And while the ClipArt gallery site has been replaced by the Bing search engine as your new main tool for finding imagery in later versions of PowerPoint, you can can still use the link below as a backdoor way to get to the original gallery.
Link to Microsoft Office ClipArt Gallery
Now when searching for vector images using the ClipArt gallery, you want to narrow your search to illustrations and resizable, then enter your keywords.
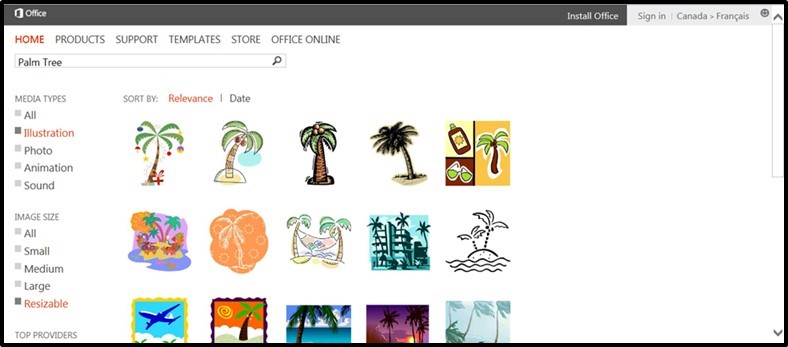
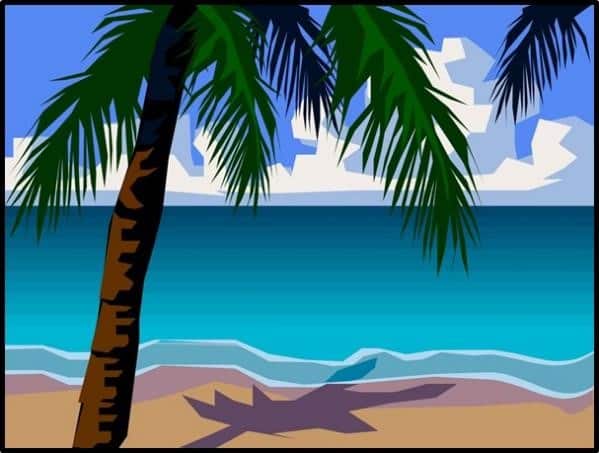
The link below opens to the Microsoft ClipArt gallery (which will soon be discontinued) filtered to the Palm Tree beach scene that I will use for the basis of this animated vector graphic tutorial.
Palm Tree image link used in this tutorial
Depending on your browser (and some browsers have both options), you can either copy and paste these images directly from the ClipArt gallery (using the green Copy button)…
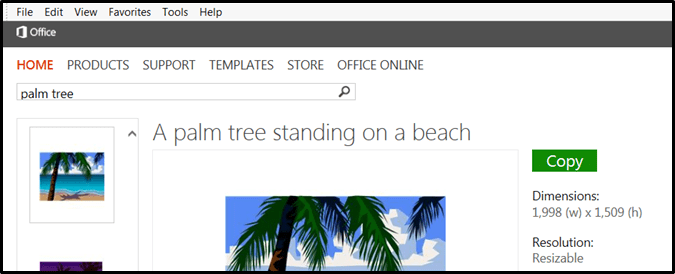
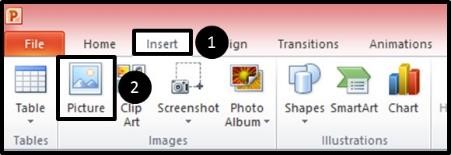
…or you can download the images and insert them into your presentation using the Insert picture command.
Part 2: Setting up your vector image scene – 2:50
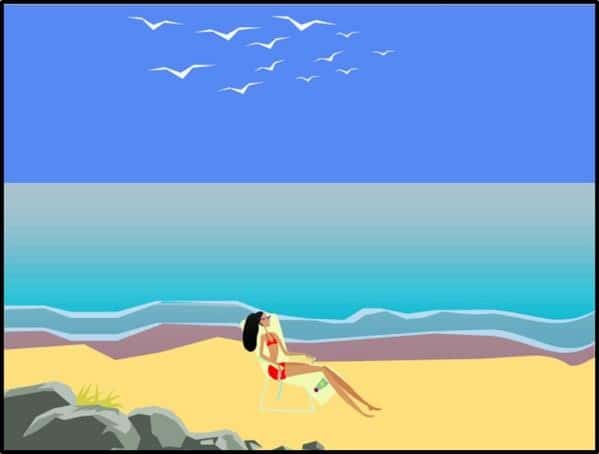
For my picture creation, I’m going to take pieces from different pictures and put them together into a new one – a girl tanning herself on the beach.
1. Add your vector image to your slide
First off, I need the background beach scene that I’ll use. So I’ll use our Palm Tree vector image, which we found earlier and will insert it onto the slide (either with the copy/paste or Insert methods, as mentioned before).
I’ll also stretch it out to fit the entire slide area. If you want to create this scene in particular (before experimenting with your own), you can
For my picture creation, I’m going to take pieces from different pictures and put them together into a new one – a girl tanning herself on the beach.
2. Add Your Vector Image to Your Slide
First off, I need the background beach scene that I’ll use. So I’ll use our Palm Tree vector image, which we found earlier and will insert it onto the slide (either with the copy/paste or Insert methods, as mentioned before).
I’ll also stretch it out to fit the entire slide area.
3. Ungroup your vector graphic
With your vector graphic placed, ungroup the graphic by either hitting CTRL + SHIFT + G on your keyboard, or right-clicking the graphic and selecting Ungroup in the right-click menu.
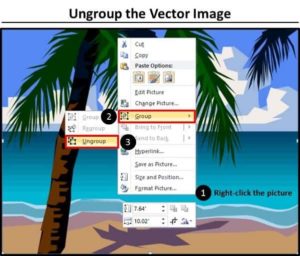
Ungrouping a vector image or graphic, a dialog box appears stating: This is an imported picture, not a group. Do you want to convert it to a Microsoft Office drawing object? Select Yes.

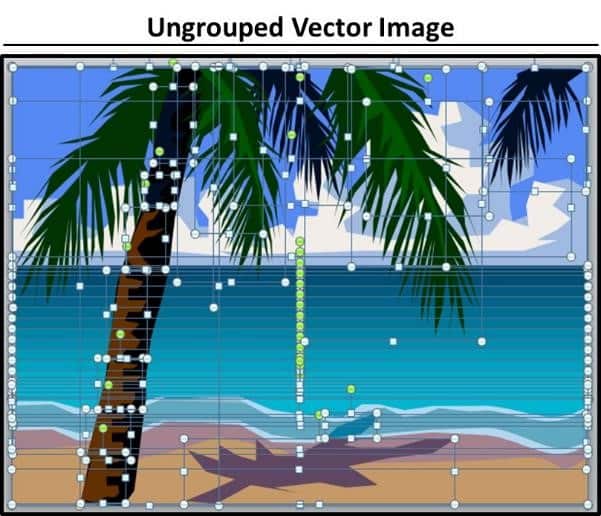
With the dialog box closed, ungroup your graphic a second time, and you can now see all of the different shapes that make up your vector image.
Now that these are ungrouped, we can freely format and manipulate the individual pieces anyway we like. We can remove any of the layers, or change their shape or color.
4. Remove the palm tree
I want a nice clean beach scene to build on, so let’s remove that palm tree with that shadow.
So with the vector graphic ungrouped, select the pieces of the palm tree and the shadow and hit Delete to remove them. The resulting image should look like the below.

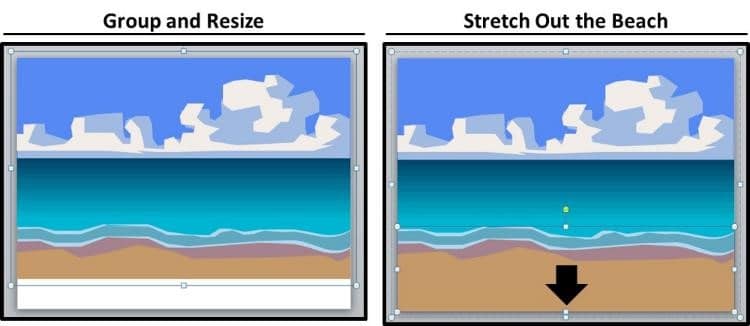
5. Regroup, resize and format the graphic
With the palm tree gone, let’s put our picture back together so it’s easier to work with, so re-select all of the pieces of the scene (CTRL + A) and group them together (CTRL + G on your keyboard).
Now I want some more sand to work with for my scene, so let’s compress the scene vertically a bit, and then grab the bottom portion of the sand and stretch it out.
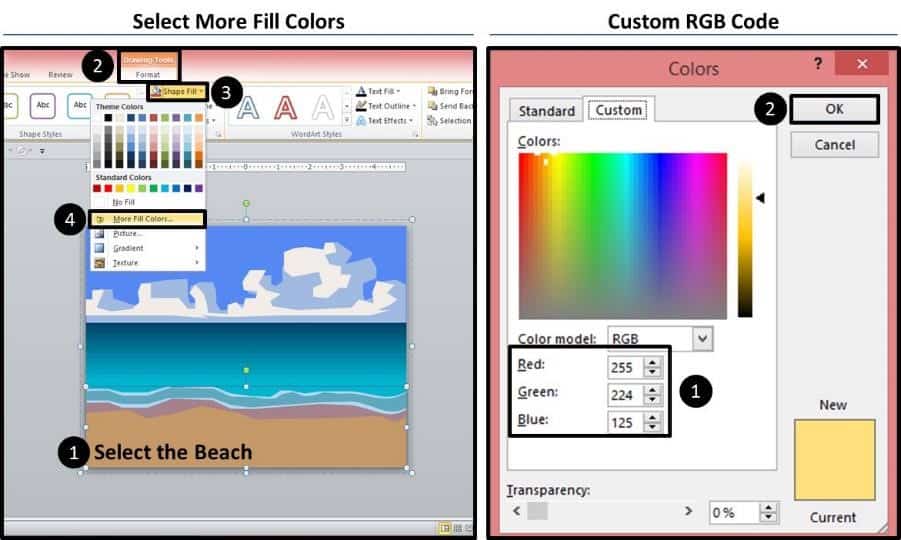
With the sand stretched out, let’s also change the color of the sand to something a bit more cheerful. From the drawing Tools Format tab, I’ll select More Fill Colors, and in the Colors Dialog box, and input a brighter color using the RGB codes of 255 for red, 224 for green, and 125 for blue.
Of course, you don’t have to use this exact color (or change the color at all) – but just wanted to let you know what I did.
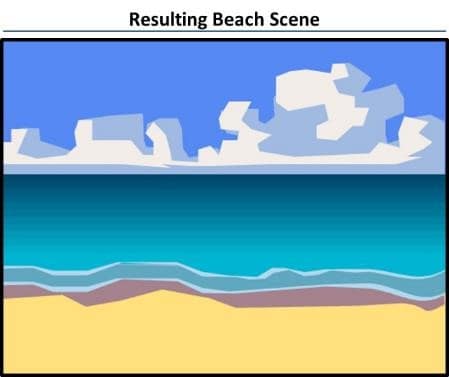
With the sand recolored, you can see the resulting beach scene below – much brighter!
This is what’s really fun about working with vector images – you have full control over all pieces, so they’re easy to manipulate to create your own unique graphics.
6. Add objects from other vector images
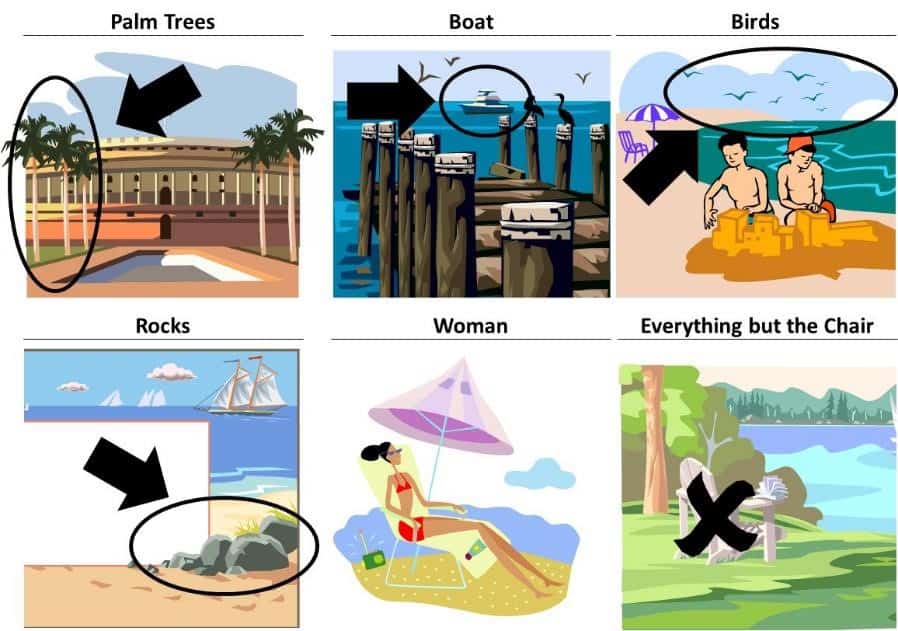
With the beach now set, we want to copy and paste items from our other vector images to create our final beach scene.
In the below diagram, you can see exactly what I’m going to use from each of the working file vector images, which I got from the Microsoft Office ClipArt site, which you can download as part of the working files above.
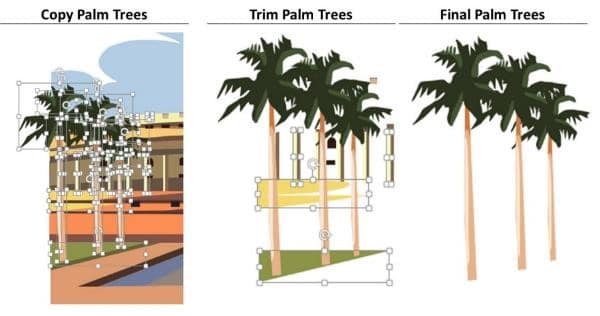
7. Grab and trim the palm trees
Starting with the vector image of the Parliament building in India…
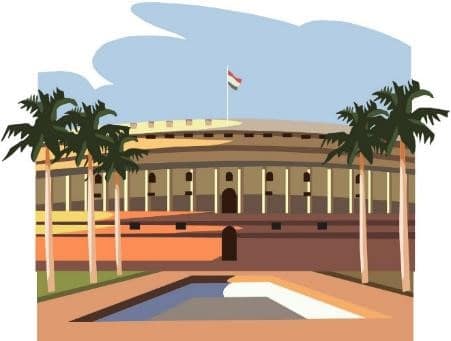
…select the Palm Trees on the left by clicking and dragging your mouse, and paste them (CTRL + C to copy / CTRL + V) onto a new, blank PowerPoint slide. Note that you’ll have other small pieces that get selected that will get pasted as well.
On the new slide, clean up the palm trees by removing all of these extra pieces until you just have the three palm trees, as pictured on the right.
8. Group and place the palm trees
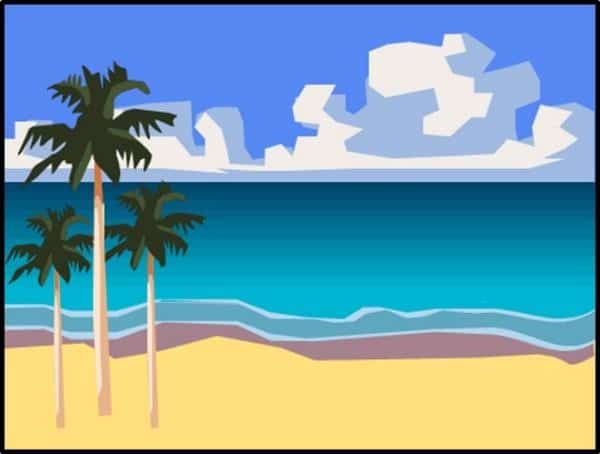
With the palm trees cleaned up, group them into individual trees, so we have three separate trees in total (we are doing this so we can work with each tree separately in our scene). With the palm trees individually grouped, copy and paste them (CTRL + C to copy and then CTRL + V) into the beach scene.
With the trees in the scene, resize and position them however you see fit. I’ve chosen to make a little grouping of them there on the left.
9. Repeat the same process for the rocks
For the rocks, we want to do the same thing. Grab them from the picture, paste them onto a blank slide, and remove the background pieces of sand that are carried over with them.
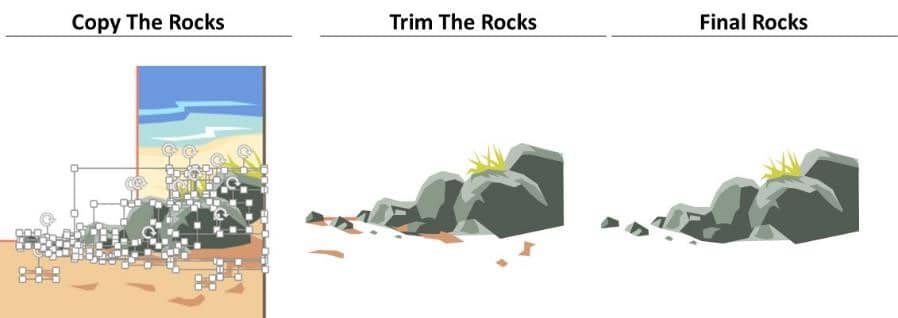
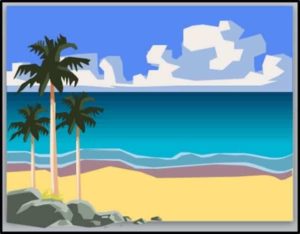
With the sand cleared away, group the rocks back together and paste them into the beach scene. I’m going to position the rocks in front of the palm trees and flip them horizontally, so that they line up with the left part of the slide.
10. Repeat the same process for the woman
Now do the same thing for the woman, except that here, since I didn’t like her hair in a bun, I stretched it out so she would have her hair long and down, as pictured below.
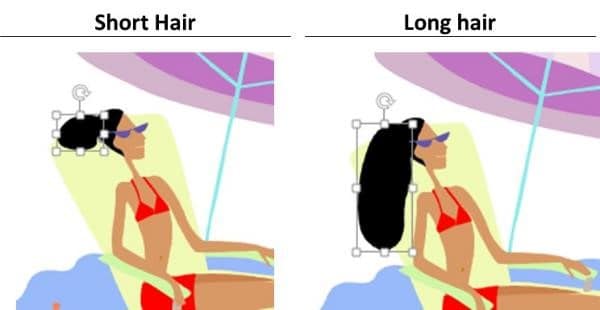
Other than that, just as we did with the other images, remove the pieces that you don’t want, group the rest of the pieces of the image back together, and add her to the beach scene (resizing and positioning her however you see fit).
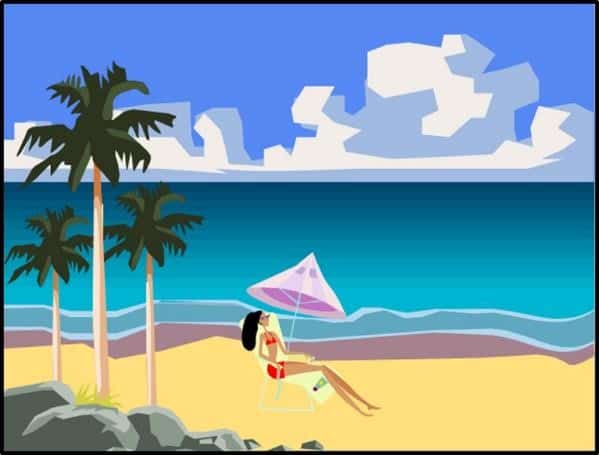
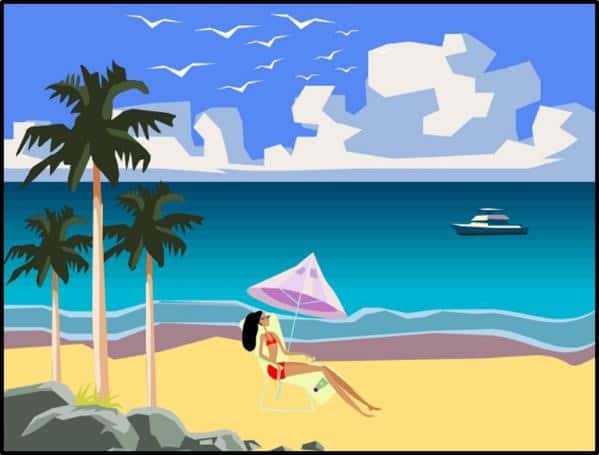
11. Repeat the same process for the birds and the boat
Repeating the same process, placing the birds and the boat, you should end up with something along the lines of the below image. Great, we have our starting scene, which we will now animate.
Part 3: Adding the PowerPoint animations – 5:12
Now there are two different ways to animate a vector scene like this in PowerPoint – the easier and the harder way. It really depends on how complex you want the animations to be and how much time you have to invest.
The Easier Way
Involves simply adding animations (such as a fade or wipe) to the grouped objects within your scene. For example, since each of the palm trees is a separate grouping, you would add an animation to each one.
In the case of the rocks, since they are all grouped together, you would animate them all at once.
The Harder Way
Involves breaking your vector scene apart (ungrouping ALL of the groups) and adding animations to each of the individual layers…starting with the one furthest back and working your way forward.
Going back to the example of the palm trees and rocks, you can animate the shading on these (and the grass on the rocks) separately to create a layering effect.
To show you just how cool the “harder” way can look when it’s done, I’ve used it throughout the video tutorial as a demonstration, so you will need to use it if you want to perfectly recreate the animation effects shown there.
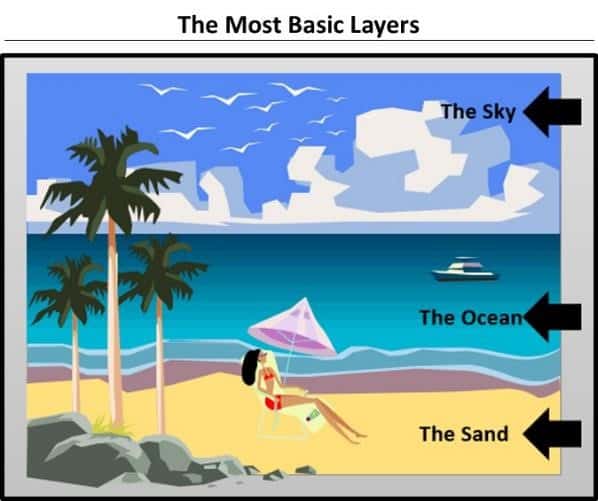
Step #1: Identify your scene’s most basic layers
First off, you want to identify the most basic layers of your scene (usually the ones in the very back), which is where you want to start adding your animations. In this case, the most basic layers are the sky, the ocean and the sand.
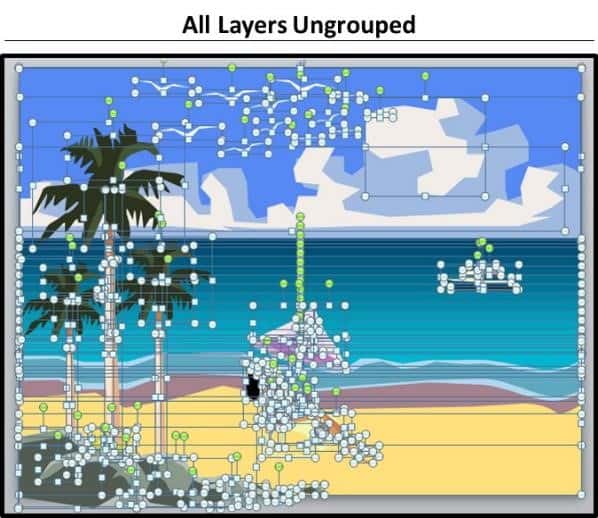
Step #2: Ungroup everything
After identifying your basic layers, select everything within your scene and ungroup everything so that you are left with all of the individual pieces.
Note that in the picture below, we have A LOT of individual pieces. Animating a scene like this takes time and patience.
If you don’t have time to do this now, a PDF version of this tutorial is included in the working files, which you can download the working files here.
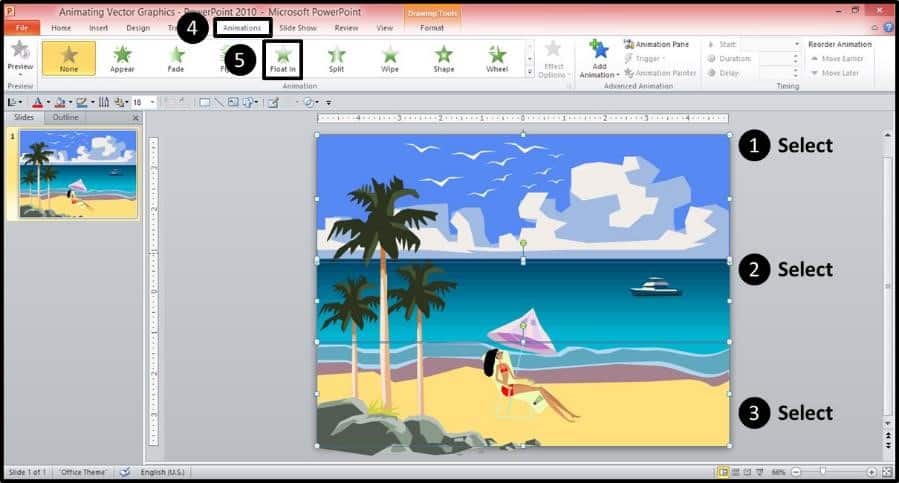
Step #3: Add entrance animations to the basic layers
Holding the Shift key to select multiple objects, select the basic layers, the Sky, the background layer of the ocean and the sand.
You can now choose which entrance animations to add. I’ve found that the more subtle ones usually work best (such as Fade, Wipe, Float In, Split, Zoom), so play around with a few options to see what works best with your particular object.
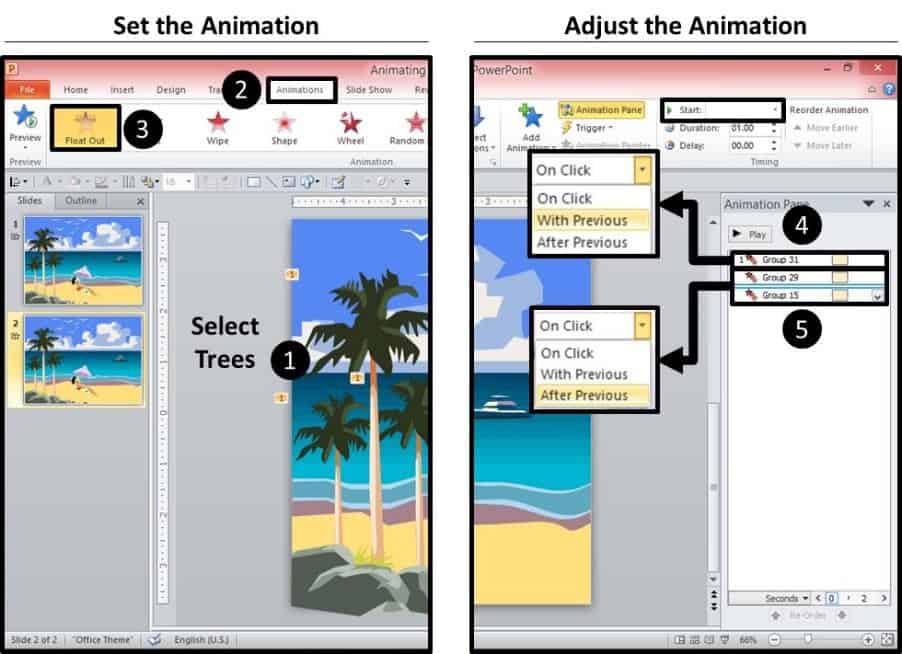
In this case, I really liked the way the Float In animation looked, so with the layers selected, from the Animations tab, we select the Float In animation.
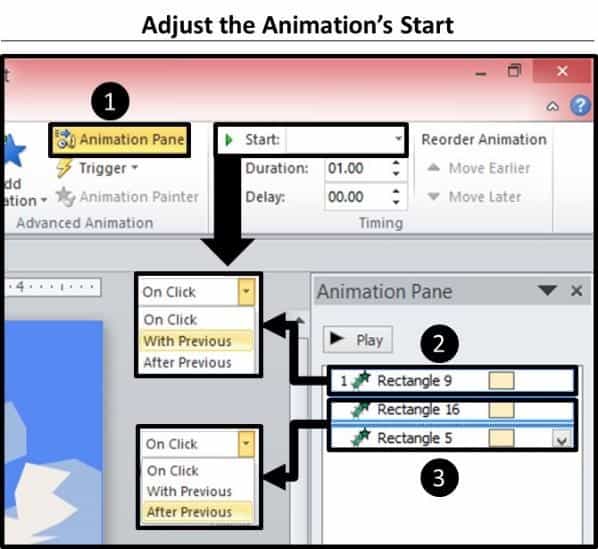
Step #4: Adjust the animations
Now we need to make sure we sequence the animations to get the best-looking effect. In the animations tab, make the first animation Start with Previous if you want it to start automatically when you go to presentation mode (if not, leave it as On Click).
Then, make the last two animations Start after Previous.
This way, we get our background layers set first so we can build upon them with the other pieces. Doing so gives you the Float In effect you saw in the beginning of the video tutorial above.
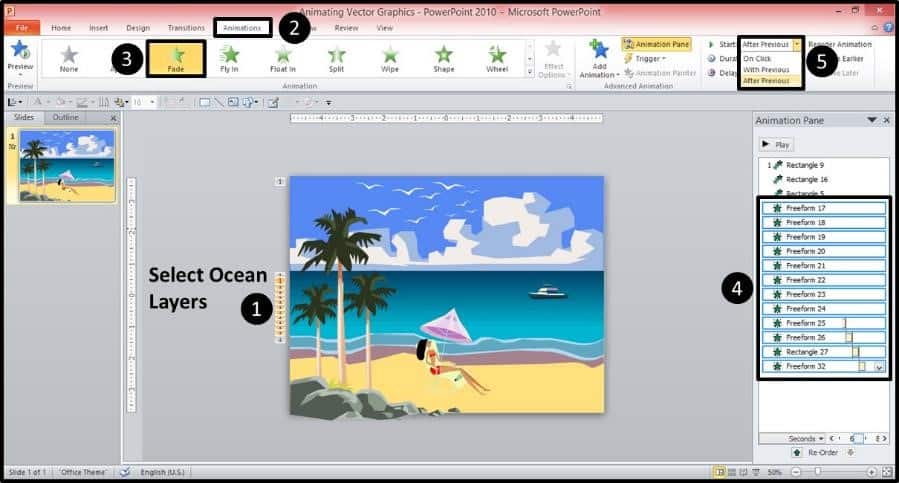
Step #5: Animate the individual ocean layers
With the basic layers set, next let’s animate the individual layers of the ocean.So holding the Shift key, select the individual ocean layers (there are a bunch of them), and with them all selected, add the Fade animation effect.
After adding the effect, select all of the individual animations in the Animation pane, and make them all start After Previous.
This will create an ongoing animated effect, creating the subtle shading for the ocean water.
Step #6: Continue animating objects
The rest of the vector scene can be animated in the same exact way. You just want to make sure you pull apart each of the individual objects that you want to animate, and start with the deepest layer first, and then work your way to the front animating
each layer as you go.
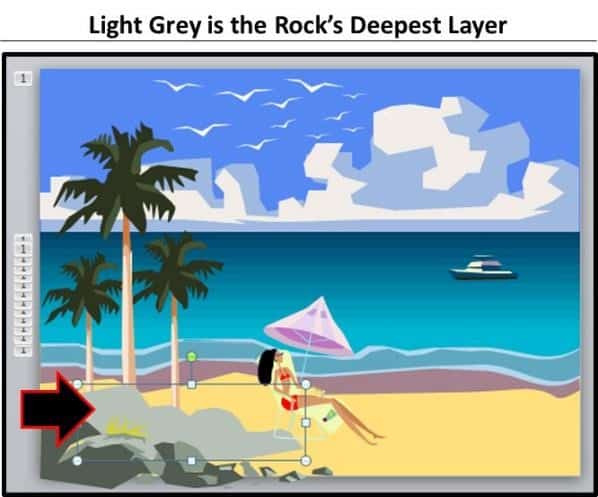
For example, in the case of the rocks, the deepest layer is the light grey shape in the back, which I’ve pulled out in the below picture…that’s where you want to start adding animations.
As you animate the different layers of your scene, go ahead and experiment with different types of animations to see what works best with each object.
Note: Remember, this harder path takes time and patience to build the effect that you want.
Part 4: Transitioning to a new vector scene – 6:42
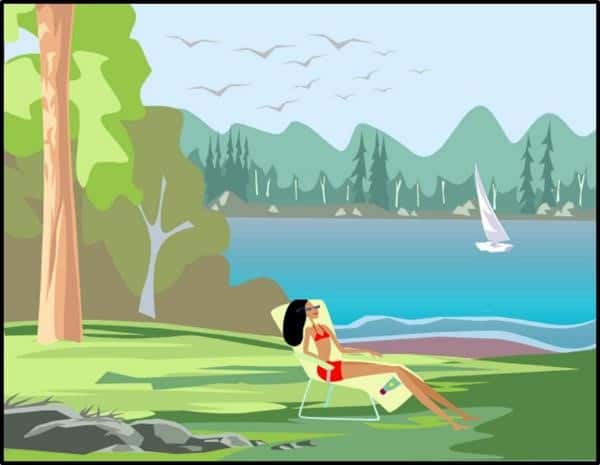
Following the above steps, you’re basically done with your first vector animation. However, to add an additional cool factor, you can also change some of the elements of the scene to create a new scene, keeping a few “anchor objects” in place while everything else changes around them.
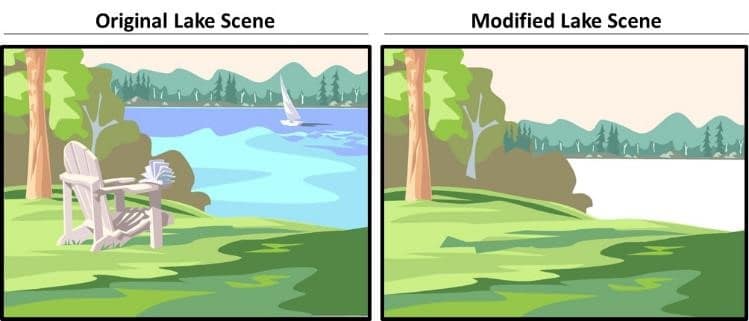
In this case, the woman is the anchor and everything else will change – while she’s snoozing on the beach, the beach will transition to a serene lake scene, as pictured below.
![]()
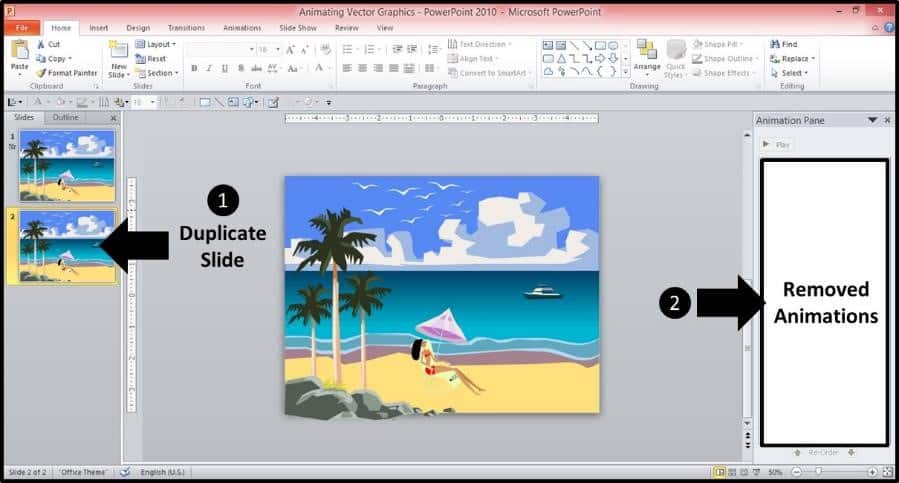
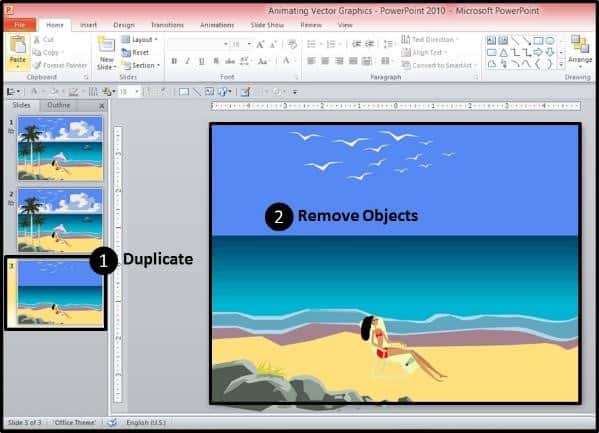
Step #1: Duplicate the slide and remove all entrance animations
To create a seamless transition from one scene to the next, first you want to duplicate the slide. In this way, the next slide starts exactly where the last slide finished. The duplicate copy allows us to first remove everything that won’t be in the next scene.
In my case, everything but the woman, birds, rocks, sky, water, and sand will be removed. So, on the duplicate slide, you want to first start by removing all of the animation effects – then, we’ll add the exit animations, starting with the palm trees.
Step #2: Add exit effects to the palm trees
The process of adding exit effects is the same as adding entrance effects. For this tutorial, I’ll add exit effects to the palm trees only, so you get the idea, and let you work on the rest.
For the exit, I actually like to have the objects leave in groups (the “easy way” compared to the entrance effects), rather than one layer at a time. Therefore, you first want to regroup each tree (which was previously ungrouped).
So holding Shift, select the individual pieces of each tree (it might take an attempt or two), and group them together so that you again have three individual grouped trees.
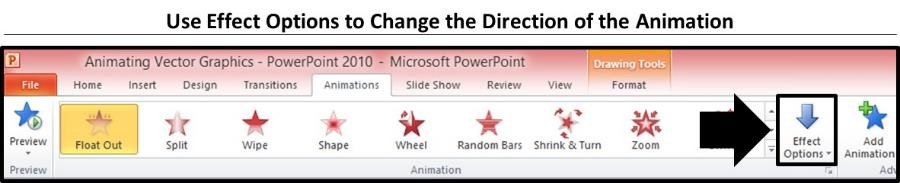
For my animated vector scene, I repeated this process for the umbrella, the boat and the clouds.
First grouping the pieces together, adding an exit animation and then using the Effect Options to change the direction of the different exit animations (for these, I also like to use relatively subtle animations, such as Fade, Float Out, Wipe, Split, Fly Out).
Step # 3 – Duplicate the slide and remove objects
With the exit animations set, duplicate your slide again, so that you now have three slides.
On the new duplicated slide, remove all of the objects to which you applied exit animations. In this case, I have removed the trees, the clouds, the boat and the umbrella.
With the previous scene’s objects removed, we now add the new objects for the second scene – in this case, the new trees, the grass, the sailboat, and the background forest. The woman is still peacefully lounging in her chair.
Part 5: Setting up for the transition scene – 7:55
Step #1: Recolor the ocean of the beach scene
Although we kept the ocean as an anchor object and didn’t remove it, I want to subtly change its color to be lighter (this is completely optional but I felt like it went better with the picture – if you don’t want to do it, skip to Step #2).
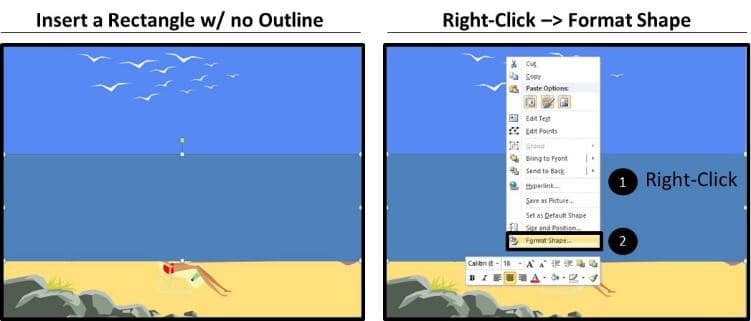
Instead of recoloring all of the individual pieces separately, I’m instead going to insert a rectangle, over the ocean, make it white, and then adjust its transparency setting to lighten all the layers at once. So insert a rectangle on top of the ocean, and then right-click the rectangle and open the Format Shape dialog box.
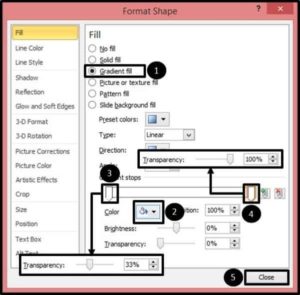
Within the format shape dialog box:
- Select Gradient fill
- Make the gradient stops white
- Set the gradient stop on the left to a transparency of 33%
- Set the gradient stop on the right to a transparency of 100%, select gradient fill
- Close the Format Shape dialog box
The result is our beach scene now looks like this:
Step #2: Prep the lake scene
In order to add objects from the lake scene into our custom picture, we’ll need to remove all the objects from the original picture that we don’t need. So ungroup all of the layers, as we did before. Then, let’s do the following:
- Remove the water, the sail boat and the chair
- Move the mountains in the horizon down and stretch out the sky
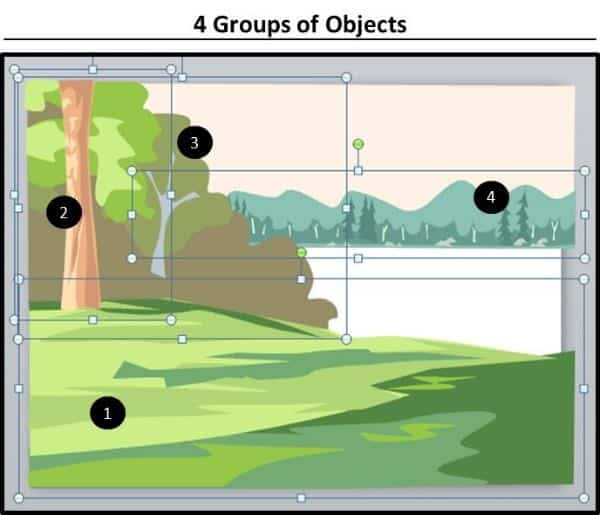
With everything set, group the different pieces of the lake scene together (these are what we’ll use for our fade in transition effect).
You can create as many groups as you like, but here I’ve kept it to four groups of objects.
Step #3: Copy and paste the transition scene
With the individual pieces grouped:
- Copy the grouped pieces of the lake scene
- On the third beach scene, remove the blue sky (we will use the sky from our lake scene – the reason we didn’t do this before was so that we could still see the white birds)
- Paste the pieces of the lake scene on top of the beach scene
- Using the arrange tool, send the lake scene sky to the back, so that you can see the birds in the beach scene.
- Recolor the sky and the birds (I’ve colored the sky a light blue and filled the birds with a dark grey)
![]()
Step #4: Rearrange and position your scene – 8:47
From here, it’s basically about sending various layers to the front and back, shifting stuff around and resizing different parts of your picture until you have the final look that you want.
You just have to play around with it a lot.
After moving around the various layers, below is the ending lake scene that I ended up with, and here I’ve added back in the sailboat.
![]()
Step #5: Add the animations
Once you have the final image that you want, you just need to ungroup everything and again add animations to each layer to get the transition effect between the two images.
See the video tutorial at 9:16 to see the animation effect I built, transitioning from the beach scene to the lake scene.
With that you now have all the tools necessary to recreate the scene at the beginning of the tutorial above – as well as your own creations!
Pro Tip: You can use this same technique to animate your photos in PowerPoint, by first removing the background from the images, either using PowerPoint (2010 or later) or Photoshop, and then have the images float in to make your own scene.
Conclusion
Vector images are an amazing way to unleash your creativity with PowerPoint and animations in general. There are truly endless possibilities with making and animating your own scenes.
In addition, you can use vector images to create really cool cartoon effects, such as the ones shown in my How to Make a Cartoon of Yourself video (you can play around with different hairstyles, clothes, and backgrounds to make yourself into whomever you like!).
Hope you’ve enjoyed and got some inspiration for your own projects – have fun with this technique