Did you know that PowerPoint includes a free (hidden) laser pointer option that you can use without having to buy one? Even if you have a differetn pointer you like to use, this built in pointer is a great backup whenever you need it. It also comes in three colors too (red, green, and blue).
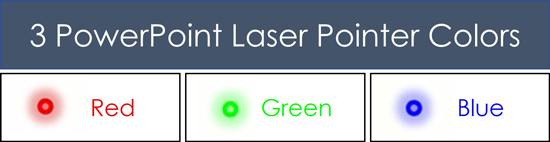
Table of Contents
[Watch] The PowerPoint laser pointer in action
You are currently viewing a placeholder content from Youtube. To access the actual content, click the button below. Please note that doing so will share data with third-party providers.
More InformationTake your PPT skills to the next level
Why is a pointer useful during a PowerPoint presentation?
A laser pointer is useful for highlighting or pointing out exactly what you want your audience to focus during your presentation. In other words, instead of trying to verbally tell somewhere where to look on your slide, you use your pointer to point it out.
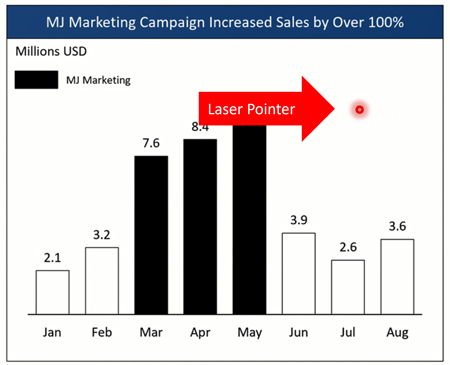
For example, if you want to bring attention to the 100% year-on-year growth on your slide, you can simply use PowerPoint’s laser pointer to point it out on your slide.

The more content you have on your slide, the more useful it is to point out what you are talking about with your laser pointer.
In the same way, you could use it to highlight:
- Different rows in a table
- The different people on your team (as you talk about them)
- Ideas for a marketing campaign as you highlight them
In short, a laser pointer allows you to better control the ebb and flow of your presentation, by pointing things out on screen while you talk about them.
While there are probably a million different laser pointers you can use, the one I use most is the hidden laser pointer in PowerPoint. Read on to see how to use it.
How to change your cursor into a laser pointer
There are two different ways to turn your cursor into a laser pointer in PowerPoint. The first is using your mouse, the second is the laser pointer shortcut. Let’s start with your mouse first.
The advantage of this first technique is it locks the laser pointer, so you don’t have to hold any keys down on your computer. On top of that, once you turn it on using your mouse like this, the laser pointer remains on as you advance through your presentation. So you don’t have to turn it on for every slide.
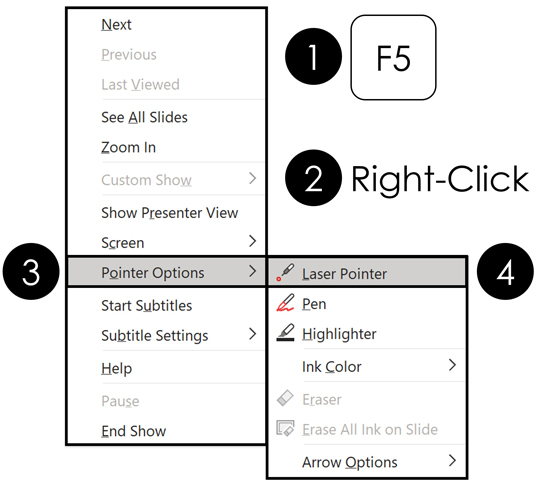
To turn your mouse cursor into a laser pointer during your PowerPoint presentation, simply:
- Hit F5 to start your Slide Show (see my guide here for other slide show shortcuts)
- Right-click your slide
- Open the Pointer Options
- Select Laser pointer
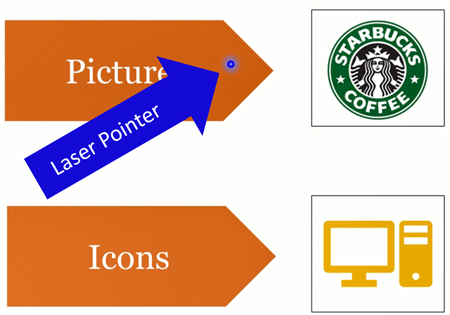
Doing so, your mouse cursor becomes a colored pointer that you can drag around on your screen to highlight things in your presentation as pictured below.
NOTE: You cannot change the color of the pointer while giving a presentation. If you want a different color, you need to change its color before you run your presentation
Turning off the laser pointer

There are two ways to turn the laser pointer off in PowerPoint. The first is simply to hit the Esc key on your keyboard. Hitting Esc, the laser pointer reverts back to the normal mouse cursor.
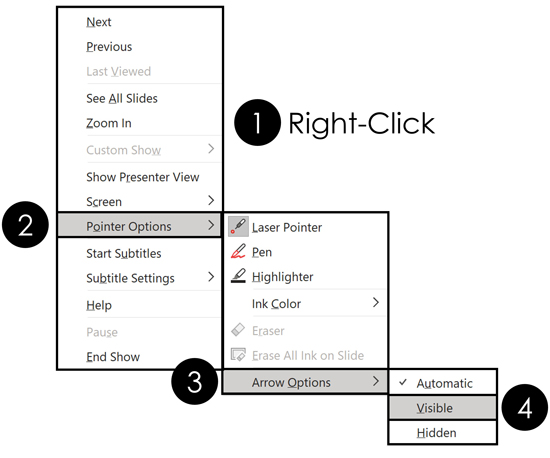
An alternative way to turn the laser pointer off, is simply to change it into something else. You can do that as follows:
- Right-click your slide in Slide Show view
- Select Pointer Options
- Select Arrow Options (or choose Pen or Highlighter)
- Select Visible
Selecting Visible turns your mouse cursor back into the normal PowerPoint arrow cursor.
Laser pointer shortcuts
My favorite way to use the laser pen is simply to use its shortcut. That’s becuase using shortcuts make everything easier in PowerPoint AND saves you a ton of time.
NOTE: If you want to learn all the best PowerPoint shortcuts and tricks, they are all inside our PowerPoint Pro Membership here.
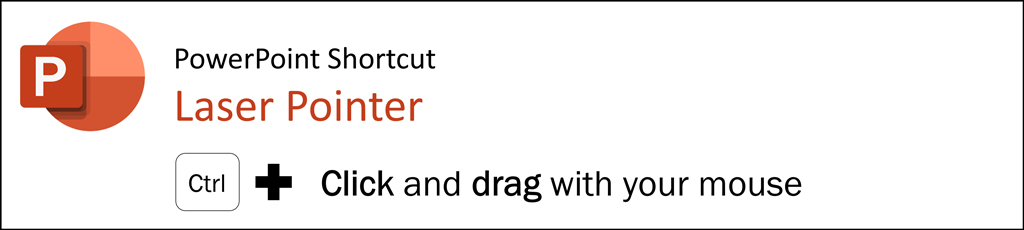
To use this shortcut, simply hold the Ctrl key on your keyboard, then click and drag with your mouse. Doing so turns your cursor into the laser pointer color you have selected (red is the default).
When you are done, simply let go of the Ctrl key and the pointer disappears. This is a fast and easy way to highlight things in your presentation on the fly and impress your clients and colleagues.
I personally find this to be the fastest way to turn the laser pointer on and off. In the picture below, you can see what the blue laser pointer looks like in PowerPoint.
You can alternatively lock the laser pointer by hitting Ctrl + L on your keyboard. This locks the laser pointer, so you don’t have to hold down anything on your keyboard (like with the previous shortcut).
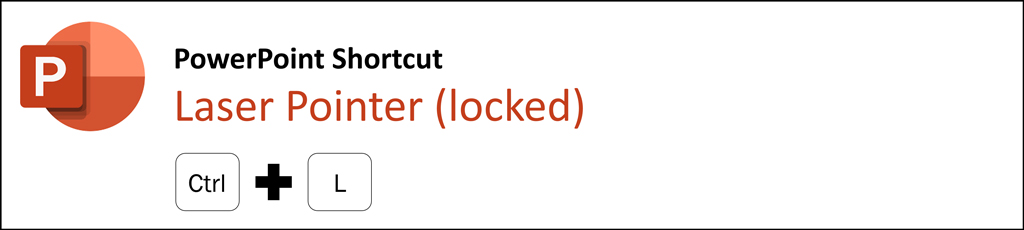
To unlock the pointer when you are done with it, simply hit the Esc key to return to the normal mouse cursor.
How to change the laser pointer color
PowerPoint has three different laser pointer colors you can choose from in PowerPoint. Red is the default color, but you can easily change its color to green or blue.
By default, the the PowerPoint pointer is red, but you can easily it to green or blue if you want to, through the Set Up Slide Show dialog box.
Just be aware that you need to set the color before you run your presentation.
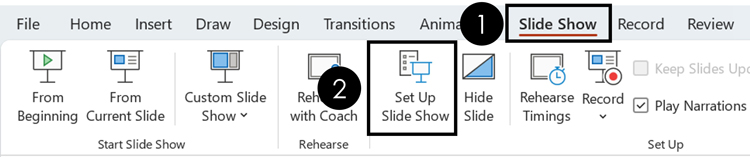
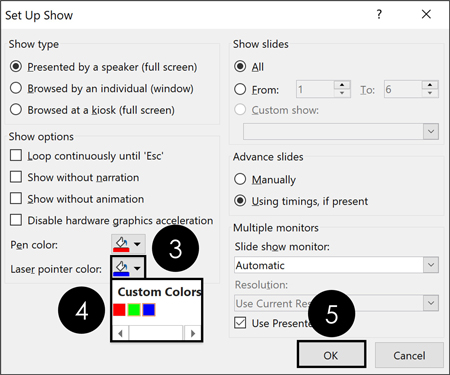
- Click the Slide Show tab
- Select the Set Up Slide Show command
- Open the Laser Pointer Color options
- Choose a color (red, green, or blue)
- Click OK
QUESTION: Does changing the laser pointer color change it’s color for all my presentations?
The color you choose for your pointer is saved in the PowerPoint presentation you changed it for. It is not set as the new default color for all your PowerPoint presentations. So, feel free to change your pointer color to best match the template / presentation you are working with.
By default, PowerPoint always starts with a red laser pointer. So unless you need a color other than red, you do not need to worry about changing it.
Does the pointer work when presenting two presentations at the same time?
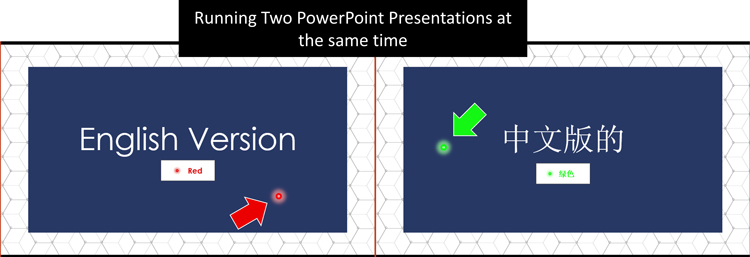
The answer is yes (as you can see pictured above).
For example, if you are running an English and Chinese version version of your presentation at the same time for two different audiences (which is what we did all the time when I was living in China), the laser pointer still works in each presentation.
The catch is, you need to use the laser pointer shortcut (discussed above), and make sure you click into each presentation before you use it. To see how to set up two presentations to run at the same time as pictured above, see my guide here.
Why bother changing the pointer color?
The most important reason to change the color of your pointer, is so that it stands out against your slide background.
Notice in the picture below, how much clearer the green laser pointer is against the red slide background, than the red one is. If your audience cannot see the color against your slide background, then using the laser pointer is meaningless.
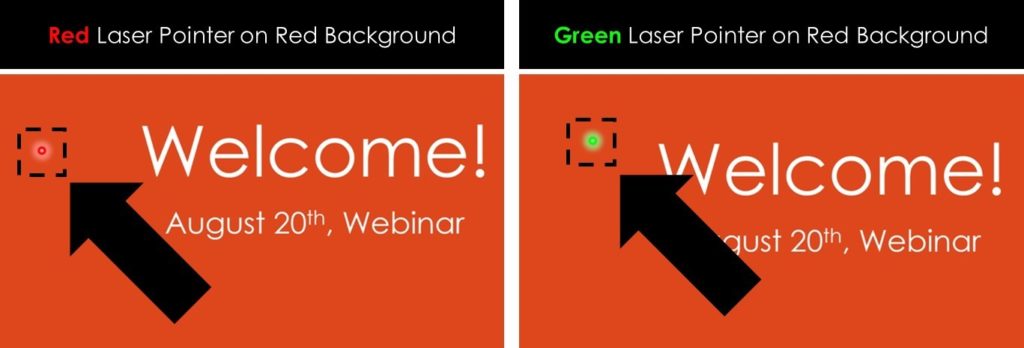
The same would be true if you were using a blue or green presentation background.
In short, you want a high contrast between your pointer color and the PowerPoint background color you are using for your presentation. That way your audience can clearly see what you are trying show them.
Conclusion
So that’s how to use PowerPoint’s built-in laser pointer and change its color between red, green and blue to have high contrast against your presentation.
This is one of those cool PowerPoint features that few people know how to use. And now that you know how to use it, you can take advantage of it during your presentations.
If you enjoyed the depth of this PowerPoint tutorial and want to learn more about our PowerPoint training courses and free resources, visit us here.
🔒 Unlock the PowerPoint Shortcuts Trusted by Industry Leaders KKR, American Express, HSBC, and More!
Join over 114,880 professionals from diverse fields including consulting, investment banking, advertising, marketing, sales, and business development who have supercharged their PowerPoint game with our proven methods.
✅ Customize compelling presentations effortlessly.
✅ Master time-saving techniques for faster deck creation.
✅ Boost your career prospects with top-notch PowerPoint skills.
Get FREE access to the Critical PowerPoint Shortcuts module of our premium training course by entering your name and email below.
DISCLAIMER: PC Users Only!
We respect your privacy and will keep your info safe and confidential.