• Post last modified:November 10, 2023

In this article, you’ll learn how to make a Table of Contents in Word, as well as how to update and manage it inside your document.

There are 3 types of Table of Contents you can create in Microsoft Word (all with a number of different options and features):

  1. Automatic Table (based on your saved formatting)
  2. Custom Table of Contents that is 100% customizable
  3. Manual Table that requires you to do all of the heavy lifting

Below are examples of 3 of the many styles of Table of Contents you can quickly create in Word.

There are three styles for your table of contents in Word: formal, distinctive, and fancy

The most important thing to know about creating an automatic Table of Contents in Word is that you first need to format your document using the Heading Styles.

That’s because it’s the Heading Styles formatting (as you can see pictured below) that feeds your Table of Contents. This step is explained in detail below.

Example showing how the heading styles in Word are reflected in your table of contents

If you don’t want to use the Heading Styles, you can use a Manual Table to create your Table of Contents, as discussed below.

Note: Throughout this article, the words Table of Contents and TOC are used interchangeably.
On the top, of all examples below were created using the Microsoft Office 365 subscription, which you can learn about on Microsoft’s website here.

How to create a table of contents in Word

You are currently viewing a placeholder content from Youtube. To access the actual content, click the button below. Please note that doing so will share data with third-party providers.

More Information

The first critical step to creating an automatic updating TOC in Word is properly formatting the sections of your document using the:

  • Heading 1 style
  • Heading 2 style
  • Heading 3 style

If you have already formatted your document this way, you can skip to the next section.

Note: You are not limited to the default Heading Styles formatting. Below I’ll show you how you can not only change your Styles formatting, but also how you can create your own.

1. Applying Heading Style Formatting

To properly format your Word document using the Heading Styles, simply:

  1. Select the section Headings of your document
  2. Navigate to the Home tab
  3. Select the Heading 1Heading 2 or Heading 3 style, as appropriate

By default, only the Heading 1 through Heading 3 Styles will automatically populate into your Table of Contents.

You can still use the Heading 4 through Heading 9 styles in a Table of Contents, but you’ll have to do so with a Custom Table of Contents, as discussed below.

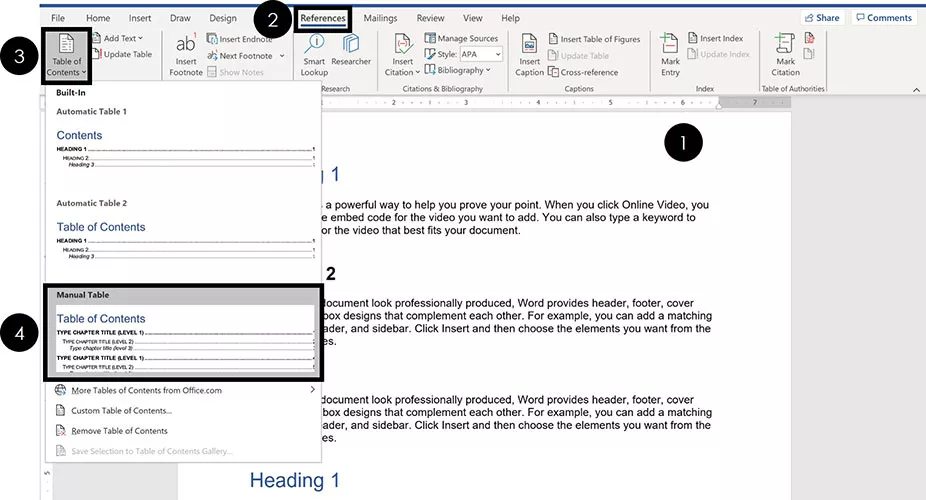
Note: Instead of using the Styles gallery to mark up your Word document, you can also use the Add Text drop down directly on the References tab, saving you a few clicks. 
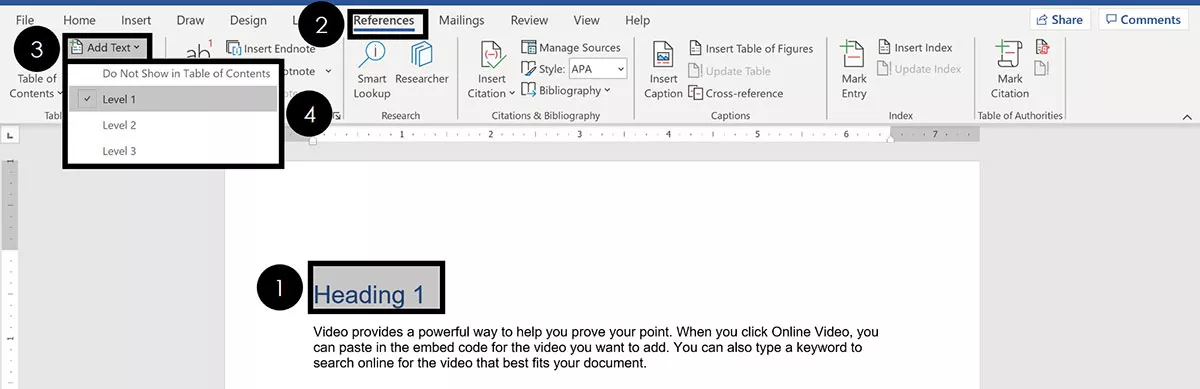
To mark up text using the Add Text drop down, simply:
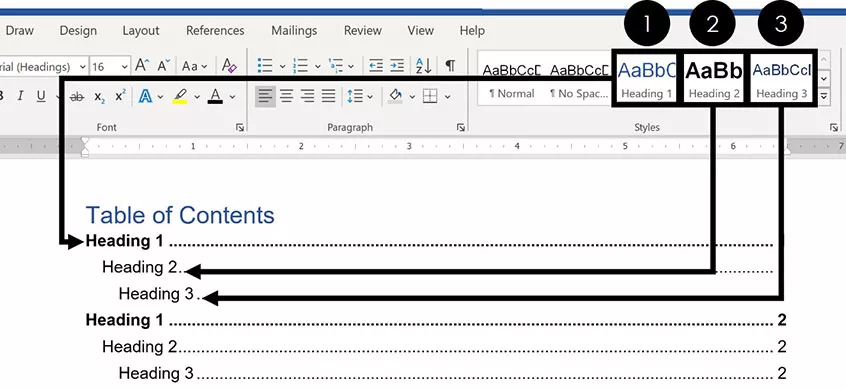
  1. Select your section heading text
  2. Navigate to the References tab
  3. Open the Add Text dropdown menu
  4. Select your Heading style
This is the exact same thing as using the Heading Style 1Heading Style 2 and Heading Style 3 options in the Styles gallery on the Home tab. The option that says Do Not Show in Table of Contents is the same as marking your text as Normal.

2. Heading Style Shortcuts

If you have a large Word document, you can speed up the formatting process by using Heading Style shortcuts.

Shortcuts like these are the fastest way to double your productivity.

The apply heading style shortcuts are alt plus shift plus one through nine

To set up a basic Table of Contents in Word, the 3 Heading Styles shortcuts you’ll need to remember are:

  • Heading Style 1 shortcut: Alt + Shift + 1
  • Heading Style 2 shortcut: Alt + Shift + 2
  • Heading Style 3 shortcut: Alt + Shift + 3

You can apply the Normal style to any text in your document that you don’t want to show in your TOC.

The apply normal style shortcut in Word is control plus shift plus n

Normal Style Shortcut: Ctrl + Shift + N

When making an automatic Table of Contents in Word, only content that is properly formatted using these Heading Styles will appear in your TOC.

Furthermore, this formatting is critical if you later want to convert Word to PowerPoint.

3. Changing Your Heading Style Formatting

To change the formatting style of your table of contents in Word, click the design tab, click the downward facing arrow, and choose a style for your document

If you don’t like the way the default Heading Styles look, you can change them. To do that, simply:

  1. Navigate to the Design tab
  2. Choose a different Document Formatting

If you click the downward facing arrow, you will see more options, as pictured above.

Note: The Document Formatting styles change all of the formatting styles within your Word document. Therefore, you’ll want to review your entire Word document to make sure you are okay with whatever new Document Formatting you select.

4. Creating Your Own Heading Style Formatting

If you don’t like the Document Formatting options for your Heading Styles, you can create your own. To do that, simply:

  1. Format your Heading Style however you want it to look
  2. Navigate to the Home tab
  3. Right-Click the Heading Style you want to change
  4. Select Update Heading to Match Selection

Doing so will change the Heading Style to match the formatting you’d applied to that text. In addition, it will automatically update all the existing Headings of that level in your Word document.

How to Insert a Table of Contents

Once you’ve properly formatted your document using the different Heading Styles, creating your Table of Contents is pretty straightforward.

1. Insert a Table of Contents

To insert an automatic updating table of contents in Word, click the references tab, open the table of contents drop down and select one of the automatic tables

Once your Word document is properly formatted with the Heading Styles, to make your Table of Contents, simply:

  1. Click into your document where you want your TOC
  2. Navigate to the References tab
  3. Open the Table of Contents dropdown menu
  4. Choose Automatic Table 1 or Automatic Table 2

Choosing either option inserts a TOC based on your Heading 1, Heading 2 and Heading 3 Styles.

Your table of contents in Word is dictated by the heading styles you apply within your document

Your TOC might look different than the one pictured above depending on whether you previously inserted and saved your TOC style.

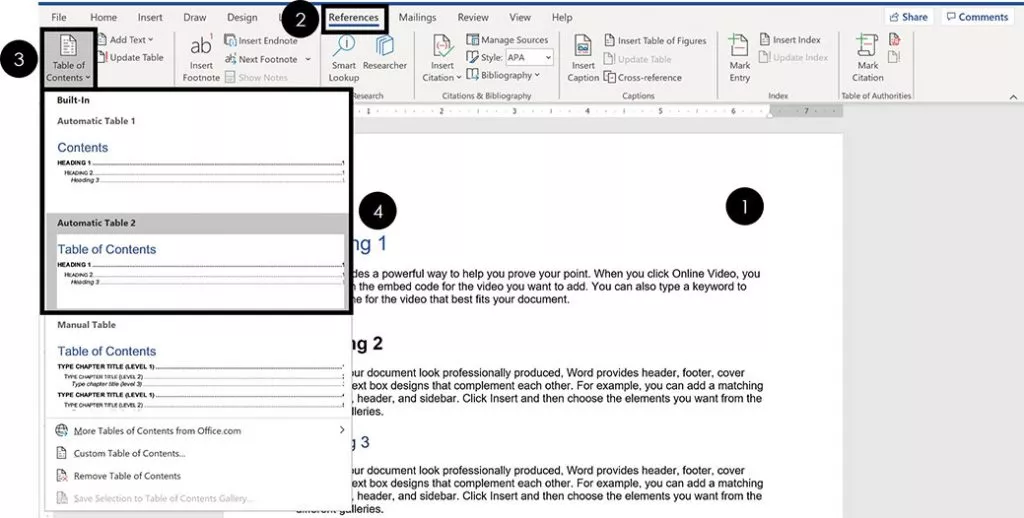
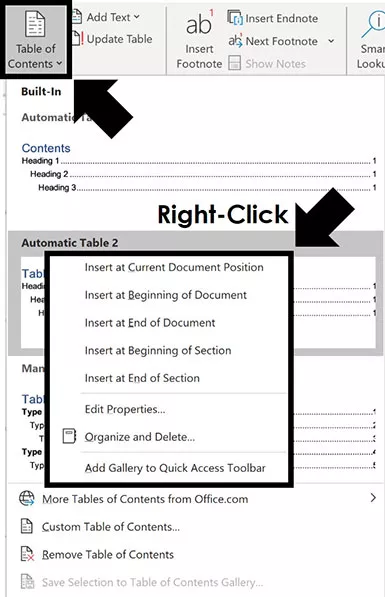
Note: If you right-click the Table of Contents in the dropdown menu, you get options for where to place it in your document.. Some of these options require you to use the different page break options in Word to properly place within your document.
  • Insert at Current Document position
  • Insert at Beginning of Document
  • Insert at End of Document
  • Insert at Beginning of Section
  • Insert at End of Section
Setting up these different sections is the trick to getting more than one Table of Contents in your Word document.

That’s the difference between the Automatic Table 1 and Automatic Table 2 styles?

Not much. The main difference is the title – table of contents vs. contents – which you can just click into and change. If you need more formatting options beyond the Automatic Table styles, you can create your own Custom Table of Contents.

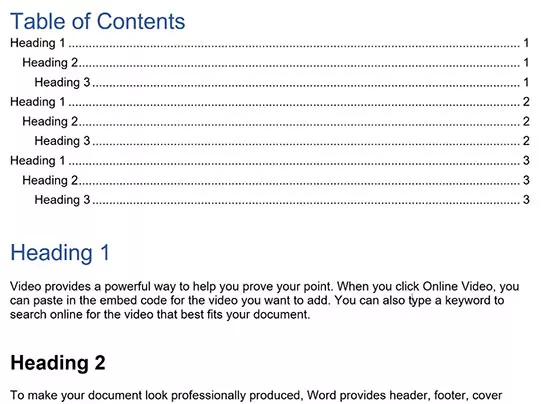
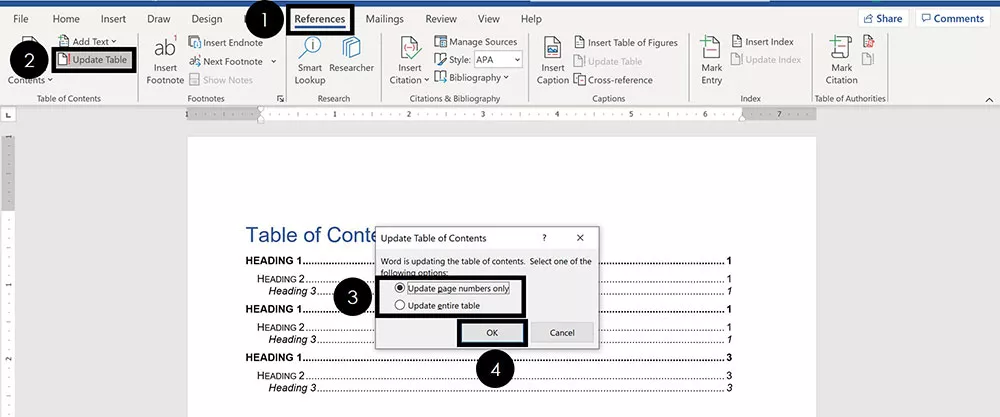
Note: If you do not properly format your Word document using the Styles gallery, inserting a TOC will result in the following warning: No table of contents entries found If this happens to you, simply work your way through your document and apply the proper Heading 1Heading 2 and Heading 3 styles.

If you want more than just 3 levels in your Table of Contents, you’ll need to insert a Custom Table.

2. Format Your Table of Contents

To format your Table of Contents in Word, simply:

  1. Hover your mouse to the left of your TOC (your arrow will look like a diagonal arrow)
  2. Select the Heading Style you want to change
  3. Format it however you wish

Sometimes this takes a few attempts to select your Heading Styles so they all properly update. If it doesn’t work the first time, just try it again.

Note: Formatting the Heading Styles of your TOC only affects the formatting styles inside your TOC. None of your document level formatting is affected.

To affect the formatting of the Headings in the rest of your document, you’ll need to update the Heading Styles in the Style area of the Home tab.

3. How to Save Your Table of Contents formatting

After formatting the different levels of your TOC, you are given the option to save that formatting when you exit out of Microsoft Word.

After editing the building blocks in Microsoft Word, a dialog box asks you if you want to save your changes

If you select Save, your manual formatting adjustments are saved to Word. That means that the next time you make a Table of Contents, all of your manual adjustments will show up by default.

Once you reformat the different elements of your new Table of Contents, you will be given the option to save them again when you exit Word.

4. Updating a Table of Contents

Table of Contents in Microsoft Word DO NOT automatically update themselves.

As you add and remove content to your document, you need to manually click the Update button to have your TOC update itself.

Your TOC is just a snapshot in time of when you either inserted it or last updated it. So, don’t forget to update it when you are done making changes to your document.

Click the reference tab in Word, select update and then choose what part of your table of contents you want to update

To update a Table of Contents in Word, simply:

  1. Navigate to the References tab
  2. Click Update Table
  3. Choose Update page numbers only or Update entire table
  4. Click OK

If you are using one of the Automatic Table layouts, can also select the Update Table button at the top of your table, as pictured below.

To update your table of contents in word, click the Update Table at the top of your TOC after selecting it

The two update options are:

  1. Page numbers only updates the page numbers of your TOC. It does not update the structure of your TOC based on any sections you’ve added or removed. It also does not update any of the text in your Headings, or the Heading Styles.
  2. Entire table updates everything in your TOC including page numbers, sections added and sections removed.

If you have made many changes to your Word document, or are unsure of what you’ve changed, I recommend updating the entire table. That ensures that everything within your document is accurately reflected in your TOC.

5. Table of Contents Navigational Shortcuts

The cool thing about making an automatic Table of Contents in Word, is that you can use it to quickly jump around your document.

That’s because each of the lines of your TOC is a hyperlink to that section within your document. All you need to do is hold down the Ctrl key and click the section of your TOC

To jump to a section of your word document from your table of contents, hold the control key and click the section in your TOC that you want to jump to

An alternative way you can quickly navigate the sections of your Table of Contents is with the Navigation Pane. In it, you can see all the different sections of your document.

To open the navigation pane to see the sections of your table of contents in word, click the view tab and put a check mark next to the navigation pane command

To open the Navigation Pane to see your Headings in Word, simply:

  1. Navigate to the View tab
  2. Click ​on Navigation Pane

Within the Navigation Pane, you can see, expand, collapse and navigate all the sections within your document.

This is another benefit of using the Heading Styles to properly format your Word document.

Removing a Table of Contents

An alternate way to remove a table of contents in Word is to click the references tab, open the table of contents command drop down and select remove table of contents

To remove a Table of Contents from a Word document, simply:

  1. Navigate to the References tab
  2. Open the Table of Contents dropown menu
  3. Select Remove Table of Contents

If you are using one of the Automatic Table styles, you can also use the dropdown menu at the top of your table, as pictured below.

To remove a table of contents in word, click the document icon at the top of your toc and select remove table of contents at the bottom of the menu
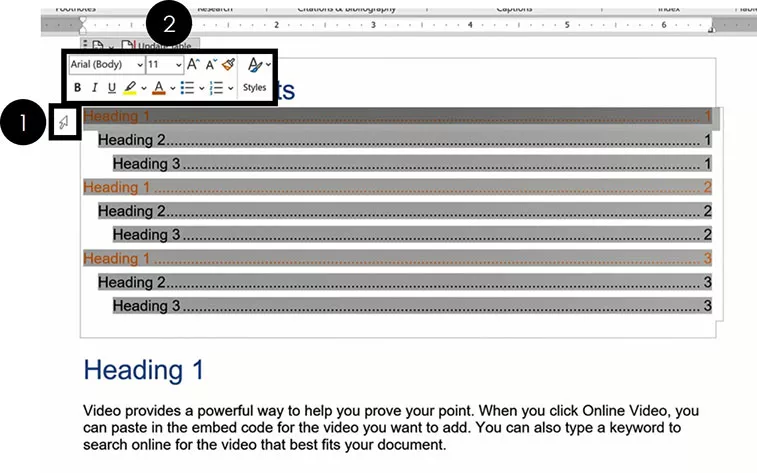
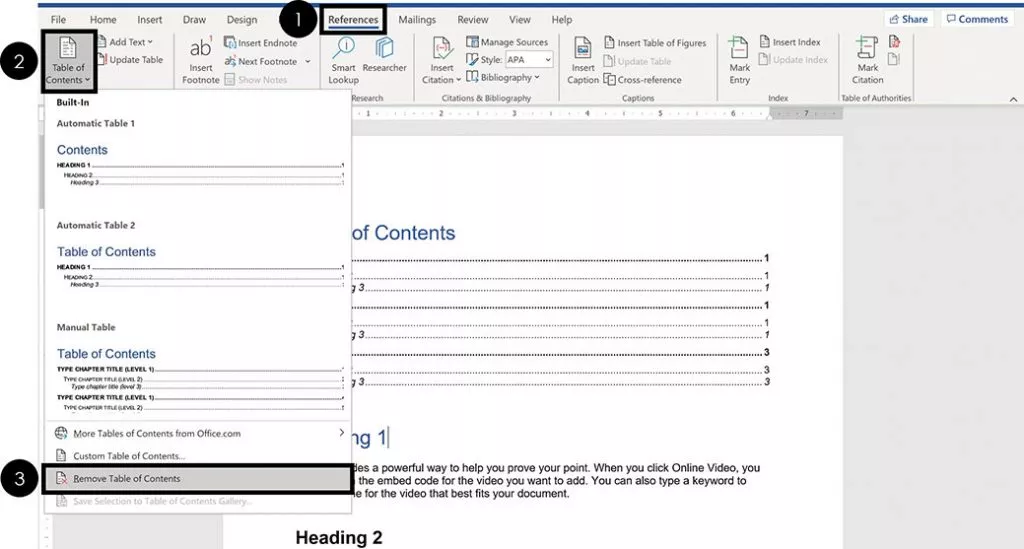
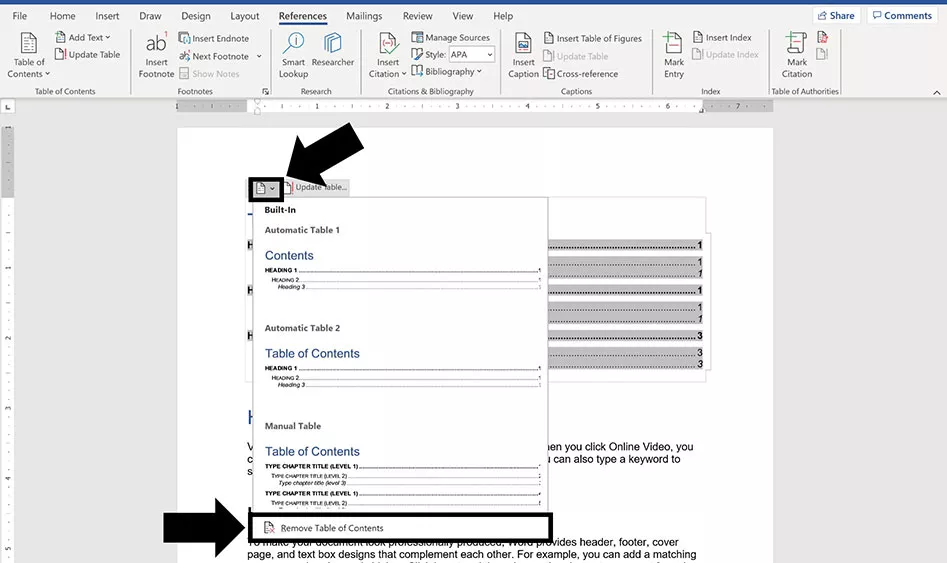
Note: If you are using one of the Automatic Table styles, sometimes the table will not fully remove itself. This is particularly true for TOCs inserted at the beginning or ends of sections. 
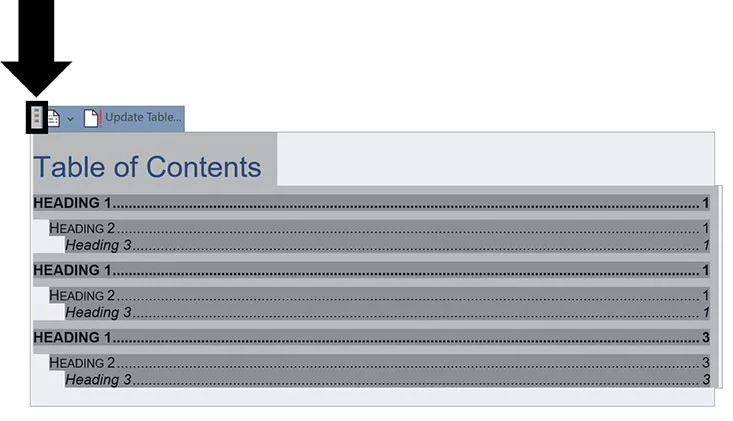
If this happens to you, simply click the three dots in the upper left-hand corner to select your TOC. With it selected, either hit Ctrl + X to cut the TOC out of your document, or keep hitting the Delete key (not the backspace key) until it is removed. Sometimes it takes three or four times before the entire TOC container is fully removed.

Creating a Custom Table of Contents

If you need more formatting options than the automatic table styles provide, you can create your own Custom Table of Contents.

To create a custom table of contents in word, click the References tab, open the table of contents command, click custom table of contentes, make your formatting selections and click OK

To create a Custom Table of Contents in Word, simply:

  1. Navigate to the References tab
  2. Open the Table of Contents dropdown menu
  3. Choose Custom Table of Contents
  4. Customize the elements of your TOC (see details below)
  5. Click OK

Don’t worry about getting your custom TOC right the first time through. There are a lot of options to choose from and you can always go back and make different selections

Note: A Custom Table of Contents is still based on the Heading Styles you use to format your Word document. That means that if you do not properly format your document, your TOC will be blank.

On top of that, as you add and remove content to your document, you will need to use the Update Table command to update your custom TOC.

If you do not want an automatic updating TOC, insert a Manual Table.

1. Show Page Numbers Options

You can choose to choose your page numbers in your table of contents in Word, or unselect the page numbers option to remove them

Selecting or de-selecting the Show page numbers box adds or removes the page numbers from your TOC, as you can see in the picture above.

My recommendation is to always select Show page numbers, as that makes it easier to understand and navigate your document. That’s usually the point of creating a TOC in the first place

2. Right Align Page Numbers Options

You can choose to choose your page numbers in your table of contents in Word, or unselect the page numbers option to remove them

Right align page numbers determines whether your page numbers are aligned on the right side of your document, or if they are just stacked up after your section Headings.

My recommendation is to always use the Right align option. This not only makes your TOC easier to read, it also also opens up all of the Tab leader options (discussed next).

3. Tab Leader Options

There are four styles of leader options for your table of contents in word to choose from

There are four different Tab leader options you can use to format your TOC, as pictured above.

The Tab leader dropdown menu is only available when you are using the Right align page numbers option. If you don’t like these styles of Tab leaders, you can use a Manual Table and create your own.

My recommendation is to always use a Tab leader as it makes it easier to find the section page numbers within your Word document.

4. Format Template Options

Examples of the six styles of table of contents in Microsoft Word

There are a variety of different Format templates you can use to change the look and feel of your TOC. For each one, you can make a number of adjustments and customizations. Here are the default formatting options for each one, as pictured above:

  1. Classic
  2. Distinctive
  3. Fancy
  4. Modern
  5. Formal
  6. Simple

You also have the From Template option which opens up the more manual formatting options for you if you know what you are doing (see the Options and Modify commands below).

All of these formats can be tweaked using the other formatting options in the Custom TOC dialog box. So feel free to try different combinations to find the custom TOC formatting that works best for you.

5. Show Levels Options

The Show levels setting determines how many of the Heading Style levels are included in your Table of Contents.

Select how many levels of header styles you want to display in your table of contents in word. the more levels you show the longer your table of contents will be

Just remember that to feed more content into your TOC, you first need to use the Heading Styles formatting throughout your document.

This is another example of when properly formatting your Word document can be a real lifesaver.

6. Options & Modify

If you use the From Template option to format your TOC, you can apply advanced formatting using the Options and Modify commands.

You can apply advanced formatting options to your custom table of contents in Word options and modify dialog boxes

These are for advanced users and go above and beyond the scope of this tutorial (and what you’ll probably need to do). So, I’m not going into detail about these options here. But feel free to explore them if you need additional formatting options for your Table of Contents.

Creating a Manual Table of Contents

If you don’t want to use the Automatic TOC styles, you can instead use the Manual Table option.

Warning: Just so we are crystal clear before you go this route. Inserting a Manual Table means that you will be responsible for manually updating anything and everything within the table.

A Manual Table will not track or update itself based on any content you add or remove to your Word document. Therefore, if you make a lot of changes in your document, updating your TOC could take you a long time.

If you ever get tired of updating a table like this, you can insert an Automatic Updating TOC.

To insert a manual table of contents in word, click the references tab, open the table of contents dropdown and select the manual table

To insert a Manual Table for your TOC in Word, simply:

  1. Click into your document where you want your TOC
  2. Navigate to the References tab
  3. Open the Table of Contents dropdown menu
  4. Select Manual Table

Selecting Manual Table, you get a default Table of Contents that in no way reflects the content of your document.

Whether you have 1 page or 100 pages in your document, the Manual Table will come pre-loaded with two level 1, level 2 and level 3 placeholders

A default manual table always starts with three levels of preloaded content in Word

That means that anything you want done to your TOC, you’ll need to do yourself. There is no way to automatically update a Manual Table.

Below you’ll find some formatting tips for how to best update and edit your Manual Table.

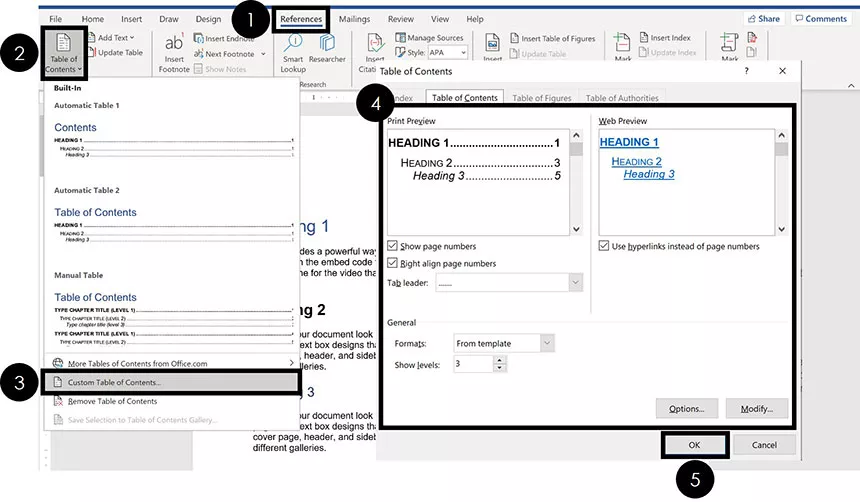
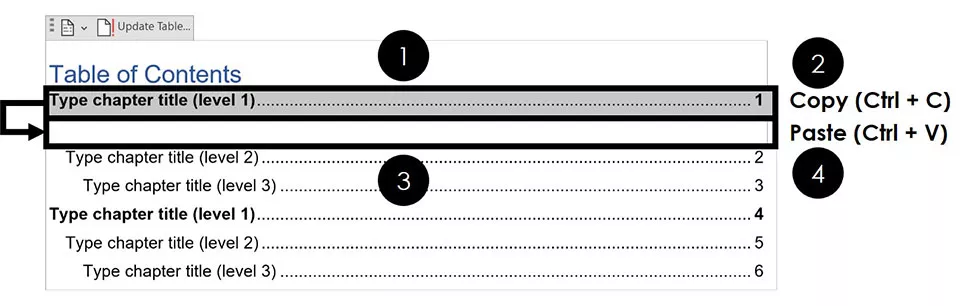
Alternative: Another way to create your own manual TOC is to insert a two column table and use the left column as your section Headings, and the right column as your page numbers. 
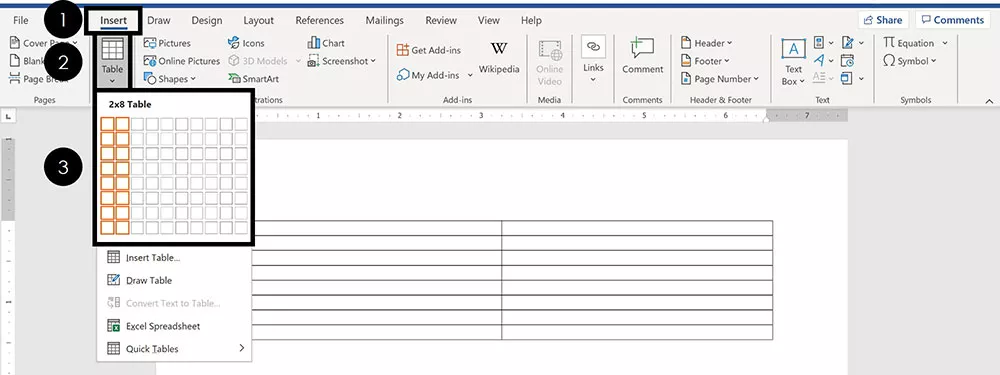
To insert a table in Word to use as your own custom TOC, simply:
  1. Navigate to the Insert tab
  2. Open the Table dropdown menu
  3. Select how many Rows and Columns you want in your table

You can then manually add section Headings to your table and remove the outline border if you like. In the below picture, I’ve left the table border in so you can see that it’s a table. 
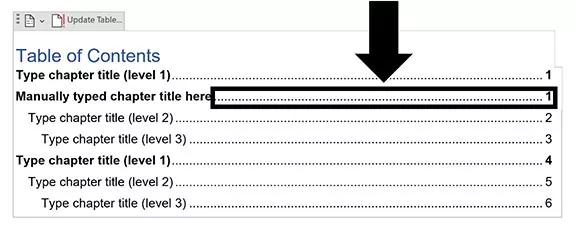
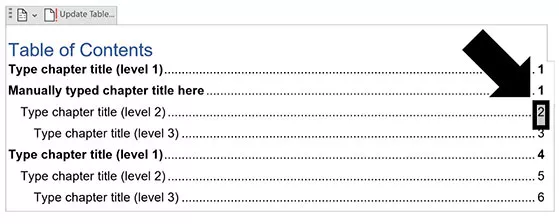
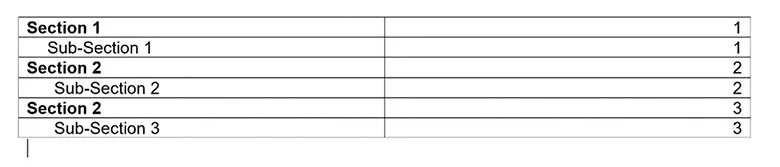
To create a tab space within a table cell as shown in the picture above, simply hit Ctrl + Tab.

1. Add a New Section Row

To add a new section to a Manual table, first add a new blank row. The fastest way to do that is to put your cursor at the end of your page number and hit Enter.

To add a new row to a manually created table of content in Word, hit Enter to create a new blank row, then copy and paste an existing row into the blank row so you can edit it

To add a new row of formatting to your Manual Table, simply:

  1. Select a section row that you want to copy
  2. Hit Ctrl + C to copy the row
  3. Click into your blank row
  4. Hit Ctrl + V to paste your row

Once you’ve pasted in your new row, you can then type in whatever text you want for it.

Example of the dashed lines in a table of contents in word

Thankfully, the Tab leader dots automatically adjust as you type in your section Headings. You don’t have to add them in yourself.

2. Edit Your Page Numbers

To edit the page numbers of a manually created table of contents in Word, you first need to click your page number

To edit the page numbers of your Manual Table, you’ll need to:

  1. Click and drag to select the page number
  2. Type and/or format your page number

Remember: When you use a Manual Table, you are responsible for manually adding and formatting everything within it (which can be really annoying).

The table will not automatically update in any way, based on the content you add or remove in your Word document.

Conclusion

So that’s how to make a Table of Contents in Word, along with all the formatting, navigation and updating options.

The most important thing to remember about your TOC is to use the Heading Styles when formatting your Word document. Doing so will make inserting and editing a TOC super easy and stress-free.

If you enjoyed this tutorial and want to learn more about our training courses and other resources, visit us here.

Taylor Croonquist

Taylor Croonquist is a PowerPoint expert and trainer. Over a career spanning the globe, from consulting in New York and investment banking in China, Taylor has truly seen it all in PowerPoint. Through necessity and a natural tech savvy, Taylor honed his PowerPoint skills to the point of even blowing the minds of the Microsoft PowerPoint programming team. When he’s not busy crafting PowerPoint training, you can find him reading a sci-fi series or scuba diving.